![]()
ZACO-A9s
Vacuuming & Mopping Robot
User Manual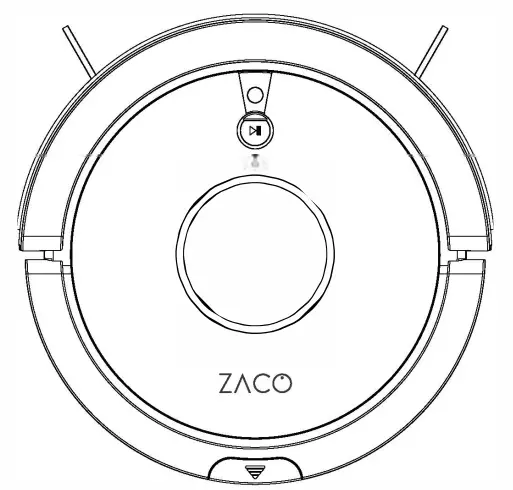
For more information, visit www.zacorobot.eu
Dear Customer,
Thank you for purchasing the ZACO A9s robot vacuum cleaner! You’ve joined the millions of people who clean with robots – the smarter way to get it down.
Please take a few moments to read this manual and get acquainted with your robot, to get the best performance from your robot. if you have any problem, please don’t worry, you are supposed to contact our customer service first or visit our website at www. zacorobot.EU for more information.
Stay connected with us on Facebook and Twitter to enjoy these exclusive benefits:
– Get support tailored to your specific robot, including answers to questions, maintenance tips, video demos, live chat, and more.
– Get product updates and other valuable information about new robots, exclusive discounts, and special promotions.
Connect with us right now at
Facebook: facebook.com/zacorobotics
Twitter: twitter.com/ZACOROBOTIC
Enjoy a thorough clean every day in your life!
Best regards, ZACO Innovation
CO Customer Service
Customer Service Number:
00800-42377961 (European Free Call)
0209-513038-383 (Direct Line DE)
Email: [email protected]
Safety Instructions
Safety
- This robot should not be used by children under age 8 (unless they are under proper supervision). This robot is not a toy.
Do not let children sit on the robot. - Attend to the robot promptly if an error occurs during cleaning. Before using the robot, remove all power cords and small objects on the floor. Roll up carpet tassels and make sure curtains and table cloth are not in contact with the floor.
- if there is any raised floors such as steps or stairs, test if the robot can detect the height difference. To avoid falls, set up a barrier along with the raised floors.
Make sure the barrier will not cause people any physical harm such as tripping. - Fellow the instructions in this user manual. Use factory authorized or recommended accessories only.
- Make sure the voltage of the charging dock is compatible with the voltage of the power supply.
- Use the robot indoor and in a harne environment only. Do not use it outdoor, or in commercial or industrial spaces.
- Use factory authorized adaptor and charging dock only. Do not use a non-rechargeable battery. Refer to the “Product Specifications” section for details about battery standards.
- Do not wash the robot with water.
- Do not clean the robot with a dripping wet cloth.
- Do not use the robot on floors with accumulated water.
- Do not use the robot near fire or fragile objects.
- Do not use the robot under extreme temperatures over 40°C or under -5°C.
- Do not allow hair, clothes, or fingers near openings or mechanical parts of the robot.
- Do not remove objects such as stones or paper that will be stuck in the robot.
- Do not remove inflammable such as gasoline, and printer, and copier toners with the robot. Do not use the robot in an environment with inflammable.
- Do not remove cigarettes, lighter, matches, ashes, or other inflammable that may cause a fire.
- Do not put any objects in the roller brush holder. To ensure smooth rotation of the roller brush, remove dust, batting, and hair winding around it.
- Do not use a damaged charging dock.
- Do not lift the product and charging dock by the power cords. Do not place power cords in gaps around the door, or pull them around sharp edges or corners. Do not allow the robot to run over power cords. Keep power cords from high heat.
PRODUCT - Damaged power cords must be repaired by the manufacturer’s repair service or certified technicians.
- install dustbin and filters properly before using the robot.
- Do not use the robot in rooms where babies are sleeping.
- Do not use damaged power cords or charging dock to recharge the robot.
Do not use the robot after a fall, water intrusion, or outdoor use, and when it is damaged. - Turn off the power switch if the robot will not be used for a long time.
Maintenance - Turn off the power switch before cleaning or maintaining the robot.
- Unplug power cords from the charging dock before cleaning or maintaining the robot.
DISPOSAL - Remove the battery before discarding the robot.
- Robots and batteries are to be disposed of according to local safety regulations.
- Do not cremate the robot to avoid explosion.
- Follow the instructions in this user manual.
The manufacturer is not responsible for any damages caused by improper use.
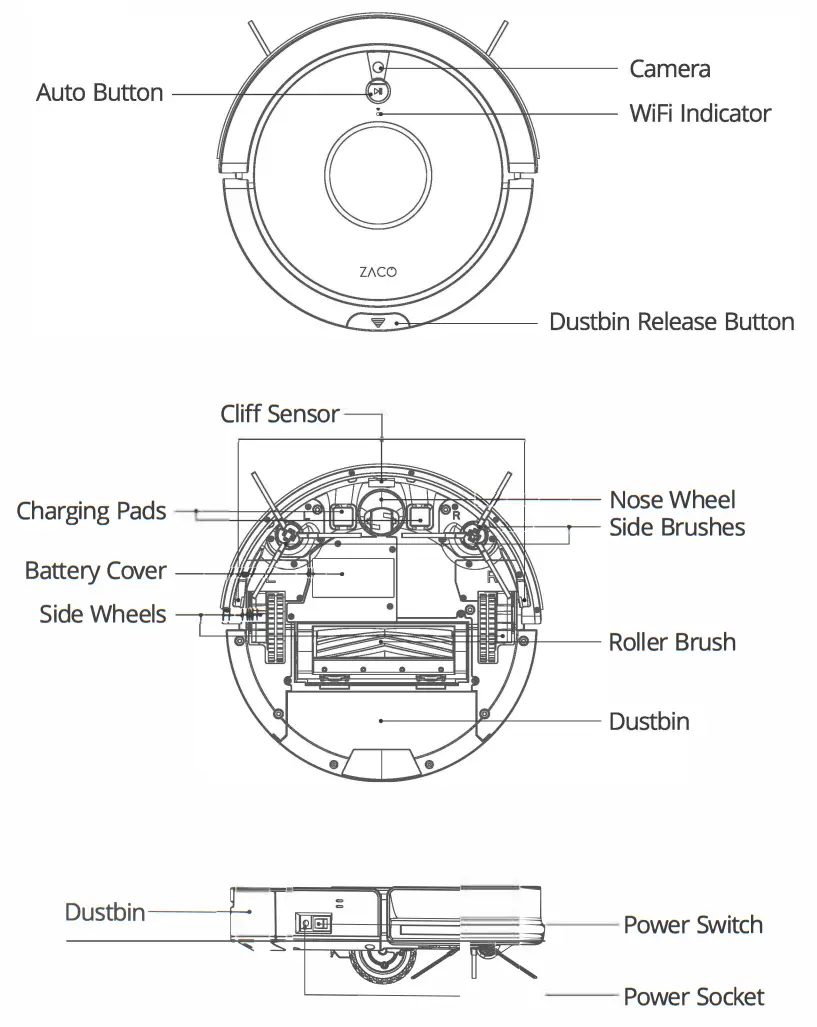
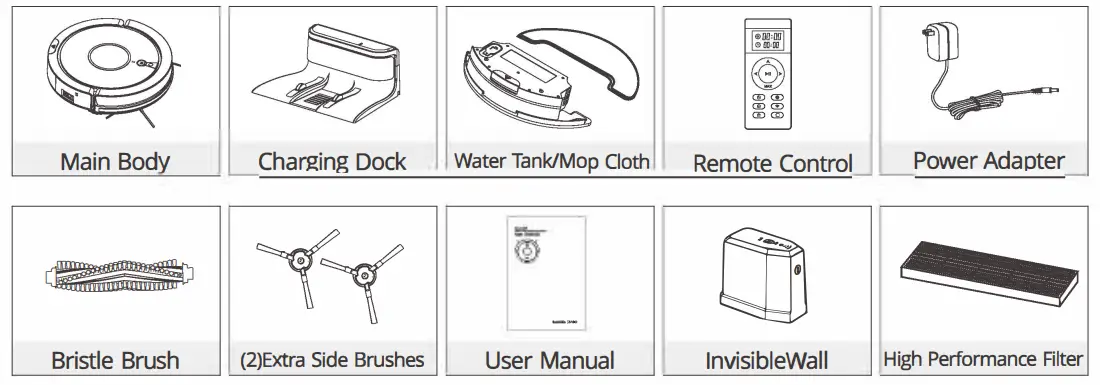
Product Components
Main Body
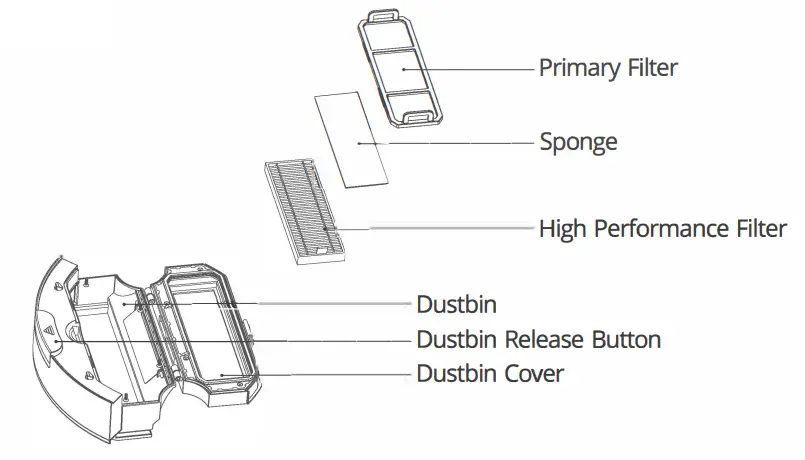
Dustbin
water tank
Charging Dock
Remote Control
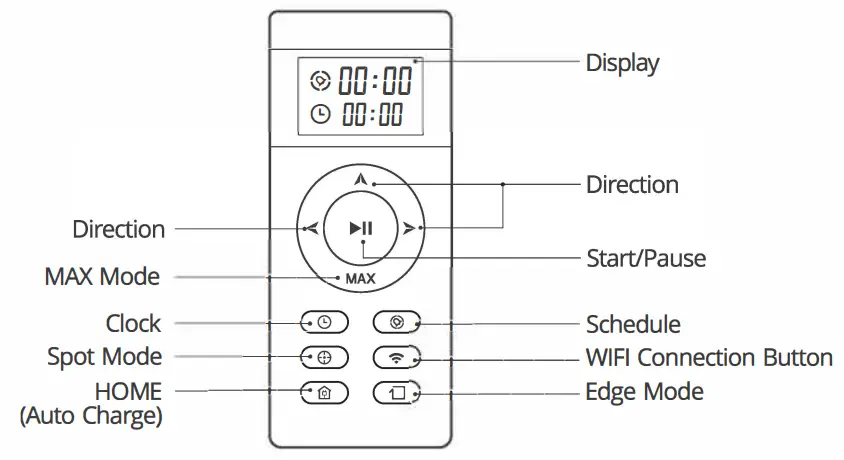
Note: “A” “<” “>” cannot be used to ring a cleaning cycle.
List of Accessories
Product Specifications
| Type | Description | Specification |
| Mechanical | Diameter | 330mm |
| Height | 76mm | |
| Nett Weight | 2.5kg | |
| Electrical | Battery | 14.4V-14.8V, Lithium-ion 2600mAh |
| Charging Methods | Auto Charging / Manual Charging | |
| Cleaning | Dustbin Capacity | 0.6L |
| Cleaning Modes | Auto, Spot, Edge, Daily Schedule | |
| Charging Time | About 300 min | |
| Cleaning Time | 120 min | |
| Main Body | Mechanical Button | |
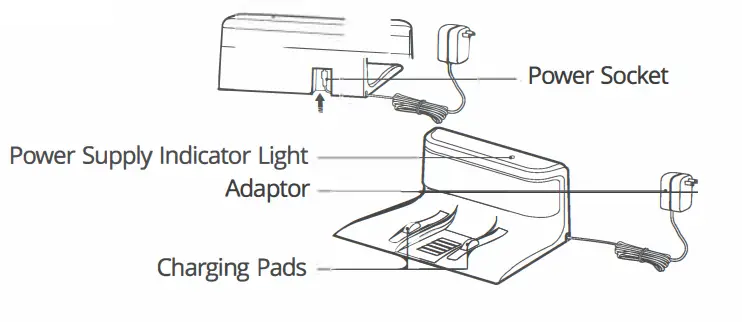
Charging
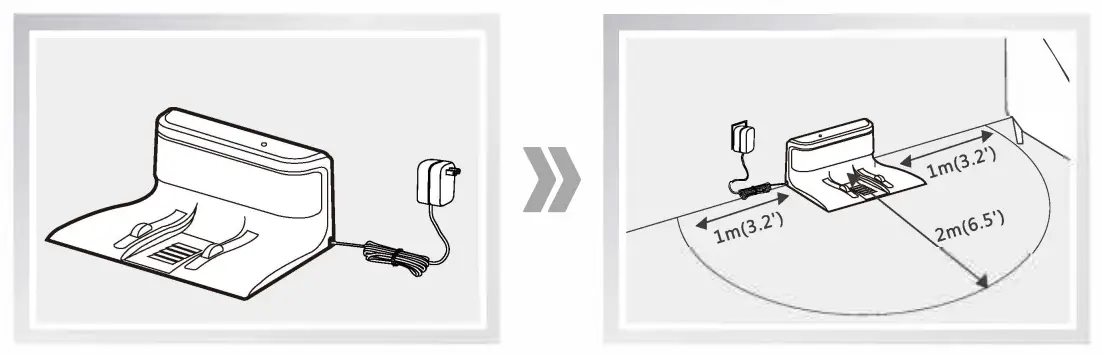
- Placing Charging Dock
• Plug the adaptor into the charging dock;
• Put the charging dock against a wall and remove obstacles and reflective objects about 1 meter on both sides and about 2 meters in front;
• Connect to power. Note: Once connected to power, the indicator light on the charging dock stays on.
 - Turning on Power Switch
Turn on the power switch on the side of the main body.
“-” is ON and “O” is OFF. Note:
Note:
Do not switch off the robot after use.
Always keep the robot fully charged for the next task. - Charging the Robot
An Auto Charge
• When the battery runs low in Auto Mode, the robot will automatically search the charging dock for recharge.
• While on standby, press the up button on the remote control. The robot will start searching the charging dock for recharge.
 Reminder:
To avoid lowered charging performance, make sure the charging pads on the main body and charging dock are clean.
B. Manual Charge
• Turn on the power switch on the side of the main body.
Plug in the adaptor and connect to power.
 Note: Once connected to power, the indicator light on the charging dock stays on.
 Note:
Note: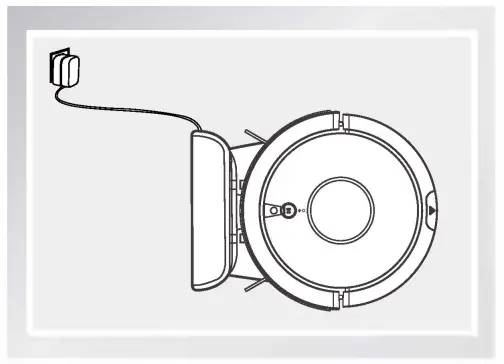 Reminder:
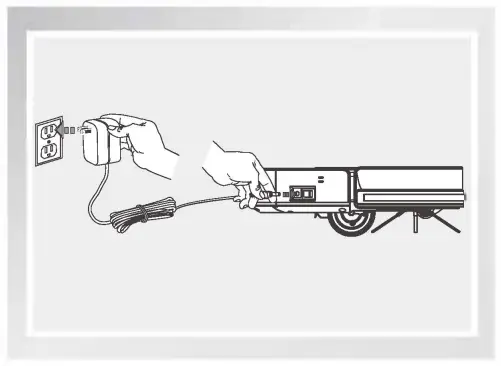
Reminders:
- For regular use, always leave the main body on the charging dock and make sure its power switch is turned on.
- if the robot will not be used for a long time, fully charge it before storing it in a cool, dry place.
- Do not charge the robot manually after a cleaning schedule is set.
The robot will not execute scheduled cleaning after manual charge.
Start/Pause/Sleep
- Sleep: Robot is idle; Power switch is on and indicator light is off.
- Standby: The robot is not working; the Power switch is on and the light at the main button is pulsing.
- Start: Robot is working; Greenlight at Auto button stays on.
- Turn on the Robot
• Turn on the power switch on the side of the main body.
• Press on the main body to start cleaning.
• Presson the remote control to start cleaning.
Note:
While in Sleep mode, pressto activate standby mode. Press again to start cleaning. - Pause
• Pause means switching from cleaning to standby. To pause a cleaning cycle, presson the remote control or on the main body.
Note:
The robot accepts new tasks once it is paused. - Sleep
• To enter Sleep Mode:
A. Press and hold for 3 seconds.
B. Robot enters Sleep mode automatically after idling for 10 minutes.
Robot
- Auto Mode
A. Press to activate robot from Sleep Mode to standby.
B. Press to start cleaning while on standby.
C. Press to pause while the robot is cleaning
Cleaning Modes
Multiple cleaning modes allow robots to perform deep cleaning in different environments and on different floorings. Use the remote control to select a suitable cleaning mode.
- Ta activates cleaning modes, make sure robot is on standby: power switch and pulsing green light are an.
- Auto Mode
The most frequently used cleaning mode. Press the main body or remote control. Rabat plans a path and cleans along with a zigzag pattern.
During cleaning, the robot detects and cleans areas that have been missed. • Rabat plans a cleaning path autonomously during a cleaning cycle. LF robot is moved manually or with the remote control, it will plan a new path and may repeat areas that have been cleaned.
• Rabat may stop working briefly during a cleaning cycle. Wait patiently for it to detect areas that have been missed or to revise the cleaning path.
The number and duration of these brief stops depend on the complexity of the harne environment. - Spot Mode
The robot takes a spiral path to clean a specific area with concentrated dust and debris.
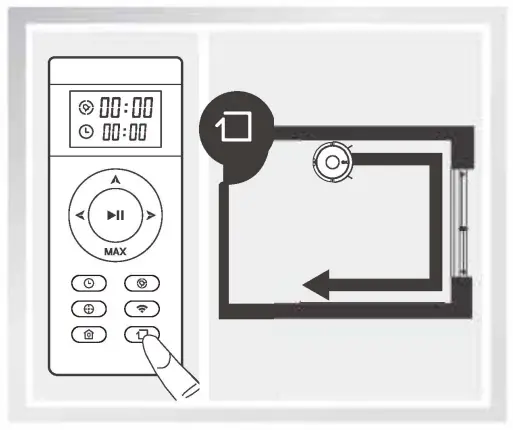
- Edge Mode
While on standby, the robot moves forward until it detects a wall.
lt cleans around the edges of the walls once.
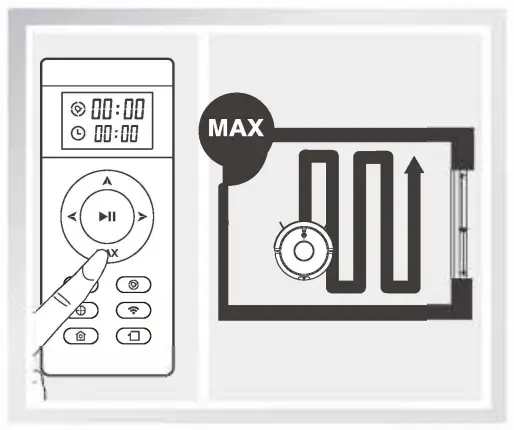
- MAX Mode
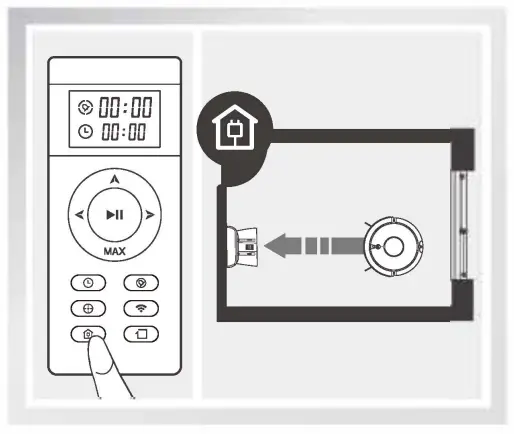
High suction power for areas with concentrated dust. Press the MAX button on the remote control to increase the suction level. Press MAX again to return to a normal level. - Auto Charge
When the battery runs low during a cleaning cycle, the robot will automatically activate the ”Auto Charge” function - searching and returning to the charging dock for recharge.
• Auto Charge can also be activated by pressing @ on the remote control.
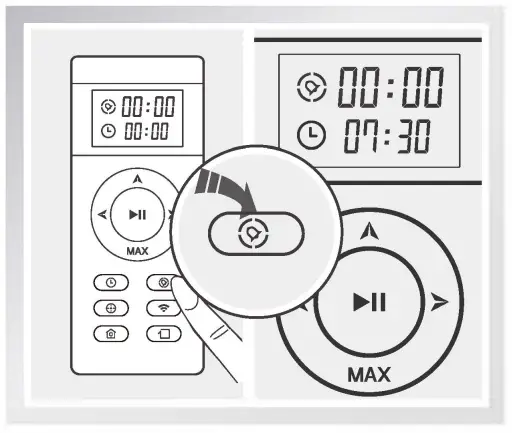
- Schedule Mode
Preset cleaning cycles at any specific time. Tap the Schedule button on the remote control. The display will show an icon and flashing .
.
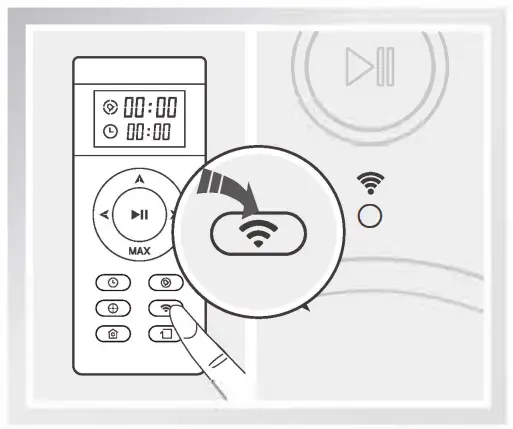
- WiFi Connection Mode
In select mode, press and hold for 3 seconds to start WiFi pairing.
 • Rabat plans a cleaning path autonomously during a cleaning cycle. LF robot is moved manually or with the remote control, it will plan a new path and may repeat areas that have been cleaned.
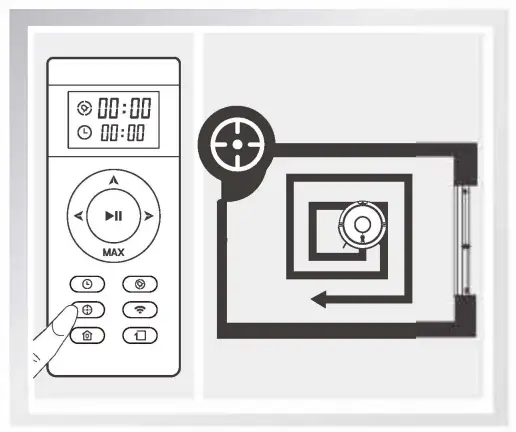
Schedule Mode
To offer a complete automatic cleaning experience, the robot receives preset cleaning schedules. Set local time and schedules with the remote control or mobile APP. The robot will start cleaning automatically at the preset time every day.
- Before setting local time and cleaning schedules, make sure the main body is switched on. A green flashing light indicates the robot is activated from Sleep mode. To activate the robot, tap ® on the main body or 8 on the remote control.
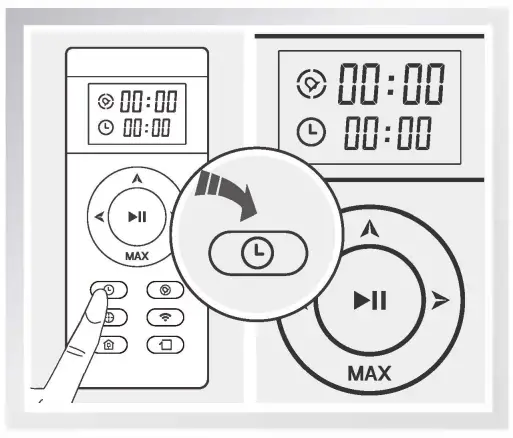
- Set Local Time with Remote Control
 Tap
Tap  button. The remote control display will show and flash.
 Press to save local time.
Voice announcement will confirm the completion of setting Adjust the time with
 the button. To set local time, press
 to change from hours to minute.
 - Set a schedule
 Tap
Tap . Remote control display will show and flash
Pressto save a schedule.
Voice announcement will confirm a successful schedule, and the robot will start working at the preset times. - Cancel a Schedule
Adjust time to “00:00” and save, or turn off the power switch on the main body.
• Please pay attention to the voice prompt to see if the robot is successfully scheduled.
• Rescheduling is required after changing batteries in the remote control. Use direction buttons to adjust schedule time.
 Tap
Tap 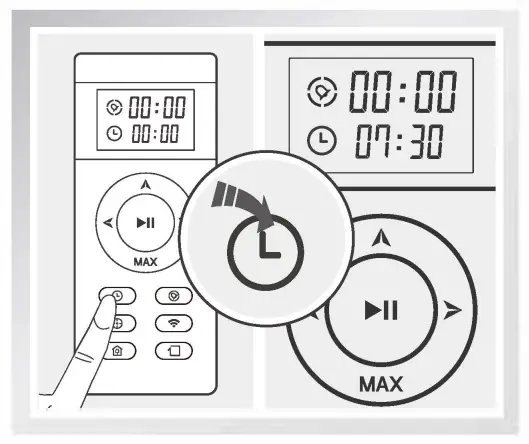 Press
Press 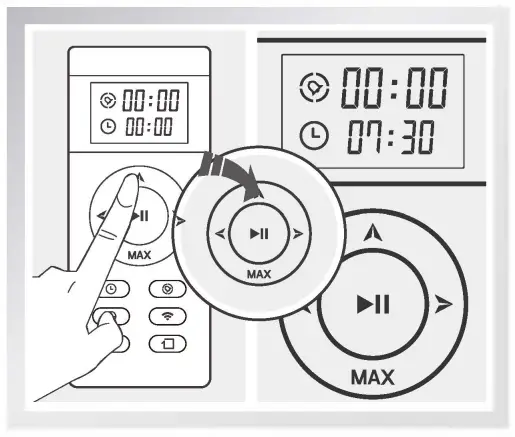 Adjust the time with
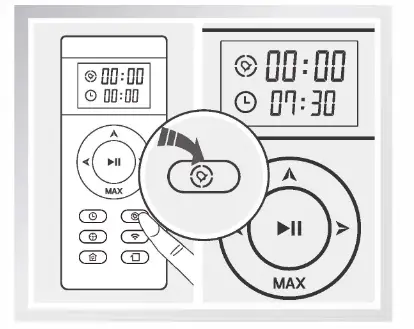 Tap
Tap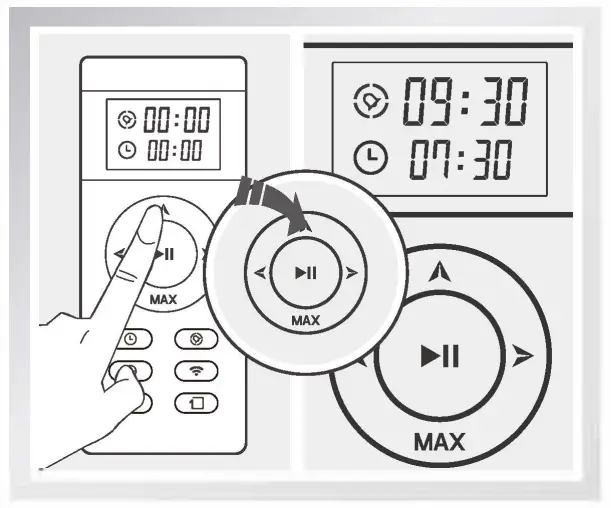 Use direction buttons to adjust schedule time.
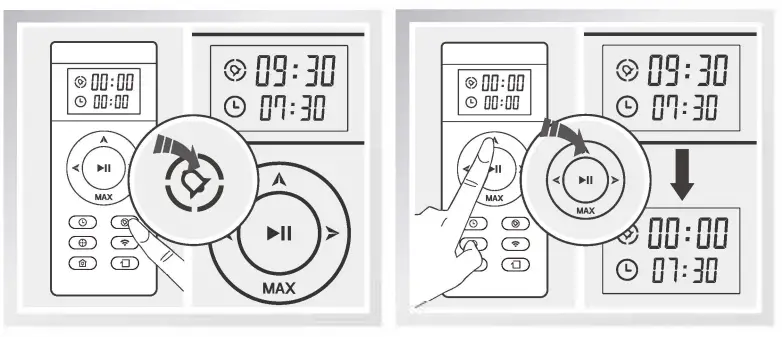
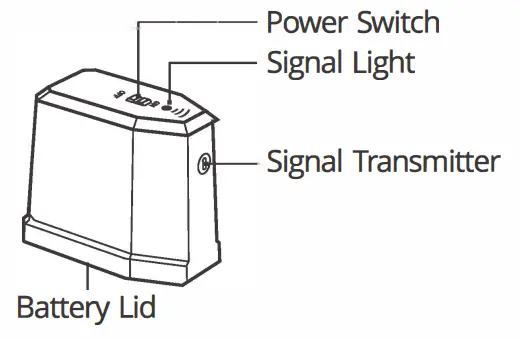
invisible wall
- An invisible wall creates an invisible barrier that A9s will not cross. This invisible barrier can be used to confine A9s to a particular room or area.

- install battery first, then turn it on.
- Put the invisible wall on the outside of the doorway you wish to block.
- Ensure the signal logo is facing forward and toward the opening, you would like to block.
- Turn off the invisible wall after each use.

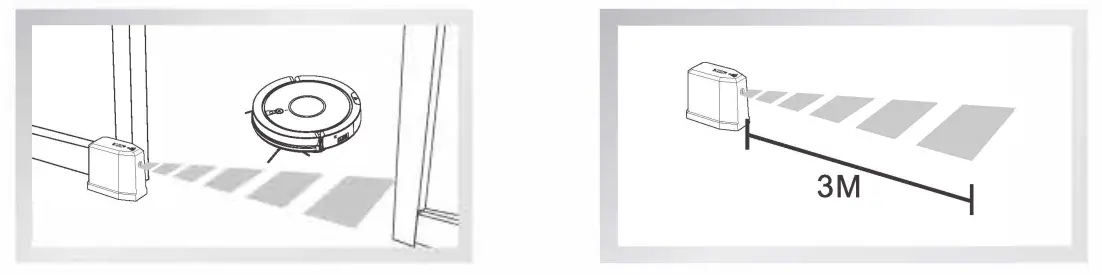
TIPS:
- Make sure which side is working area according to the stickers on the invisible wall.
- Place the robot in the “working area” to do the cleaning.
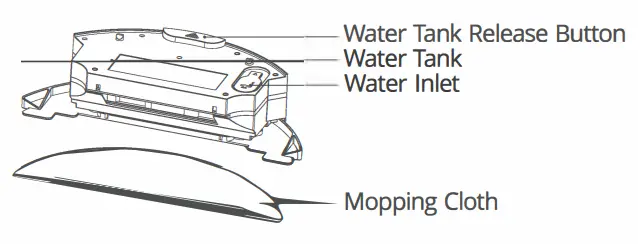
water tank
This product contains water tank components. After sweeping and vacuuming, replace the dustbin with the water tank for mopping function.
 • if a cleaning cycle is paused for water refill or mop cloth cleaning, the robot will plan and start a new cleaning path. Completed areas may be cleaned again. For best performance, mop one room at a time. • if a cleaning cycle is paused for water refill or mop cloth cleaning, the robot will plan and start a new cleaning path. Completed areas may be cleaned again. For best performance, mop one room at a time.• Manually move the robot to another room that requires mopping. Refill water and clean the mop cloth, if necessary, before the robot starts mopping. |
| • Do not use the water tank on the carpet. To prevent mop cloth from staining the carpet, roll up the carpet edges before mopping. • Make sure there is enough water for mopping during cleaning. Refill water when needed. Remove the water tank before a refill. • Remove the water tank before charging. |
- Water Refill
 Open the water inlet cap. Slowly pour in water with a cup.
 - Attach Mop Cloth
 Close the cap tight and attach the mop cloth firmly. Secure with the rings on both sides.
 - install Water Tank
 Press the dustbin release button to remove the dustbin and replace it with the water tank.
 - Mopping
 Press the Auto button to start mopping and vacuuming.
 Open the water inlet cap. Slowly pour in water with a cup.
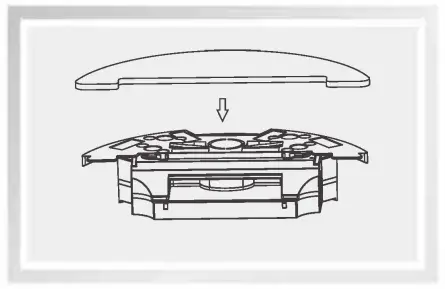 Close the cap tight and attach the mop cloth firmly. Secure with the rings on both sides.
 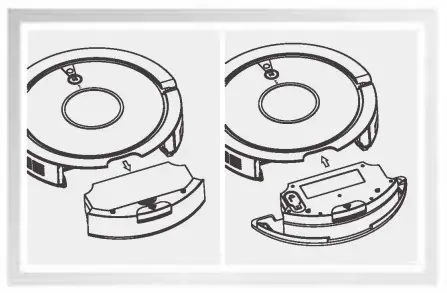 Press the dustbin release button to remove the dustbin and replace it with the water tank.
 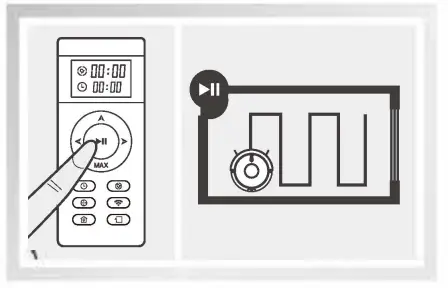 Press the Auto button to start mopping and vacuuming.
APP Download
Your robot can be controlled remotely by a mobile APP. Operation guides are available on the APP interface. 
https://itunes.apple.com/us/app/zaco-robot/id1463018845?l=zh&ls=1&mt=8
https://play.google.com/store/apps/details?id=com.zacorobot_eu
Maintenance
Make sure the main body is turned off and the adaptor is unplugged before accessories maintenance.
Cleaning Side Brushes & Roller Brush
Cleaning Side Brushes 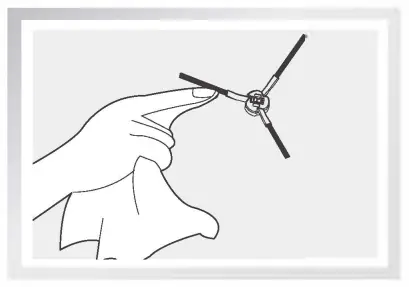
Remove side brushes. Wipe clean with a clean cloth.
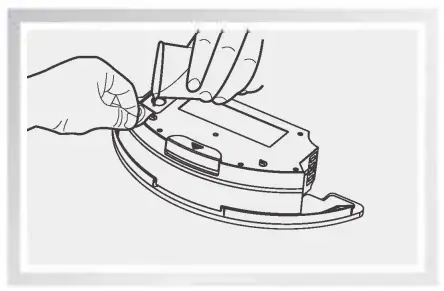
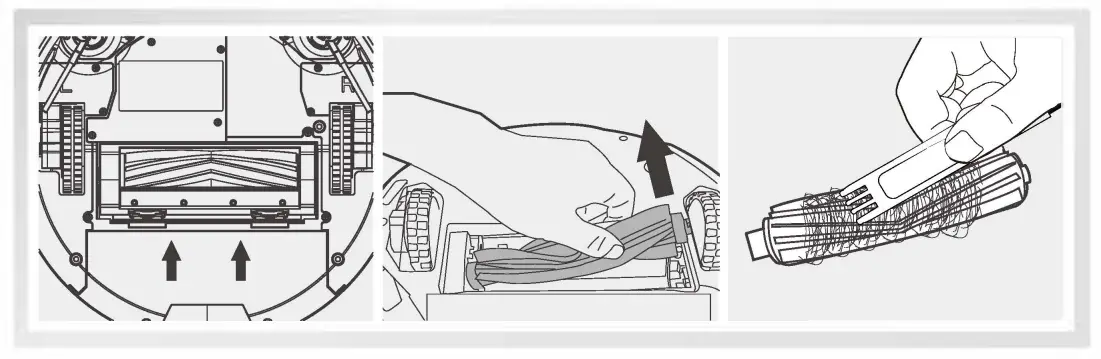
Cleaning Roller Brush
Remove roller brush cover. Take out roller brush. Cut the hair winding around the brush for easy removal.
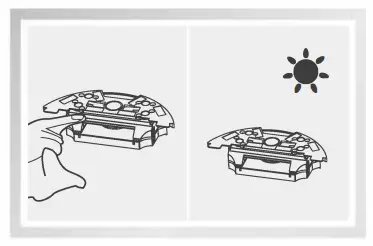
 Cleaning Sensors & Charging Pads
 Cleaning Sensors & Charging Pads
Use cleaning tools or a soft cloth to clean the sensors and charging pads:
Note: Remove dust or foreign objects on sensors and charging pads on the charging dock as soon as possible.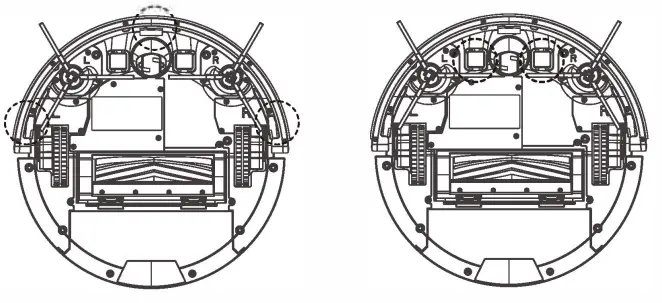 Cleaning Dustbin & Filters
Clean dustbin and filters after each use:
A. Take out the dustbin. Check the suction port if there is anything stuck in it.
Clean suction port if needed.
B. Wash replaceable primary filter and sponge with water every 15-30 days.
Do not squeeze. Air dry after wash.
C. Tap to remove dust from the high-performance filter. Do not wash with water.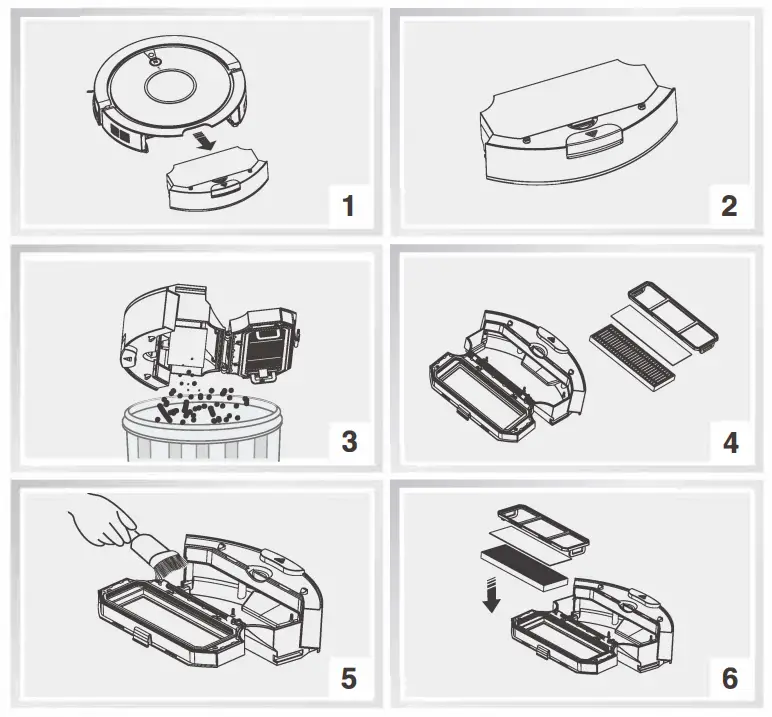
Cleaning Water Tank Components
- Cleaning Mop Cloth
 Remove: Take out the water tank and mop cloth after each use.
 Maintenance: Rinse and dry the mop cloth.
 - Cleaning Water Tank

 Remove: Take out the water tank and mop cloth after each use.
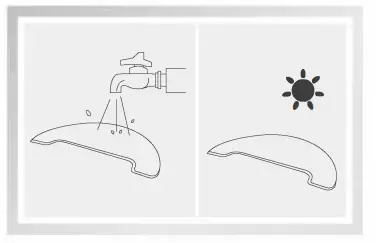 Maintenance: Rinse and dry the mop cloth.
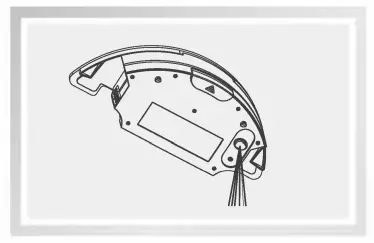
Remove: After each use, remove the mop cloth holder and mop cloth, and empty the water tank.
Maintenance: Wipe the water tank with a dry cloth before air drying.
Do not rinse the water tank directly with water.
Note: Do not submerge the vibrating water tank in water.
Troubleshooting
Alert Reference
In case of errors, the red light stays on with the voice announcement.
| No. | Voice announcement | Possible causes | What to do |
| 01 | Please clean the left side brush | The fault of the left side brush | Check and clean the left side brush |
| 02 | Please clean the right side brush | The fault of the right side brush | Check and clean the right side brush |
| 03 | Please check the left wheel | The fault of the left wheel | Check and clean the left wheel |
| 04 | Please check the right wheel | The fault of the right wheel | Check and clean the right wheel |
| 05 | Please clean turbo brush | The fault of the turbo brush | Clean the turbo brush |
| 06 | Please check vacuum | The fault of the vacuum | Contact the customer service |
| 07 | Please clap the front bumper | The fault of the front bumper | Check the front bumper |
| 08 | Please clean drop sensors | The fault of the drop sensors | Please check the drop sensors |
| 09 | Please check the nose wheel | Fault of the nose wheel | Clean the nose wheel |
| 10 | Please put the robot back on the ground | The robot is lifted | Place the robot on the ground |
| 11 | Auto charging fail, please put the robot back to charging dock | A charging dock can not be found | Reposition the charging dock |
| 12 | Please pull out the plug from the robot | / | Press |
| 13 | Please turn on the power switch | / | Press |
CO Customer Service
Free Call Europe: 00800-42377961
Direct Line DE 0209-513038-380
Email: [email protected]
website: www.zacorobot.eu


