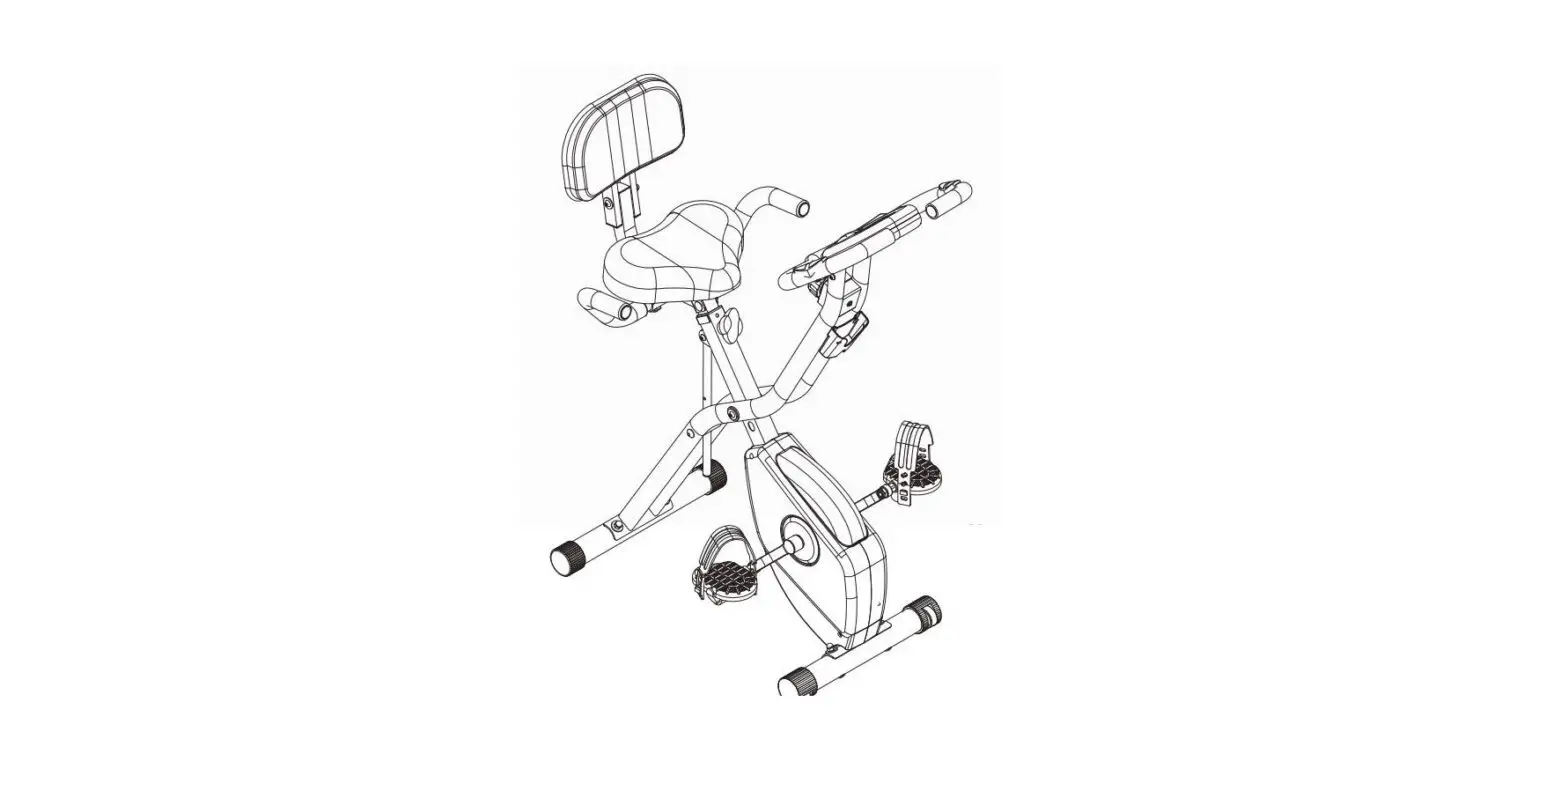
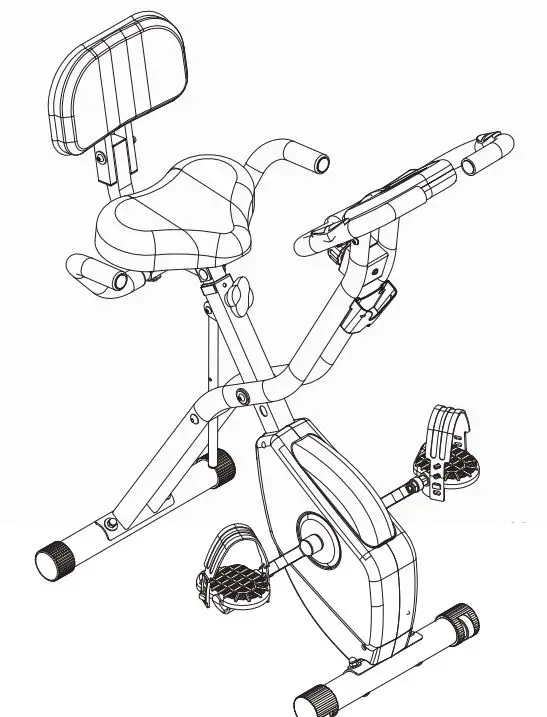
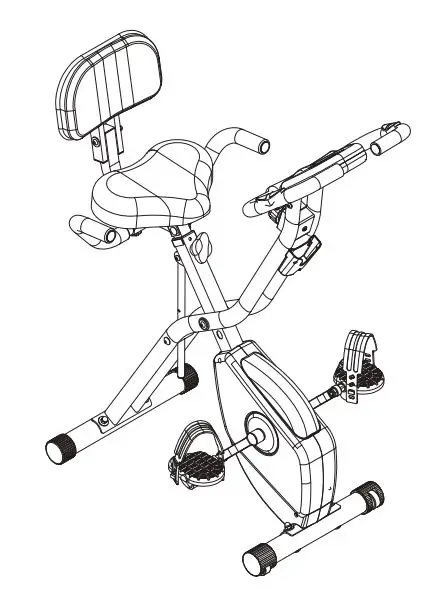
GEARSTONE L80001262 D3 Fitness Bike
Safety Instructions
Please pay attention to the following matters before installing and using this exercise bike:
- Please install in strict accordance with the requirements of the manual.
- In order to ensure the safety of users, please check whether all the bolts and other connecting parts on the equipment are locked before each use.
- Do not expose the equipment to damp places, as this will cause malfunctions.
- It is best to put the parts on a mat (rubber or wood) during installation to avoid soiling.
- Before exercising, make sure that no other items are placed within 2 meters of the exercise bike
- Do not use corrosive detergent when cleaning the machine. Please use the tools provided with the vehicle or your own special tools to assemble and repair parts. Also pay attention to wipe off the sweat dripping on the car in time after each exercise.
- Incorrect or super-intensity exercise is not good for your health. It is recommended to consult a doctor before exercise, he will set you a maximum amount of exercise (including pulse, watts, duration, etc.), so that you can be on your own exercise and get accurate information. Any strenuous exercise can only start after 40 minutes after a meal. Note: This bike cannot be used for therapeutic training
- You can exercise only when the machine is in a normal state, and you can only use the accessories provided by the original factory when repairing.
- This machine can only be used for exercise by one person at a time.
- It is best to wear sportswear and sports shoes when exercising, and sports hoes must fit well.
- If you feel dizzy, vomiting or other bad symptoms during exercise, you should stop training immediately and see a doctor for consultation.
- Children and the disabled can only use it under the supervision of someone.
- This car is designed to adjust the size of the resistance to adjust the speed of movement, from light to heavy, it can be adjusted back and forth to choose your suitable resistance.
- The user’s weight cannot exceed 100 kg
Exploded View X-BIKE Exploded View List
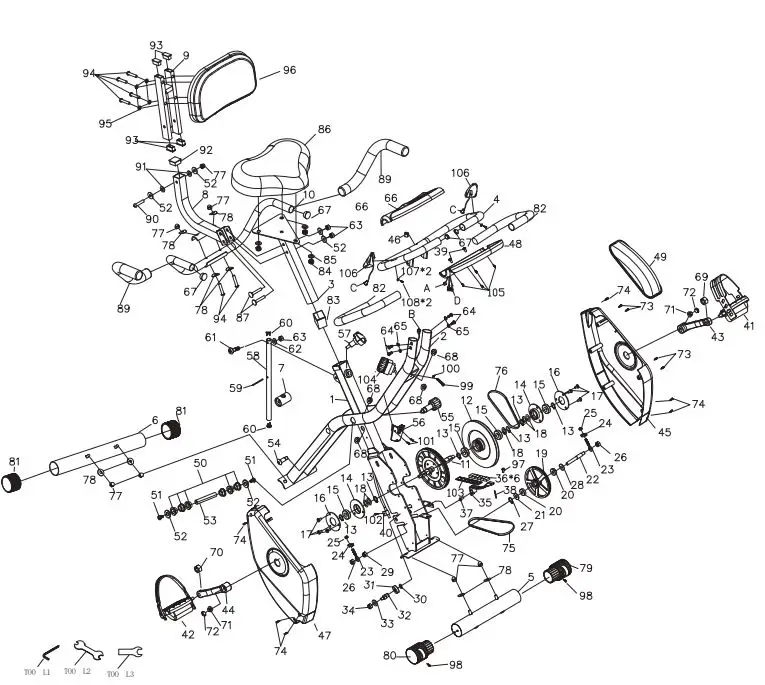 X-BIKE Exploded View List
| NO. | Name | Qty | NO. | Name | Qty |
| 1 | Front bracket assembly | 1 | 55 | Special elastic pin M16 | 1 |
| 2 | Rear bracket assembly | 1 | 56 | storage box | 1 |
| 3 | Seat cushion tube assembly | 1 | 57 | Tighten the bolts | 1 |
| 4 | Front armrest tube assembly | 1 | 58 | Support adjustment tube | 1 |
| 5 | Front leg assembly | 1 | 59 | Cylindrical pin | 1 |
| 6 | Rear leg assembly | 1 | 60 | Round pipe inner plug | 2 |
| 7 | Intermediate rotation group | 1 | 61 | Pan Head Hexagon Bolt | 1 |
| 8 | Cushion connecting pipe assembly | 1 | 62 | Flat pad | 1 |
| 9 | Cushion fixing pipe assembly | 1 | 63 | Locknut | 3 |
| 10 | Rear armrest tube assembly | 1 | 64 | Pan Head Hexagon Bolt | 4 |
| 11 | Belt pulley assembly | 1 | 65 | Spring cushion | 4 |
| 12 | Cast iron wheel | 1 | 66 | Electronic watch cover | 1 |
| 13 | Circlip for shaft | 6 | 67 | Round pipe inner plug | 4 |
| 14 | Bearing seat | 2 | 68 | Thread plug | 4 |
| 15 | Bearing | 4 | 69 | Left pedal nut (left tooth) | 1 |
| 16 | Bearing cap | 2 | 70 | Right pedal nut (right tooth) | 1 |
| 17 | Phillips pan head screws | 6 | 71 | Center lock flange nut | 2 |
| 18 | Wave washers | 5 | 72 | Crank plug | 2 |
| 19 | driven wheel | 1 | 7h3illips | Ppan head tapping screws | 4 |
| 20 | Bearing | 2 | 74 | Phillips pan head tapping and self-drilling screws | 6 |
| 21 | Plastic spacer | 1 | 75 | Belt | 1 |
| 22 | Driven shaft | 1 | 76 | Belt | 1 |
| 23 | Draw bolt | 2 | 77 | Cap nut | 7 |
| 24 | Draw bolt U-shaped baffle | 2 | 78 | Enlarged arc gasket | 8 |
| 25 | Locknut | 2 | 79 | Left front foot plug assembly | 1 |
| 26 | Hex nuts | 2 | 80 | Front foot right plug assembly | 1 |
| 27 | Circlip for shaft | 1 | 81 | Round pipe outer plug | 2 |
| 28 | Wave spring cushion | 1 | 82 | Sponge grip | 2 |
| 29 | Hexagon thin nuts | 1 | 83 | Bushing between pipes | 1 |
| 30 | Circlip for shaft | 1 | 84 | M8 lock nut | 3 |
| 31 | Bearing | 1 | 85 | Flat pad | 3 |
| 32 | Pinch roller shaft | 1 | 86 | cushion | 1 |
| 33 | Increase flat pad | 1 | 87 | Pan head square neck bolts | 0 |
| 34 | Locknut | 1 | 88 | Pan Head Hexagon Bolt | 0 |
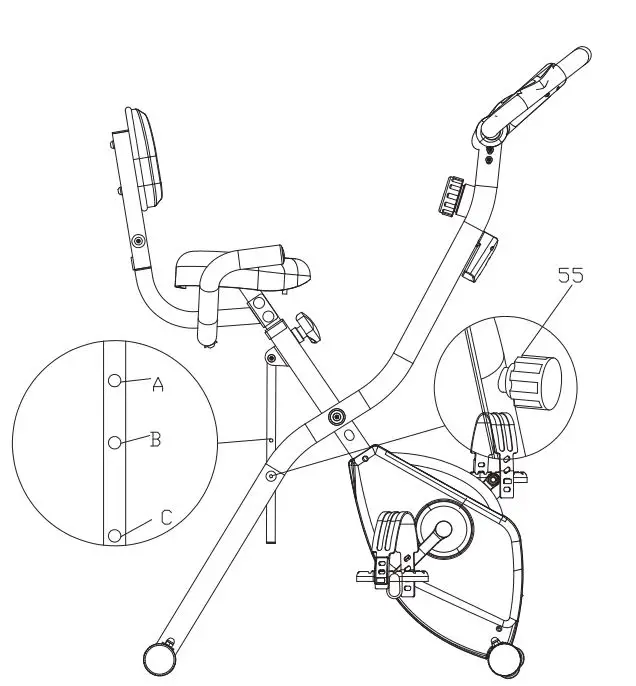
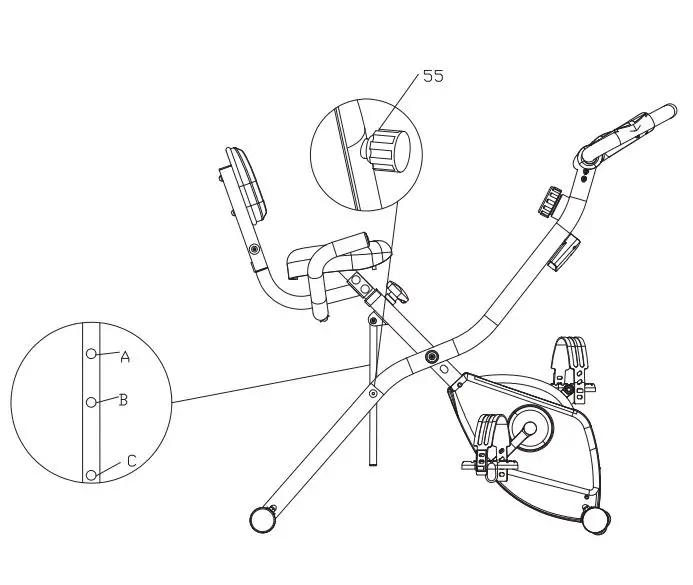
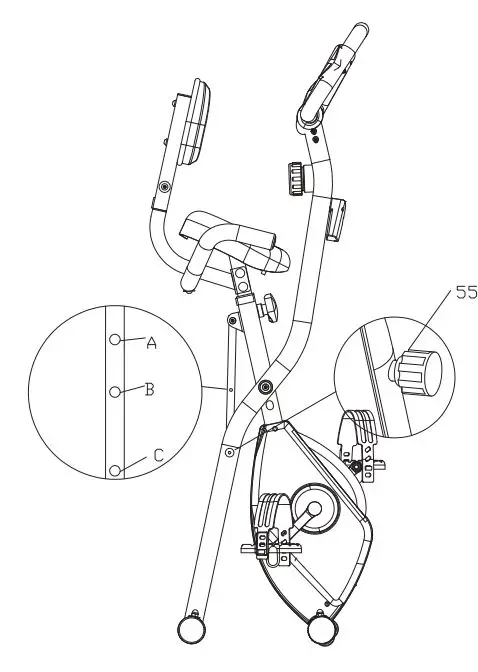
| 35 | Magnet frame assembly | 1 | 89 | Sponge grip | 2 |
| 36 | magnet | 6 | 90 | Pan Head Hexagon Bolt | 1 |
| 37 | Cross flat head bolt | 1 | 91 | Plastic flat pad | 2 |
| 38 | spring | 1 | 92 | Square tube plug | 1 |
| 39 | Cross pan head bolts | 2 | 93 | Square tube plug | 4 |
| 40 | Sensor base | 1 | 94 | Pan Head Hexagon Bolt | 6 |
| 41 | Left pedal | 1 | 95 | Spring cushion | 4 |
| 42 | Right pedal | 1 | 96 | Cushion | 1 |
| 43 | Left crank | 1 | 97 | Limit plug | 1 |
| 44 | Right crank | 1 | 98 | Phillips pan head tapping screws | 2 |
| 45 | Left protective cover | 1 | 99 | Cross pan head bolts | 1 |
| 46 | Line plug-2 | 1 | 100 | Increase flat pad | 1 |
| 47 | Right protective cover | 1 | 101 | Phillips pan head tapping screws | 2 |
| 48 | Electronic watch back cover | 1 | 102 | Phillips pan head tapping and self-drilling screws | 1 |
| 49 | Middle protective cover | 1 | 103 | Magnet holder | 1 |
| 50 | Plastic bushing | 6 | 104 | Eight-speed fine-tuning | 1 |
| 51 | Pan Head Hexagon Bolt | 2 | 105 | Phillips tapping screws | 1 |
| 52 | Increase flat pad | 6 | 106 | Pulse seat | 2 |
| 53 | transmission shaft | 1 | 107 | Flat pad | 2 |
| 54 | M10 fixed pin special | 1 | 108 | Phillips pan head tapping screws | 2 |
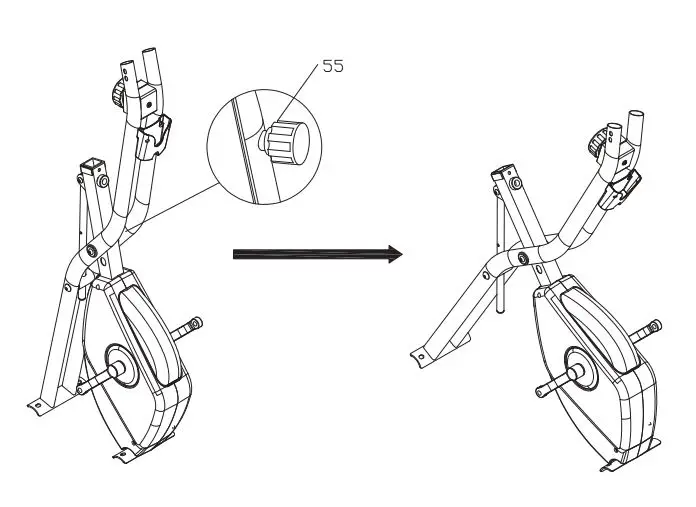
Step 1
Take the product out of the box as shown in Figure 1; Pull the special elastic pin (55) outward and unfold the body as shown in Figure 2.
Step 2
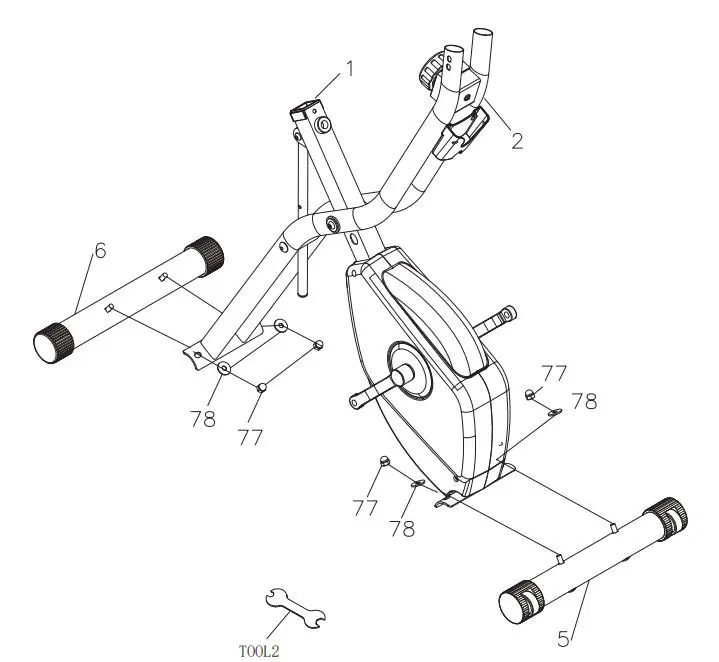
- Use TOOL 2 with cap nut (77) to enlarge the arc-shaped washer(78) Fix the front leg tube (5) to the front bracket (1), and lock it tight.
- Use TOOL 2, cooperate with the cap nut (77) to enlarge the arc-shaped washer (78), fix the rear leg tube (6) to the rear bracket (2), and lock it.
Step 3
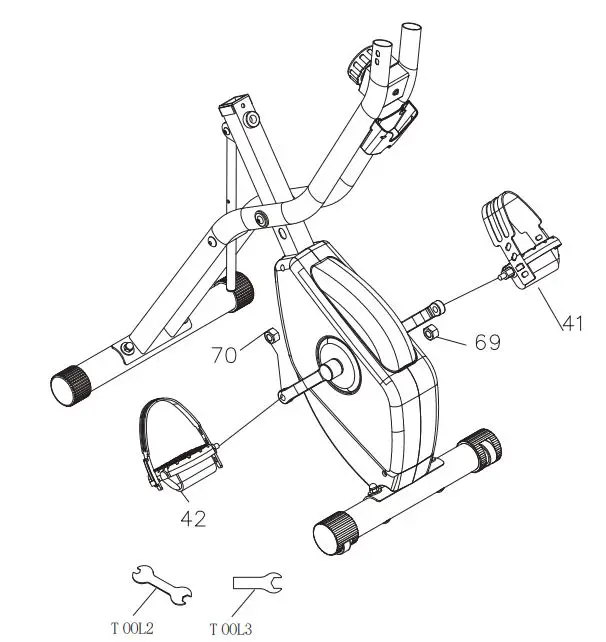
- Using TOOL 2, screw the left pedal (41) into the left crank, and then cooperate with TOOL3 to tighten the left pedal nut (69).
- Using TOOL 2, screw the right pedal (42) into the right crank, and then cooperate with TOOL3 to tighten the right pedal nut (70). Note: Please pay attention to the direction of the arrow during tightening
Step 4
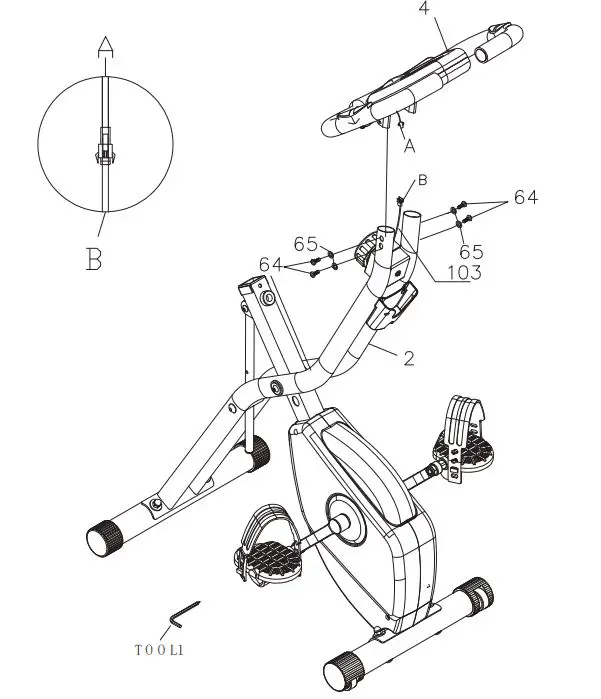
- Insert the front armrest assembly (4) into the rear bracket tube (2), use TOOL 1, and cooperate with the pan-head hexagon socket bolt (64) spring washer (65) to fix the front armrest assembly (4) to the front bracket (2) .
- Connect the electronic meter connector (A/B) and click into place (as shown in the figure)
Step 5

- Using TOOL 2, fit the seat cushion (86) with the lock nut (84) The gasket (85) is fixed on the cushion tube.
- Insert the locked seat tube (3) into the front bracket (1), and fix it with the tightening bolt (57).
Step 6
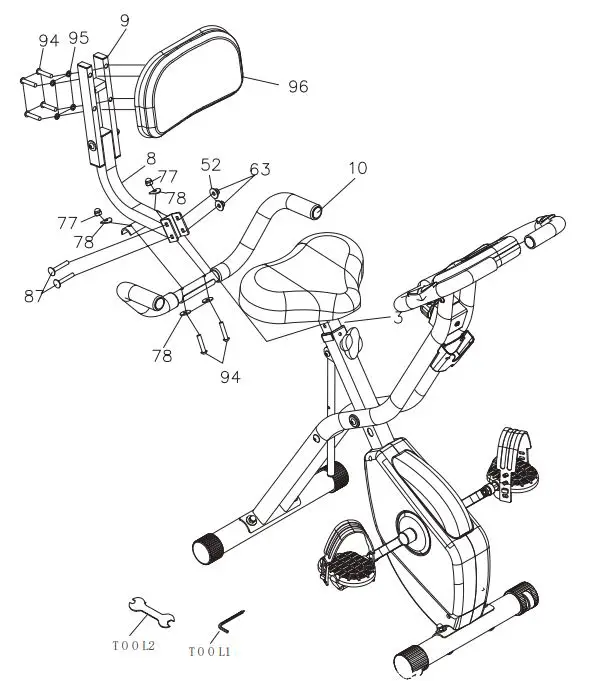
- Use TOOL 1 to fix the back cushion (96) on the back cushion tube (9) with the pan head hexagon socket bolt (94) and spring washer (95).
- Use TOOL 1 and TOOL 2, and cooperate with the pan-head hexagon socket bolt (94) to enlarge the arc-shaped cushion (78) and the cap nut (77), and fix the rear armrest (10) to the back cushion connecting pipe (8).
- Use TOOL 2, cooperate with the pan-head square neck bolt (87) to enlarge the flat washer (52) and lock nut (63), and fix the locked cushion connecting tube (8) to the cushion tube (3).
Finished
The product assembly is completed. Please install the battery of the electronic watch before use, and remove the battery when not in use for a long time. Before use, please be sure to check whether all the connections are fully locked before moving.
Exercise Bike Status
Pull the special elastic pin (55) outwards and unfold the body to make the special elastic pin (55) snap into hole B.
Lazy Bike Status
Pull the special elastic pin (55) outward and unfold the body so that the special elastic pin (55) fits into the hole A.
Collapse status
Pull the special elastic pin (55) outward and unfold the body so that the special elastic pin (55) fits into the hole C.
EXERCISE COMPUTER INSTRUCTION
FUNCTIONAL BUTTON:
MODE : Push down to select functions, (SCAN),(TIME),(SPEED),(DIST),(ODO), (CAL),(♥) RESET : Push down to reset time、distance and calories for 2 seconds.
FUNCTIONS AND OPERATIONS
- SCAN: Press MODE button until “SCAN” appears, monitor will rotate through the following functions: time、speed、distance、calories、odometer and pulse, each display will be hold 6 seconds.
- TIME : Count the total time from exercise start to end.
- SPEED: Display current speed.
- DISTANCE: Count the distance from exercise start to end.
- CALORIES: Count the total calories from exercise start to end.
- ODOMETER(TOTAL DIST):Monitor will display the total accumulated dis tance, after the battery is reinstalled, the value will return to zero.
- PULSE RATE: Measure the user’s heart rate.Press the button to switch to the pulse function, and hold the two heartbeat sensors in both hands to measure the heart rate. Remark: During the process of pulse measurement, because of the contact jamming, the measurement value may be higher than the virtual pulse rate during the first 2~3 seconds, then will return to normal level. The measurement value can not be regarded as the basis of medical treatment.
SPECIFICATIONS
|
FUNCTION | AUTO SCAN | Every 6 seconds |
| TIME | 0:00’~99:59’ | |
| CURRENT SPEED | 0.0~999.9 KM/H(MILE/H) | |
| TRIP DISTANCE | 0.00~999.9 KM(MILE) | |
| CALORIES | 0.0~999.9 CAL | |
| ODOMETER | 0.0~9999 KM(MILE) | |
| PULSE RATE | 40~240 BPM | |
| BATTERY TYPE | 2pcs of SIZE –AAA or UM –4 | |
| OPERATING TEMPERATURE | 0°C ~ +40°C | |
| STORAGE TEMPERATURE | -10°C ~ +60°C | |
Sports Description
Using a multi-functional abdomen machine can bring you many benefits, it can improve your physical health, strengthen muscles, and control diet calories can help you lose weight.
Warm-up Stage
This stage helps blood flow around the body and allows the muscles to work normally. It also reduces the risk of cramps and muscle damage. It is recommended to do some stretching exercises as shown below. Each stretch should be maintained for about 30 seconds. Do not force or jerk your muscles. If you feel pain, stop immediately.
Exercise Stage
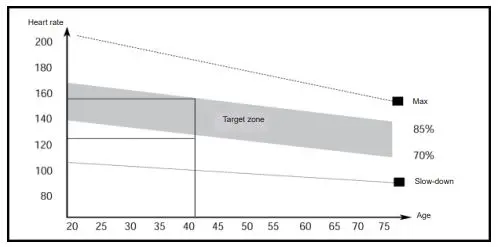
This is the stage where you work hard. After regular use, the leg muscles will become more flexible. It is very important to maintain a steady rhythm throughout the process. The speed of movement should be enough to make your heartbeat reach the target area shown in the figure below.
Relaxation Stage
This stage is to relax your cardiovascular system and muscles. This is a repetition of a warm-up exercise, such as slowing down your rhythm for about 5 minutes. The stretching exercise should be repeated now, again remember not to force or pull your muscles into the stretch. When you become healthier, you may need to train longer and harder. It is wise to train at least three times a week, and if possible, schedule your exercises evenly throughout the week.
Muscle sculpting
In order to exercise muscles on your abdomen machine, you need to set a fairly high resistance. This will put more pressure on our leg muscles and may mean that you can’t train as long as you think. If you also want to improve your fitness level, you need to change your training plan. During the warm-up and cooling phase, you should train as usual, but at the end of the exercise phase, you should increase the resistance to make your legs work harder. You will have to reduce your speed to keep your heart rate in the target zone.
Lose Weight
The important factor here is the effort you put in. The harder you exercise and the longer it takes, the more calories you burn. Effectively speaking, it’s like you are training to improve your physical fitness, but the goal is different.


