
TOP LOVO TL-403 Personal GPS Tracker User Manual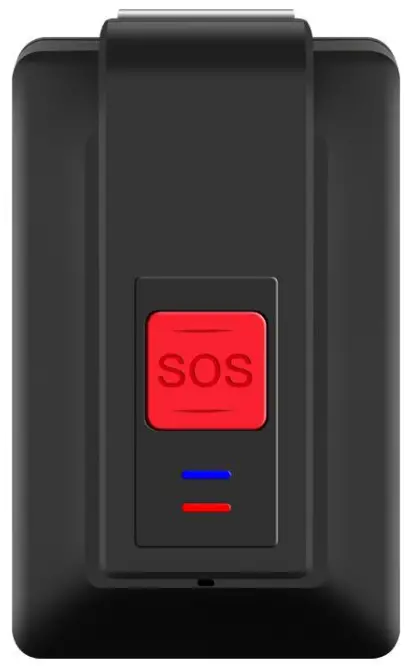
Welcome
Introduction
TL-403 is waterproof IP67 GPS personal tracker developed by Toplovo.
With two-way communication, SOS alarm function, fall down alarm function, auto tracking and listen-in function, it is suitable for children, elder people, lone workers, patients and vehicles. You can implement real time tracking anywhere via the mobile phone APP or tracking platform. It helps to protect the person who you care about.
What is in the Box
- TL-403 Device
- Magnetic Contact Cable
- Lanyard
- Plug
- Screw Driver & Screws
- User Manual
Optional Accessories: Belt Clip / Docking Station
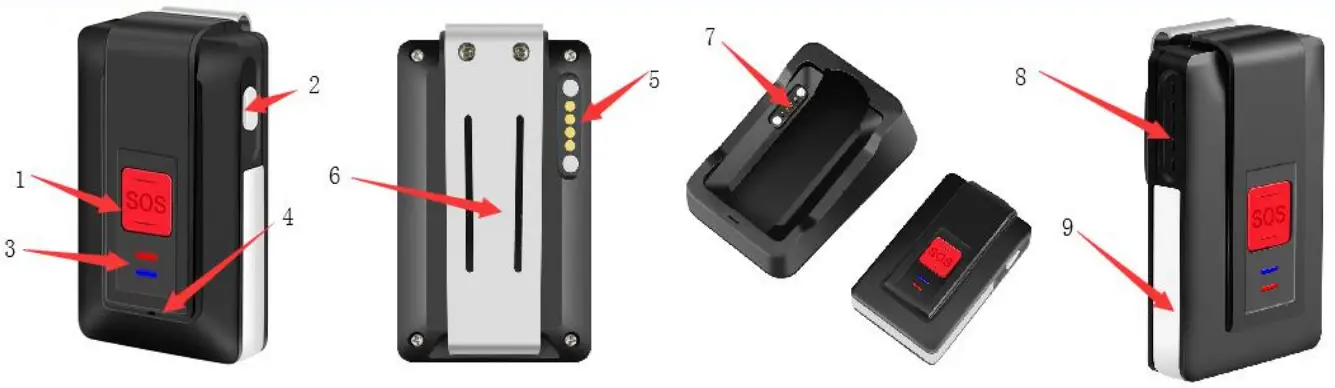
Getting to Know TL-403
Hardware Description
- SOS Button
- Power Button
- Indicator
- Microphone
- Charging Contact Point
- Belt Clip
- Docking Station Charging Contact Point
- Speaker
- Antenna Cover

Specification
| Content | Specs |
| 2G | Europe: 900/1800MHz |
| 3G HSPA Bands | America: B2/B5 Europe: B1/B8 Australia: B1/ B5 |
| 4G LTE CAT-1 Bands | Europe: B1/B3/B7/B8/B20 America: B2/B4/B12 Australia: B1/B3/B5/B7/B28 |
| Dimensions | 64.0 * 39.0 * 19.0 mm |
| Weight | 55g |
| Waterproof Level | IP67 |
| Color | Black/White |
| GPS Sensitivity | Tracking: -165dBm Re-acquisition: -160dBm Acquisition: -148dBm |
| GPS Accuracy | ≤10m |
| GPS Start time | Cold start: 32s Warm start: 30s Hot start: 1s |
| Battery Capacity | 1100mAH |
| SIM Card Type | Nano SIM |
| Firmware Upgrade Mode | OTA/USB |
| Maximum Standby Time | 7 Days |
| The Longest Working Time (5Min upload data once) | 72 Hours |
| Docking Station Charge Current | 500mA (Max) |
| Charging Time | 2-3 Hours |
| Operating Temperature | -20°C to +65°C |
| Working Humidity | 5% — 95% |
About Charging
Three Ways of Charging:
- Docking Station with Magnetic Contact Cable Charging,
- Single Magnetic Contact Cable Charging
- Docking Station with USB Cable Charging.
How to Use Your Device
Put the SIM Card
Open the device by screwdriver, put SIM card into the card port. Please tighten the device to make sure the waterproof function.
Notice: To avoid damaging the battery, please make sure the SIM card cover is closed before screwing back the device.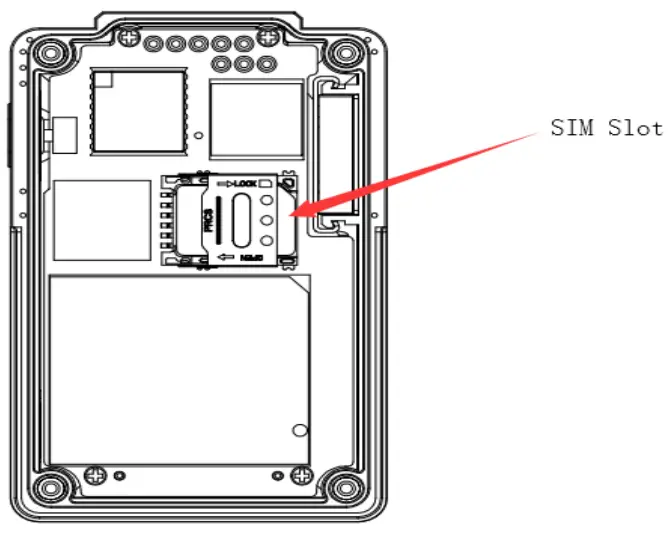
Switching the Device On and Off
- Long press the power button more than 2 seconds until the tracker vibrates, the yellow indicator flashes singly, the tracker is switched on.
- Long press the power button more than 3 seconds until the tracker vibrates and the two indicators flash at the same time, the tracker is switched off.

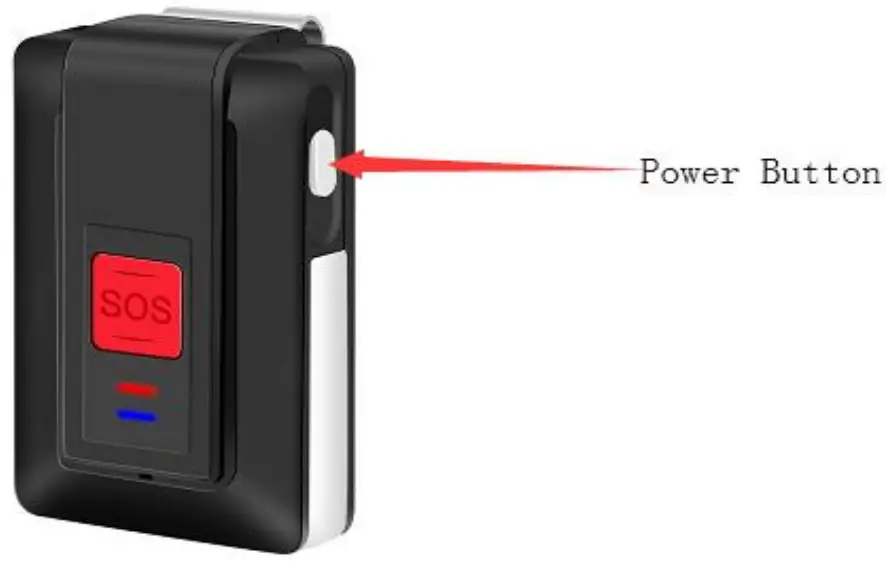
Notice: It is better to get the signal outdoor or near the window.
Set the Authorized Phone Numbers
You can set 8 authorized phone numbers at most.
Put the SIM card and switch on device, then send command 123456A1, authorized phone number via SMS, the device reply: 1 TEL OK! authorized phone number.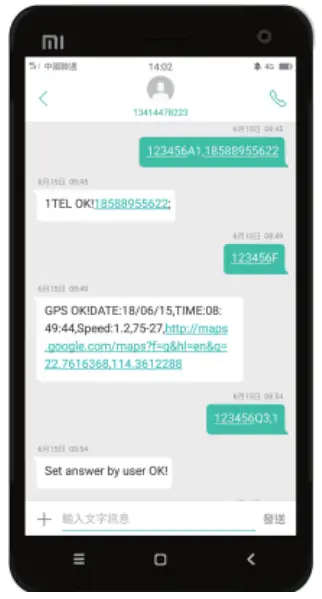
Notice: A1 means the first authorized phone number, A2 means the second one and A3 means the third one until A8.
All the letters of commands must be capital.
Make the SOS Emergency Call
Long press SOS button until the device vibrates. SOS alert will be triggered.
It will send SOS message to the first authorized phone number and make a 2 way call to A1-A8 authorized phone numbers.
Notice: If A1 misses the calling, the device will call to the next one until someone answers.
Help Me iA, Date: 18/05/29, Time: 05/34/26, 000.3,88-30, http://maps.google.com/map?f=q&hl=en&q=22.7614266.114.3614000
Set the Call Volume
Send command 123456Vxx via SMS to set the call volume.
Xx is the volume, and it should be less than 10. When the volume is successfully set, the device will reply “SET Volume OK!” via SMS
Make a Phone Call by the Device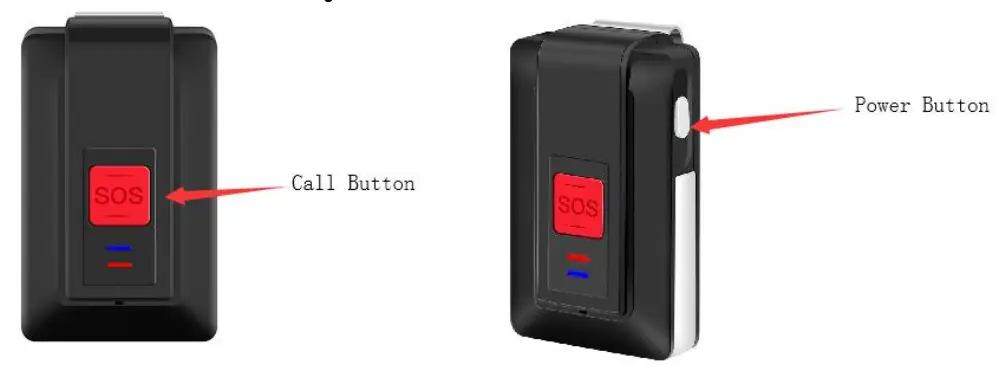
- Continuously press SOS button (Call Button) for 4 times, the device will dial the fourth authorized number.
- Continuously press SOS button (Call Button) for 5 times, the device will dial the fifth authorized number.
Notice:
- Press the SOS button (Call Button) for only one time when dialing, you can hang it up.
- When making the phone call, the device can only dial 2 phone numbers, the fourth and the fifth authorized numbers.
Receive the Phone Call
The default setting is to answer the phone automatically after the device rings 3 times. If you want to change it, send command 123456Q3,1 via SMS, then you can pick up or hang up the call by pressing the SOS button.
Set the Listen-in Function
Send command 123456U1 via SMS, the device answers automatically and enters the listening in mode when you make a call to the device.
Notice: The default setting is two-way audio (123456U0). Command of U1 and U0 cannot be used at the same time, you can send command 123456U1/123455U0 to switch it.
Use the Fall Down Alert
Send command 123456KLXXX to set threshold, XXX is 3 digital number from 000≤xxx<255. 000 means close the drop alarm function.
Suggestion: xxx it would be from 045 to 050.
For example, Send command 123456KL045 via SMS, when fall down alert is triggered, the device will send message to the first authorized phone number and give call to A1-A8.
Notice: If A1 misses the calling, the device will give call to the next one until someone answers. ice: The default setting is two-way audio (123456U0). Command of U1 and U0 cannot be used at the same time, you can send command 123456U1/123455U0 to switch it.
Use the Fall Down Alert
Send command 123456KLXXX to set threshold, XXX is 3 digital number from 000≤xxx<255. 000 means close the drop alarm function.
Suggestion: xxx it would be from 045 to 050.
For example, Send command 123456KL045 via SMS, when fall down alert is triggered, the device will send message to the first authorized phone number and give call to A1-A8.
Notice: If A1 misses the calling, the device will give call to the next one until someone answers.
1234596KL045
SET Low-g Threshold OK.
Mdown!DATE: 18/04/24,
TIME: 09:18:55,
Speed: 0.2,53-31,
http://maps.google.com/maps?f=q&gk=en&q=22.7613424.114.3614336
Get the Single Positioning
Send command 123456F via SMS. The device will search the GPS single to get the latest location. If it fails, the device will reply invalid information.
123456F
GPS OK DATE: 18/05/25, TIME 10:02:38, Speed: 0.9,42-27, http://maps,google.com/maps?f=q&hl=en&q=22.7614224.114.3614080
Set the Low Battery Alarm
Send command 123456N1,yy via SMS.
“yy” means the low battery volume. Such as 123456N1,30, it means when the battery is below 30%, the device will send message to the first authorized phone number.
Two ways of wearing
The device has two types of wearing accessories; it can both be hanged up by the belt clip and by the Lanyard.
Support GPS & WIFI Dual Positioning Functions
When the GPS signal is weak, the device can switch to the WIFI assist positioning mode, searching 3 open WIFI (with visible WIFI name) with the fullest signal nearest the device, sending 3 MAC addresses to the platform and APP to support positioning and make it more accurate, it’s especially very useful when using the tracking device indoor.
How to Use the Tracking Platform
Connect the Tracking Platform
Set APN, IP and port
Please confirm the SIM Card GPRS function is activated.
IP connection: Send command 123456CAPN,IP:Port via SMS.( APN is from your SIM card in the device and IP port is 112.124.14.58:9289)
Example: 123456CCMNET, 112.124.14.58:9289 (CMNET is APN.)
Send command 123456D to turn on GPRS.
About the Account
- Send command 123456B to get the IMEI number, then share the IMEI number with your contact.
- Ask for an account and password from your contact.
After the above two steps done, you can login the tracking platform or APP start to use it.
Login the GPS Tracking Platform
PC platform website: www.glotracking.com#mmm_
How to Download APP
iOS version: Search Go Top Track in App Store.
Android version: Search Top Track in Google Play
Notice: Under Development.
Notice: If tracker is connected the platform, all of the messages (such as the SOS emergency alert, fall down alert and the single positioning) will be sent to the platform and authorized phone numbers as well.
More Functions of the Device
Command list is attached as below and if you need help please contact the sales.
Reset the Device
Send command RESET! via SMS, the device will reset to the factory settings.
Notice: The device will restart after sending the message without further response.
Command List
| Function | Command | Example |
| Set Authorized Phone Number | 123456Ax,pho ne number,name | 123456A1,+86158000000,wang or 123456A1,+86158000000 x stands for the No. of the authorized phone number(1-8). |
| Delete Authorized Phone Number | 123456Ax,D | 123456A1,D x means the No. of the authorized phone number(1-8) |
| Ask for IMEI and Hardware and Software Version | 123456B | |
| Set APN, IP and Port | 123456CAPN, IP:Port | 123456C3gnet,119.122.101.91:9289 The user can obtain APN from local Operator, and if he or she wants to delete all, just needs to set 123456C,: |
| Turn on GPRS | 123456D | |
| Turn off GPRS | 123456E | |
| Single Positioning | 123456F | |
| Search User Setting | 123456G | |
| Modify SMS Password | 123456Hxxxx xx | 123456H999999 |
| Set GEO Fence Alarm | 123456Ix,y,z, aabbccddefffg ghhiijkkllmmn nepppqqrrssj
| 123456I1,1,1,51113525N009125670 E50241115N011011173E x stands for the GEO fence number(1-5) y=0 means turning off; y=1 means turning on. z=0 means walking in; z=1 means walking out. e=N stands for North; e=S stands for South. j=E stands for East; j=W stands for West. |
| Set Low Speed Alarm | 123456Jx,yyy | 123456J1,080 x=0 means turning off; x=1 means turning on. yyy stands for the low speed threshold(000-255) |
| Turn off Device | 123456K | |
| Set BMA Fall- down Alarm Threshold | 123456KLxxx | 123456KL045 xxx stands for the fall-down threshold(sensitivity) 000≤XXX<255,000 means turning off the fall-down alarm function. |
| Set Collision Alarm Threshold | 123456KHxxx | 123456KH045 xxx stands for the collision threshold(sensitivity) 000≤XXX<255,000 means turning off the collision alarm function. |
| Set Local Time Zone | 123456Lxyy:z z | 123456L+08:00 |
| Set Time Range of Continuous Positioning | 123456Mx,yy yz | 123456M1,005M x=0 means turning on; XX=1 means turning off. yyy means the set time(001-255) z=S means the second; z=M means the minute; |
| z=H means the hour; | ||
| Set GPRS Heart Beating Time | 123456M2,xxx | 123456M2,180 xxx stands for the second(060-600) |
| Set Low Battery Alarm | 123456Nx,yy | 123456N1,30 x=0 means turning off; x=1 means turning on. yy means low battery threshold(less than 45, more than the lowest threshold) |
| Set Fully-charged Alarm | 123456N2,x | 123456N2,1 x=0 means turning on; x=1 means turning off. |
| Set GPRS User Name and Password | 123456O&& &,@@@ | 123456Ointernet,internet123 &&& stands for the user name @@@ stands for the password |
| Set Movement Alarm | 123456Px,yyy | 123456P1,050 x=0 means turning off, x=1 means turning on yyy means deviation from the current coordinate distance (less than 250, unit:10m) When the tracker’s movement distance is over the set range, the device will send out the alarming message. |
| Set the Selection of Making SOS/BMA Call or Not | 123456Q1,x | x=0 means no phone call; x=1 means making phone call |
| Set the Selection of Identification of the Calling-in Number the Authorized Number or not | 123456Q2,x | 123456Q2,1 x=0 means it needs the authorization; x=1 means any call can be received without the authorization |
| Set the Selection of Phone Call’s Receiving or Hanging-up automatically in Two-way Audio Mode | 123456Q3,x | 123456Q3,1 x=0 means receiving the phone call automatically by device; x=1 means receiving or hanging up the phone call by user. |
| Set the Selection of Turning on or Tuning off the Identification Function of Voicemail | 123456Q4,x | 123456Q4,1 x=1 means turning on the voicemail identification. x=0 means turning off the voicemail identification. |
| Set the Selection of Matching the Password or not in SMS |
123456Q5,x | 123456Q5,1 x=1 means it needs to matching the SMS password x=0 means it doesn’t need to matching the SMS password |
| Set GPR Domain Name and Port | 123456Rhttp:/ /Domain;Port | 123456Rhttp://liaohong.vicp.net;600 0 Domain means Domain Name Port means Port No. |
| Delete GPRS Domain Name and Port | 123456R; | |
| Set Calling-in Two-way Audio Mode | 123456U0 | |
| Set Calling-in One-way Monitoring Mode | 123456U1 | |
| Set SOS/BMA One-way Silence Mode | 123456U2 | |
| Set SOS/BMA Two-way Audio Mode | 123456U3 | |
| Set Permission to Turing on GPS Power Source | 123456U4 | |
| Set Forbiddance to Turing on GPS Power Source | 123456U5 | |
| Set GPRS Traffic Saving Mode | 123456U6 | |
| Set GPRS a Fixed Time to Upload Data | 123456U7 | |
| Set GPS a Powerful Mode without Cutting off Power Source | 123456U8 | |
| Set GPS a Power Saving Mode | 123456U9 | |
| Set the Mode Selection of Calling-out | 123456V3x,nu mber | 123456V30,123456 x=0 means call out in two-way audio mode; x=1 means call out in one-way monitoring mode; |
| OTA Upgrade | 123456UVxxxx | 123456UV xxxx means the upgraded version, without suffix, it means upgrading to the newest version. |
| Set Voice Call Volume | 123456Vxx | 123456UV10 xx is the voice volume and is less than 10. |
| Set Device Name | 123456Z2,xxx | 123456Z2,John |
| Reset to the Original Version | RESET! | This Command can only be set via SMS or GPRS |
| Device Reset | RESET!1 | This Command can only be set via SMS or GPRS |
Cautions
- Keep the unit inside part dry when opening the back cover to put in the SIM card. Any liquid, i.e. rain, moisture, may destroy or damage the inside circuitry.
- Don’t put the unit in overheated or overcooled places.
- Handle carefully. Don’t vibrate or shake it violently.
- When the unit is touched with water, clean it with a piece of dry cloth.
Don’t clean in chemicals, detergent. - Don’t paint the unit, this may cause some foreign materials left in between the parts.
- Please don’t disassemble or refit the unit. The system should be installed by technical personnel.
- Please use the battery and charger provided by manufacturer. Using other batteries and chargers will cause unwanted situation.
- This product should be used in the normal condition of GPS signal and GSM signal. If not, it will result in the inability to locate (GPS) or locate data that cannot be transmitted (GSM).
- The product has position tracking and listen-in functions, the user must use it within the legal limit. If the user illegally use it (such as Invasion of privacy) that lead to damage of others’ rights and interests, the consequences are the user’s responsibility.
- This product is obtained by satellite to get the position information. Position data drift is normal, because it is limited by satellite positioning transmission characteristics.
Warranty One Year
This device complies with part 15 of the FCC Rules. Operation is subject to the following two conditions:
- This device may not cause harmful interference, and
- This device must accept any interference received, including interference that may cause undesired operation.
Any Changes or modifications not expressly approved by the party responsible for compliance could void the user’s authority to operate the equipment.
Note: This equipment has been tested and found to comply with the limits for a Class B digital device, pursuant to part 15 of the FCC Rules. These limits are designed to provide reasonable protection against harmful interference in a residential installation. This equipment generates uses and can radiate radio frequency energy and, if not installed and used in accordance with the instructions, may cause harmful interference to radio communications. However, there is no guarantee that interference will not occur in a particular installation. If this equipment does cause harmful interference to radio or television reception, which can be determined by turning the equipment off and on, the user is encouraged to try to correct the interference by one or more of the following measures:
- Reorient or relocate the receiving antenna.
- Increase the separation between the equipment and receiver.
- Connect the equipment into an outlet on a circuit different from that to which the receiver is connected.
- Consult the dealer or an experienced radio/TV technician for help
This equipment complies with FCC radiation exposure limits set forth for an uncontrolled environment. This equipment should be installed and operate with minimum distance 5mm between the radiator & your body
