![]()
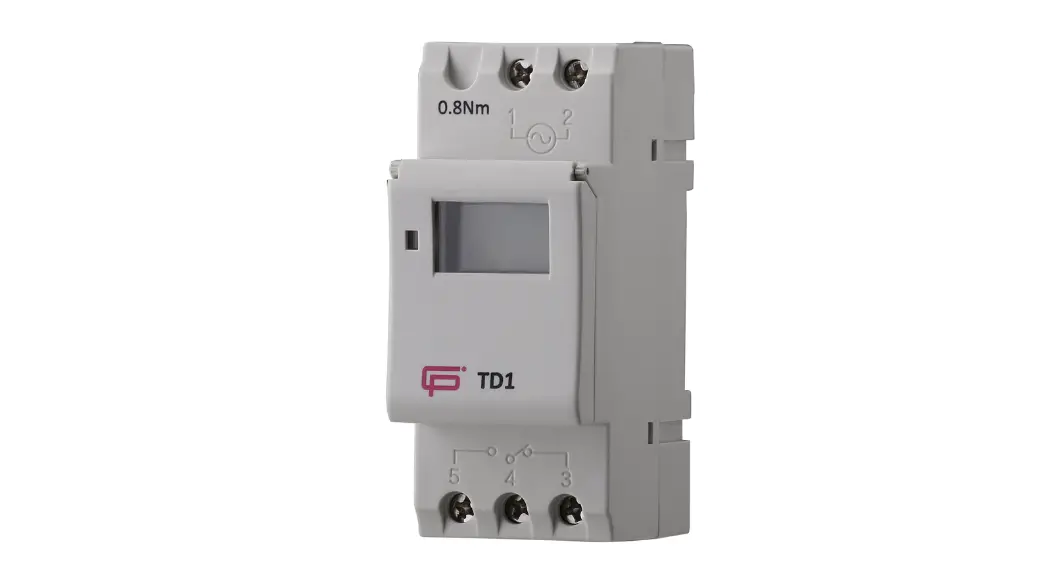
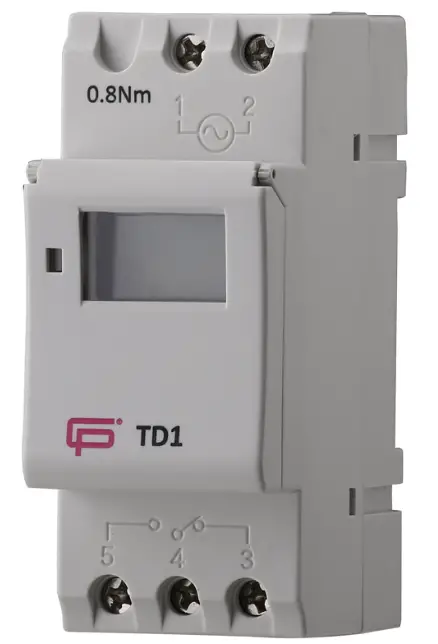
FuseBox TD1 Time Switch 7 Day Single Channel
Technical information
| Rating (A) | 16A/250V AC resistive load 4A/250V AC inductive load |
| Voltage(V) | 220-240V 50/60Hz |
| IP RATING | IP20 EN 60529 |
| Mounting | 35mm top hat din rail |
| Torque (switch terminals) | 0.8Nm |
| Maximum cable | 4mm² |
| Memory locations | 16 ON 16 OFF |
| Power consumption | 7.5VA |
| Display | LCD |
| Minimum setting | 1 minute* |
| Bell function | *30s (set ON and OFF time the same) |
| Contacts | 1 changeover contact (3,4,5) |
| Battery | Lithium battery, 150H reserve |
| Ambient temperature | -10~ +40℃ |
| Ambient humidity | 35~85%RH |
| Weight | 150g |
| Accuracy | ≤2sec/day(at25℃) |
| Complies with | EN 60730 |
| IMPORTANT | VOLTAGE FREE CONTACTS |
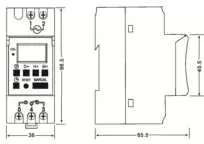
- Dimensions
 Connections (VOLTAGE FREE CONTACTS)
- Time Switch must be installed by a qualified electrician in accordance with the current IET Wiring Regulations BS 7671.
- Total load must not exceed the rating of the time switch or any additional limitation.
- For loads greater than above, we recommend an installation contactor is used, switched by the TD1 Time Switch.
 Connections (VOLTAGE FREE CONTACTS)
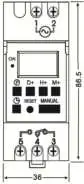
| BUTTON | FUNCTION |
| ON LED | Illuminates when switching program is on |
| Program button | |
| ¹ | Clock /Time button |
| D+ | Day |
| H+ | Hour |
| M+ | Minute |
| RESET | CAUTION This will DELETE ALL settings! |
| By pressing D+ and H+ for 3sec this will also delete all settings! | |
| MANUAL | Manual switch for the following settings: ON, ON AUTO, OFF, AUTO OFF |
Initial setup
- Connect SUPPLY to terminals 1 and 2 and LOAD to terminals 4 and 5. Torque connections to 0.8Nm. Loose connections cause fires!!!!
- Press and hold “RESET” button for 3seconds to initiate programing functions.
Setting the DAY and TIME
| Default setting is 24H mode if you wish to change to 12H press “¹”button for 5 sec, and LCD will display AM. If you want to change back to 24H mode press “¹”button 5 sec | ||
| Step | Key | Setting the DAY |
| 1 | Press and hold ¹ and press D+ TO CHANGE DAY | The day is displayed at the top of the LCD display |
| Setting the TIME | ||
| 2 | Press and hold ¹ and press H+ TO CHANGE HOUR | Setting the hour |
| 3 | Press and hold ¹ and press M+ TO CHANGE MINUTE | Setting the minutes |
| 4 | Press ¹ | To return to display |
Before you start programming the time clock select the function required:
PROGRAMMING, PULSE OR COUNTDOWN (Only 1 of the 3 options can be used simultaneously).
Programming
| Step | Key | Programming ON memory locations |
| 1 | Press | Setting 1 ON time (display 1 ON) |
| 2 | Press H+ or M+ | Set hours and minutes |
| 3 | Press D+ | DEFAULT IS EVERY DAY OF THE WEEK or you can select one of the following options by pressing the D+ button OPTIONS: MO-FR,MO-SA,SA SU,MO-WE,TH-SA,MO WE FR,TU TH SA |
| Step | Key | Programming OFF memory locations |
| 4 | Press | Setting 1 OFF time (display 1 OFF) |
| 5 | Press H+ or M+ | Set hours and minutes |
| 6 | Press D+ | DEFAULT IS EVERY DAY OF THE WEEK or you can select one of the following options by pressing the D+ button OPTIONS: MO-FR,MO-SA,SA SU,MO-WE,TH-SA,MO WE FR,TU TH SA |
| 7 | Repeat step 2-6 | Set 2-16 ON/OFF times |
| 8 | Press¹ | End |
| To review programmed time settings press | ||
FOR THE PROGRAMMED TIMES TO OPERATE AUTOMATICALLY THE TIMER MUST BE SET TO “AUTO OFF”
(ON LED is NOT ILLUMINATED)
IF YOU ARE WITHIN THE SWITCHING TIMES YOU SHOULD SET THE TIMER TO “AUTO ON”
(ON LED is ILLUMINATED)
MANUAL OVERRIDE Press “MANUAL” to turn ON, ON AUTO, OFF, AUTO OFF programmed times
Pulse (“P” displayed at left hand side of LCD)
| Step | Key | Programming ON memory location |
| 1 | Press and HOLD H+ and M+ | Enter pulse setting (“P” will display LHS) |
| 2 | Press¹ and H+ or M+ | Set pulse time range: 1sec to 59min 59sec |
| 3 | Press ¹ and MANUAL | To confirm pulse time range (“P” flashes) |
| 4 | Press P | Into setting 1 ON time (display 1 ON) |
| 5 | Press H+/M+ | Set hours and minutes |
| 6 | Press D+ | DEFAULT IS EVERY DAY OF THE WEEK or you can select one of the following options by pressing the D+ button OPTIONS: MO-FR,MO-SA,SA SU,MO-WE,TH-SA,MO WE FR,TU TH SA |
| 7 | Repeat steps 4-9 | Set 2-18 ON PULSE programs (OFF programs not required!) |
| 8 | Press ¹ | End (“P” will continue to flash when PULSE program is set) |
| 9 | Press and HOLD H+ and M+ | Exit PULSE function |
Countdown (“d” displays in bottom LHC)
This is a manual operation only initiated by pressing the “MANUAL” button on the TD1
| Step | Key | Programming COUNTDOWN function |
| 1 | Press and HOLD P and ¹ | Enter COUNTDOWN setting (“d” displays in bottom LHC) |
| 2 | Press¹ and H+ or M+ | Set COUNTDOWN time range: 1sec to 99min 59sec |
| 3 | Press MANUAL | Start COUNTDOWN |
| 4 | Press P | Return to start of COUNTDOWN |
| 5 | Press and HOLD P and ¹ | End COUNTDOWN (“d” no longer displayed in bottom LHC) |
PAUSE program settings
| Step | Key | Programming PAUSE function |
| 1 | Press ¹ and MANUAL for 3s | Permanent “AUTO OFF” state(“┌” flashes in bottom LHC) |
| 2 | Press ¹ and MANUAL for 3s | To restore “AUTO” settings |
| PAUSE function can only be accessed when “AUTO ON” or “AUTO OFF” is displayed on the LCD | ||
Auto time correction (“7d” displayed at left hand side of LCD)
| Step | Key | Programming ON memory location |
| 1 | Press P and MANUAL | Into count |
| 2 | Press D+ | Setting -30s to +30s |
| 3 | Press¹ | Confirm |
Testing
- On completion of the installation, it must be tested in accordance with the latest edition of the IET Wiring Regulations for Electrical Installations (BS 7671).
Environment
WASTE ELECTRICAL PRODUCTS SHOULD NOT BE DISPOSED OF IN HOUSEHOLD WASTE. CONTACT YOUR RETAILER OR LOCAL AUTHORITY FOR RECYCLING INFORMATION.
Fuse Box
www.fusebox.co.uk
After installation and testing of this product it is essential that the INSTRUCTION LEAFLET is available for reference


