![]()
BRITELINE
GEN2 1
Integrated version
INSTALLATION INSTRUCTIONS
![]()

PRODUCT OVERVIEW
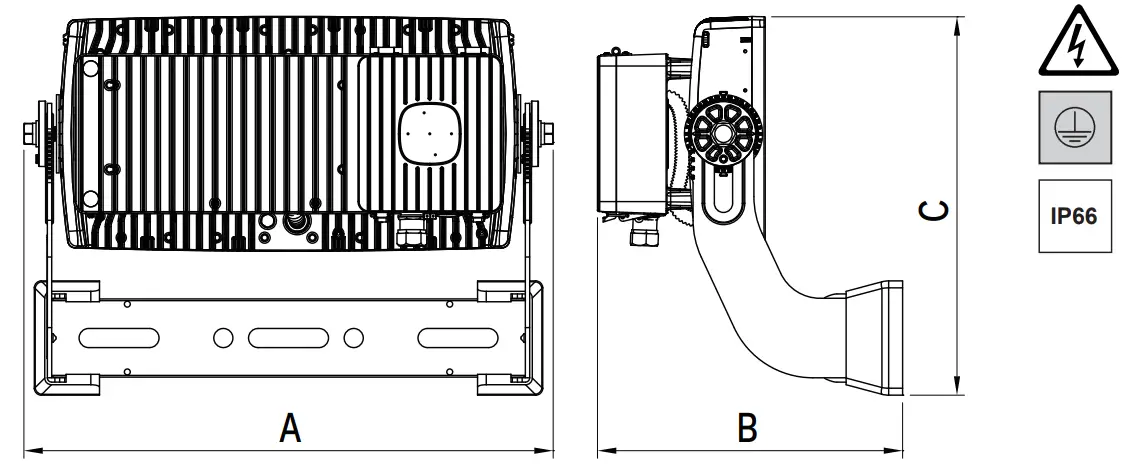
| BRITELINE GEN2 1 with Integrated driver | |||
| A | B | C | |
| 609mm 23.97in | 351mm 13.81in | 436mm 1716in | 21.5kg 47.391bs |
EPA – Effective Projected Area
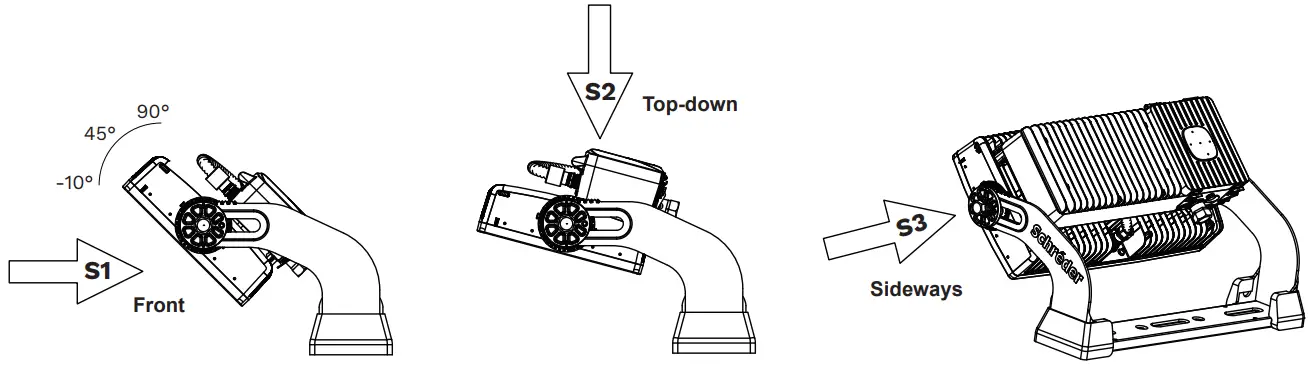
| a = 0° | a = 30° | a = 45° | a = 70° | a = 90° | |||||||||||
| S(m2) | CxS (m2) | EPA (ft2) | S S(m2) (m | CxS (m2) | EPA (ft2) | S(m S(m2) | CxS (m2) | EPA (ft2) | S(m2) | CxS (m2) | EPA (ft2) | S(m2) | CxS (m2) | EPA (ft2) | |
| Si | 0.0753 | 1 | 0.98 | 0.1333 | 0.16 | 2. | 0.1434 | 0.18 | 2. | 0.1405 | 0.17 | 2. | 0.1408 | 0.17 | 2. |
| S2 | 0.1408 | 0.17 | 2. | 0.1450 | 0.18 | 2. | 0.1435 | 18 | 2. | 0.1212 | 0.15 | 2. | 0.0753 | 0.1 | 0.98 |
| S3 | 0.0398 | 0.05 | 0.52 | 0.0398 | 0.05 | 0.52 | 0.0398 | 0.05 | 0.52 | 0.0398 | 0.05 | 0.52 | 0.0398 | 0.05 | 0.52 |
MOUNTING
 Screws and washers are not included inthe package!

Minimum screw requirement:
| Vibration standard | IEC 0.5g / ANSI 1.5g |
| Minimum fastener requirement | 1x M20 8.8 or A2-70 DIN9021 large plain washer |
| Tightening torques | 1xM20: 200 Nm 2xM20: 140 Nm |
Recommended to use anti-seizing agent (Tikal Tef-Gel®) !
 1xM20 with large plain washer
or- 2xM20 with large plain washer
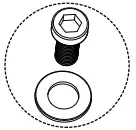 1xM20 with large plain washer
Mounting dimensions
| D1 | D2 | D3 | D4 | D5 |
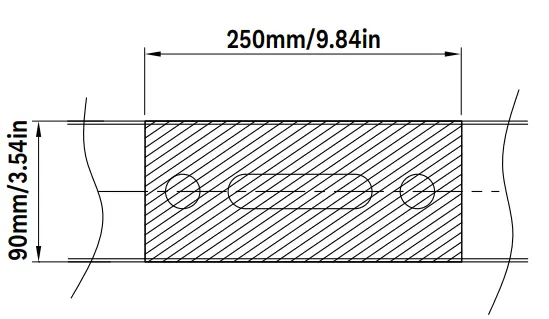
| min 250mm min 9.84in | 70mm 2.75in | 150mm 5.9in | 320mm 12,6in | 460mm 15.98in |
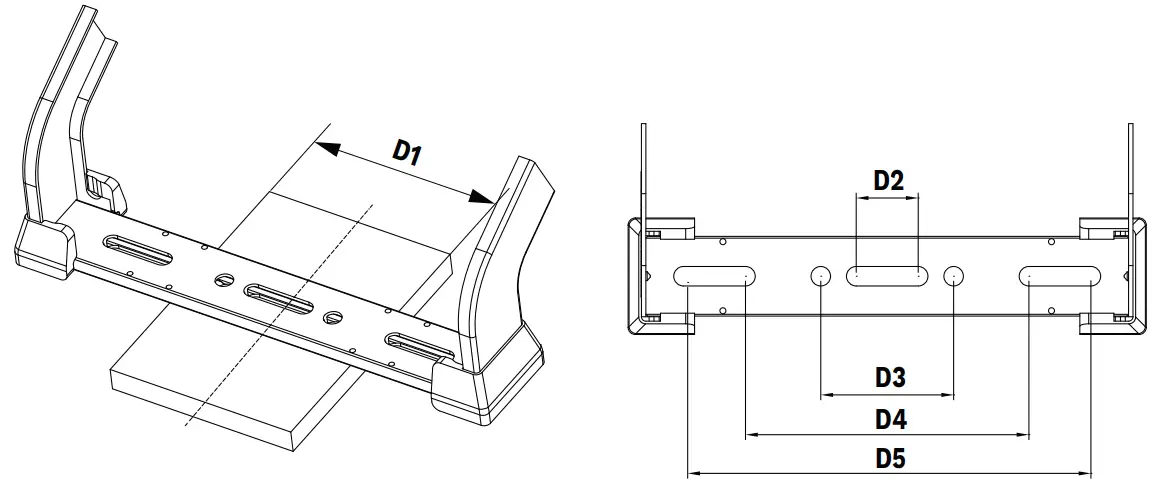
Fasteners are not included in the package!
Remark: the hatched area always need to be supported by a flat planar mounting surface as minimum.
Wider surface contact is recommended, smaller is not allowed!
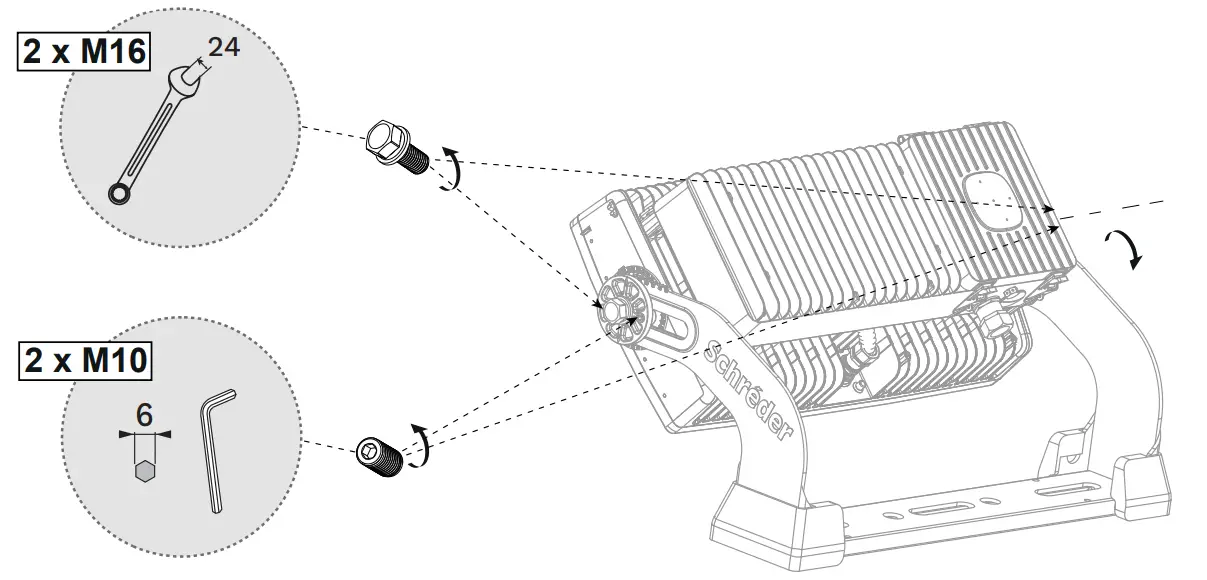
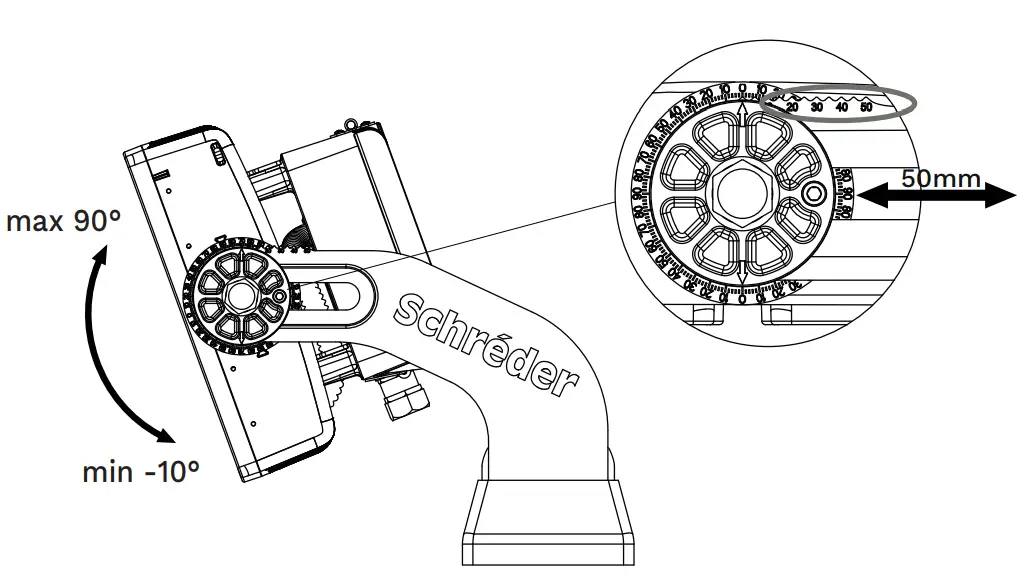
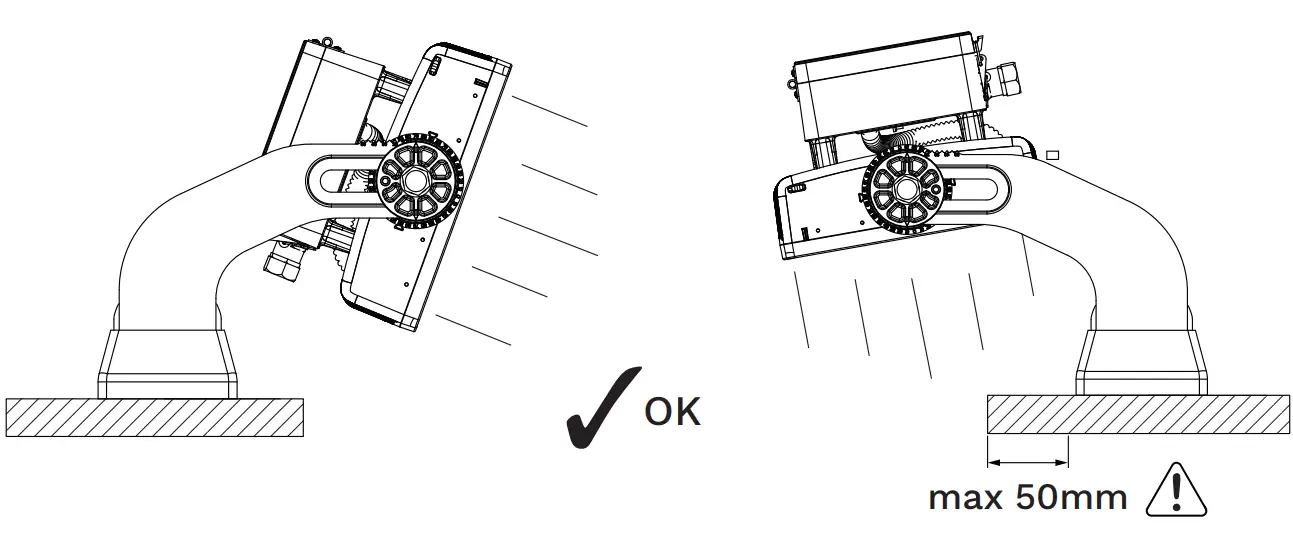
ANGLE ADJUSTMENT
- Loosen the clamp screws

- Adjust tilting angle

Separate scale for adjusting the distance of the optical block from the luminaire holder 50mm
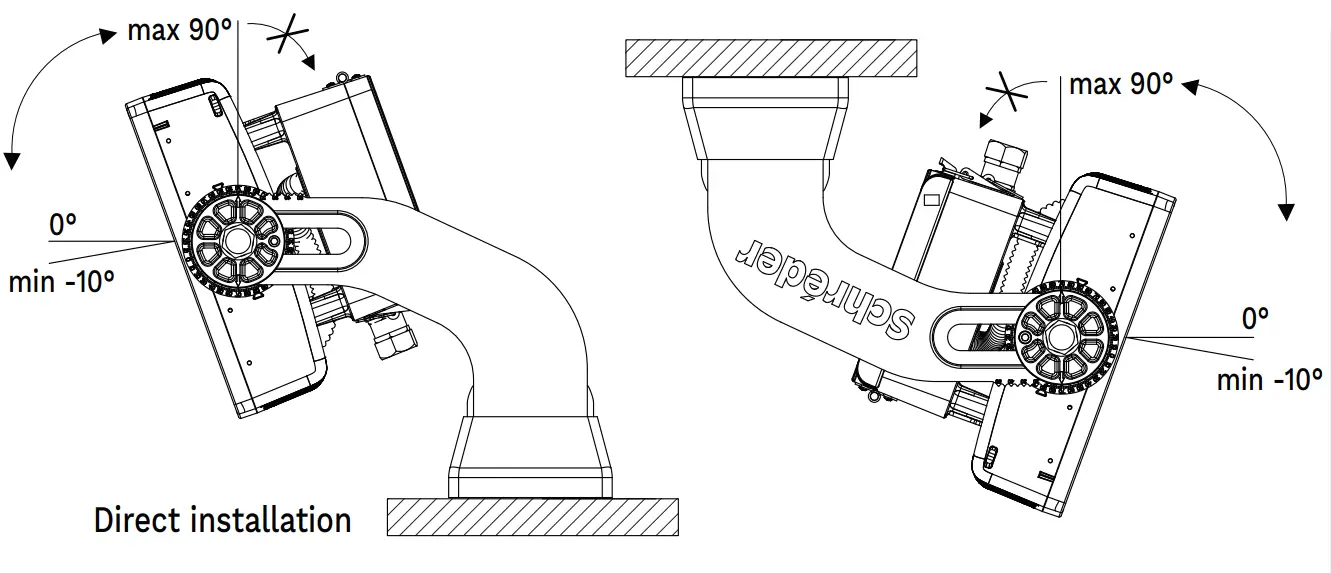
The swing arm inclination is adjustable in 10 degree increments relative to fork base. ALLOWED tilt angle is between -10° to 90°
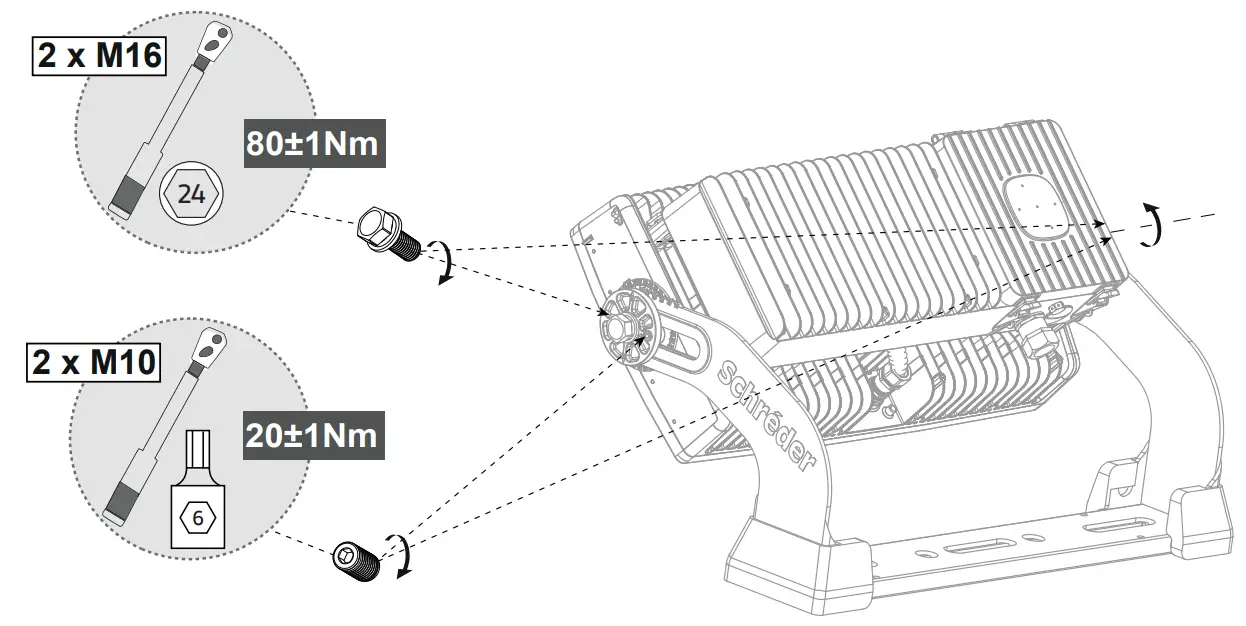
 - Tighten the clamp screws
 Do not exceed the proposed torque levels, as it may result in fraction of the parts!
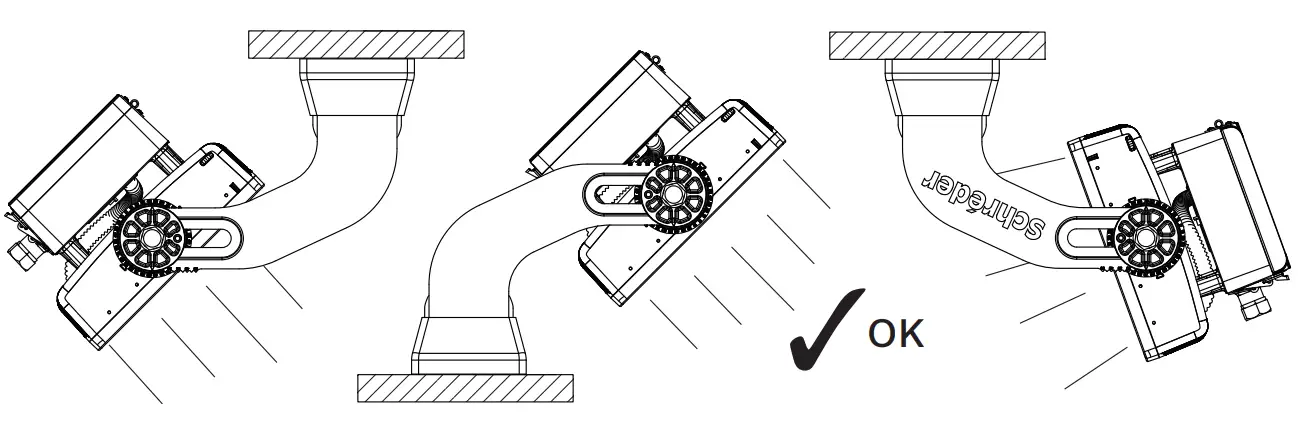
ALLOWED POSITIONING
Suspended installation
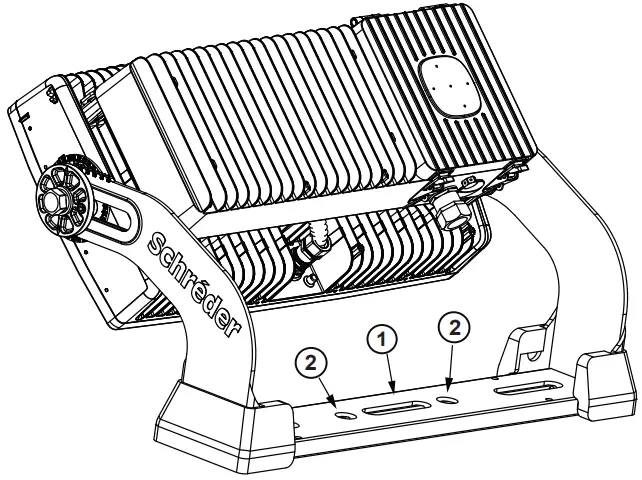
SAFETY CABLE
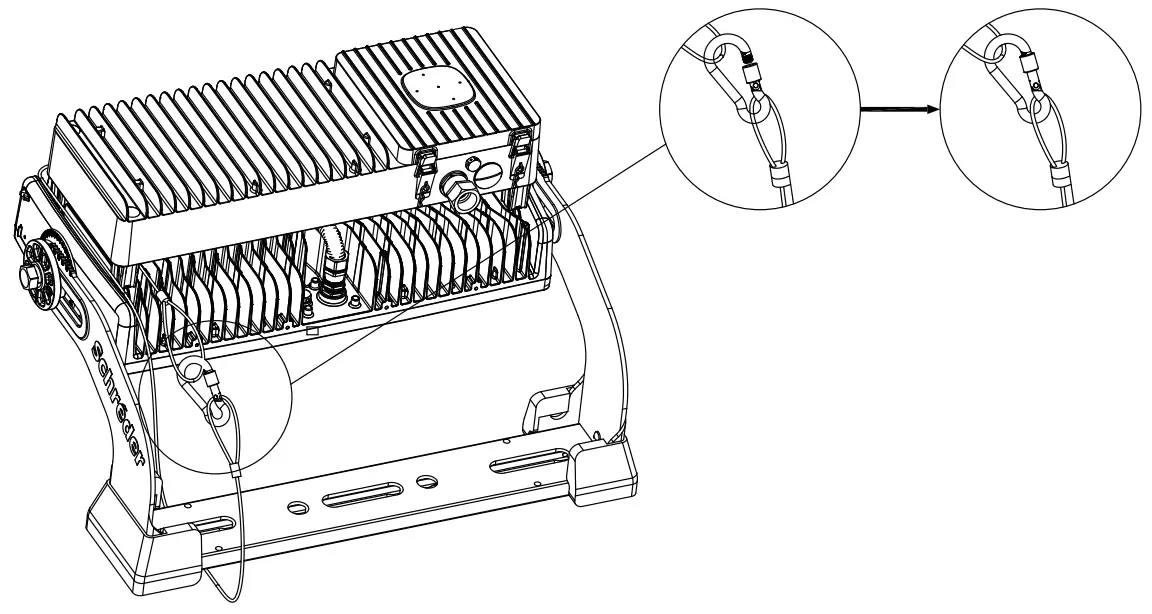
Steel safety cable should pass through the holes shown in the drawing in sequence.
Then connect the two ends with the lock buckle and tighten the lock bolt by hand.
For installations over 3m height: secondary safety system application is mandatory, which is appropriated for the luminaire load (e.g. safety cable)
 1500mm/59.05in safety cable is supplied with the luminaire.
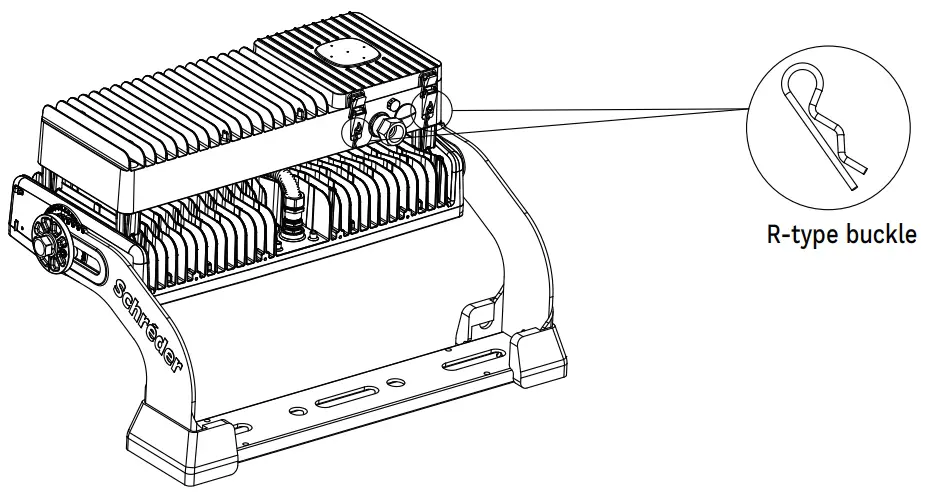
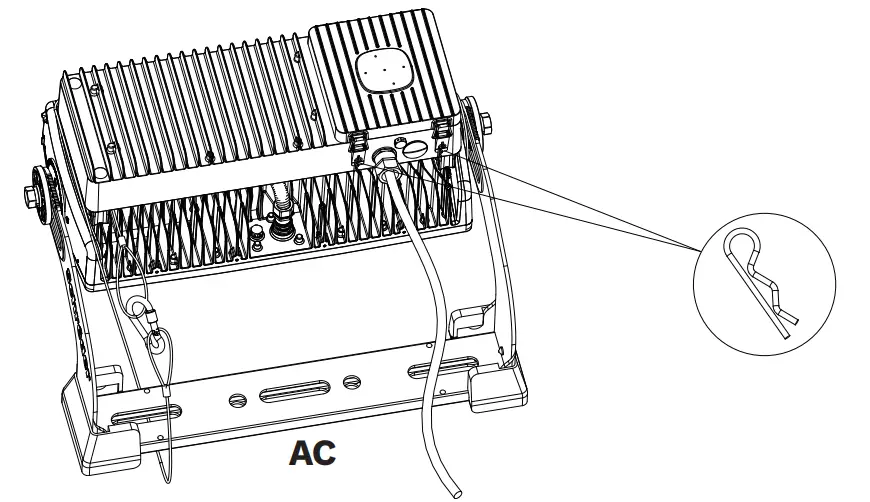
ELECTRICAL CONNECTION
- Remove the R-type buckles from the junction box

- Open junction box

- Make the electrical connection


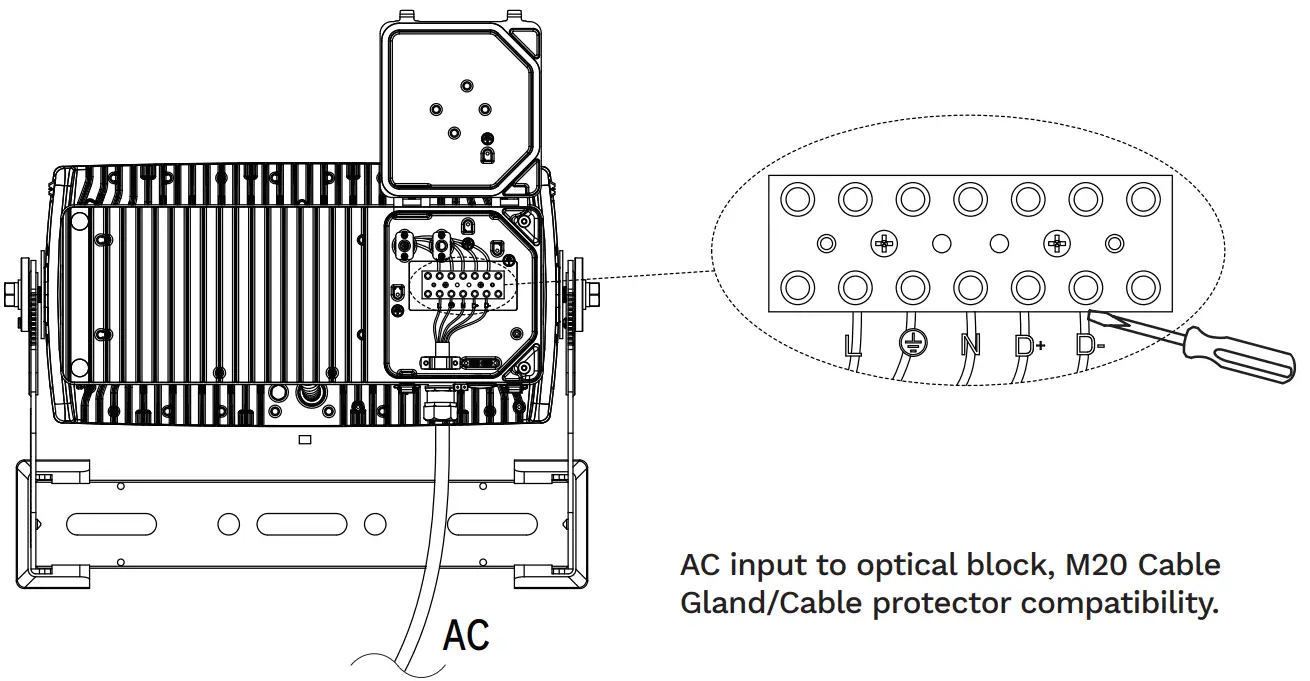
| 0-10V/DALI | |
| Connection ID | Cable ID |
| PE/ | Protective Earth |
| L | Line |
| N | Neutral |
| D+ | Dim + |
| D- | Dim – |
| DMX | |
| Connection ID | Cable ID |
| PE/ | Protective Earth |
| L | Line |
| N | Neutral |
| D+ | Data + |
| D- | Data – |
| Sh | Shield |
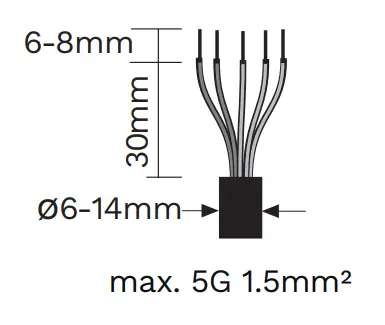
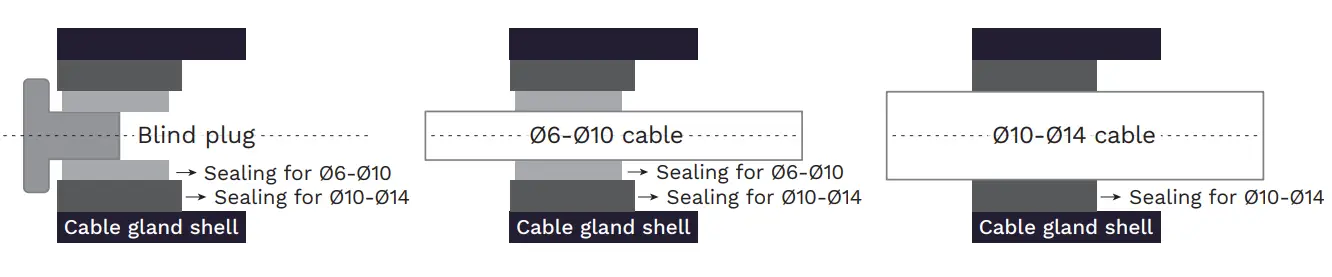
Cable gland parameters
When using a larger external diameter cable, the plug and the smaller inner diameter seal hasto be removed.
When using a smaller external diameter cable, simply remove the plug.
| Connection | Cable gland | Recommended cable type |
| AC INPUT | PG20(Ø6-Ø10/Ø10-Ø14) | H05RN-F , 5 x 1.0mm2 H07RN-F , 5 x 1.5mm2 |
5. Close the junction box
Close junction box cover, lock the buckle and insert R-type buckles back in
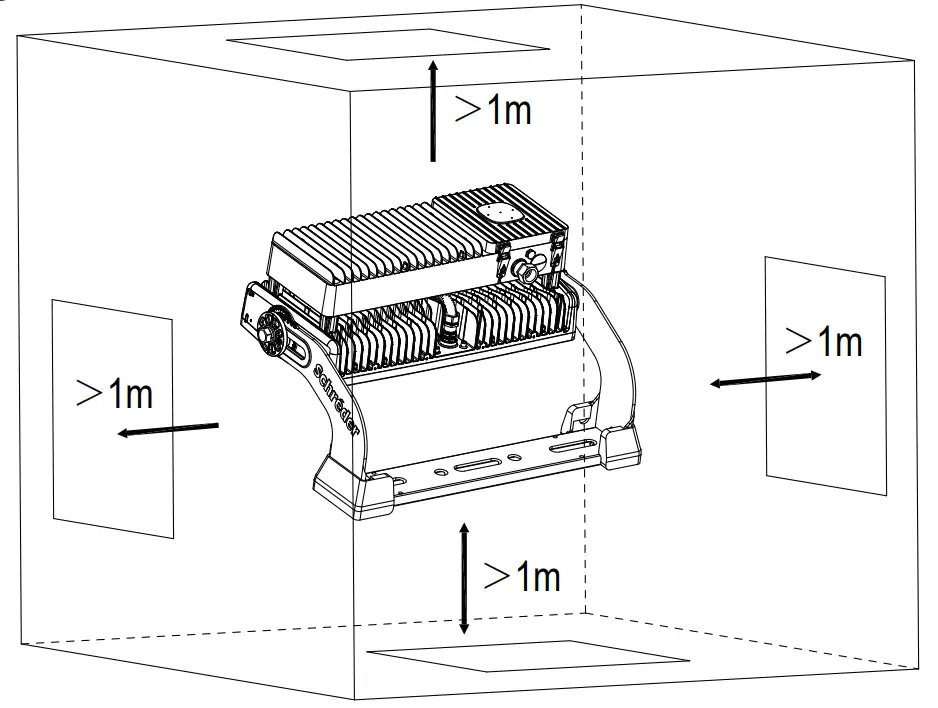
RECOMMENDATIONS
- Surrounding distances
 At least 1 meter distance should be kept from surrounding walls, floor, and ceiling for all types of mounting/inclination.
 - Maximum number of luminaires per MCB
Product Driver MCB B type B10 B13 B16 B20 B25 B32 B40 BRITELINE GEN2 1 ©220V EUM-680MG/BG 1 2 2 3 4 5 6 BRITELINE GEN2 1 ©480V ESM-680MG/BG 2 2 3 4 5 6 7 Product Driver MCB C type C10 13 16 C20 C25 C32 C40 BRITELINE GEN2 1 ©220V EUM-680MG/BG 1 2 3 3 4 5 6 BRITELINE GEN2 1 ©480V ESM-680MG/BG 3 4 5 7 9 11 14
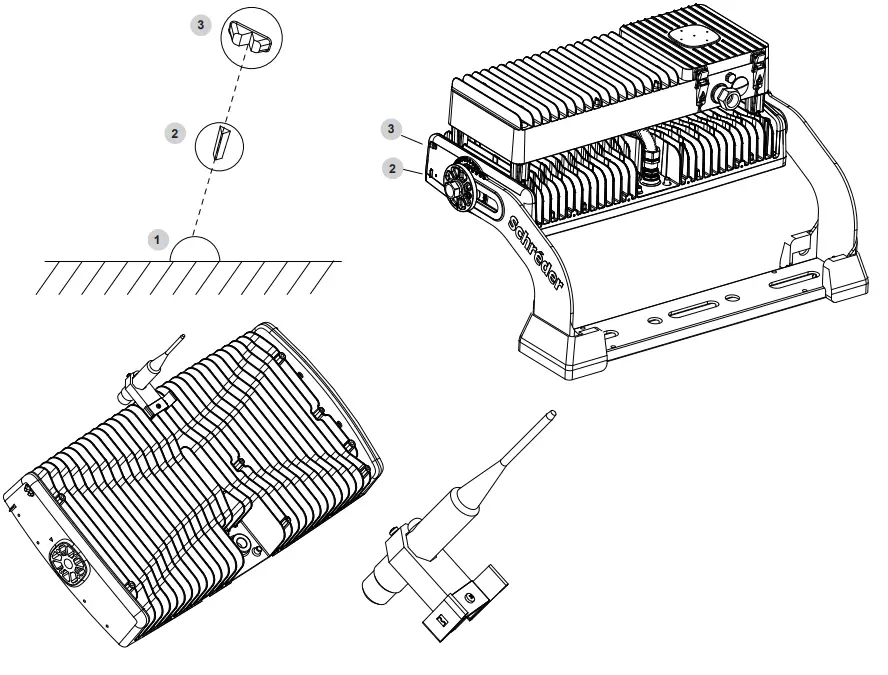
AIMING DEVICE
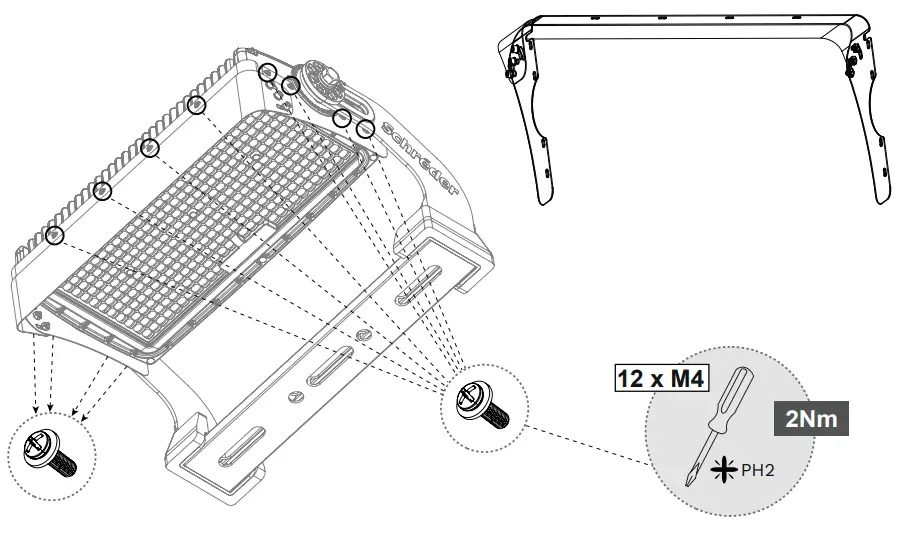
ACCESSORIES – HOOD
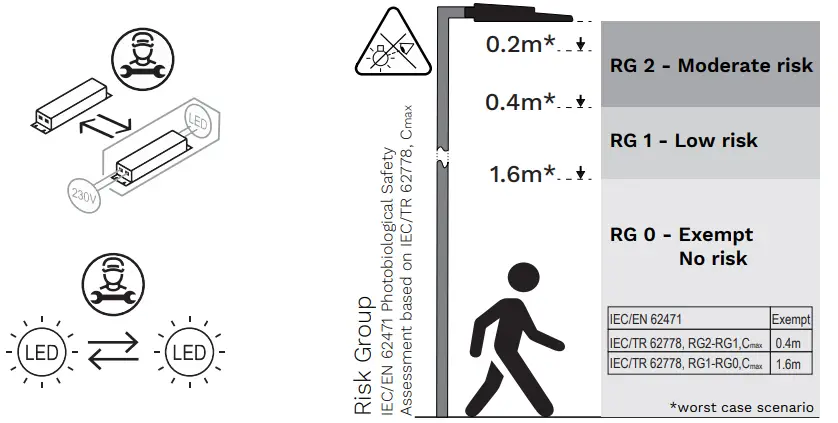
SAFETY INSTRUCTIONS
The light source contained in this luminaire shall only be replaced by the manufacturer or his service agent or a similar qualified person. Always switch off the power prior to installation, maintenance or repair activities.
RISK GROUP 2 – CAUTION! Hazardous optical radiation may be emitted from this product. Do not stare at the luminaire when operating as it may be harmful to the eyes. The luminaire should be positioned so that prolonged staring at the luminaire at a distance of less than 0.2m is not expected.
This product contains a light source of an energy efficiency class G or higher.
In case of PVC insulated mains cable, the installer MUST ensure that the WHOLE cable is protected against climatic conditions, especially UV rays and rain, by making sure that the cable is contained inside the luminaire and pole Y-connection: In case of amage to the wire, it has to be replaced only by the manufacturer, distributor or by an expert, to avoid risks.
 www.schreder.com
Rev B | 07-2023
Copyright © Schréder S.A. 2023 – Executive Publisher: Stéphane Halleux – B-4000 Liége, Rue de Mons 3 (Belgium) – The information, descriptions and illustrations herein are only of an indicative nature and subject to changes without notice.


