![]()
UL212/UL212-E
Bluetooth(BLE5.0) All-in-one Ultrasonic Fuel Level Sensor
User Manual
V1.3
Introduction
Copy Right
Copyright © 2020, All rights reserved. Reproduction, transfer, distribution or storage of parts or all of the contents in this document in any form without the prior written permission of Tenet is prohibited.
Contact Information
Website: www.tenet.com.hk
E-mail: [email protected]
Tel: +86-755-82591445
Document Changelog
| Version | 10S | Modification |
| 1.0 | 2020-3-21 | Updated: User Manual structure and re-edit |
| 1. | 2020-6-30 | Updated: Connectivity, Android/10S APP |
| 1. | 2020-7-28 | Added: update protocol 114, 116 |
Safety Information
![]() Do not use unknow power supply to connect the device to avoid burning or damage.
Do not use unknow power supply to connect the device to avoid burning or damage.![]() Do not disassemble the device. If the enclosure of the device is damaged, or the insulation of the wires is damaged, disconnect the power supply cables from the power supply source first.
Do not disassemble the device. If the enclosure of the device is damaged, or the insulation of the wires is damaged, disconnect the power supply cables from the power supply source first.![]() Do not connect UL212/UL212-E with vehicle battery directly before adding fuse
Do not connect UL212/UL212-E with vehicle battery directly before adding fuse
![]() The device can be installed or dismounted only by qualified personnel!
The device can be installed or dismounted only by qualified personnel!![]() Do not connect Green Cable to Power +, which will damage the device
Do not connect Green Cable to Power +, which will damage the device

This crossed-out wheelie bin symbol means that waste equipment should not be disposed of with your other household waste. The product must be taken to separate collection points at the product’s end-of-life.
Notations
LED: Light Emitting Diode
BLE: Bluetooth Low
DC: Direct Current
Product Information
About UL212/UL212-E
- New Edge Bluetooth BLE All-in-One Ultrasonic Fuel Level sensor will use non-contact technology to detect fuel level without drilling holes. With the ultrasonic reflection feature when cross liquid to air, it can read accurate fuel level height.
- PPS(Phenylenesulfide) Plastic Housing, Anti-Corrosion/Strong Acid, Anti-Fire, and support Max300~400 300~400
- Built-in BLE Bluetooth Module, Sync with RS232/RS485 & Analog output.
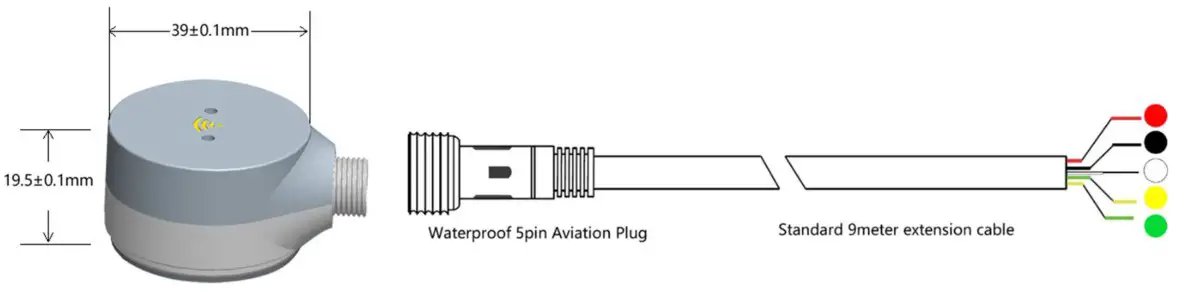
Device Overview
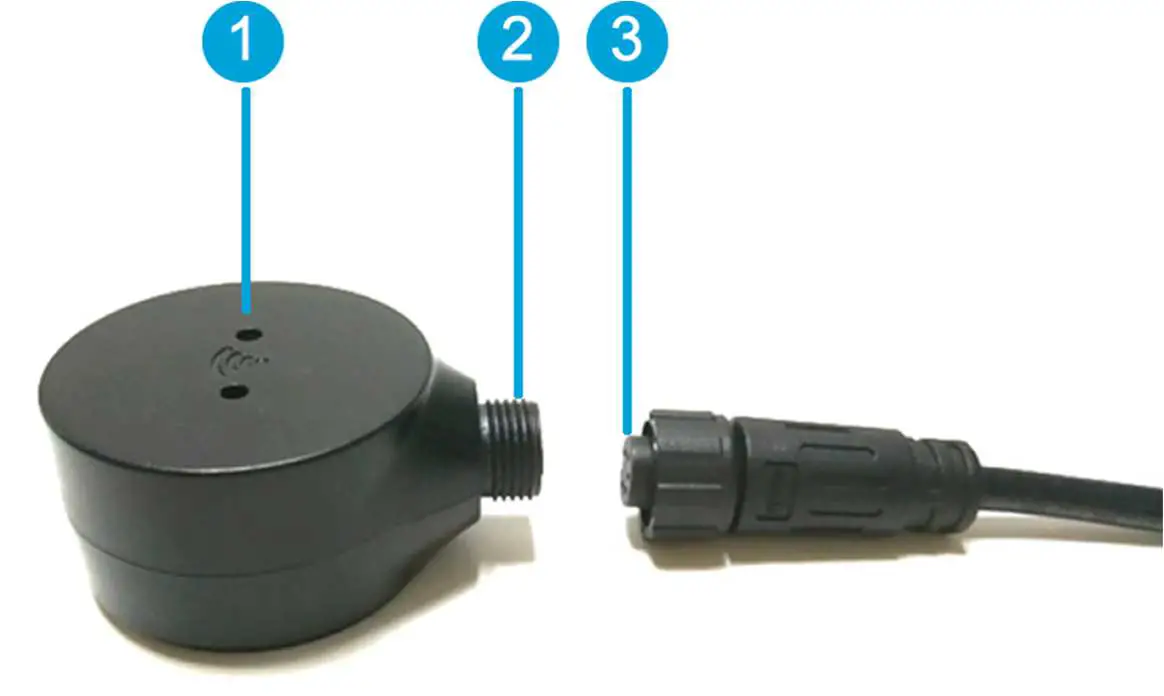 | 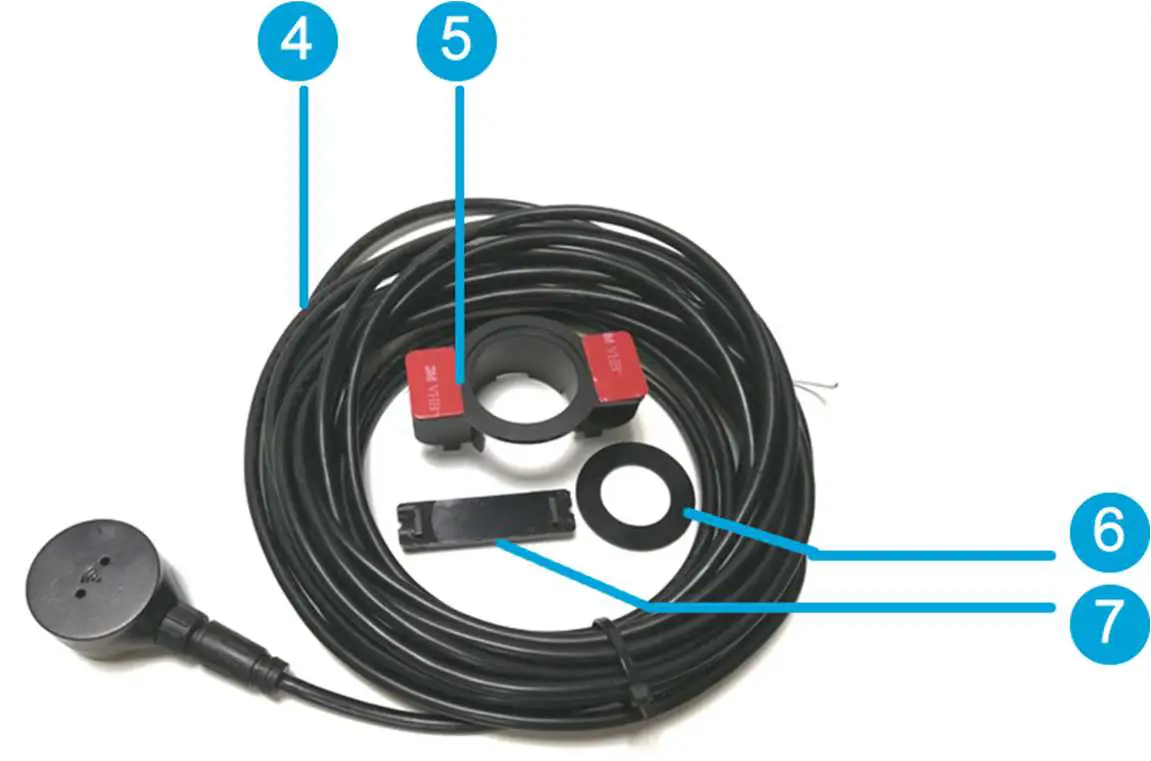 |
| 1. Indication LED 2. 5pin Male Plug 3. 5pin Waterproof Female Plug 4. Extension Cable | 3. Bracket Holder 4. Silicone Ring 5. Probe Back Support |
Size Information
Key Features
- No Drilling Holes in Tank, Easy Installation
- Support Any Liquid: Diesel, Gasoline, Water, etc.
- Support Any Material Tank: Metal/Aluminum/Stainless Steel /Fiber/Plastic
- Resolution: 0.1mm
- Accuracy: 99.5%
- Maximum Measuring Range: 250cm
- Lowest Detection Hight(Blind Area): 3cm
- Maximum Tank Thickness: 8~12mm
- Output Interface: BLE Bluetooth 5.0 +RS232(Default)/RS485+Analog(0~5V)
- Mobile App Configuration &Calibration
- Built-in AI Algorithm to filter abnormal signal
- IP68 waterproof
Package Contents

- UL212/UL212 All-in-one Probe x1
- Extension cable x1
- Bracket Holder x1
- Probe Back Support x1
- Silicone Ring x1
- Silicone Gel x2
- Adhesive Sticker x2
- Fuse x1
- Sand Paper x2
- Rubber Pad(used to protect some tank if needed) x4
- Plastic Strap kits x1
- 304L Stainless Steel Strap x2
Technical Information
Indication LED Patterns
| Pattern | Description |
| Red Flash | Detect no liquid or signal weak |
| Green Light On | Stable signal, best choice for installation |
| Yellow Light on | Upgrading/Configuring status |
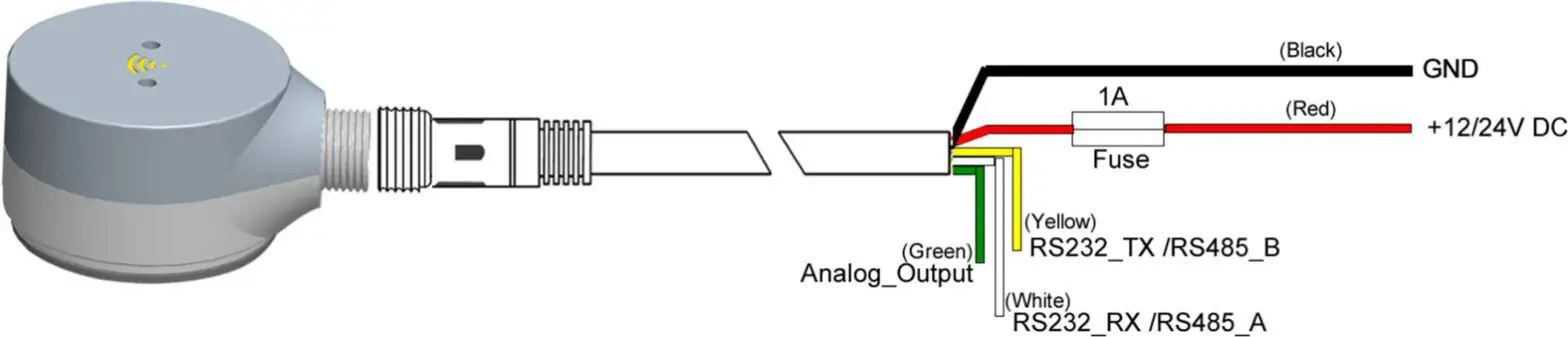
Cable Definition

| Cable | Definition | Remarks |
| Red | Power Supply 9~36V DC+ | Fuse must be used if connected to Power Battery |
| Black | Power GND, RS232/RS485 GND | |
| Yellow | RS232 TX (Default), or RS485B | Connect GPS/DVR RS232_RX |
| White | RS232 RX (Default), or RS485A | Connect GPS/DVR RS232_TX |
| Green | Analog Output 0~5V | Support in all protocols except Protocol 08 (In protocol 08, Green cable will keep output 0V when working normally, but will output 5V high-level trigger for 30 seconds when fuel theft alarm triggered) |
Physical Characteristics Size
| Size | Diameter: 39mm Height: 19.5mm |
| Net Weight | 0.6KG |
| Gross Weight | 1KG |
| Material | PPS ( Phenylenesulfide) |
| Plug | 5pin Gold-Coated Waterproof Plug |
Technical Characteristics
Environmental Specifications
| Temperature | Operating: -40~ 80 ℃ Storage: -40~ 80 ℃ |
| Relative Humidity | 0% ~95% Non-condensing |
Electrical Specifications
| Power Supply | 9~36V DC |
| Max Voltage | 42V DC |
| Power Consumption | 60mA @12V DC |
Installation Prepare:
Mobile APP Introduction
- Download LinkAndroid https://www.pgyer.com/TankOffline

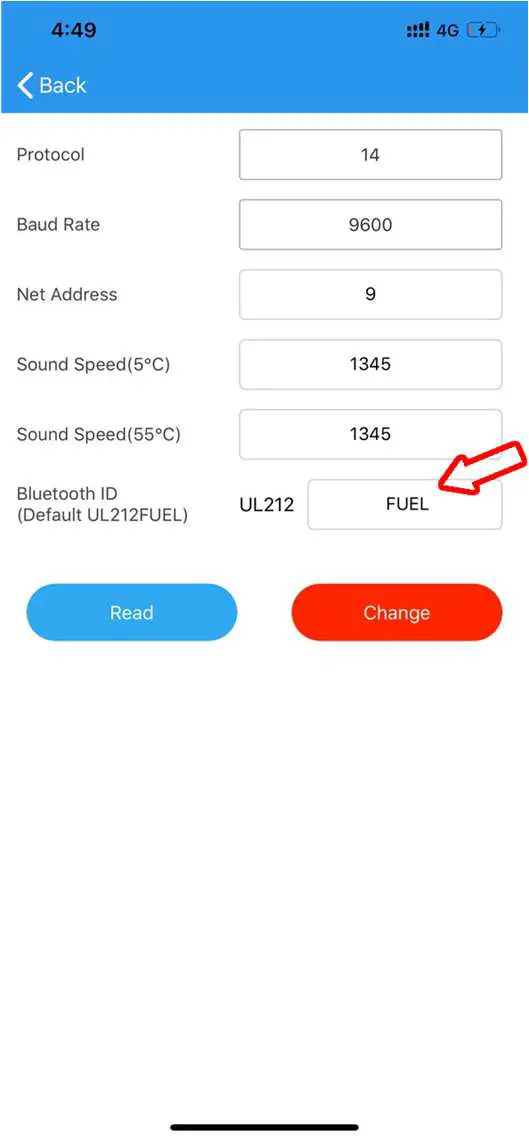
- Open APP and search Bluetooth ID: UL212 FUEL
- Change Device ID(with fixed head UL212, password: 52381


Indoor Test
Indoor Test Prepare
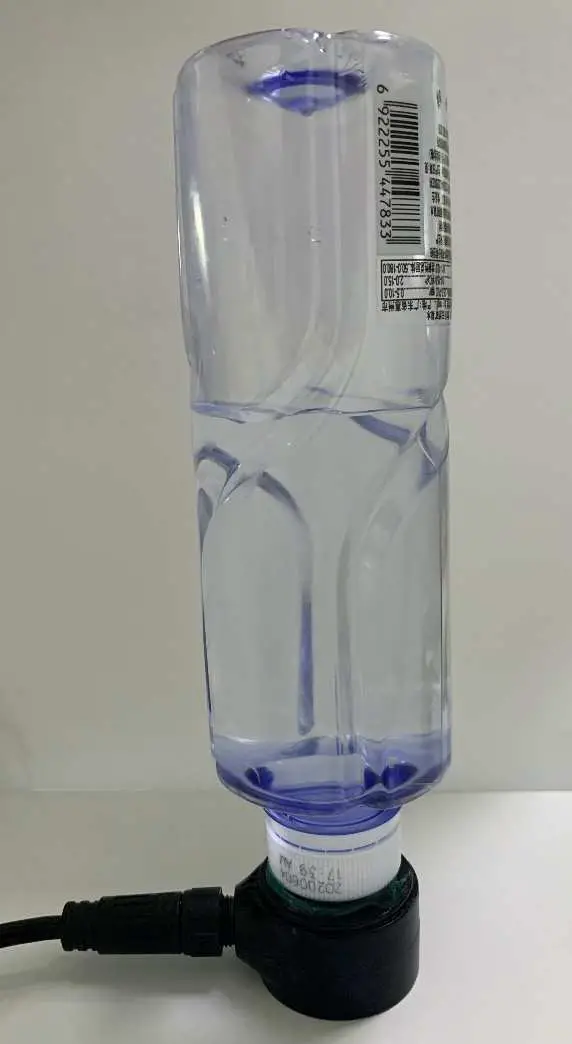
- Mineral Water Bottle (flat cap)
- UL212/UL212-E
- Android or iOS Phone
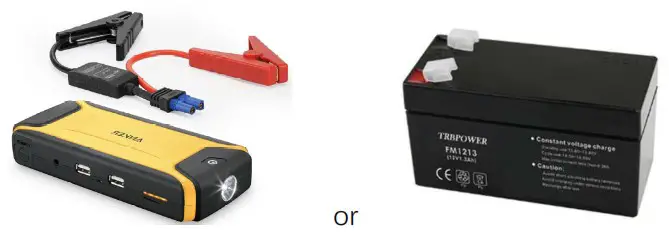
- 12/24V Power Bank/Jump Starter/Power Supply
Indoor Test Steps
- Power On UL212/UL212-E, RED LED flashes, and connect the UL212 Mobile APP via Bluetooth
- Search Bluetooth Device ID in APP and connect “UL212 Fuel”


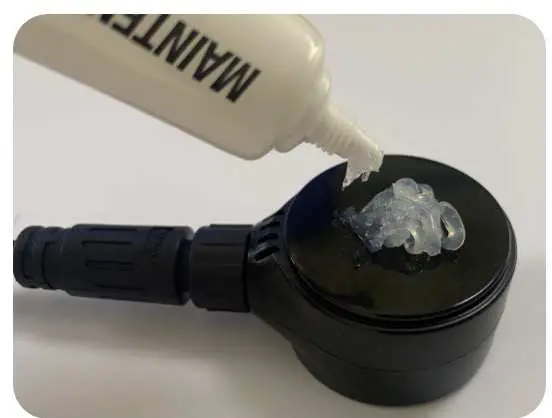
- Paste 1mm thickness Silicone Gel on top of the probe

- Make sure water bottle has more than 3cm height water inside, and put on the probe

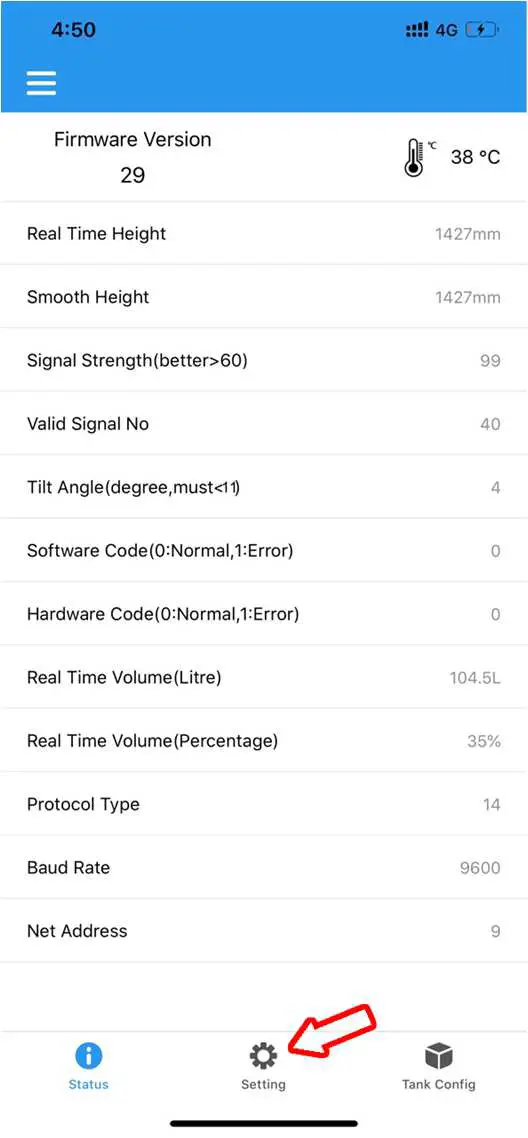
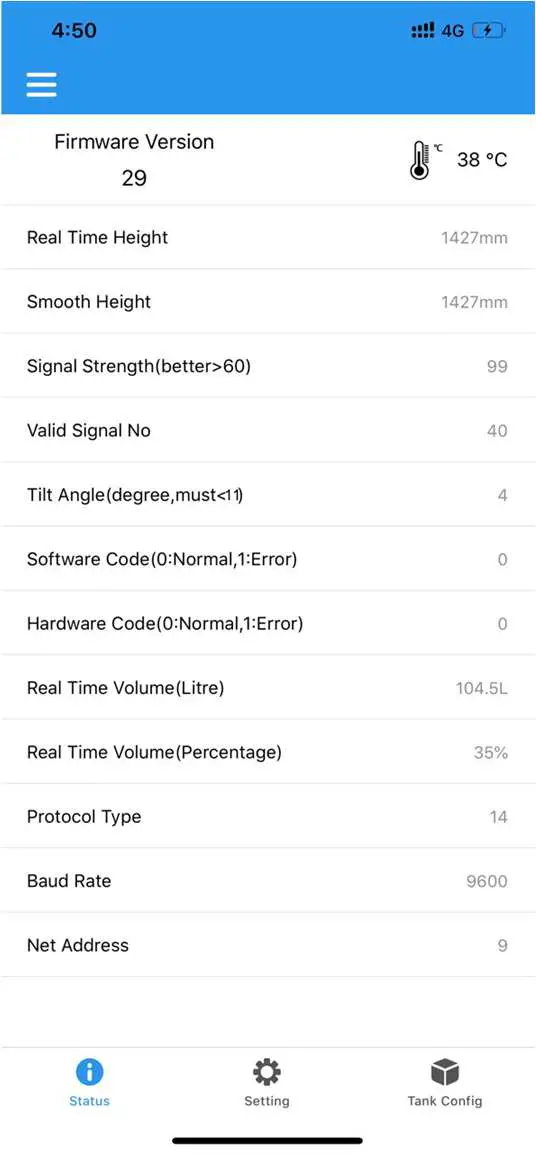
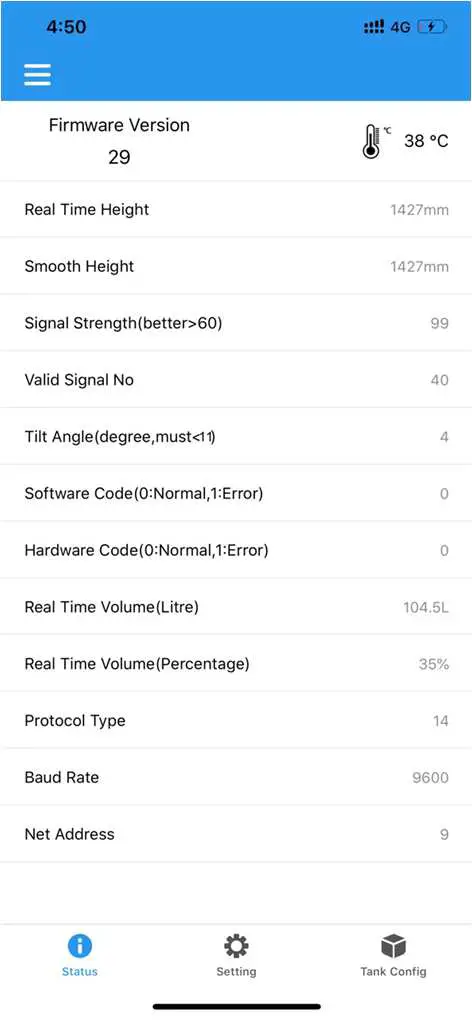
- Check Real Time Mobile APP data in Smart Phone.


Outdoor Installation
Outdoor Installation Prepare
- Make sure fuel tank has at least 1/2 fuel inside
- Make sure there is flat zone on the bottom of tank to fix probe
- UL212/UL212-E
- Android or iOS Phone
- 12/24V Power Bank/Jump Starter or Portable Battery

- Slot Type Screw Driver


Key Steps for Outdoor Fuel Tank Installation

Quick Guide for Outdoor Fuel Tank Installation
Connect Mobile APP “UL212 FUEL”
- Power On UL212/UL212-E, RED LED flashes, and connect the UL212 Mobile APP via Bluetooth
- Search Bluetooth Device ID in APP and connect “UL212 FUEL”

Clean the target zone around the middle of tank bottom
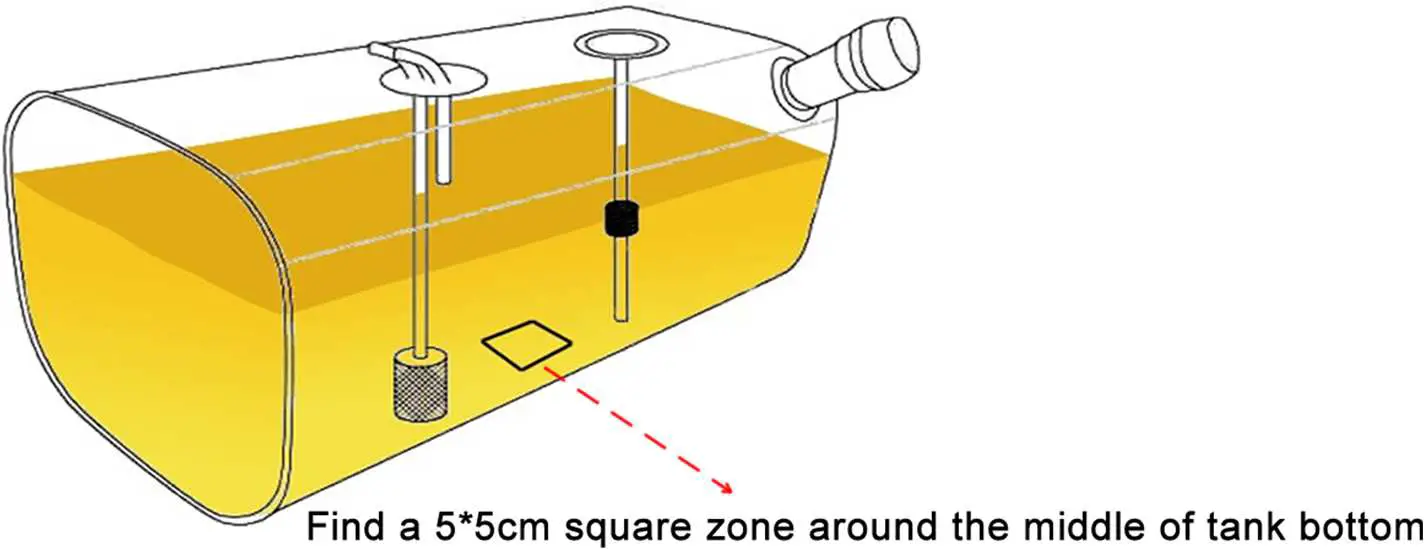
- Find a 5*5cm zone around the middle of tank bottom
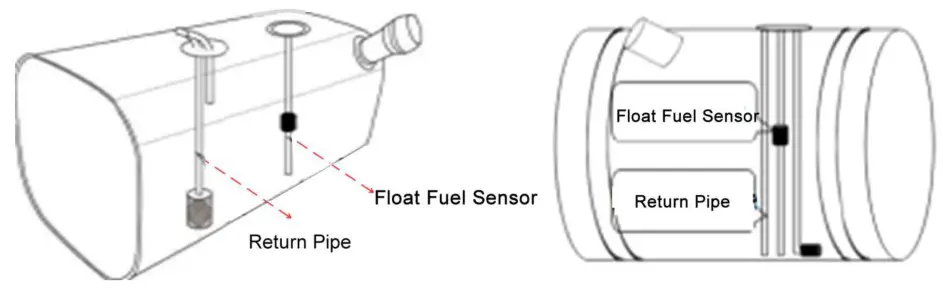
- Please make sure get rid of the original tank float sensor and return pipe

- Metal Tank with painting needs sand paper to polish before fix probe
- Aluminum, Stainless Steel or Fiber tank will not need sand paper
Find Target Installation Position:
- Paste 2~3mm thickness Silicone Gel on top of the probe.
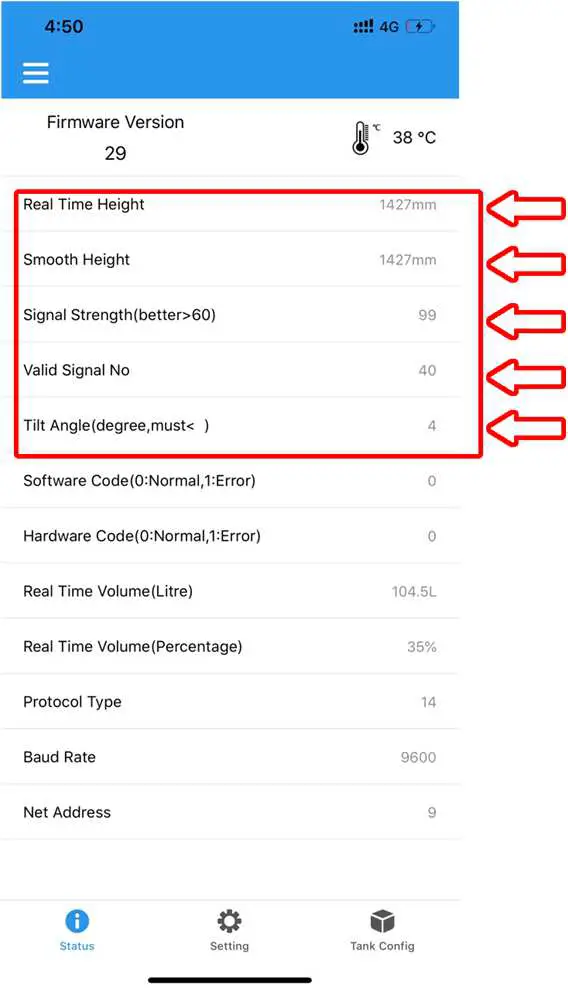
- Put the probe to the target zone of tank bottom in step 6.3.2 and check the real time Mobile APP reading, and make sure these conditions below are approved to confirm the installation position:
A. Real Time & Smooth Value are similar
B. Signal Strength more than 60 or stable
C. Valid Signal Quantity is stable
D. Tilt Angle is less than 11 Degrees
- Mark the position to be target installation position after approve the Mobile APP data show
Fix the probe to the bottom of tank
- Remove the probe in step 6.3.3, and clean the installation zone again to be AS DRY AS POSSIBLE.
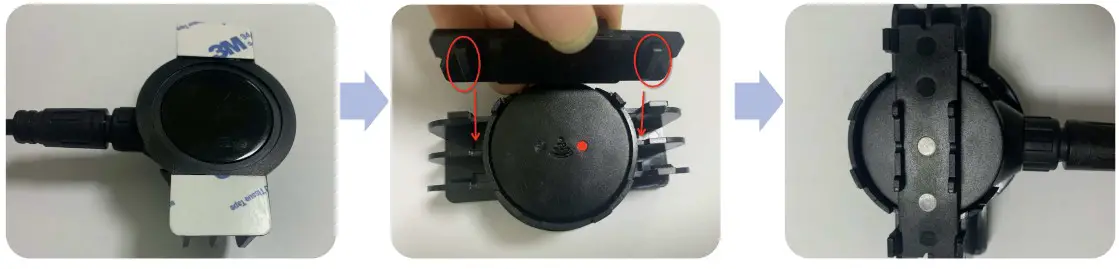
- Put the probe inside the Bracket Holder and use Back Support to fix the probe(Aim at the Bayonet)

- Stick the Silicone Ring exactly on top of the probe. Inject the Silicone Gel inside the ring and Overflow a little bit to make sure it’s full

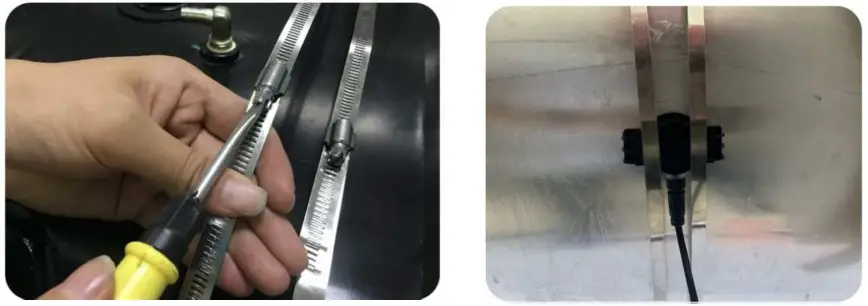
- Stick the Bracket Holder on the target installation position and use Twon Stainless Steel Strap to fix the Bracket & Probe

- Verify the installation
After fixing the screw, use Mobile APP to check again the data to be sure the same or similar in step 6.3.3 to complete the installation.

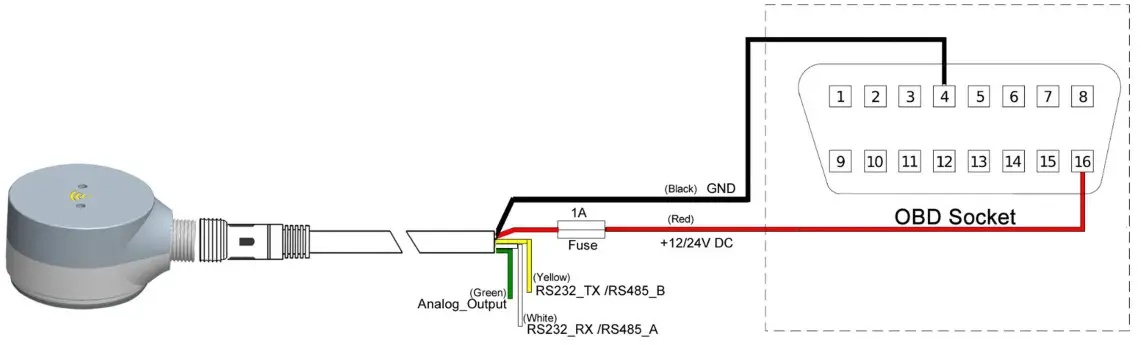
Wiring Diagram
Power Input: 9~36V DC
![]() It is Mandatory to use a an external Automotive1 A Fuse
It is Mandatory to use a an external Automotive1 A Fuse
- Recommended

- Optional for LCV Vehicles

FCC Warning:
This equipment has been tested and found to comply with the limits for a Class B digital device, pursuant to part 15 of the FCC Rules. These limits are designed to provide reasonable protection against harmful interference in a residential installation. This equipment generates, uses and can radiate radio frequency energy and, if not installed and used in accordance with the instructions, may cause harmful interference to radio communications. However, there is no guarantee that interference will not occur in a particular installation. If this equipment does cause harmful interference to radio or television reception, which can be determined by turning the equipment off and on, the user is encouraged to try to correct the interference by one or more of the following measures:
- Reorient or relocate the receiving antenna.
- Increase the separation between the equipment and receiver.
- Connect the equipment into an outlet on a circuit different from that to which the receiver is connected.
- Consult the dealer or an experienced radio/TV technician for help.
Caution: Any changes or modifications to this device not explicitly approved by the manufacturer could void your authority to operate this equipment.
This device complies with part 15 of the FCC Rules. Operation is subject to the following two conditions:
- This device may not cause harmful interference, and
- this device must accept any interference received, including interference that may cause undesired operation.
The device has been evaluated to meet general RF exposure requirements. The device can be used in portable exposure conditions without restriction.
 All-in-one Ultrasonic Fuel Level Sensor User Guide")


