BenQ QS02 Android TV Dongle
Copyright
© 2023 BenQ Corporation. All rights reserved. No part of this publication may be reproduced, transmitted, transcribed, stored in a retrieval system or translated into any language or computer language, in any form or by any means, electronic, mechanical, magnetic, optical, chemical, manual or otherwise, without the prior written permission of BenQ Corporation. All other logos, products, or company names mentioned in this document may be the registered trademarks or copyrights of their respective companies, and are used for informational purposes only. Google, YouTube and Android TV are trademarks of Google LLC.
Disclaimer
BenQ Corporation makes no representations or warranties, either expressed or implied, with respect to the contents hereof and specifically disclaims any warranties, merchantability or fitness for any particular purpose. Further, BenQ Corporation reserves the right to revise this publication and to make changes from time to time in the contents hereof without obligation of BenQ Corporation to notify any person of such revision or changes.
Screen images and icons in this manual are simulated for illustrative purposes only. Actual displays may vary. BenQ is not responsible for the content of the websites or of similar resources, which are maintained and controlled by third parties, that may be linked from this product. Providing links to those websites or to similar resources does not mean that BenQ makes any warranty or representation to their content by expression or by implication.
Any third party content or service preinstalled in this product is provided “as is”. BenQ does not, by expression or by implication, make any warrant to the content or to the services provided by third parties. BenQ does not warrant or guarantee that the content or services provided by third parties are accurate, effective, most up-to-date, legal, or complete. Under no circumstances shall BenQ be liable for the content or services provided by third parties including their negligence.
Services provided by third parties may be terminated temporarily or permanently. BenQ does not warrant or guarantee that the content or services provided by third parties are in good condition at any time, and is not liable for the termination of the said content and services.
In addition, BenQ is not involved in any transactions you conduct in the websites or similar resources maintained by third parties. You should contact the content or service providers for any questions, concerns, or disputes.
This document aims to provide the most updated and accurate information to customers, and thus all contents may be modified from time to time without prior notice. Please visit Support.BenQ.com for the latest version of this document.
It is the sole responsibility of the user if problems (such as data loss and system failure) occurred due to non-factory installed software, parts, and/ or non-original accessories.
Introduction
The QS02 dongle may be bundled with your projector or sold separately. Available package contents and connection procedures vary by the way the product is provided.
Package contents
- QS02 dongle

- Remote control for QS02 dongle (Model name: C008)*

- Quick start guide & Regulatory statements

- Warranty card (Varies by country/region)


(Provided when the product is sold separately. Availability may vary by country/region.)
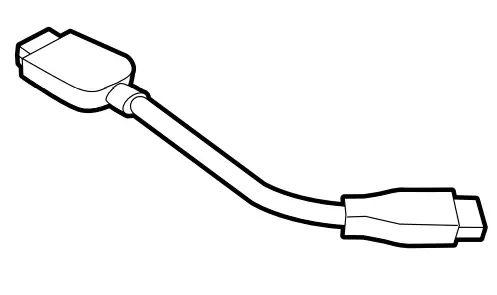
- HDMI adapter (For video input)

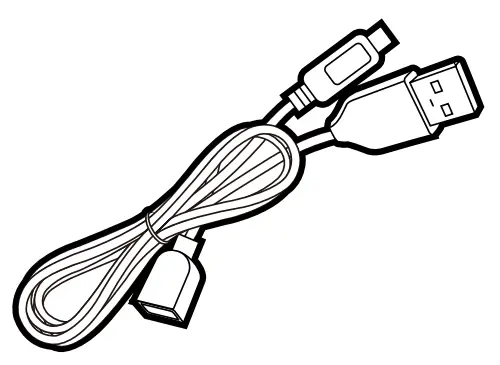
- USB splitter cable (For power supply)

Note
- *: Availability may vary by country/region.
- Available accessories and the pictures shown here may differ from the actual contents and the product supplied for your region.
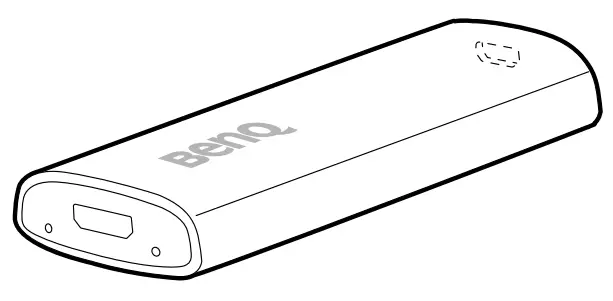
Overview
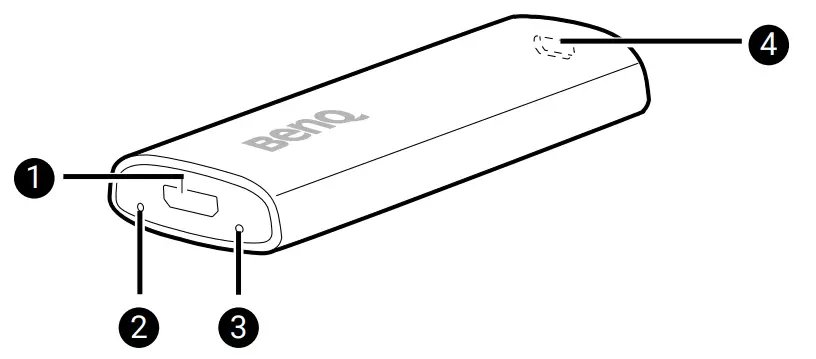
QS02 dongle
| No. | Item | Descriptions |
| 1 | Micro USB port | Connects to the projector’s USB port (or a standard adapter head) via the USB splitter cable to supply the dongle with power. |
| 2 | Service port | (Service only) Press to disconnect all paired Bluetooth devices. Pairing instructions will be displayed then. |
| 3 | LED indicator | Lights up blue when power is supplied. |
| 4 | Mini HDMI port | Connects to a display. Use of the HDMI adapter may be required. |
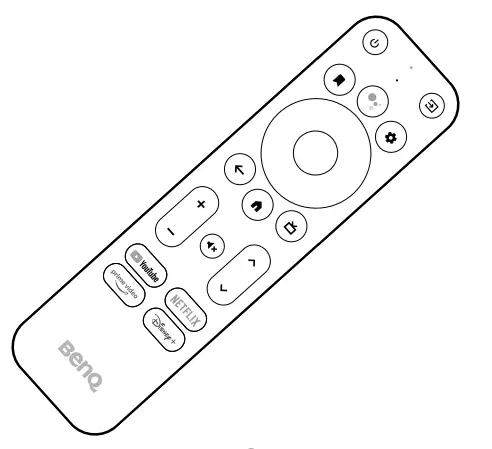
Remote control
Applicable for C008 only. Availability of C008 may vary by country/region.
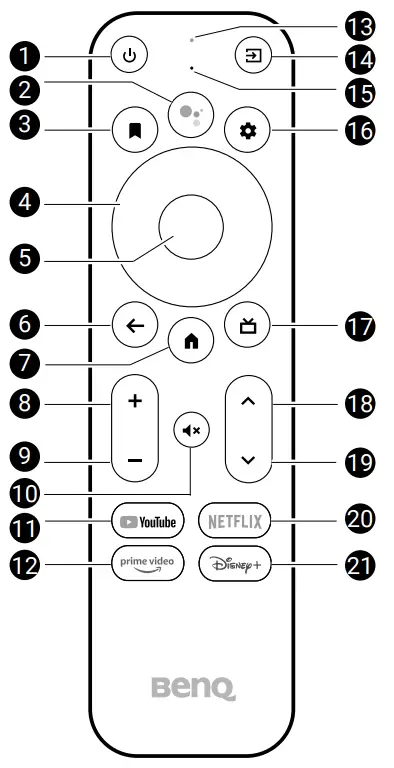
| No. | Item | Descriptions |
| 1 | Power | Toggles the projector between standby mode and on (after initial power up from the keypad). |
| 2 | Google Assistant | Press the Google Assistant button on your remote to talk to Google. |
| 3 | Watchlist | Shows a list of options to open/move the selected app or add it to favorites. |
| 4 | Arrow keys | Moves through the menu items or toggle through the available options. When the On-Screen Display (OSD) menu is activated, these keys are used as directional arrows to select the desired menu items and to make adjustments. |
| 5 | OK | Confirms the selection. |
| 6 | Back | Returns to the previous menu. |
| 7 | Home | Returns to the home screen. |
| 8 | Volume up | Increases the volume. |
| 9 | Volume down | Decreases the volume. |
| 10 | Mute | Toggles the projector’s audio on or off. |
| 11 | YouTube | Opens the YouTube app. |
| 12 | Prime video | Accesses Prime Video. A registered account is required. |
| 13 | LED indicator | Shows the status of the QS02 dongle. See LED indicator on the remote control on page 9 for more information. |
| 14 | Input | Selects an input source. |
| 15 | Microphone | Speak into the microphone on the remote control after pressing the Google Assistant button to control your TV with your voice. |
| 16 | Settings | Access QS02 Settings. |
| 17 | Open Live TV EPG | Open Live TV EPG. A Google account is required. |
| 18 | Channel up | Goes to the next channel. |
| 19 | Channel down | Goes to the previous channel. |
| 20 | Netflix | Accesses Netflix. A registered account is required. |
| 21 | Disney+ | Accesses Disney+. A registered account is required. |
LED indicator on the remote control
Applicable for C008 only. Availability of C008 may vary by country/region.
| Scenario | Status | LED indicator |
| Bluetooth pairing | Pairing enabled by pressing and holding the | Green – solid |
| Waiting for pairing and connecting | Green – flashing | |
| Connected successfully | N/A | |
| Pairing failed | Red – flashing 4 times | |
| Using Google Assistant | Press the Google Assistant button to talk to Google | Green – solid or flashing |
| Sending IR signal to control your projector | Pressing one of the following IR learning keys:
| Red – flashing once |
| Pressing any of the keys that is not IR learning key | Green – flashing once |
Getting started
Placing the remote control batteries
Applicable for C008 only. Availability of C008 may vary by country/region.
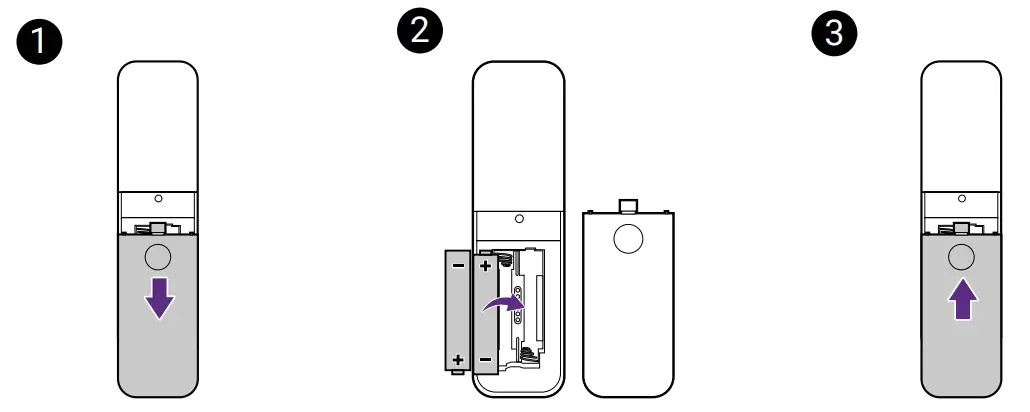
- Slide to open the battery cover.
- Insert two AAA batteries (purchased separately) to the battery compartment as illustrated. Make sure that the positive and negative ends are positioned correctly.
- Replace the battery cover

Remote control effective range
Effective angle: within 30 degrees
Effective range: within 8 meters (~ 26 feet)
Make sure that there are no obstacles between the remote control and the IR sensor(s) on the dongle or projector that might obstruct the infra-red beam.
Connection and pairing with a bundled projector
- If the QS02 dongle came with a BenQ projector, refer to the quick start guide or user manual of the purchased projector for the specified HDMI port to install the dongle.
- A micro USB cable should be available next to that HDMI port to supply power to the dongle. Make sure to connect the USB cable to the micro USB port on the dongle.

- Once the dongle has been installed properly, power on the projector and follow the on-screen instructions to complete the initial setup with the projector’s remote control.
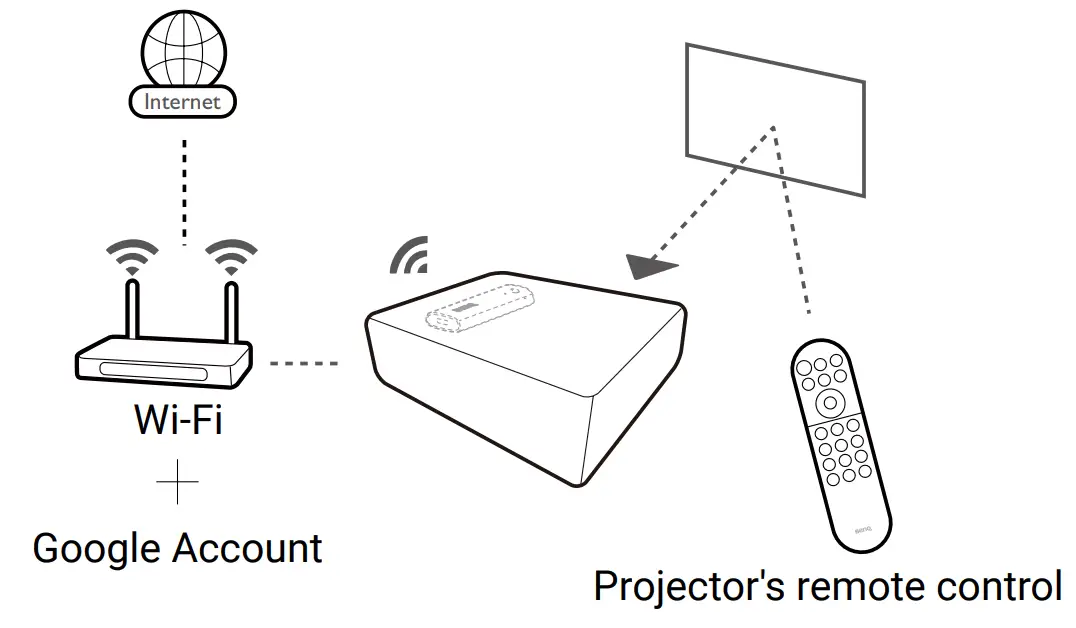
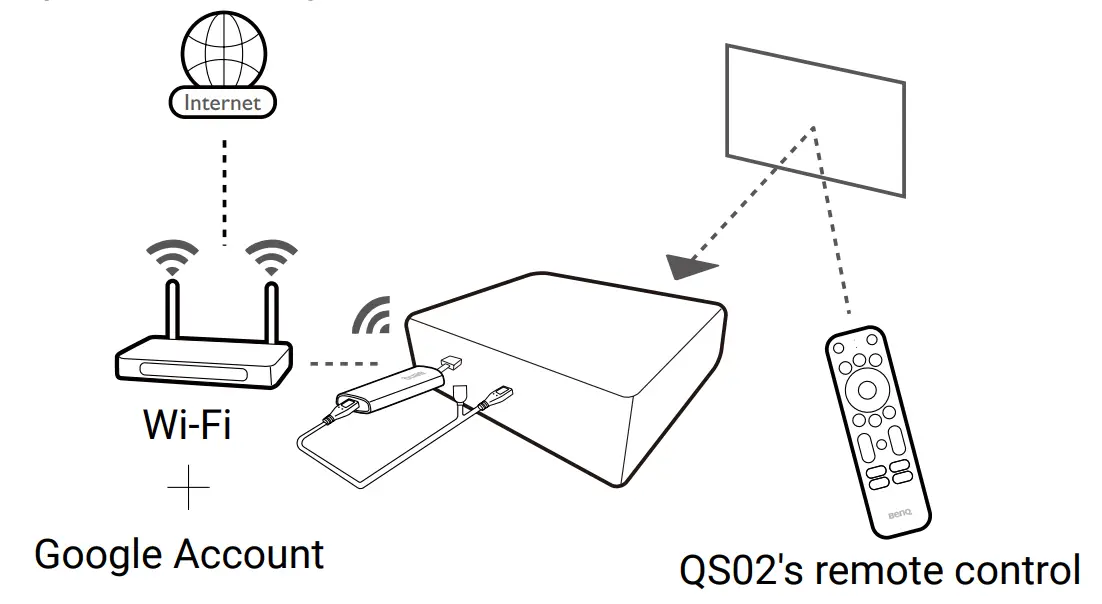
- Not all settings are required to complete the initial setup. However, you are required to connect to a wireless network and sign in with your Google Account to proceed.
- When you are asked to set up your remote, select Not now.
- Once the initial setup is complete, the Home screen is displayed. See Android TV home screen on page 15 for more information.

Tip
If the projector’s remote control has been paired with the QS02 dongle during initial setup process, you can add other remote controls to control the projector or the dongle. See Adding a new remote control on page 14 for more information.
Connection and pairing with a projector purchased separately
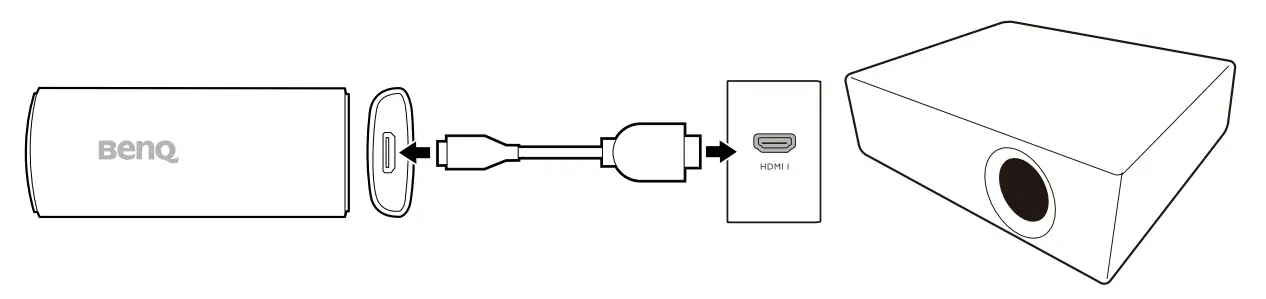
If the QS02 dongle is purchased separately, install the dongle to the projector properly before powering on the projector.
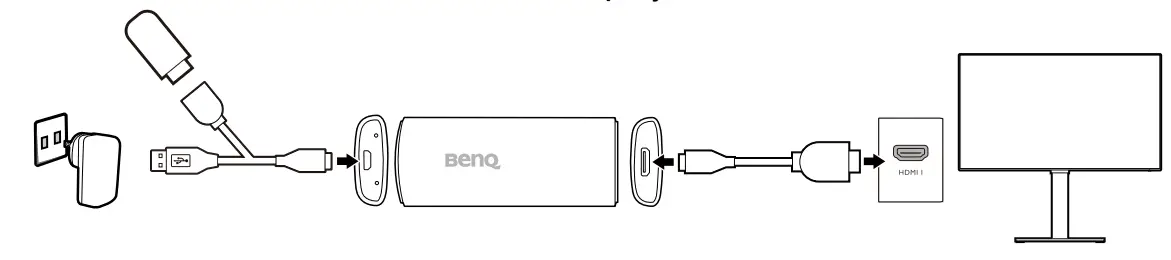
- Install the dongle to the HDMI port on the projector via the HDMI adapter supplied with the dongle.
- Supply power to the dongle using the supplied USB splitter cable. You can either connect the dongle to the USB type-A port labeled with the
 symbol on your projector (if available) or to a power adapter (purchased separately). Make sure the power outlet is able to provide 5V/1A power.
- Once the QS02 dongle has been installed properly, power on the projector and follow the on-screen instructions to complete the initial setup with the dongle’s remote control.

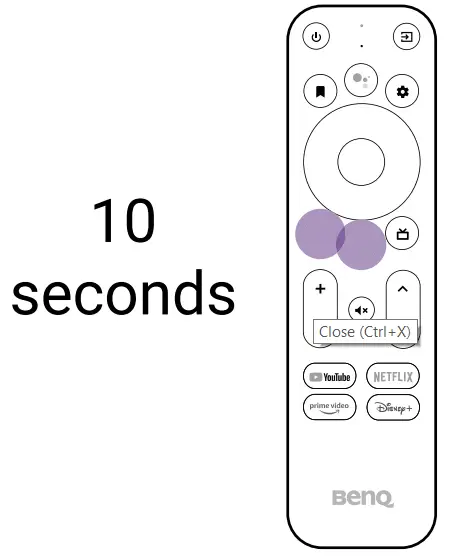
- Press and hold the
 and the buttons on the remote control at the same time for 10 seconds for pairing.
- Not all settings are required to complete the initial setup. However, you are required to connect to a wireless network and sign in with your Google Account to proceed.
- When you are asked to set up your remote, select Not now. This is an optional step. If you skip the setup now, you can still operate the projector and the dongle normally with the remote controls came with the products respectively. You can always set up later as instructed in Control of projector and dongle with one remote control on page 13.
- Once the initial setup is complete, the Home screen is displayed. See Android TV home screen on page 15 for more information.
 symbol on your projector (if available) or to a power adapter (purchased separately). Make sure the power outlet is able to provide 5V/1A power.
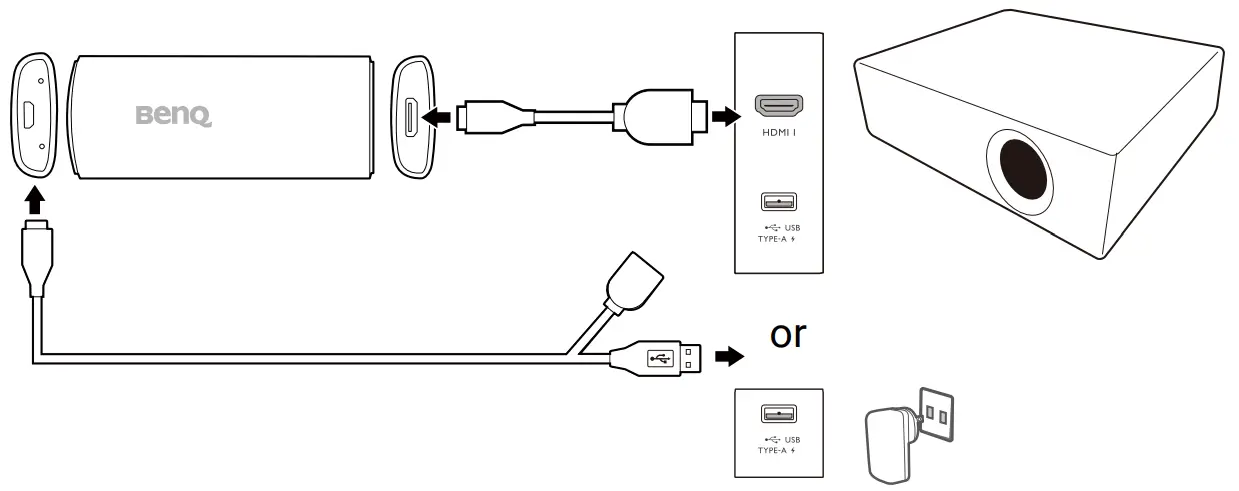
Tip
To navigate the projector’s menus and access its functions, you need to work with the remote control came with the projector. If you wish to access services or apps from the Android TV™ (ATV) home screen, use QS02’s remote control.
Control of projector and dongle with one remote control
To enhance product compatibility, you can set up to control the projector’s power and volume with the dongle’s remote control. Available functions are determined by Google.
- Go to
 > Set up remote buttons > Add device from the ATV home screen.
 - Select TV as your device and BenQ when you are prompted to choose your TV brand.
- Follow the on-screen instructions to check if specific buttons on the remote control work.
 > Set up remote buttons > Add device from the ATV home screen.
Adding a new remote control
A remote control may be supplied with your projector and the QS02 dongle respectively. You can work with a remote control purchased separately. The projector pairs and works with one remote control during initial setup. If you prefer to work with another remote control, add it to the device list first.
- Go to > Remote and accessories from the ATV home screen.
- Select Add accessory.
- Wait for a few seconds until you are prompted with the pairing screen of the ATV’s remote control. If you prefer to pair with QS02’s remote control, follow the on-screen instructions. If you prefer to pair with another remote control, check its quick start guide or user manual for pairing procedures.
Android TV home screen
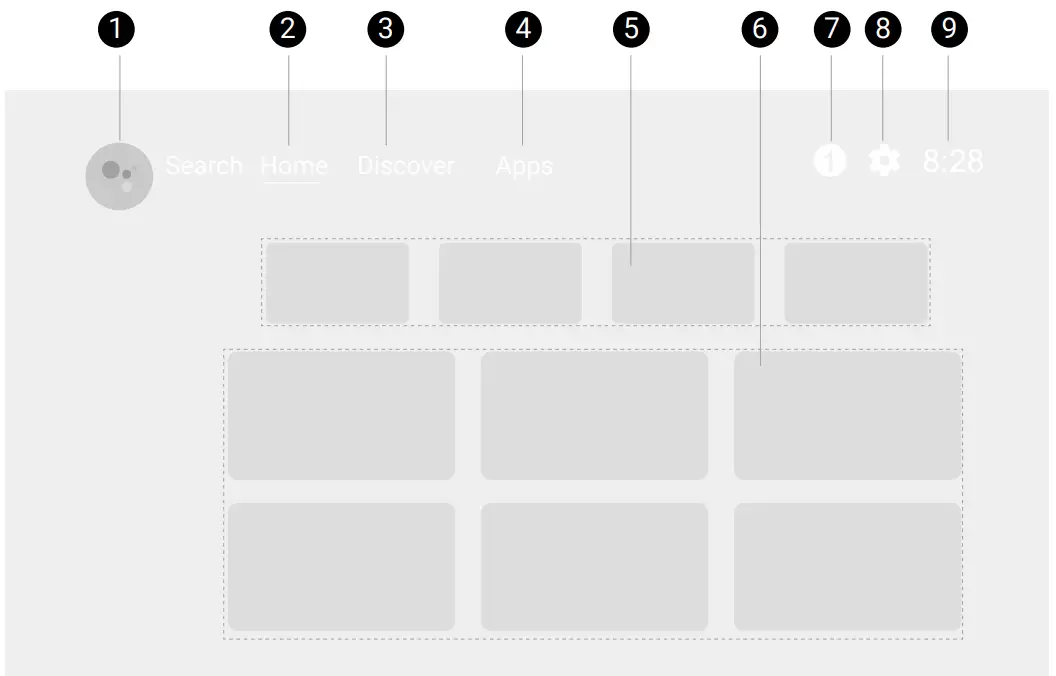
| No. | Item | Descriptions |
| 1 | Google Assistant | Press the Google Assistant button on your remote control to talk to Google. |
| 2 | Home | Access to Home screen. |
| 3 | Discover | Access to personalized recommendations. |
| 4 | Apps | Access to all the installed apps and Google Play. |
| 5 | Recommended apps/My favorites |
|
| 6 | Recommended content | Access to the content recommended by the specified channel/streaming service. |
| 7 | Notification | Access to notifications. |
| 8 | Settings | Access to the QS02 settings. |
| 9 | System time | Displays system time. |
Note
The screenshots and user interface in this document are for reference only and may be subject to change without prior notice.
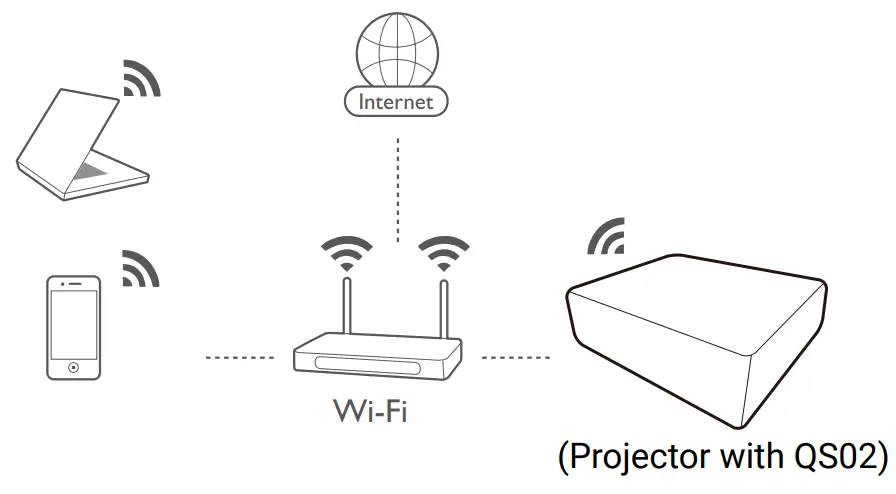
Wireless projection
Before you can project wirelessly via the projector you must first connect the projector to a wireless network. Depending on your mobile device, different procedures and options are required. Follow the instructions.
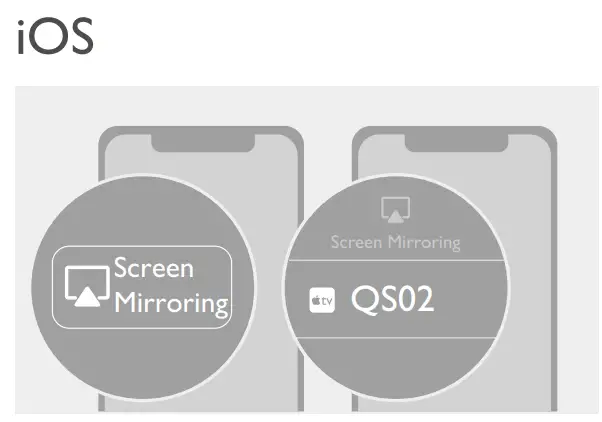
Wireless projection from an iOS/ macOS device
- Go to Apps from the Android TV Home screen on the projector, and launch the Wireless Projection for iOS app.

- Follow the on-screen instructions to grant the access right.
- Connect your mobile device to the same wireless network as the dongle.
- Enable the screen mirroring function from your iOS/macOS device. Available name and access to the screen mirroring function may vary by device. Note that the dongle is named QS02 by default. If you have changed the name, look for the new name from the device list.


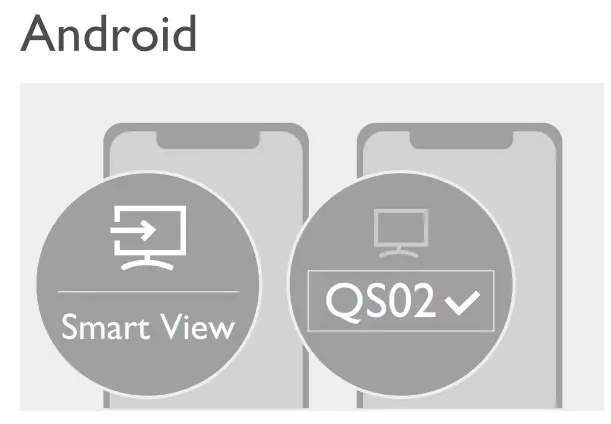
Wireless projection from an Android device (via Chromecast built-in™)
- Connect your Android device to the same wireless network as the dongle.
- Enable the screen mirroring function from your mobile device. Available name and access to the screen mirroring function may vary by device. Note that the dongle is named QS02 by default. If you have changed the name, look for the new name from the device list.

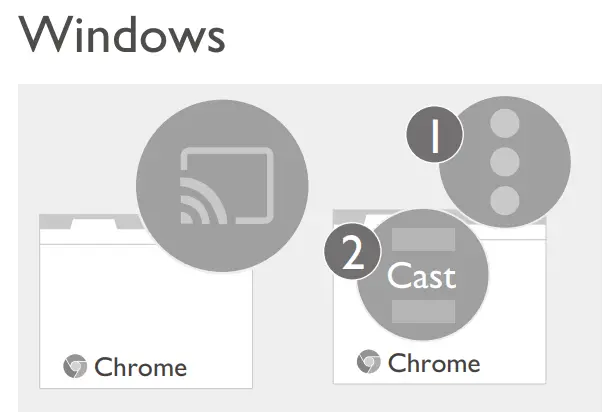
Wireless projection from a PC (via Chromecast built-in)
- Connect your computer to the same wireless network as the dongle.
- Enable the screen mirroring (cast) function from your computer. Available name and access to the screen mirroring function may vary by program. Note that the dongle is named QS02 by default. If you have changed the name, look for the new name from the device list.

Working as a USB reader
The QS02 dongle can work as a USB reader to play files stored on a USB flash drive directly when connecting to a display without PC connection.
- Connect the dongle to the HDMI port on your display via the provided HDMI adapter.
- Supply power to the dongle by a USB power adapter via the provided USB splitter cable. Make sure the power outlet is able to provide 5V/1.5A power.
- Connect a USB flash drive to the USB type-A female connector.
- Switch the input source to USB storage. You are ready to choose the files from the USB flash drive for playback now.

Updating your dongle
To keep your QS02 dongle most up-to-date, you are strongly recommended to upgrade it to the latest firmware version to make the best use of the product.
Keep stable power supply to the Host and Button. Do not remove the power adapter or disconnect the cables.
Do one of the following to update your dongle.
- The update information is provided via Over-the-Air (OTA) technology. You will be notified by a message in the ATV home screen when an update is available. Click Details to update as instructed.
- To manually update your dongle, go to > Device preferences > About > System update from the ATV home screen.
Restoring to factory default settings
Restoring the QS02 dongle to factory default settings will erase everything you set on the dongle, including the account information, the apps you installed, and your preference settings.
- Go to > Device preferences > About > Factory reset from the ATV home screen.
- The operation takes a few seconds to return the dongle to factory default settings.
Specifications
| Item | Description | |
| System | CPU | ARM Quad 64-bit Cortex-A35 |
| GPU | ARM Mali-G31 MP2 GPU OpenGL ES3.2,Vulkan1.1 and OpenCL2.0 | |
| RAM | DDR4 2GB | |
| Storage | 16GB | |
| Compatible operating systems |
| |
| WiFi | Wi-Fi 6 (2.4G / 5G 802.11 a/b/g/n/ac/ ax) | |
| Bluetooth version | 5.0 | |
| HDR | HDR 10, HLG, HDR10+ | |
| Resolution | 4K | |
| Video format |
| |
| Audio format |
| |
| Environment | Power input | DC 5V/1A, through micro USB port |
| I/O ports |
| |
| Operating temperature | 0 ~ 45°C | |
| Item | Description | |
| Accessory | Remote control | C008 (Availability of C008 may vary by country/region.) |
| USB cable | USB splitter cable (type-A male to micro USB type-B male and type-A female) | |
| Others | HDMI adapter (mini HDMI male to HDMI male) | |
| Dimensions & Weight | Dimensions (W x D x H) | 36mm x 89.83mm x 13mm |
| Weight | 35.5g | |