![]()
Installation, Operating, and Servicing Instructions
CONVECTOR
Electric Convection Ovens CO133M, CO133T, CO223M, CO223T CO235M, CO235T
Please make a note of your product details for future use:
Date Purchased:_____________
Model Number:____________
Serial Number:___________
Dealer:__________________
IMPORTANT INFORMATION
 Read these instructions carefully before using this product, paying particular attention to all sections that carry warning symbols, caution symbols and notices. Ensure that these are understood at all times.
![]() WARNING! This symbol is used whenever there is a risk of personal injury.
WARNING! This symbol is used whenever there is a risk of personal injury.![]() CAUTION! This symbol is used whenever there is a risk of damaging your Lincat product.
CAUTION! This symbol is used whenever there is a risk of damaging your Lincat product. NOTE: This symbol is used to provide additional information, hints, and tips.
KEEP THIS MANUAL FOR FUTURE REFERENCE
WARNINGS AND PRECAUTIONS![]() This appliance must be installed, commissioned, and serviced by a qualified person in accordance with national and local regulations in force in the country of installation.
This appliance must be installed, commissioned, and serviced by a qualified person in accordance with national and local regulations in force in the country of installation.
If the supply cord is damaged, it must be replaced by the manufacturer, its service agent or a similarly qualified person.
Ensure that the plug/socket is accessible at all times.
Strip plastic coating and clean the appliance before use.
During operation parts may become hot – avoid accidental contact.
Disconnect this appliance before servicing, maintenance or cleaning.
CHECKLIST OF ENCLOSURES
- Instructions Manual
- Shelves (2 off CO223M, CO223T).
- Shelves (3 off CO133M, CO133T, CO235M, CO235T).
- Water connection hose (CO133T, CO223T, CO235T).
TECHNICAL DATA
| Model | Supply | Rating | Capacity | Tray Spacing Weight | (kg) |
| C0133M | 1P+N+E, 50-60 HZ | 3.0kW | 3 x 2/3GN 3 x 400×300 3 x460 x 330 | 80 | 55 |
| C01331 | 1P+N+E, 50-60 HZ | 3.0kW | 3 x 2/3GN 3 x 400×300 3 x460 x 330 | 80 | 55 |
| CO223M | 1P+N+E, 50-60 HZ | 3.0kW | 2 x 1/1GN 2 x 660×460 2 x 600 x 400 | 110 | 70 |
| CO223T | 1P+N+E, 50-60 HZ | 3.0kW | 2 x 1/1GN 2 x 660×460 2 x 600 x 400 | 110 | 70 |
| CO235M | 1P+N+E, 50-60 HZ 3P+N+E, 50-60 HZ | 4.8kW | 3 x 1/1GN 3 x 660×460 3 x 600 x 400 | 90 | 71. |
| CO2351 | 1P+N+E, 50-60 HZ 3P+N+E, 50-60 HZ | 4.8kW | 3 x 1/1GN 3 x 660×460 3 x 600 x 400 | 90 | 71. |
INSTALLATION AND COMMISSIONING
This appliance must be earthed.![]() An equipotential bonding terminal is provided to allow cross bonding with other equipment.
An equipotential bonding terminal is provided to allow cross bonding with other equipment.
If replacing the plug connect the terminals as follows:
Green and Yellow wire……………………… Earth E
Blue wire……………………… Neutral N
Brown wire………………….Live L
Means of isolation with at least 3mm contact separation in all poles must be incorporated into the fixed wiring of the CO235M and CO235T. These units must be connected by a qualified electrician (see power ratings).
The fixed wiring insulation must be protected by insulated sleeving having a temperature rating of 60 Deg C.
Supply cords shall be oil-resistant, sheathed flexible cable not lighter than ordinary polychloroprene or equivalent elastomer sheathed cord (code 60245 IEC 57)
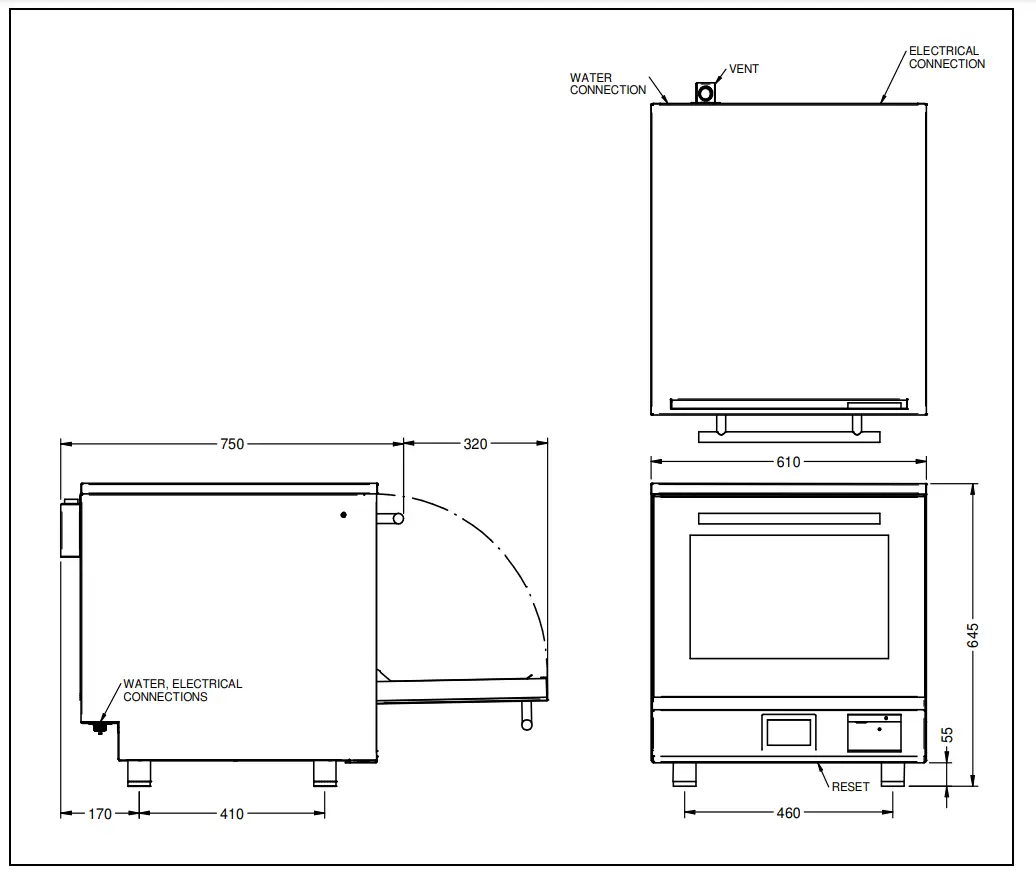
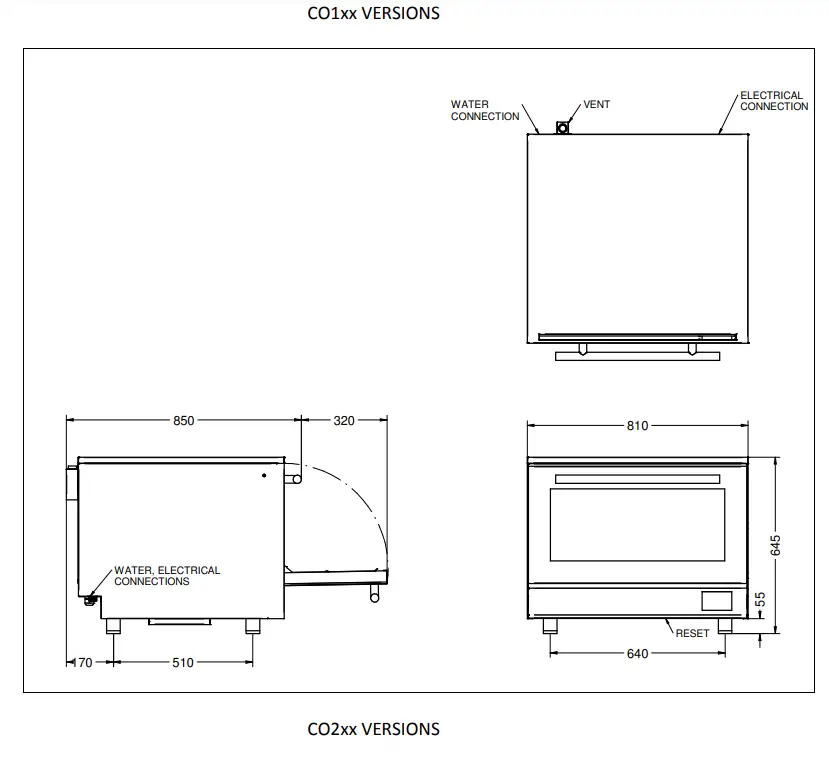
Install this appliance on a level surface ensuring all vents are unobstructed. Any partitions, walls or furniture must be of non-combustible material. Minimum distances A 200mm B 1000mm see Fig 1. Leave 100mm for services.
An air filter will need occasional access. (See Fig 3 for position).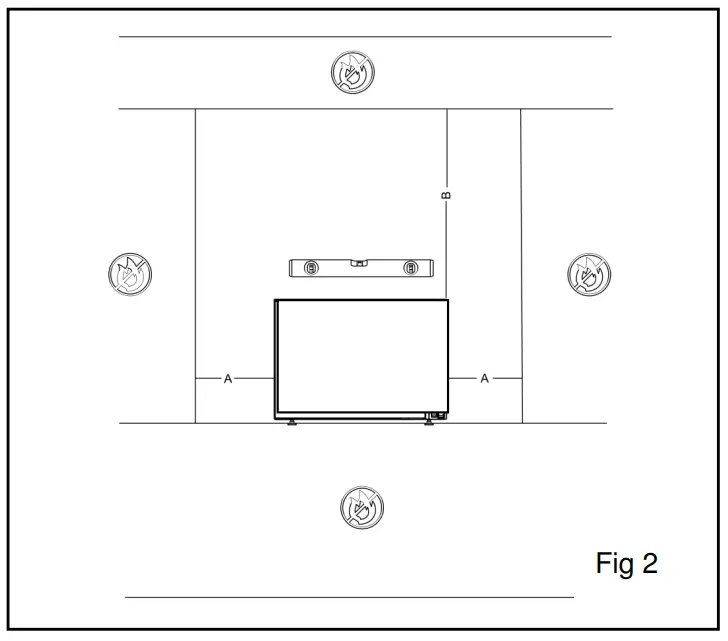 The water supply pressure must be from 2 – 6 bar (200kPa-600kPa). Lincat recommends that a water filter should be installed. Refer to Lincat’s website for the recommended option
OPERATING INSTRUCTIONS
Only qualified or trained personnel should use this appliance.
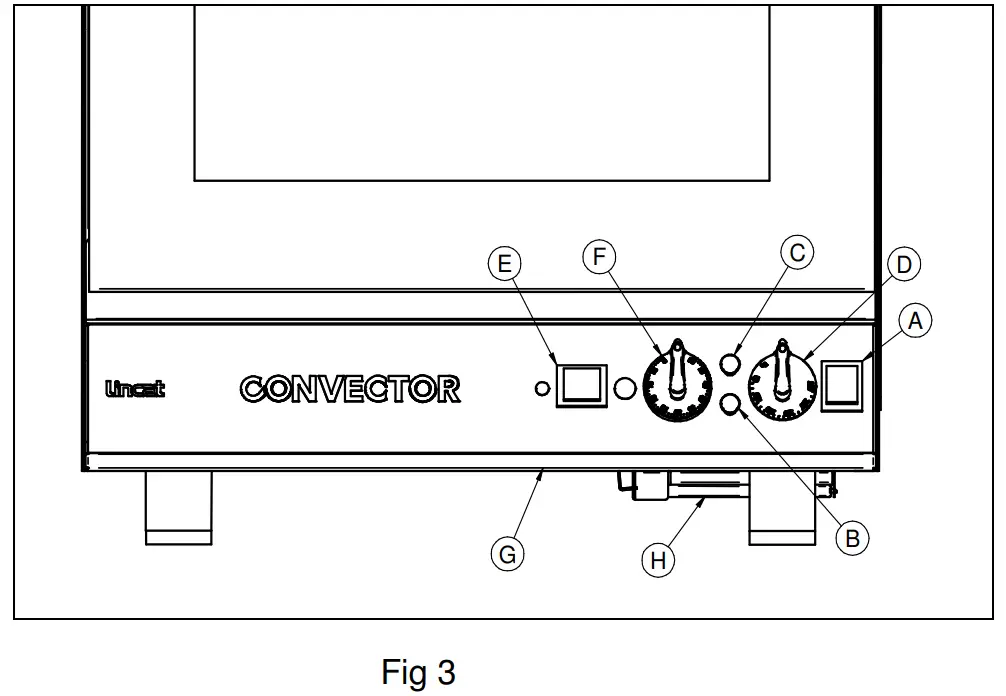
MODELS CO133M, CO223M, and CO235M
A- On/Off
B- Power supply indicator
C- Oven heating indicator
D- Temperature control knob
E- Fan Speed
F- 120-minute timer
G- Reset
H- Filter
 Connect the appliance to the electricity supply. The green neon (A) illuminates indicating power to the appliance. Select the On/Off switch, the switch will illuminate and the fan will start rotating.
Select the desired fan speed, slow or fast.
Set the thermostat to the desired temperature, the amber neon will indicate that the unit is heating.
When at the set temperature the amber light will turn off and will alternate on or off to maintain the set temperature.
Load products onto the shelves and if required set the timer.
When the set time expires the buzzer/lights will sound/flash.
Carefully open the door and remove the cooked products. Opening the door will cancel the buzzer and flashing lights.
Note: When the door is opened, if the fan is set to fast speed, the fan will switch from fast to slow speed and return to fast speed when the door is closed. To turn the unit offset the temperature control knob to the off position and switch it off at the mains.
MODELS: CO133T, CO223T, and CO235T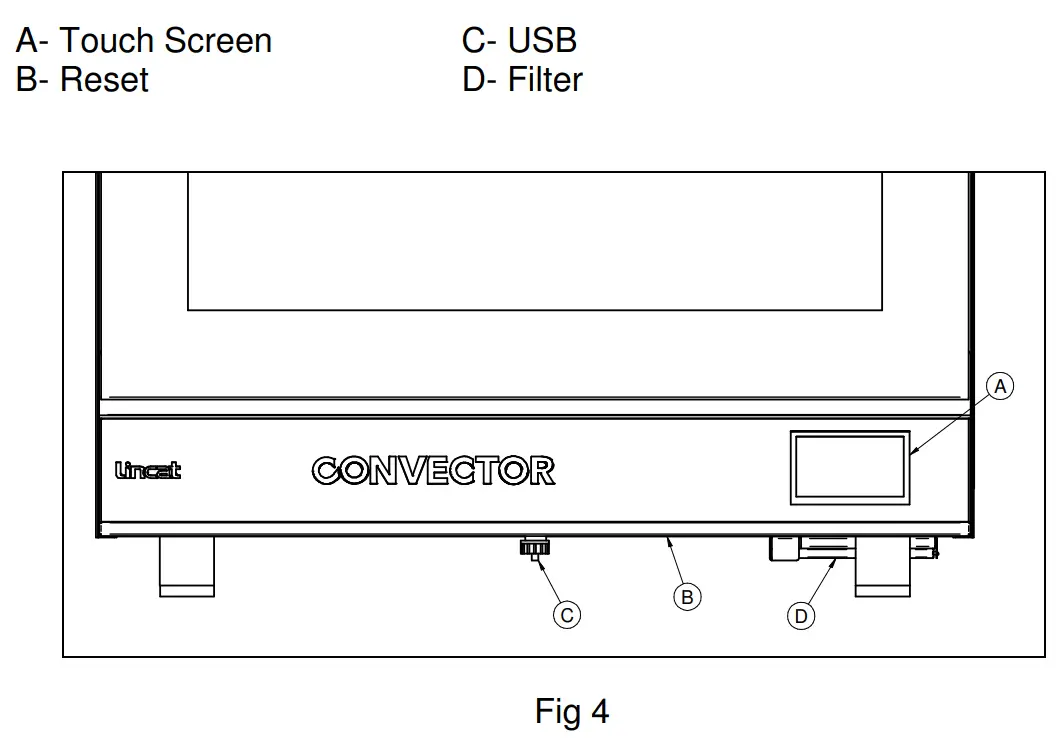
Only qualified or trained personnel should use this appliance.
Connect the appliance to the electricity supply. The unit will beep once and will self-test the elements and fans. The screen will show the CONVECTOR logo and then go to the home screen.
Refer to the Programming guide for the user interface operation and programming.
To use the unit simply select the correct program. The unit will Pre-heat to the set temperature and beep when ready to be loaded with the product.
Place the food in the oven and press cook. The oven will cook the food and when the set time expires the buzzer/lights will sound/flash. On-screen timers will also indicate the timer has expired.
Press did and remove the food from the oven.
To adjust the clock settings go to the home screen, click on the clock in the top right corner, select the hours or minutes to change, adjust and save.
How to program your Touch screen Convector
(COxxxT models).
Home screen
This is where you run recipes from (just press the recipe you want). You can switch to the oven mode from here. Pressing recipe manager takes you into the programming area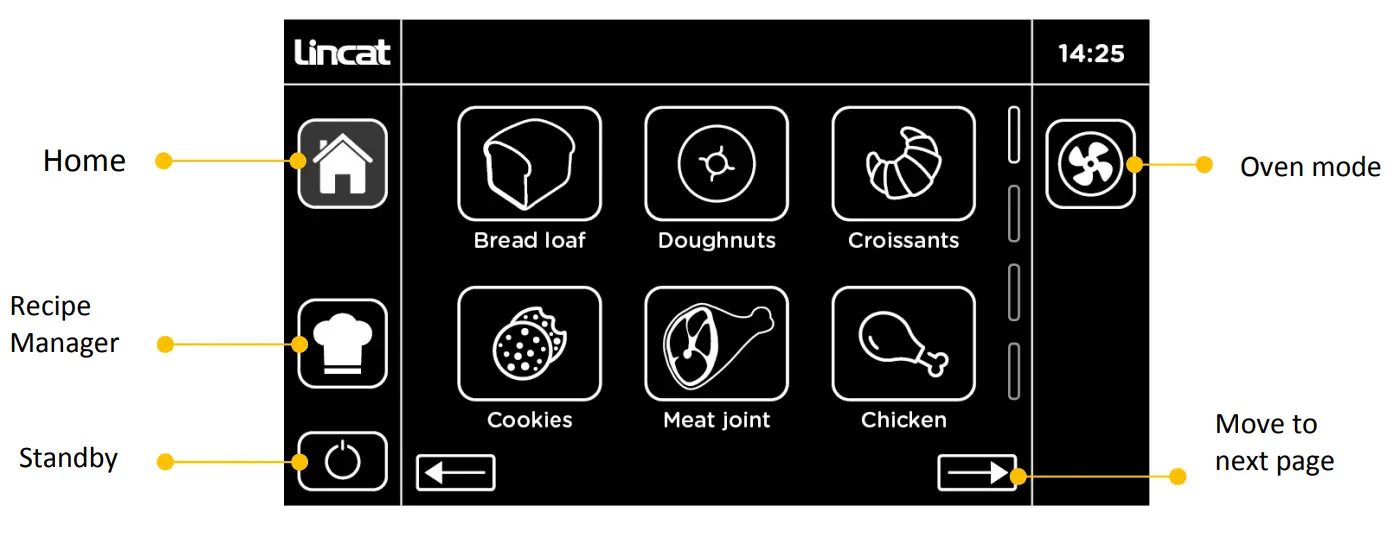
Recipe Manager
This lets you select a recipe to edit (just press the recipe). Here you can also reassign the order recipes are presented in, access further oven settings, and run updates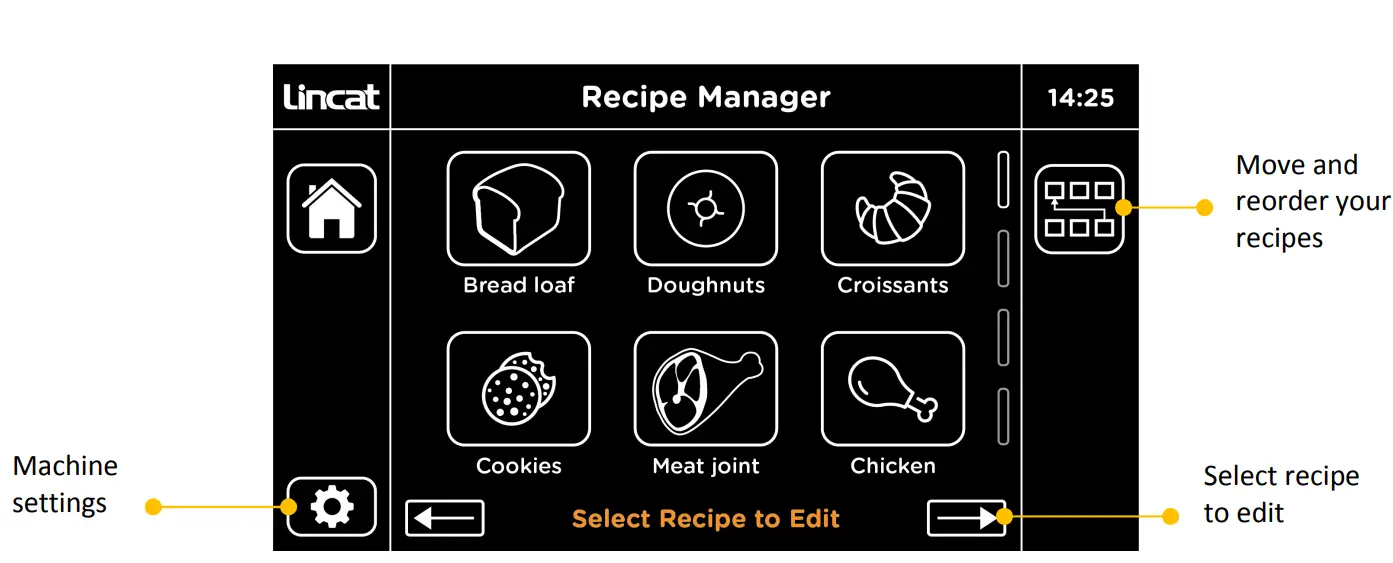 Recipe summary and edit screen
This is where you view your recipe with changes highlighted in green. Press on the steps to edit them. Press on the name bar to rename the recipe. Attach or change an icon from the library. Click on to save to keep your recipe. Or exit without saving.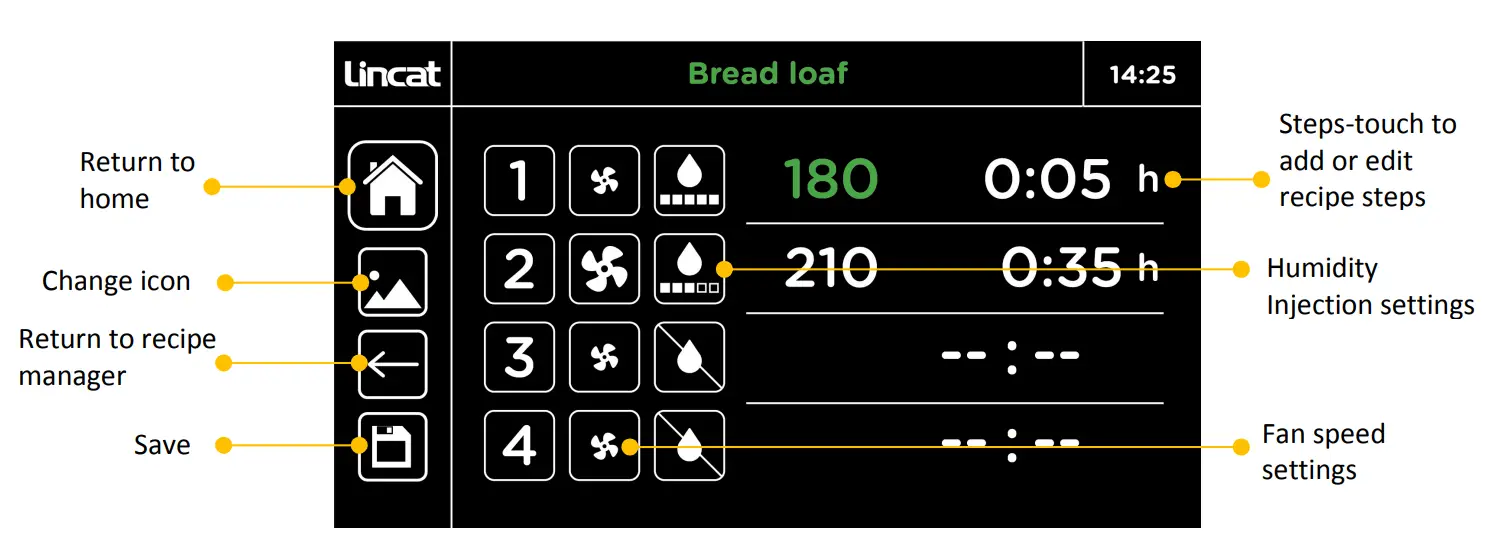 Recipe summary and edit screen
This is where you adjust the times, temperature and set humidity injection and fan speeds. The recipe summary button takes you back to the summary screen so you can review changes and save them.
Timer screen
In oven mode, you can change the temperature and run up to 4 counts down timers. Alternatively don’t enter a time and it will maintain the set temperature indefinitely.
The fan speed can be increased or decreased. A humidity injection level can be set (this then operates in 30-second steps at the beginning of the programmed cycle).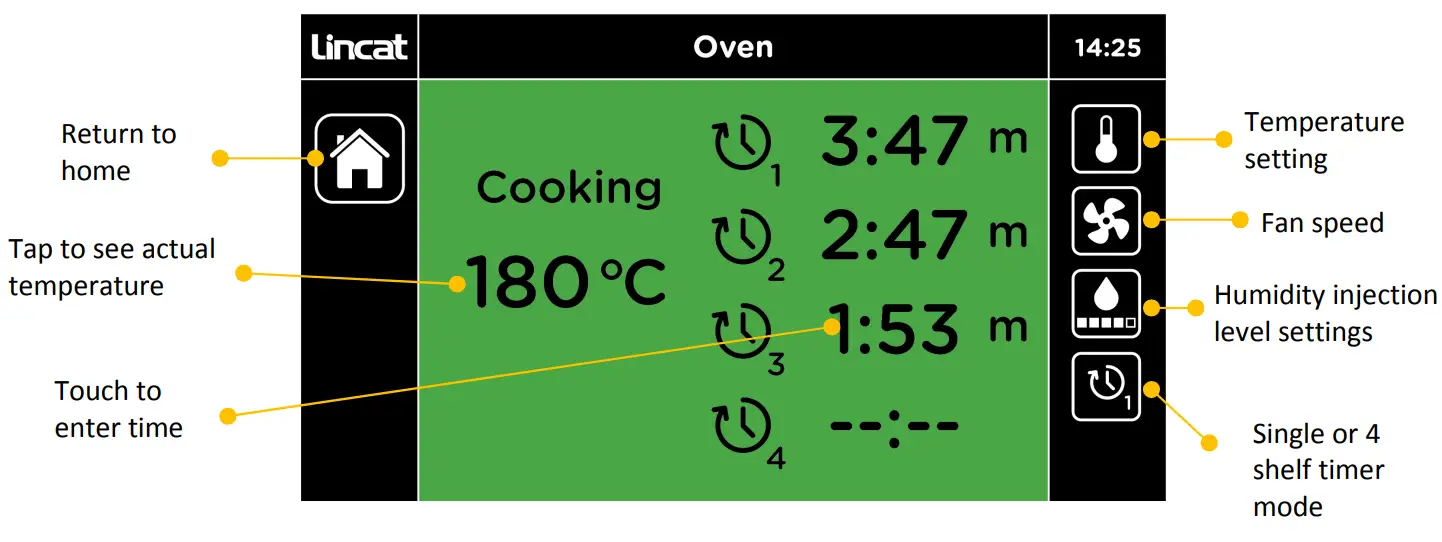
Humidity can be added by pressing the humidity injection setting. In the oven, mode humidity is added on demand. In program mode, it is injected at the start of each step.
Higher levels of humidity can be achieved by incorporating additional steps in the cooking program and adding humidity within these steps.
Humidity injection levels can be set from 1 5.
FAULT FINDING
This appliance is fitted with a safety thermostat, which will cut power to the appliance under fault conditions. If when turning the unit on it fails to operate firstly check the power supply to the unit then the reset before contacting Lincat service. To reset the safety thermostat, firmly push the red button which is recessed under the front edge of the unit see (Fig 3 4). This re-set cannot be activated until the appliance is cool. If this continues to happen please call our service department.
Please refer to the Service Help Desk number on the final page of this manual.
CLEANING
Your product has a manufacturer’s warranty. This requires you to maintain and care for your product and follow maintenance instructions. If you fail to maintain your unit or damage components Lincat may charge you for a warranty repair. Please check the website for terms and conditions.![]() Do not use a water jet or steam cleaner, and do not immerse this appliance. Clean all panels with warm water and mild detergent, do not use abrasive materials. Dry with a soft cloth. Please refer to the Lincat website for the recommended cleaning products. Avoid damaging the thermostat bulbs inside the oven when cleaning. To assist cleaning remove shelf supports see Servicing.
Do not use a water jet or steam cleaner, and do not immerse this appliance. Clean all panels with warm water and mild detergent, do not use abrasive materials. Dry with a soft cloth. Please refer to the Lincat website for the recommended cleaning products. Avoid damaging the thermostat bulbs inside the oven when cleaning. To assist cleaning remove shelf supports see Servicing.
SERVICING, MAINTENANCE, AND COMPONENT REPLACEMENT
All servicing, maintenance, and component replacement on this appliance should be carried out by one of our recommended service engineers. Regularly check the filter, see Fig 3 or 4, on the right-hand side of the unit. It may be cleaned in a dishwasher. Allow to fully dry before re-fitting. Do not use the unit without the filter. The door seal and bulbs are considered consumable parts and are not covered by the warranty. The door seal on all units and the bulbs on the COxxxM units are customer-replaceable parts. COxxxT bulbs require a screwdriver and disassembly of the light housing to replace. Lincat recommends a qualified person undertakes this operation.
Door inner glass removal and refitting
With the door open, hold the lower edge of the inner glass and one of the metal tabs at the top. Carefully pull the glass towards you whilst lifting the metal tab. With the glass now free at the top, lift the glass panel clear.
To refit, position onto the locating pins on the lower edge and close against the upper locating pins.
Pull the tabs towards you until the glass drops onto the upper locating pins then push to engage.
Light bulb replacement
Mechanical units.
Carefully remove the glass cover and use a flat-bladed screwdriver. Remove the bulb. Fit a new bulb and replace the cover.
Touch units.
Remove four screws holding the cover plate, carefully remove the cover plate, gasket, and glass lens. Remove the bulb. Fit a new bulb and re-assemble.
Shelf racks removal and refitting
See Fig 5 (Door removed for clarity).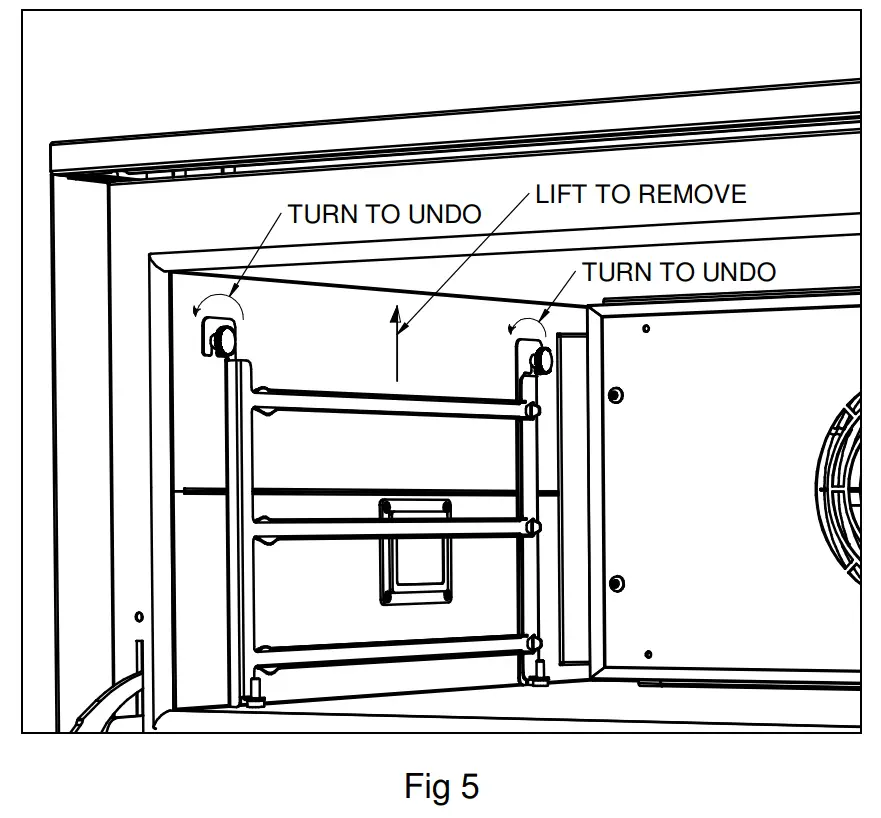
SPARE PARTS LIST
You can search for your spare parts on Lincat.co.uk using your products serial number.
| Part Number | Description | Used on |
| BU227 | Oven light bulb | All Models |
| CA208 | Run Capacitor | All Models |
| CCB02 | Control PCB | C01331, CO223T, CO235T |
| CCB03 | Control PCB | CO133M, CO223M, CO235M |
| CDB02 | Display PCB | C01331, CO223T, CO235T |
| CO215 | Contactor | CO235M, CO235T |
| EL330 | 4.5 Kw element | CO235M, CO235T |
| EL332 | 3.0 Kw Element | CO133M, C01331, CO223M, CO223T |
| FAS250 | Knob clip | CO133M, CO223M, CO235M |
| GL703/S | Inner glass | CO223M, CO223T, CO235M, CO2351 |
| GL705/S | Inner glass | CO133M, C01331 |
| HI189 | RH Door Hinge | All Models |
| HI190 | LH Door Hinge | All Models |
| HI191 | Door Hinge Roller | All Models |
| IMPO2 | Impellor | All Models |
| KN526 | Control Knob | CO133M, CO223M, CO235M |
| KN527 | 120-minute timer knob | CO133M, CO223M, CO235M |
| LE85 | Adjustable Leg | All Models |
| M031 | Bi-Directional Motor | All Models |
| NE46 | Green neon | CO133M, CO223M, CO235M |
| NE47 | Amber neon | CO133M, CO223M, CO235M |
| P112 | Inlet connection hose | C01331, CO223T, CO235T |
| PL306 | Plug and lead | CO133M, C01331, CO223M, CO2231 |
| SE92 | Door seal | CO133M, C01331 |
| SE93 | Door seal | CO223M, CO223T, CO235M, CO235T |
| 51-1137 | Shelf | CO223M, CO2231, CO235M, CO2351 |
| 51-1138 | Shelf | CO133M, C01331 |
| S023 | Solenoid valve | C01331, CO223T, CO235T |
| SW34 | Fan speed switch | CO133M, CO223M, CO235M |
| SW97 | On/Off switch | CO133M, CO223M, CO235M |
| TC47 | Thermocouple | C01331, CO223T, CO235T |
| TH46 | Thermostat | CO133M, CO223M, CO235M |
| TH203 | Safety Cut out | All Models |
| 1156 | 120-minute timer | CO133M, CO223M, CO235M |
| TSO4 | Thumbscrew | All Models |
| X54900 | Door switch | All Models |
ACCESSORIES
| Part Number | Description | Used on | |
| C0100/FS | Floor stand 6 runners | 2/3 GN, 400 x 300 Baking Sheets 460 x 330 Baking Sheets | C0133M, C0133T |
| CO200/FS | Floor stand 6 runners | 1/1 GN, 600 x 400 Baking Sheets 660 x 460 Baking Sheets | CO223M, CO223T, CO235M, CO2351 |
| C0100/LFSK | Low floor stand and stacking kit | Stand and oven vent kit | C0133M, C0133T |
| CO200/LFSK | Low floor stand and stacking kit | Stand and oven vent kit | CO223M, CO223T, CO235M, CO2351 |
| AC IKO4 | Standard filter ki, 1500 liter life | C0133T, CO223T, CO2351 | |
SERVICE INFORMATION
For help with the installation, maintenance, and use of your Lincat equipment, please contact our service department:
UK: 01522 875520
For non-UK customers, please contact your local Lincat dealer
All service work, other than routine cleaning should be carried out by one of our authorized service agents. We cannot accept responsibility for work carried out by other persons.
To ensure your service inquiry is handled as efficiently as possible, please tell us:
All available on the serial plate
- Brief details of the problem
- Product code
- Type number
- Serial number
Lincat reserve the right to carry out any work under warranty, given reasonable access to the appliance, during normal working hours, Monday to Friday, 08:30 to 17:00.
GUARANTEE
This unit carries a comprehensive UK mainland 2-year warranty. The guarantee is in addition to, and does not diminish your statutory or legal rights.
The guarantee does not cover:
- Accidental damage, misuse, or use not in accordance with the manufacturer’s instructions
- Consumable items (such as filters, glass, bulbs, slot toaster elements, and door seals.)
- Damage due to incorrect installation, modification, unauthorized service work or damage due to scale, food debris build-up, etc.
The manufacturer disclaims any liability for incidental, or consequential damages.
Attendance is based on reasonable access to the appliance to allow the authorized technician to carry out the warranty work.
Service calls to equipment under warranty will be carried out in accordance with the conditions of sale. Unless otherwise specified, a maximum of 15 minutes of administrative time, not spent directly carrying out servicing work, is provided for within the warranty. Any requirement for staff attending the call to spend greater time than 15 minutes due to administrative requirements, such as on health and safety risk assessments, will be chargeable at the prevailing rate.


