Full-HD Drive Recorder
Model: BK-200
User Manual
Product Overview
ASUKA BK-200 is a state-of-the-art Full HD drive recorder featuring with user-friendly smartphone Apps for file access and operation controls. Thanks to its LCD-free design and low-profile streamline housing, BK-200 provides users an unobstructed view for more comfort and safety during driving. In addition to its many excellent functions, the most noteworthy feature of BK-200 is its seamless integration with existing car TV receivers or smartphones. Operations of BK-200 are easy and intuitive, making BK-200 an ideal device for in-car applications to meet the growing demand of personal security. The purpose of this manual is to provide interested installers and users become familiar with its functions and operations.
Some important BK-200 features are recapped as below:
2-CH Full-HD video recording capability
BK-200 is equipped with a powerful media processor capable of recording 2 independent video streams at full-HD resolutions. The built-in front lens is usually the first video stream, while the optional rear lens can be the 2 video stream (for front 1920 x 1080, rear 1280×720).
Seamless integration with ASUKA Car TV Receiver and 2-Din Headunit
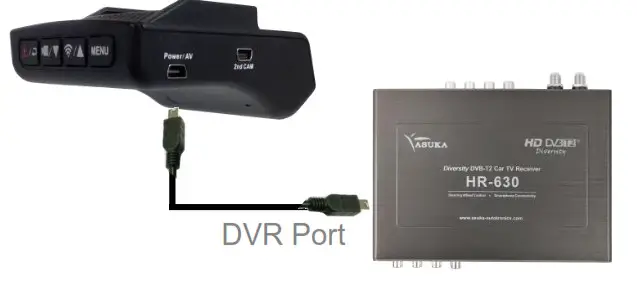
For users who already had the ASUKA Car TV receiver such as HR-600 & HR-630, BK-200 can be directly connected to HR-600/HR-630 via the dedicated DVR input port and operated BK-200 as an integral part of the TV receiver using the same remote controller.
Video output available for monitor
The BK-200 recorded files can be playback and monitored via its CVBS output.
BK-200 Overall system architecture: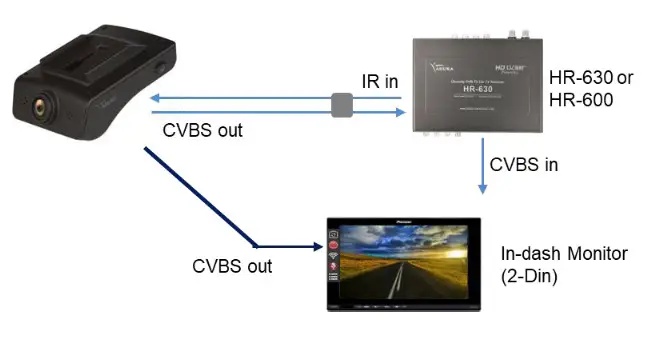
Contents of Package
The package of BK-200 contains the standard accessories as shown below. If you wish to buy the optional accessories, please contact the local distributor for further purchase.
Standard Accessory:
- Main Unit

- Interconnection Cable for Installation with ASUKA Head-unit

- Adjustable Stand with adhesive tape

- Micro-SD Card


NOTE: For proper recording operations, the Micro-SD card used must support UHS speed class 1.
Optional Accessory:
- General-type power Cable

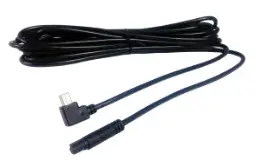
- Rear Camera LVDS Cable (Length: 5M)

- Rear Camera

Unit Description
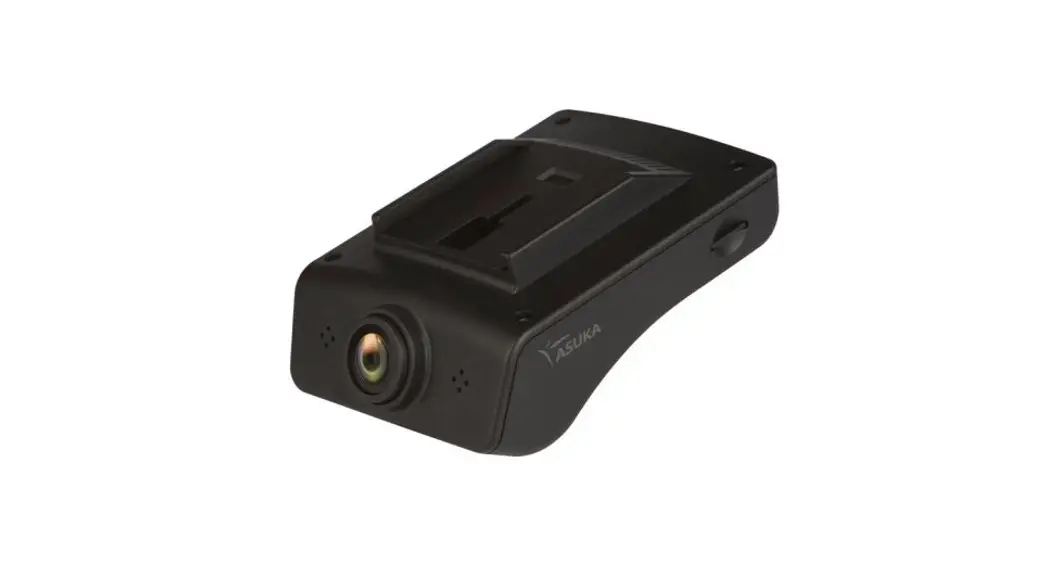
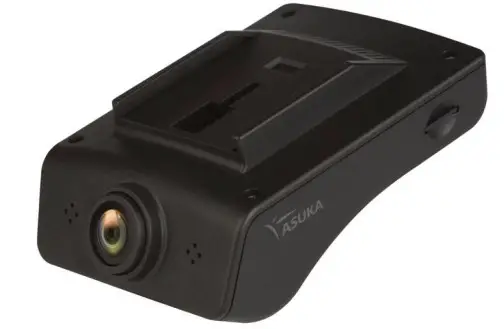
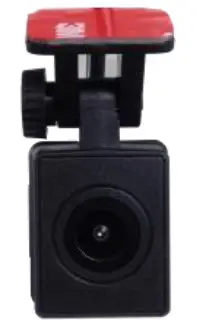
Main Unit
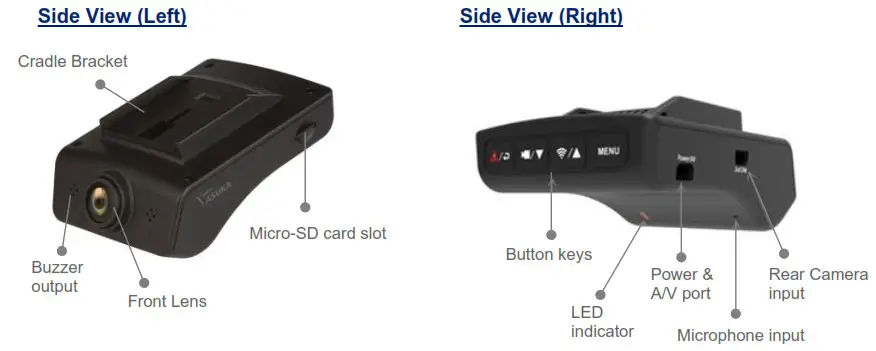
Description of button key & LED status: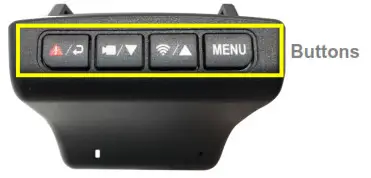 1. Buttons description
| Multi-function Key | Functions | |
| Under Recording mode | Under Menu mode | |
 | Enter system MENU | Exit system MENU |
| Switch on/off the WiFi (Optional) | Move selection upward | |
| Start/Stop the recording | Move selection downward | |
| Start/Stop emergency recording mode | Enter/Confirm the selection | |
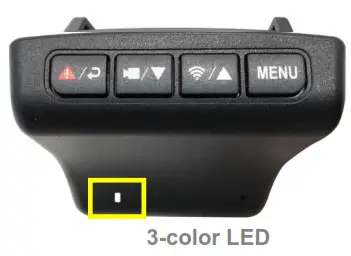
2. LED status indicators
| LED Status | Indication |
| White Light On | DVR is powered on. |
| Red Light On | Recording in progress. |
| Red Light-Flashing | Abnormal!! Please check the error message on the display and/or Apps (from Smartphone) |
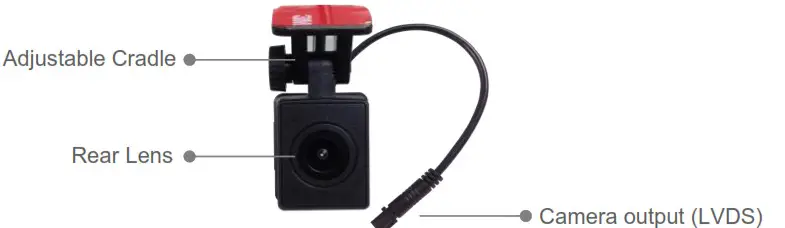
Rear Camera (Optional accessory)
Interconnection Cables
There are two different types of interconnection cable available for your application.
- HR-630 Interconnection cable: This is the specific cable prepared for connecting BK-200 with ASUKA Car TV receiver( i.e. HR-630) and PTA series Headunit (i.e. PTA-100).
- The system configuration is illustrated below.

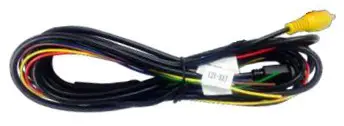
- General-type power cable: BK-200 also provides a general-purpose interconnection cable that can be connected to vehicle +12V power source and also provide CVBS output for monitoring or playback.
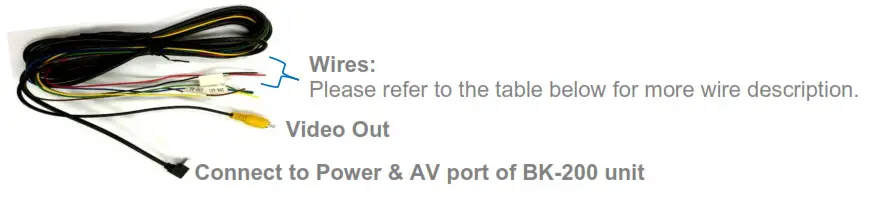
Wire description
| No. | Wire color | Function Description | Type |
| 1 | Yellow | B+(12V) | Power wires |
| 2 | Red | ACC | |
| 3 | Black | GND | |
| 4 | Blue | IR(Infra red) input control signal | Control wires |
| 5 | Brown/Gree | UART(TX & RX) control signal |
Installation
Overview
STEP 1: Select a suitable position
Select a suitable position for BK-200 main unit installation. A suitable position is a place around the windshield & WITHOUT tinted film on it.
STEP 2: Install adjustable stand first
Remove the red paper of adhesive tape from adjustable stand and stick it onto windscreen.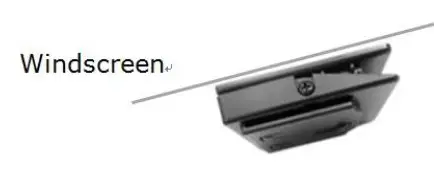
Note:
As the double-side adhesive tape cannot be re-pasted, please make sure the position selected before you actually paste the stand onto the windshield.
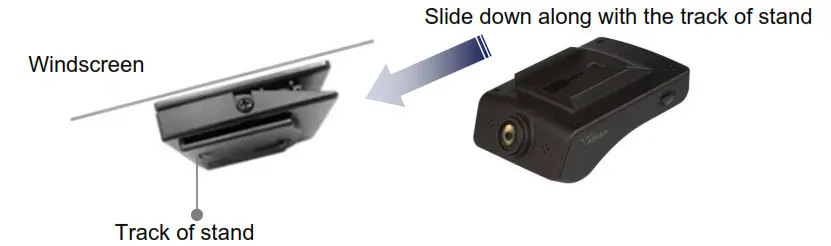
STEP 3: Mount the main unit on stand
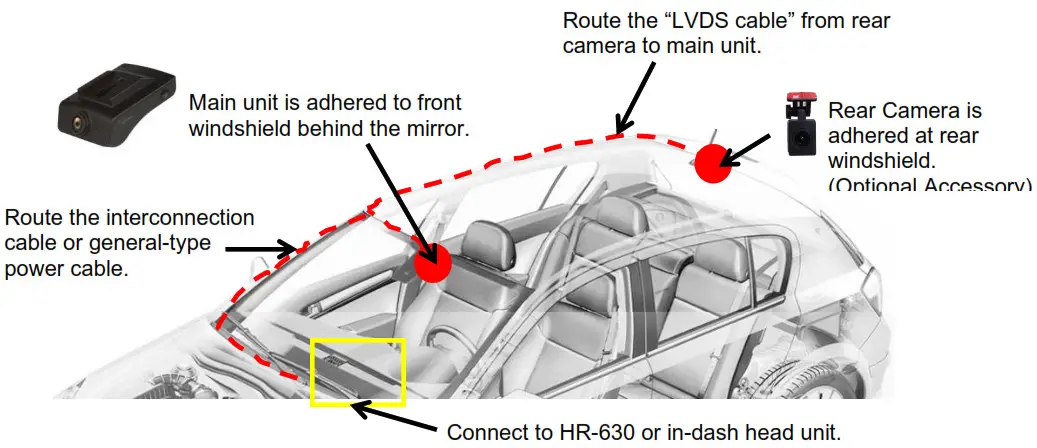
STEP 4: Route the “Interconnection Cable” from BK-200 to Car TV receiver, or the general-type power cable from BK-200 to head unit. 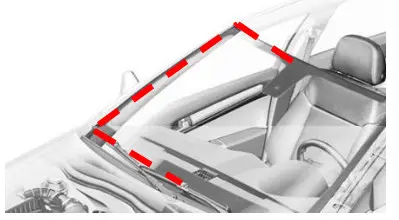
STEP 5: Select a preferred position for Rear Camera
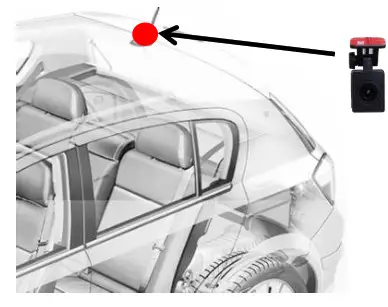
Choose a preferred installation position for Rear Camera and ensure the adhesive tape can be easily adhered.
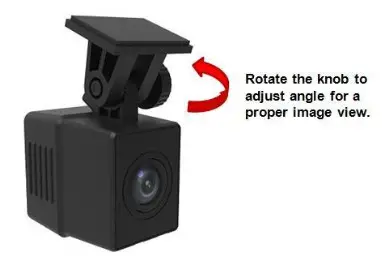
STEP 6: Install external Rear Camera
Remove the red paper of adhesive tape from cradle and stick it on windscreen. Then rotate the knob to adjust angle for a proper recording view.
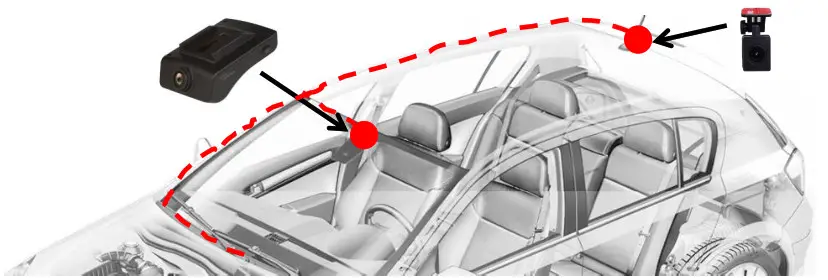
STEP 7: Route “LVDS cable”
Route “LVDS cable” along with car ceiling, and connect to BK-200.
STEP 8:
Case 1: Connect to ASUKA Car-TV. (Suitable for using DVR along with HR-630 or HR-600)
BK-200 can be powered, controlled, and monitored by the ASUKA Car TV once they are properly connected. To do so, just use the interconnection cable provided to set up the connection.
Case 2: Connect to in-dash head unit.
After above installation steps, connect “General-type power able” to car power system and head unit. The description of power wire is listed as below:
– Yellow wire: connect to B+
– Red wire: connect to ACC signal
– Black wire: connect to GND
STEP 9: Insert a micro-SD card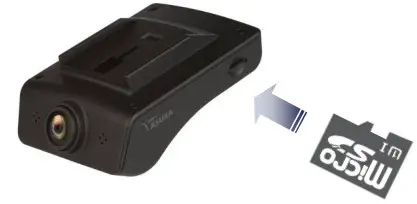
NOTE: For proper recording operations, the Micro-SD card used must support UHS speed class 1.
STEP 10: Turn on car engine and test it.
Turn car engine on and check whether BK-200 is powered on and recording automatically.
STEP 11: Finish and enjoy!
Initial Setting
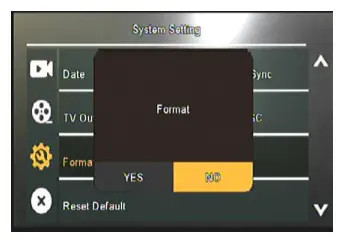
(1) Format the Micro-SD card
It is highly recommended that the micro-SD card for use within BK-200 shall be formatted BEFORE operation.
- Press key to pop up the menu list.
- Use
 &
&  key to choose the “System Setting”, and then press
 to enter the options available.
 - Select “Format SD card” option in System Setting menu, press , and then & properly to format the Micro-SD card.
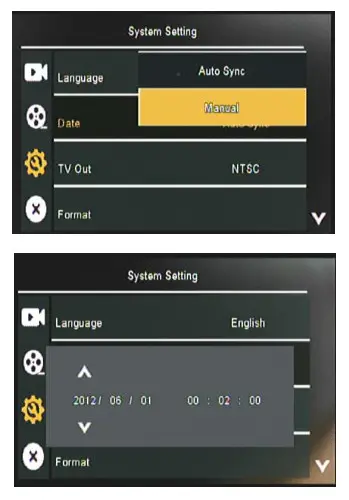
(2) Set up the “Date” information
- Press key to pop up the menu list.
- Use & key to choose the “System Setting”, and then press to enter options available.
- Select “Date”, and press toward next setting.
- Use & key to choose “Manual” toward further setting.
Button key’s operation in system setting mode:
MENU: Exit system setting.![]() : Enter/Confirm the selection.
: Enter/Confirm the selection.![]() : Move the selection upward.
: Move the selection upward.![]() : Move the selection downward.
: Move the selection downward.
Note:
If the BK-200 DVR is connected by ASUKA Car-TV, one could press “SRC” key in the remote controller to change the TV mode to DVR mode and start DVR operation.
Using BK-200
Recording
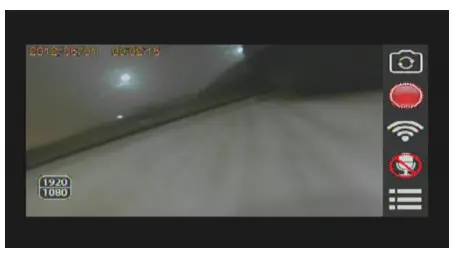
After the device is powered up, it will automatically enter the recording mode to perform recording operation. At this mode, the options available will appear as follows to allow users control or monitor the operation of BK-200.
Button key’s operation in recording mode:
MENU: Enter the system menu.![]() : Switch between front or rear camera.
: Switch between front or rear camera.![]() : Start/Stop recording.
: Start/Stop recording.
VI.1.1 Recording Modes
To deal with various circumstances, BK-200 will be intelligently operating in one of the following modes. The mode of recording operation is determined by BK-200 itself. User intervention is not required.
- Normal Mode Recording
Note that the BK-200 could automatically start recording the video after engine on. Once you switch off the engine, the recording file will be automatically saved and then shutdown BK-200. As time goes, when the SD card memory is full of recorded files, the most recent recorded file will “overwrite” the oldest recorded file. This is so-called “ Automatic Loop Recording”. - Emergency Mode Recording
When BK-200 detects any abnormal driving situation, such as collision, huge vibration, the BK-200 will automatically change to “Emergency Recording” mode and show icon on monitor. When an emergency event is occurred, a 1-min video file containing the scenario 15sec BEFORE and 45sec AFTER the event will be generated and stored at a special SD memory zone for extra protection. The memory space allocated for storing emergency video files is up to 8min.
As time goes, when the special zone of SD card memory is full of 8 recorded emergency files, the most recent recorded emergency file will “overwrite” the oldest recorded emergency file.
In the system menu, one could either enter other operating mode or configure the device settings.
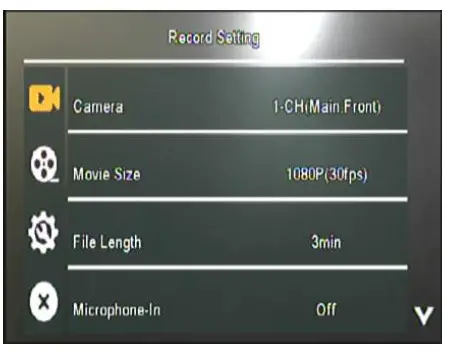
![]() 1. Options Setting◼
1. Options Setting◼
- Camera:
Adjust camera display mode. - Movie Size:
Adjust preferring resolution. - File Length:
Adjust recording file length. - Microphone-In:
Switch on/off the Microphone-In. - G-Sensor Sensitivity:
Adjust sensitivity level of G-Sensor.
Button key’s operation in recording setting mode:
MENU: Back to the upper layer menu.![]() : Apply or select the current item.
: Apply or select the current item.![]() : Move the selection up.
: Move the selection up.![]() : Move the selection down..
: Move the selection down..
 2. Playback Mode
In playback mode, you can quickly switch among categories of front camera, rear camera and emergency recording files, browse and select the file to play or perform management operations.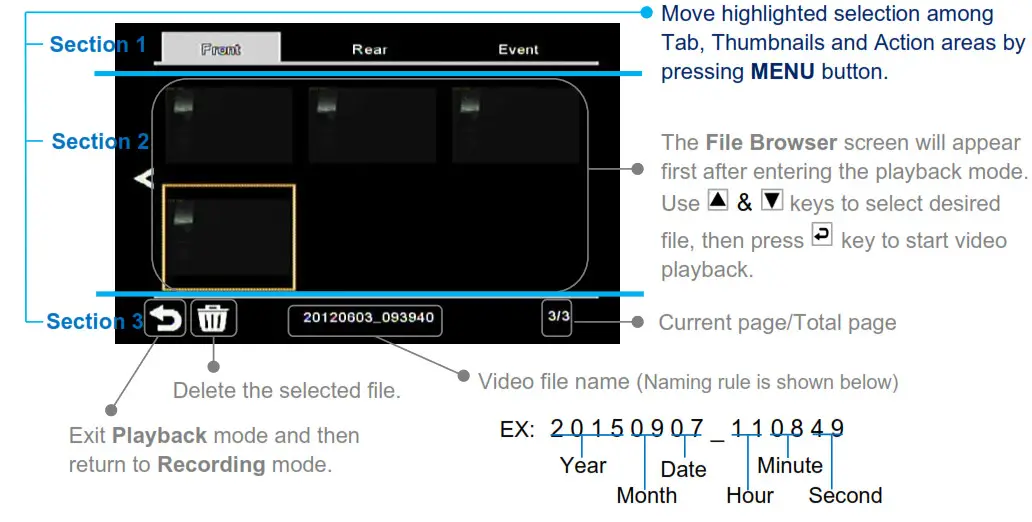
Video Play
After a file is selected from the File Browser screen, it will start playing the video. When the current file reaches its end, the next file will be played automatically.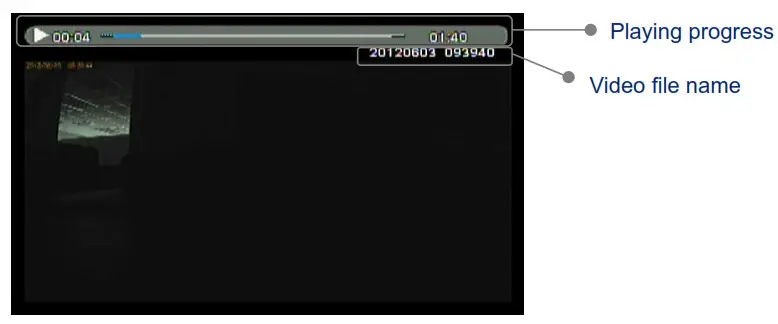
Button key’s operation in video play mode:
MENU : Go back to File Browser screen.![]() : Play / Pause.
: Play / Pause.![]() : Play the previous file.
: Play the previous file.![]() : Play the next file.
: Play the next file.
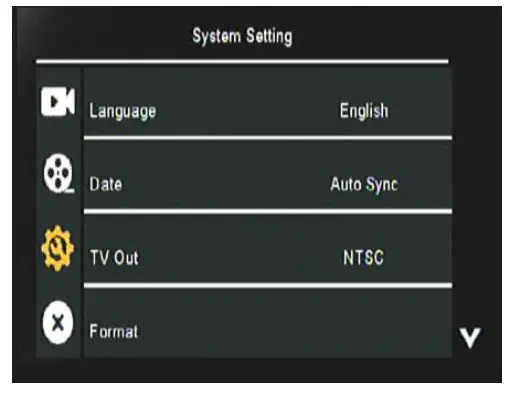
 3. System Setting
Language:
Setup desired language.
- Date:
Setup the date information. - TV Out:
Setup display output format. - Format:
Format the recording file. - Reset Default:
Erase all contents & setting andreturn back factory setting. - About Device:
See more device information.
Button key’s operation in system setting mode:
MENU: Back to the upper layer menu.![]() : Apply or select the current item.
: Apply or select the current item.![]() : Move the selection up.
: Move the selection up.![]() : Move the selection down.
: Move the selection down.
X 2.4 Exit
Close the menu and back to recording mode.
Software Update
After acquiring a new version of BK-200 software, please follow below steps to upgrade your device.
- Unzip the upgrade file and then copy it to the root folder of a micro-SD card
- Insert the micro-SD card into BK-200, and then power on the device
- The confirmation dialog will show up. Select “YES” to proceed.

- The device will start upgrading its software. Do not remove the power when it’s in progress.

- It takes several minutes to complete the process. The device will restart automatically when the upgrade is done


Specification
Main Unit
| Lens & CMOS Sensor | |
| – 4-megapixel sensor with best-in-class low-light sensitivity and high dynamic range. – Optical imaging lens containing built-in 6 glasses with wide F/1.8 aperture and 4M pixels resolution. – Wide view angle: 122°(H), 63°(V), 160°(D) | |
| Supported recording mode | |
| – Automatic and loop recording – Emergency recording: built-in 3-axies G-sensor for crash detection and data lock during emergency – Single/Dual-channel HD recording | |
| Recording Format/Specification | |
| Number of channel supported | 2 |
| AudioNideo compression | PCM/H.264 |
| Max. resolution@Rate | 1920x1080p@30fps |
| Recording time/GB | 12 mins/GB with single-ch. full-HD@30fps 18 mins/GB with single-ch. HD@30fps |
| Storage Memory | Micro-SD card – Support SD, SDHC, SDXC type Micro-SD card, up to 128GB. – Micro-SD card used must support class 10 or UHS speed class 1. |
| Others Main Functions | |
| – Record voice via built-in microphone – Provide warning alert and status info. via built-in buzzer and LED indicators. | |
| I/O Interface | |
| AV & Power Port | BATT, ACC, GND, Video out(CVBS)x1, Control signals |
| Others | 4 control keys, micro-SD card slot, LED indicators, built-in buzzer, built-in microphone |
| Power/Power Consumption | |
| (DC 12V in) / 3W | |
| Operating Temperature | |
| -20-65 C | |
| Dimension | |
| 65mm(W)x95mm(L)x39mm(H) | |
Rear Camera
| Lens & CMOS Sensor | |
| 4-megapixel sensor with best-in-class low-light sensitivity and high dynamic range. – Optical imaging lens containing built-in 6 glasses with wide F/1.8 aperture and 4M pixels resolution. Wide view angle: 122°(H), 63°(V), 160°(D) | |
| Video Quality | |
| Max. resolution @Rate | 1920x1080p@30fps |
| I/O Interface | |
| Camera Port | +5V in, GND, LVDS signals out |
| Power Consumption / Operating Temperature | |
| 1.5W / -20-65 ( | |
| Dimension | |
| 29mm(W)x39mm(L)x35mm(H) | |


