GRIZZL-E GR1 Level 2 EV Charger
Instructions

Connect Grizzl-E to Wi-Fi
The following instructions are for all Grizzl-E Smart purchased before January 31, 2022.
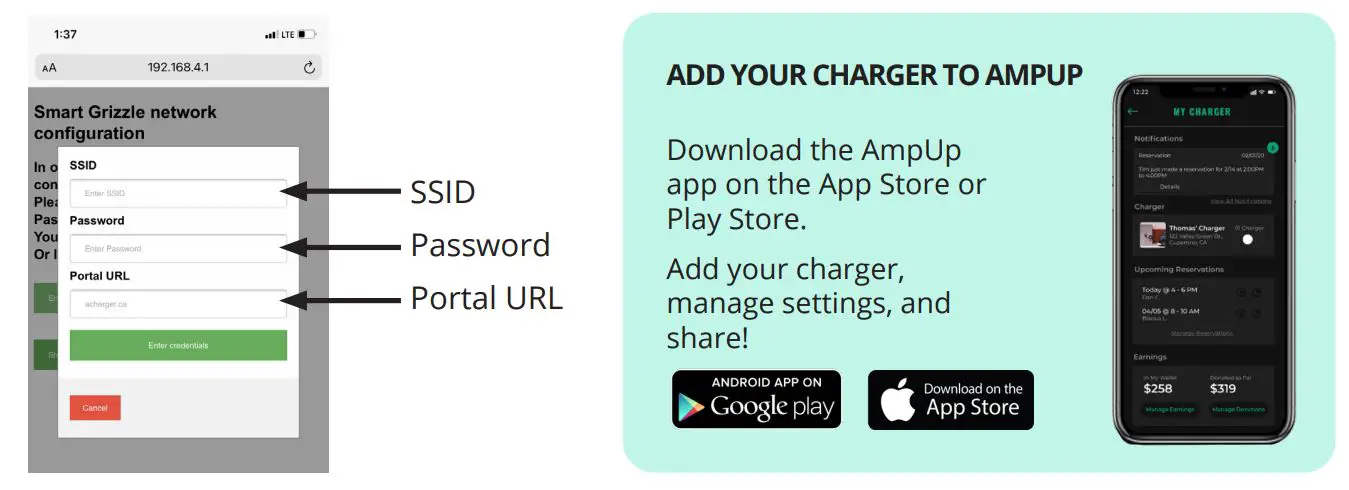
Step 1: Open the Wi-Fi Settings on your phone or desktop. Select the network UC_Smart_ [ChargerSerial#]
Step 2: Open your browser page. Type in the IP address 192.168.4.1.
Step 3: A webpage will load. Select the Enter Router Credentials button.
Step 4: Enter your router’s SSID and password.
Step 5: Enter the following URL into the Portal URL field: centralsystem.ampup.io/ocpp/united-chargers/[ChargerSerial#]
Note: If you are unable to type a URL please fill out the Technical Support Form on grizzl-e.com.
Step 6: Select the Enter Credentials button.
Step 7: Verify that you are connected. If connection is successful the indicator light will alternate between Blue and Light Blue.
Set Up Charger on AmpUp
Step 1: From the home screen/login screen, select the Profile Screen.
Step 2: Select the My Home Charger field.

Step 3: Select the Add Charger button
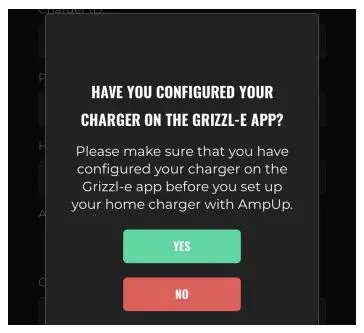
Step 4: Select Grizzl-E from the Charger Brand drop down list. Confirm that you have configured your Grizzl-E Charger.
(Completed when charger was connected to Wi-Fi).
Step 5: Enter the following into Add Home Charger Form:
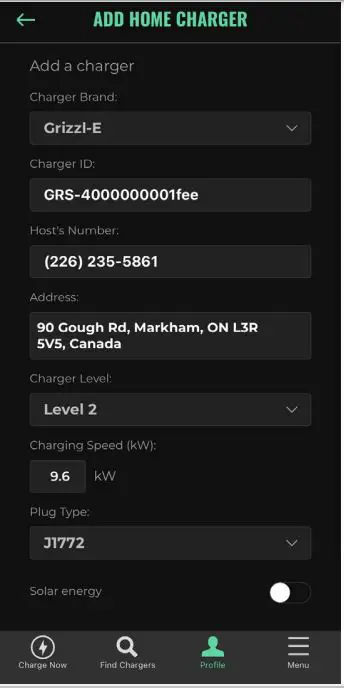
- Enter the Charger Serial Number in the Charger ID field.
- Enter your phone Number in the Host’s Number field.
- Enter your address into the Address field.
- Select Level 2 for Charger Level
- Enter the Charging speed based on the units DIP Switches: 9.6kW for 40A, 7.7kW for 32A, 5.8kW for 24A, 3.8kW for 16A
- Select J1772 for Plug Type.
Step 6: Select the Next button.
Step 7: Review the information and Select the Confirm button.
![]() 833-692-6787
833-692-6787


