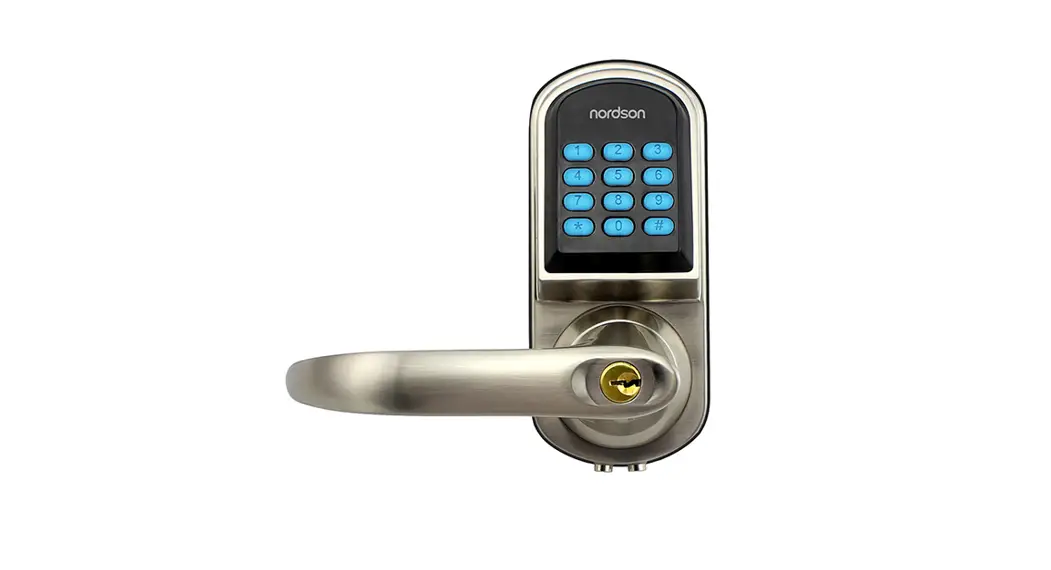
![]() S200MF Code Smart Entry Keyless Lock
S200MF Code Smart Entry Keyless Lock
User Manual

Product instruction
 | Item No. | S200MF |
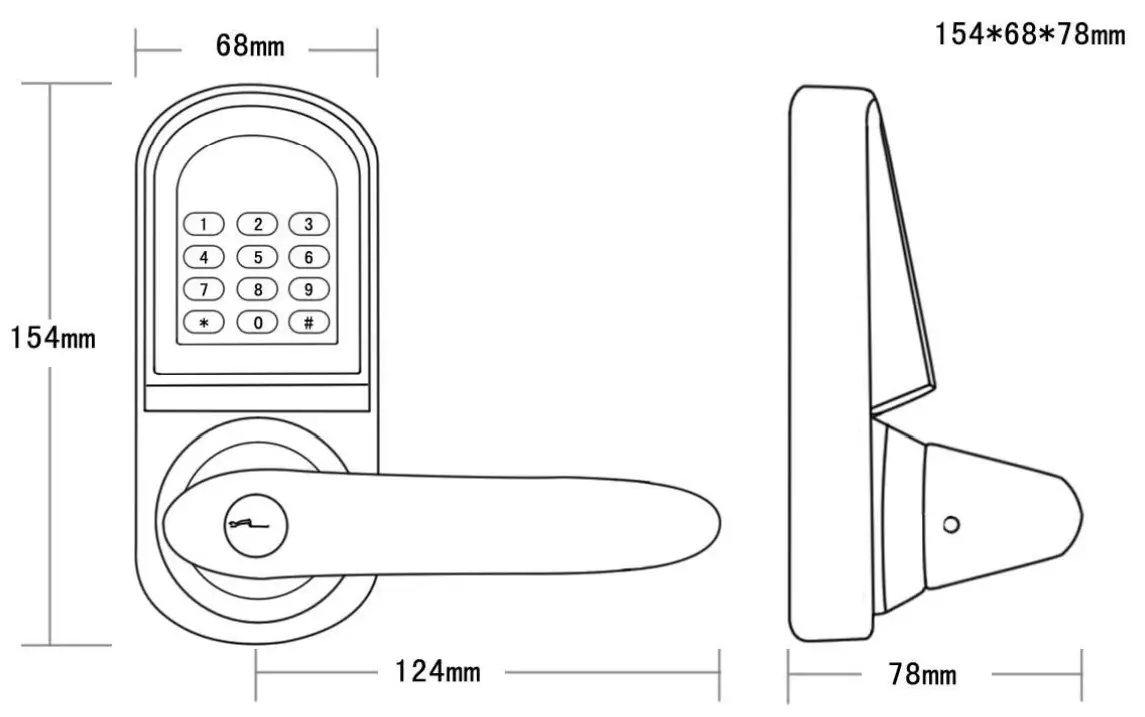
| Dimension | 154’68*78mm | |
| Material | Zinc Alloy | |
| Weight | 2.3Kgs |
Standard Single latch :
Latch length can be adjusted as 60mm or 70mm
Technical Specification
| Card type | Mifare-1 Card |
| Inductive distance | 3cm |
| Unlock way | Card, Code, Code+Card, Mechanical key |
| Code length | 4-8 digits |
| User capacity | 200 users |
| Power supply | 4pcs AA batteries |
| Static current | ≤30uA |
| Working current | ≤200mA |
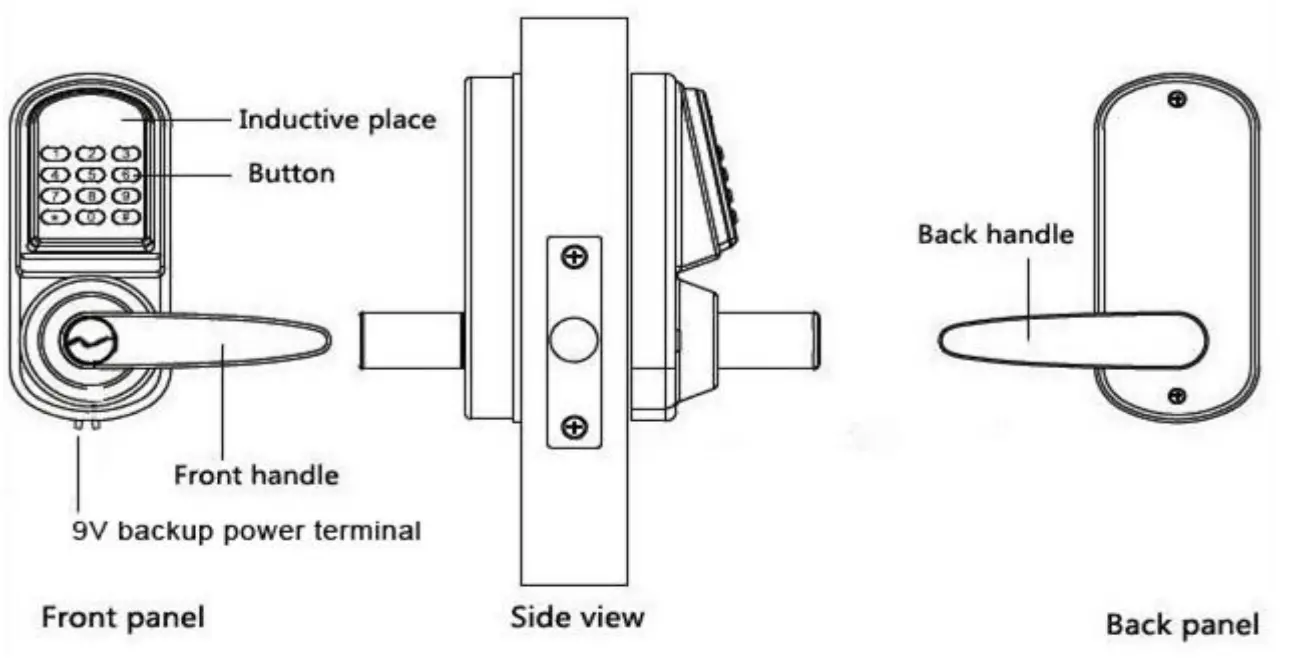
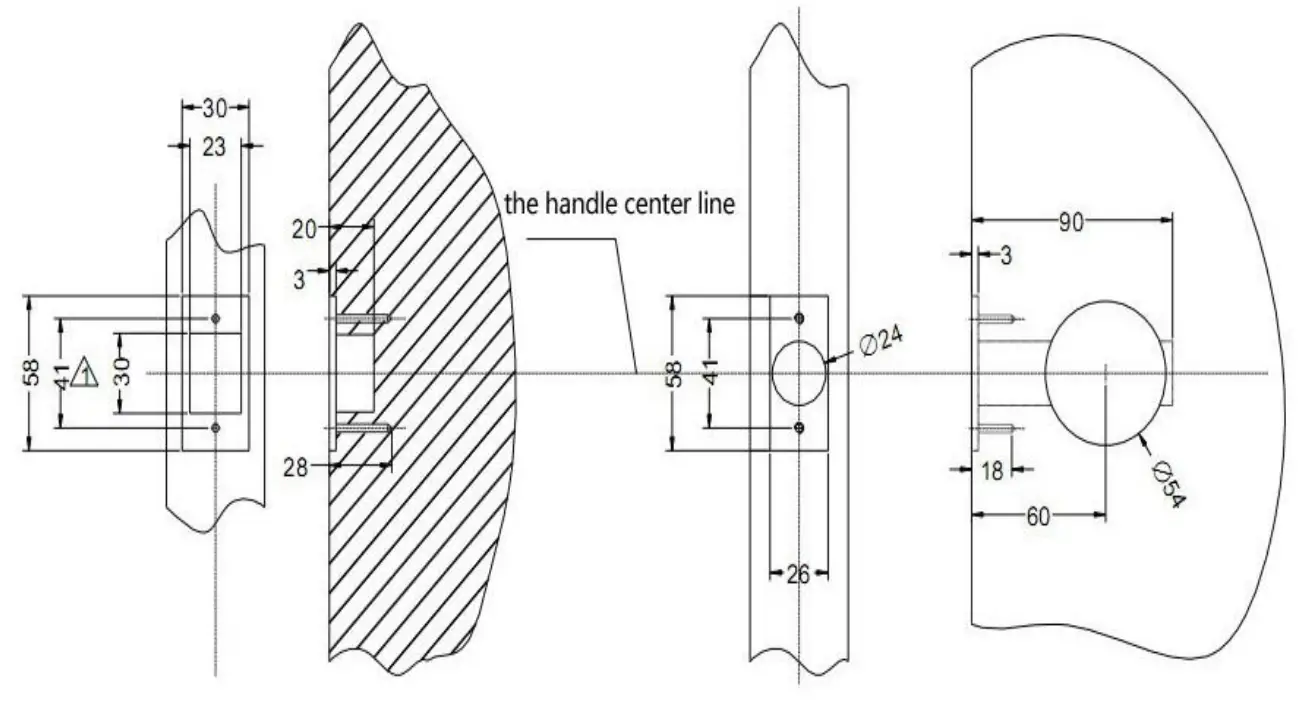
Item Dimension:
Door drill hole map:
Installation Guide:
Installation condition
- Door frame≧110mm (Thickness different doors)
- Door thickness: 38-50mm, over 50mm doors spare parts need custom made.
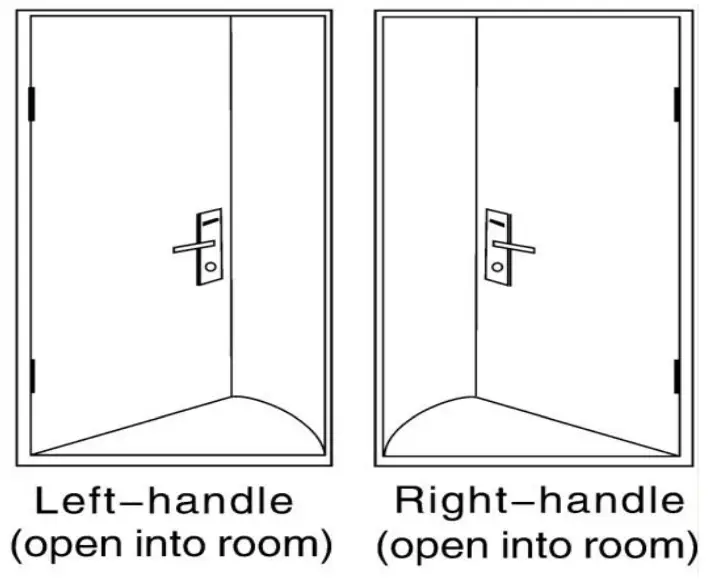
- Handle Orientation
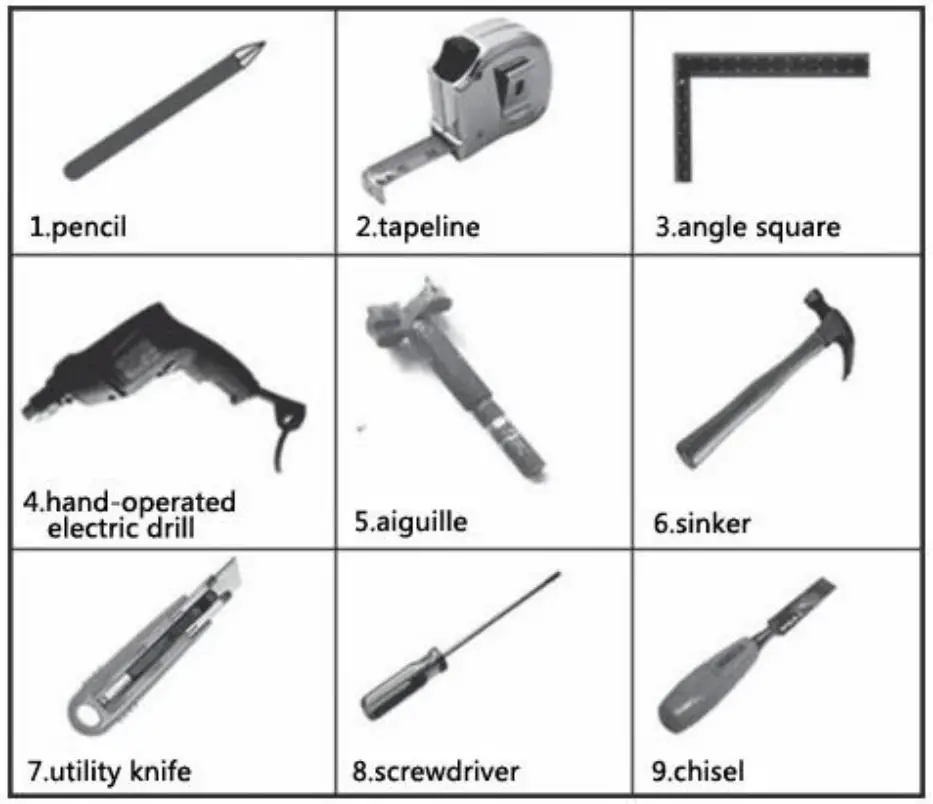
Installation tools
Installation instructions step by step
 | 1. Line drawing 1-1. Draw a horizontal center line inside and outside the door at 1 m from the ground. 1-2. Fold the hole template, make the Handle center line align at the door horizontal center line, then draw out the hole lines at the front and side. | 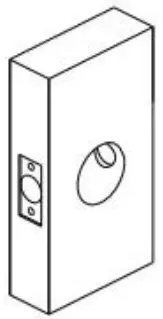 | 2. Hole drilling Make out the holes for the lock panel and the mortise lock according to the drill hole map. |
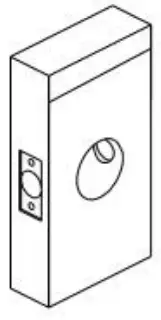
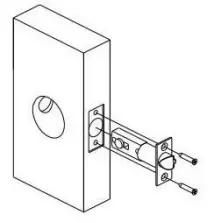 | 3. Mortise lock installation 3-1. Hold the mortise lock into the side hole, using 2 pcs of Fa5*20 Screws fix to the door. | 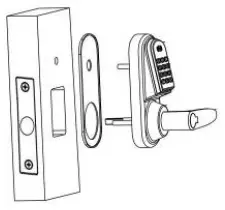 | 4. Front panel installation 4-1. Cover the waterproofing rubber mat to the front panel. 4-2. Make the Square shaft hole on the panel aim at the mortise lock. 4-3. Fix the front panel to the door. |
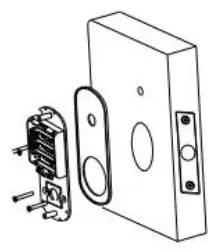 | 5. Back panel installation 5-1. Cover the waterproofing rubber mat to the back panel, and connect the 2P plug from the front panel to the battery box. 5-2. Fix the back panel to the door by using 3 fixing screws. | 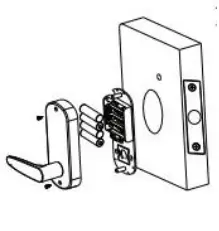 | 6. Battery installation Correctly Install 4 pcs of AA alkaline cell. |
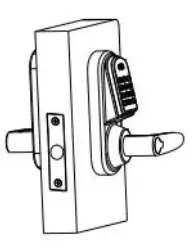 | 7. Debugging after installation 7-1. Turn the handle, and check the flexibility of both handles. 7-2. Insert the mechanical key, clockwise to open the door, and check if the key work normally. 7-3. Following the User operation instruction to test the card and code function. | 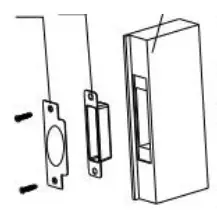 | 8. Door holder installation. 8-1. Get the door and door frame close, Get the door and door frame dose, to draw out the position of the latch and the hole position on the door frame. 8-2. Input the buckle box and striking plate to the door holder hole in order, and fix them with 2 pcs of Fa5*20 screws. 8-3. Check if all the latches are fully extended out after closing the door |
Operating Instruction
- Project Debugging Code: 0 (After the 4 pcs of AA battery is installed, without any setting, press “0” then “#” open the door directly. After setting, the Debugging Code of “0” automatic invalid.)
- After locks debugging is finished, the owner must modify the Master code and set the new Master code.
2.1 Master code: To add and delete the Guest Code User or the Card User.
The Master code can’t open the door.
2.2 The initial Master code:123456
2.3 Master code should be 4-8 digits.
2.4 Preparing work before modifying Master code:
2.41 Recover the Master code:operating steps Locks presentation Use a screwdriver to loosen the back panel of the 2 screws, dashboard the back panel, and press the button under the battery box for 10 seconds. Sound one “beep” and red light flash,“ After 10
second,” beep” 2 times, and blue light flash, succeed
recover the Master code of 123456.Note: This operation will clear all the users added before.
2.42 Prepare the New Master Code, 4-8 digits (eg.:12345678)
2.5 Modify the Master code (11#)Operating steps Locks presentation 1 Press “#” to start the lock “beep” 2 times, blue digit button background light, and the inductive place blue light flash. 2 Input the Initial Master
code:123456,then “#Lock status as above 3 Within 10 seconds(before the indicator light extinguish ) input “11” then “#” Lock status as above 4 Input the New Master Code,(4-8digits) then “#” Lock status as above 5 Input the New Master Code again, then “#” confirm. “beep” 4 times, indicator light extinguishes, New Master
Code set succeeds.
Add Normal User (01#)
3.1 At most can set 200 Users, including the Code User, Card User,, Code&Card User.
3.2 Set the User Group before adding the Normal User, each Group stands for one User.
Group No. 3 digits, from 001 to 200, and groups can’t reuse.
# Master Code # / Program Code # / Group No.# / Guest Open Door Code# / ##
3.3. Add the Code User.
3.31 Preparing work before adding the Code User:
3.311. Write down the User Group (001-200)
3.312. Write the Guest Code. (4-8 digits)
3.313. User Group should correspond to the Guest Code. Can’t set several Guest codes under one Group, nor the Same Guest Code under different Groups.
| Operating steps | Locks presentation | |
| 1 | Press “#” to start the lock | “beep” 2 times, blue digit button background light, and the inductive place blue light flash. |
| 2 | Input the “Master Code” then “#” | Lock status as above |
| 3 | Within 10 seconds(before the indicator light extinguish ) input “01” then “#” | Lock status as above |
| 4 | Within 10 seconds(before the indicator light extinguish ) input “Group No.” then “#” (Group No. can’t reuse. | Lock status as above |
| 5 | Within 10 seconds indicator light extinguish, input the”Guest Code” then “#” | Lock status as above |
| 6 | Press “#” 2 times. | First “#” “beep” 2 times, status as above Second”#” “beep” 3 times,Gust Code User added succeed. |
| 7 | After 15 seconds, or press”#”, Exit | A long time of ‘beep” indicator light extinguish. |
Under this Mode,use the Guest Code to open the door directly.
Open door operation :
| Operating steps | Locks presentation | |
| 1 | Input “Guest Code” then “#” | Digit button background blue light, indicator blue light,with one” beep” Lock motor sound of opening, turn the handle to open |
| 2 | After 5 seconds | “beep” 2 times, red light flashes 2 times, lock the door, and the indicator light extinguishes. |
3.5. Add the Card User.
3.51 Preparing work before adding the Card User:
3.511 Write down the User Group (001-200)
3.512 Prepare the Mifare Card.
3.513 User Group should correspond to the Card. Can’t set several cards under one Group, nor the Same card under different Groups.
| Operating steps | Locks presentation | |
| 1 | Press “#” to start the lock | “beep” 2 times, blue digit button background light, and the inductive place blue light flash. |
| 2 | Input the “Master Code” then “#” | Lock status as above |
| 3 | Within 10 seconds(before the indicator light extinguish ) input “01” then “#” | Lock status as above |
| ,:t | Within 10 seconds(before the indicator light extinguish ) input “Group No.” then “#” (Group No. can’t reuse. | Lock status as above |
| 5 | Within 10 seconds indicator light extinguish, get the “Card” close to the inductive place, then “#” | Lock status as above |
| 6 | Press “#” 2 times. | First “#” “beep” 2 times, status as above Second”#” “beep” 3 times, Gust Code User added succeed. |
| 7 | After 15 seconds, or press”#”, Exit | A long time of “” beep” indicator light extinguish. |
Under this Mode,use the Card to open the door directly.
Open door operation :
| Operating steps | Locks presentation | |
| 1 | Get the Card close to the inductive place. | Digit button background blue light, indicator blue light,with one” beep” Lock motor sound of opening, turn the handle to open |
| 2 | After 5 seconds | “beep” 2 times, red light flashes 2 times, lock the door, and the indicator light extinguishes. |
3.6. Add Code&Card User
3.61Preparing work before adding the Code&Card User:
3.611Write down the User Group (001-200)
3.612. Prepare the Card and Code.
3.613. User Group should correspond to the Guest Code&Card. Can’t set several Guest Code&Card under one Group, nor the Same Guest Code&Card under different Groups.
| Operating steps | Locks presentation | |
| 1 | Press “#” to start the lock | “beep” 2 times, blue digit button background light, and the inductive place blue light flash. |
| 2 | Input the “Master Code” then “#” | Lock status as above |
| 3 | Within 10 seconds(before the indicator light extinguish ) input “01” then “#” | Lock status as above |
| 4 | Within 10 seconds(before the indicator light extinguish ) input “Group No.” then “#” (Group No. can’t reuse. | Lock status as above |
| 5 | Within 10 seconds indicator light extinguishes, input the“Guest Code” then “#” | Lock status as above |
| 6 | Within 10 seconds indicator light extinguish, get the “Card” close to the inductive place, then “#” | Lock status as above |
| 7 | Press “#” 2 times. | First “#” “beep” 2 times, status as above Second”#” “beep” 3 times, Gust Code User added succeed. |
| 8 | After 15 seconds, or press”#”, Exit | A long time of “beep” indicator light extinguish. |
Note: Set the Code first, then the Card.
Under this Mode, use the Card together with the Code to open the door.
Open door operation :
| Operating steps | Locks presentation | |
| 1 | Get the “Card” close to the inductive place. | “beep” 2 times, blue digit button background light, and the inductive place blue light flash. |
| 2 | Input the “Guest Code” then “#”” | Digit button background blue light, indicator blue light, with one” beep” Lock motor sound of opening, turn the handle to open |
| 3 | After 5 seconds | “beep” 2 times, red light flashes 2 times, lock the door, and the indicator light extinguishes. |
Note: Guest Code and the Card,no matter which first.
4. Normal User Block up, Start using and Delete
4.1 Normal User Block up: (02#)
| Operating steps | Locks presentation | |
| 1 | Press “#” to start the lock | “beep” 2 times, blue digit button background light, and the inductive place blue light flash. |
| 2 | Input the “Master Code” then “#” | Lock status as above |
| 3 | Within 10 seconds(before the indicator light extinguish ) input “02” then “#” | Lock status as above |
| 4 | Within 10 seconds(before the indicator light extinguish ) input “Group No.” then “#”(Group No. which u wish to Block up) | “beep” 2 times, blue digit button background light, and the inductive place blue light flash. Block up User success. |
| 5 | After 15 seconds, or press”#”, Exit | A long time of “beep” indicator light extinguish. |
4.2 Normal User Start using. (03#)
| Operating steps | Locks presentation | |
| 1 | Press “#” to start the lock | “beep” 2 times, blue digit button background light, and the inductive place blue light flash. |
| 2 | Input the “Master Code” then “#” | Lock status as above |
| 3 | Within 10 seconds(before the indicator light extinguish ) input “03” then “#” | Lock status as above |
| 4 | Within 10 seconds(before the indicator light extinguish ) input “Group No.” then “#”(Group No. which u wish to Start using) | “beep” 2 times, blue digit button background light, and the inductive place blue light flash. Appointed User Start using succeed. |
| 5 | After 15 seconds, or press”#”, Exit | A long time of “” beep” indicator light extinguish. |
Note: You can Start several Users using at one time.
4.3 Normal User Delete:(44#)
| Operating steps | Locks presentation | |
| 1 | Press “#” to start the lock | “beep” 2 times,blue digit button background light,and the inductive place blue light flash. |
| 2 | Input the “Master Code” then “#” | Lock status as above |
| 3 | Within 10 seconds(before the indicator light extinguish ) input “44” then “#” | Lock status as above |
| 4 | Within 10 seconds(before the indicator light extinguish ) input “Group No.” then “#”(Group No. which you wish to Delete) | “beep” 2 times, blue digit button background light, and the inductive place blue light flash. Appointed User Delete to succeed. |
| 5 | After 15 seconds, or press”#”, Exit | A long time of “beep” indicator light extinguish. |
Note: You can Delete several Users at one time.
5. Add Single Use Code User & Delete
5.1 Add Single Use Code User (33#)
| Operating steps | Locks presentation | |
| 1 | Press “#” to start the lock | “beep” 2 times, blue digit button background light, and the inductive place blue light flash. |
| 2 | Input the “Master Code” then “#” | Lock status as above |
| 3 | Within 10 seconds(before the indicator light extinguish ) input “33” then “if | Lock status as above |
| 4 | Within 10 seconds(before the indicator light extinguish ) input “Group No.” then “#” (Group No. can’t reuse. | Lock status as above |
| 5 | Within 10 seconds indicator light extinguish, input the”Single Use Code” (4-8 digits) then “#” | Lock status as above |
| 6 | Press “#” 2 times. | First “#” “beep” 2 times, status as above Second”#” “beep” 3 times,Gust Code User added succeed. |
| 7 | After 15 seconds, or press”#”, Exit | A long time of “beep” indicator light extinguish. |
5.2 Delete Single Use Code User(23#)
| Operating steps | Locks presentation | |
| 1 | Press “#” to start the lock | “beep” 2 times, blue digit button background light, and the inductive place blue light flash. |
| 2 | Input the “Master Code” then “#” | Lock status as above |
| 3 | Within 10 seconds(before the indicator light extinguish ) input “23” then “#” | Lock status as above |
| 4 | Within 10 seconds(before the indicator light extinguish ) input “Group No.” then “#”(Group No. which you wish to Delete) | “beep” 2 times, blue digit button background light, and the inductive place blue light flash. Appointed User Delete to succeed. |
| 5 | After 15 seconds, or press”#”, Exit | A long time of “beep” indicator light extinguish. |
Encryption
This function is aimed at preventing codes from being observed while being entered.
Step 1.
Enter any sequence of the digits to confuse the observer.
Step 2.
Enter the user code, followed by the “#”.
Example:
The user code is “87373557”.
Enter any digits to confuse the observer: 31126405
Enter the original user code: 87373557 and press “#”
Program Code No.:
| Code No. | Function | |
| 1 | 11 | Modify Master Code |
| 2 | 1 | Add Normal User |
| 3 | 2 | Block up Normal User |
| 4 | 3 | Start Using Normal User |
| 5 | 23 | Delete Single Use Code User |
| 6 | 33 | Add Single Use Code User |
| 7 | 44 | Delete Normal User |


