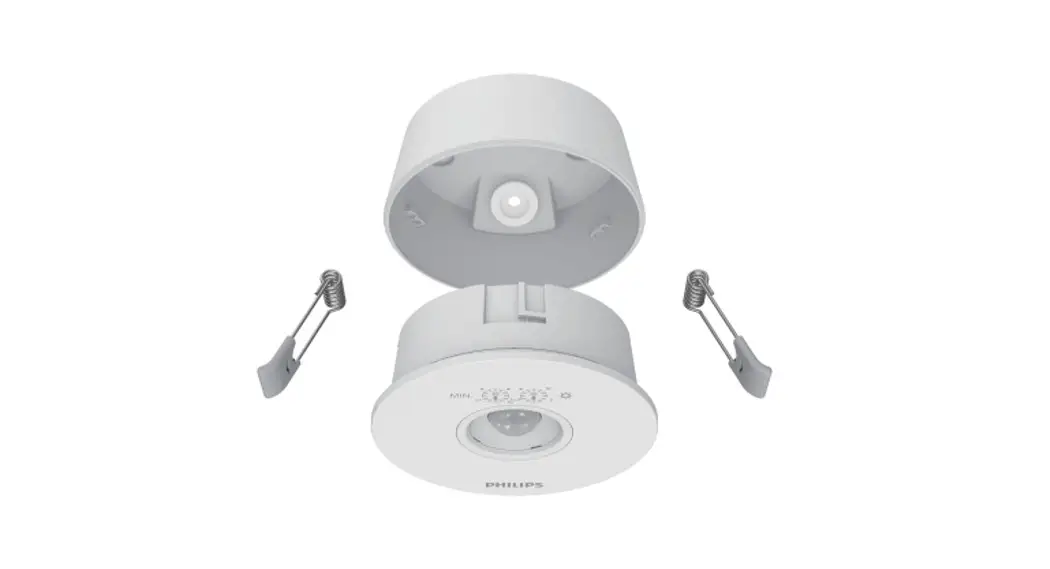
![]() SES LCM 1660 Occ PIR WH
SES LCM 1660 Occ PIR WH
Instruction Manual 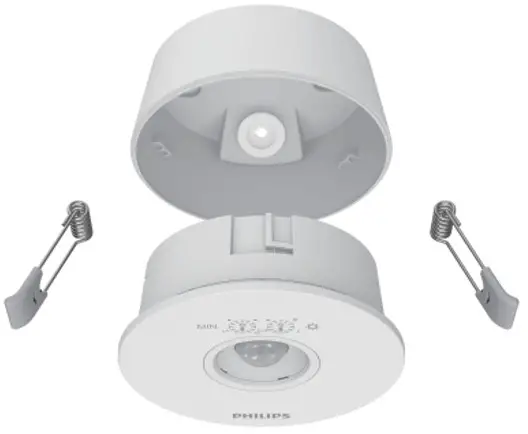
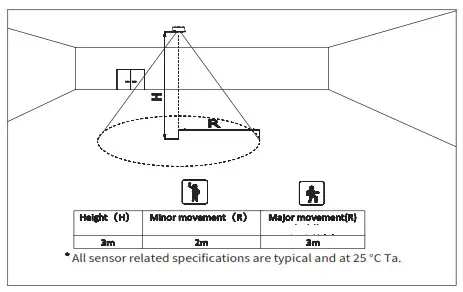
PIR sensing range
Ceiling installation
Installation height: 2.5-4m (typical value: 3m)
Sensing distance (Figure 1-1): radius 3M (according to NEMA test specification)
This radius is hanging at 3m height,if you hanging at other heights, the inspection distance will be reduced.
Power
Sensor working voltage range 220-240VAC 50/60Hz
When the load is not connected, the static power consumption is less than 1.2W
Maximum load current 4A (resistive load)
Product description
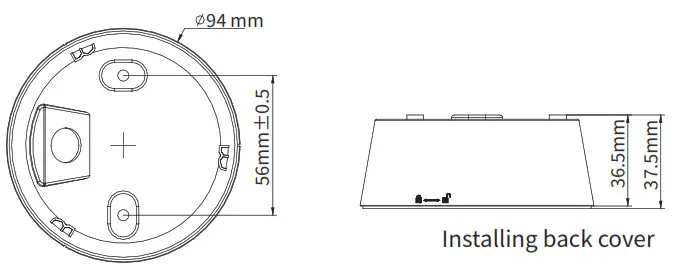
| No. | 12NC | EAN1 | EAN3 | SAP Description | SIZE |
| No.2 | 911401542702 | 6923828657369 | 6923828657406 | SES LCM 1060 Occ PIR WEI | 094×37.5mm |
Surface installation method
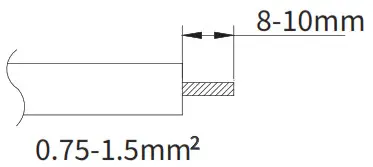
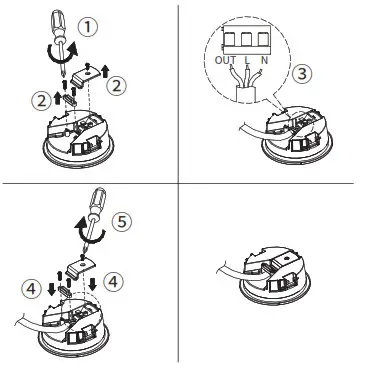
- Connect the neutral wire N/ live wire L / output wire OUT through the connector. The length o f tin stripping is 8-10mm, and the installation wire cannot be removed easily
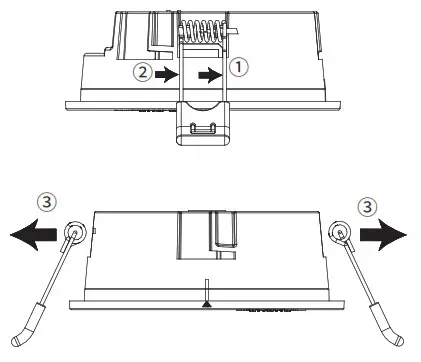
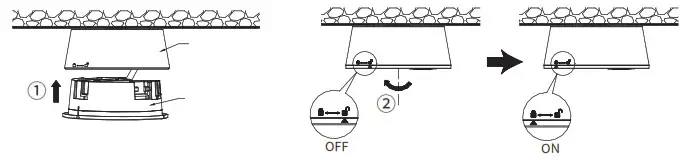
- Remove installing back cover
- Remove the snap fasteners on both sides
- Route the external power cable into the rear cover of the wall, and fix the rear cover to the required position using screws.
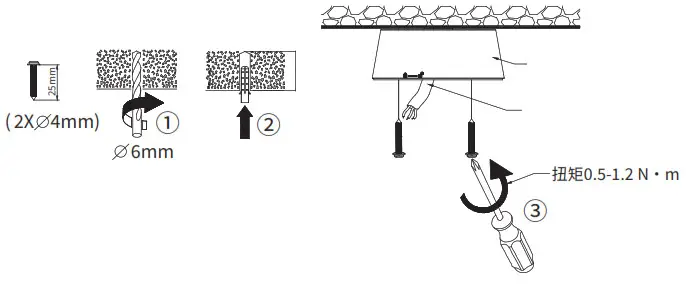
- Then connect the external power line to the terminal post, and install the housing into the back cover. (Note: The extra external power cord should be withdrawn from the sensor, not left inside the sensor)

- The concealed installation fixed position shall be able to bear the weight o f 2450g, (Surface installation should be able to bear the weight of 600g).
- Product protection grade: IP20 (For indoor use only).
Embedded installation method
- Connect the neutral line N/ live line L / output line OUT through the connector. The length of tin stripping is 8-10mm, and the installation line cannot be pulled
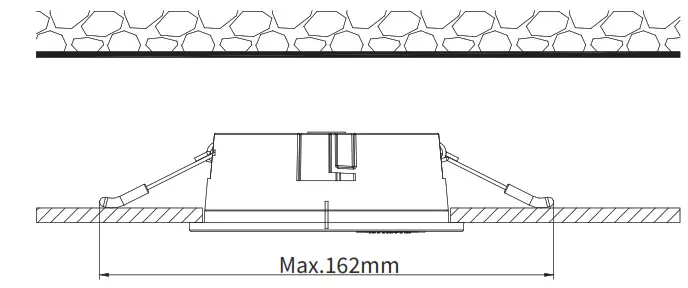
OUT easily; - Opening diameter : Ø85-87mm;
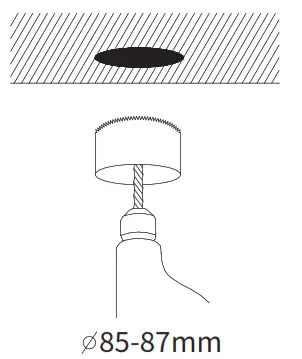
- Then turn the fixed spring buckle upward and put it into the opening position;
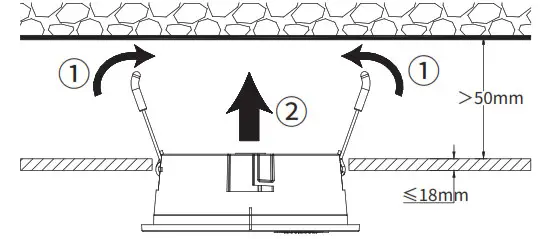
- Finally, mount the housing together on the wall
- The concealed installation fixed position shall be able to bear the weight of 2450g, (Surface installation should be able to bear the weight o f 600g).
- Product protection grade: IP20 ( For indoor use only).
Wiring diagram
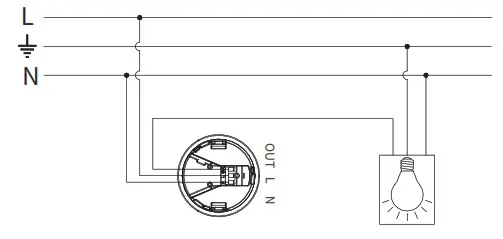
General wiring diagram 1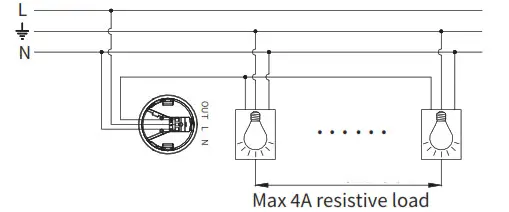
General wiring diagram 2
Calculation method of the number o f loadable lamps:
Divide the inrush current of the maximum load by the inrush current of the lamps.
Note: I f multiple lamps are used in one area, the minimum distance between the two sensors should be 1.5m. I t can prevent false triggering.
Wiring steps
Sensor function setting
- After powering on, th e sensor will warm up for about 40 seconds (less than 1 minute) and enter the working mode.
- Adjustment time button such as”MIN.”: adjust the hold on time. You can get different hold on time by adjust t h e time knob.
Below i s the time instruction.
| 2min+ 12s | 5min+ 30s | 15min+ 90s | 30min+3min |
 | |||
Note:
- Once the sensor light isturned on, the timing cycle starts again when the sensor detects the sensor before the light is turned off.
- If the time knob is adjusted during the light is on, the latest time value will be activated.
Adjust the “LUX” button: the sensor contains a light sensitive element device to distinguish the brightness around the sensor.
This Lu x levelis vertically illuminated into the sensor light sensation in the darkroom experimental environ- ment.
| Daylight switching off | Daylight switching on | ||
 | |||
| Function off | Approximate 10lux | Approximate 30lux | Approximate 100lux |
Technical parameters
voltage: 220V-240Vac 50/60Hz
load: Max 4A resistive load
Induction angle: Maximum 360° (high hanging ceiling)
Mounting height: 2.5-4m (typical height 3m)
Induction distance: radius 3m (at height 3m, Ta 25°C)
Duration o f light on: 3 switchs can be adjustable (threshold 10/30/100lux)
External brightness level: Adjustable from 2min+12s to 30min+3min
Dustproof and waterproof grade: IP20
Load Peak Inrush Current: <100A
? Please note that:
When the external illumination into the sensor exceeds the threshold, the lamp will not be triggered to light up by the movement signal
The light intensity tap value of the threshold i s defined according to the triggering light intensityo f the 90 ° vertical incident sensor on the front in the darkroom.
The threshold can be adjusted in 3 gears, and the customer can adjust itto the appropriate gear position according to the field effect.
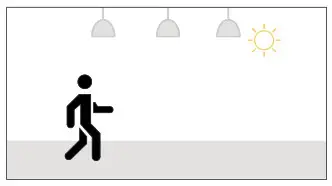
When the external ambient light is bright engough Even detected the motion object.Sensor keep luminaire off.
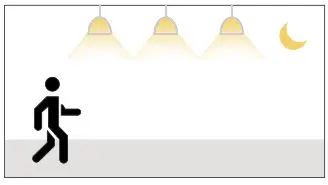
When the external ambient light is under preset photosensitive value. The sensor enter into motion detection mode.
After the hold time, When the sensor does not detect the moving object, the lamp off.
Please Pay Attention
- The sensor should be installed at least 2 meters away from the heat source, including air conditioning, heater, fireplace and other heating equipment

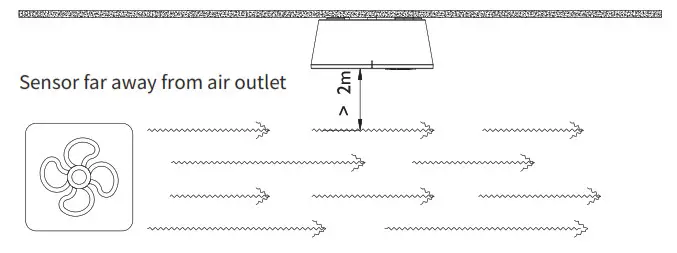
- The sensor installation should be more than 2 meters away from the location of the air outlet, which includes the air outlet of ventilation pipe, air condi- tioning air outlet, fan and other air outlet equipment
- There can be no shelter within the sensing range
- The working principle of sensor is to sense the differ- ence between target and ambient temperature .In winter, if people wear too thick clothes, hats and gloves may not be able to sense, if people wear less clothes, the sensing distance will become far, summer temperature close to the human body temperature, the sensing distance will become close.
- The sensor should be installed far away from large equipment, the strong electromagnetic radiation and surges of large equipment may interfere or damage with the sensor.
- If too much dust accumulates on the induction probe, it will affect the induction distance. Itis recommended to wipe the lens gently with asoft, dry cloth.
- Please read this manual carefully before installing or using this product.
- The sensor should be installed far away from the door or window where there is wind speed and convection, otherwise i t may be triggered frequently by mistake.
- It is recommended that sensors be installed at a ceiling height of 3m to ensure mot ion coverage and detection range.
- Keep sensors away from routers and other signal devices (Zigbee, WIFI, etc.).
- Switch switching time i s more than 5s to avoid incom- plete recovery of the relay during the use o f the prod- uct.
- Do not collision lens with hard objects.
- Do not press the lens by hand.
- If the lens is deformed, contact the dealer to replace it.
- If effective induction signal is generated during the lighting, the lighting time will be postponed. If some- one adjusts the time during the light, it takes effect immediately.

The OccuSwitch is designed for use in offices and similar applications, including toilets, storage rooms, etc.
![]() Signify Luminaires (Shanghai) Co., Ltd.
Signify Luminaires (Shanghai) Co., Ltd.
Address:2F, Building 1, No. 2555 Hechuan Road,Minhang District, Shanghai,
P.R. China
Postalcode:200233


