Hisense DH-70KP1SDLE Dehumidifier
For questions about features, operation/performance, parts or service, call: 1-877-465-3566 Para preguntas sobre caracterf sticas, funcionamiento, rendimiento, piezas servicio, llame al: 1-877-465-3566
DEHUMIDIFIER SAFETY
Your safety and safety of others are very important
We have provided many important safety messages in this manual and on your appliance. Always read and obey all safety messages.
- This is the safety alert symbol. This symbol alerts you to potential hazards that can kill or hurt you and others. All safety messages will follow the safety alert symbol with the word “DANGER”or”WARNING” These words mean:
DANGER You can be seriously injured if you do not immediately follow instructions.
WARNING You can be seriously injured if you do not follow instructions.
All safety messages will tell you what the potential hazards is, tell you how to reduce the chance of injury, and tell you what can happen if the instructions are not followed.
IMPORTANT SAFETY INSTRUCTIONS
WARNING: To reduce the risk of fire, electric shock, injury or sickness when using your dehumidifier, follow these basic precautions:
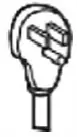
- Plug into a grounded 3 prong outle
- Do not remove ground prong.
- Do not use an adapter.
- Do the an extension cord. up/QGP dehumidifier before servicing.
- Do not drink water collected in the water bucket.
SAVE THESE INSTRUCTIONS
DISPOSING OF THE UNIT
- Before throwing out the device, it is necessary to remove the battery cells and dispose of them safety, by recycling if possible.
- When you need to disposal of the unit, consult dealer. If pipes are removed incorrectly, refrigerant may leak out and come contact with your skin, causing injury. Releasing refrigerant into the atmosphere damages the environment.
- Please recycle or dispose of the packaging material of the product in an environmentally responsible manner.
- To avoid damage to the compressor, never store or ship the appliance upside down or sideways.
- The appliance is not intended for use by Children or people without supervision. Children should be supervised to ensure that they do not play with the appliance.
State of California Proposition 65 Warnings:
WARNING: This product contains one or more chemicals known to the State of California to cause cancer. WARNING: This product contains one or more chemicals known to the State of California to cause birth defects or other reproductive harm.
INSTALLATION REQUIREMENTS
Electrical Requirements
WARNING
- Electrical Shock Hazard
- Plug into a grounded three-prong outlet.
- Do not remove ground prong.
- Do not use an adapter.
- Do not use an extension cord.
- Failure to follow these instructions can result in death, fire, or electrical shock.
Specific electrical requirements are listed in the chart below. Follow the requirements for the type of plug on the power supply cord.
Power supply cord Wiring requirements
- 115 V (103.5 min. to 126.5 max.)
- 15 A time-delay fuse or circuit breaker.

Recommended Grounding Method
This dehumidifier must be grounded. The dehumidifier is equipped with a power supply cord with a three-prong grounding plug. The cord must be plugged into a grounded three-prong outlet. Grounded in accordance with all local codes and ordinances. If an outlet is not available, it is the customer’s responsibility to have a properly grounded three-prong outlet installed by a qualified electrical installer
It is the customers responsibility:
- lo contact a qualified electrical installer.
- To assure that the electrical installation is adequate and conforms to the Nation Electrical Code, ANSI/NFPA 70-last edition, and all local codes and ordinances.
Copies of the standards listed may be obtained from: Nation Fire Protection Association 1 Battery march Park QuiffY, MA 02169-7471
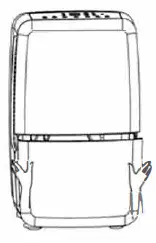
Location Requirements
NOTE: ‘bur model may differ from the one shown.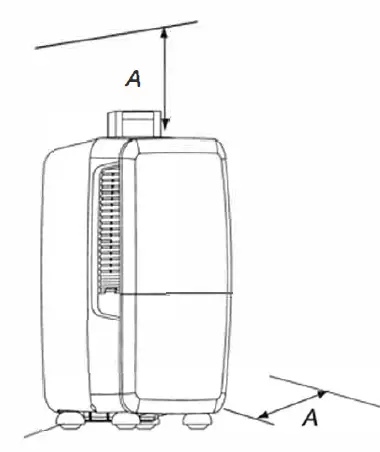
A. 12″ to 18″ (30.5 to 45.7 cm)
- Allow at least 12″ to 18″ (30.5cm to 45.7 cm) of space on the side of the dehumidifier for models with side louvres and above the dehumidifier for models with top louvres.
- You will need a surface strong enough to support the dehumidifier when its bucket is full of water.
- You will need a surface level enough to keep the water from spilling when the bucket is full of water.
- Keep all outside doors, windows and other openings closed when you are operating the dehumidifier. Humid outdoor air will increase the dehumidifiers workload
- Install the dehumidifier in an area where the temperature will not fall below 38 F (3°C ). Lower temperatures will cause performance to drop.
- Do not block the louvres on the front panel and /or the side panel.
DEHUMIDIFIER USE
Setting the Controls
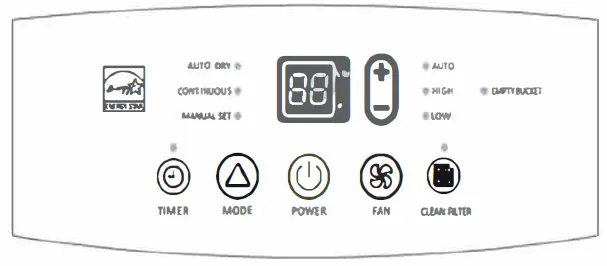
Control Panel
- Control Type1

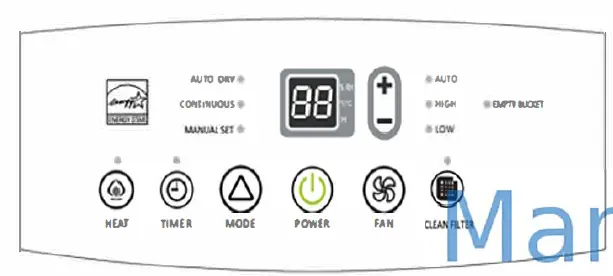
- Control Type2 (HEAT)

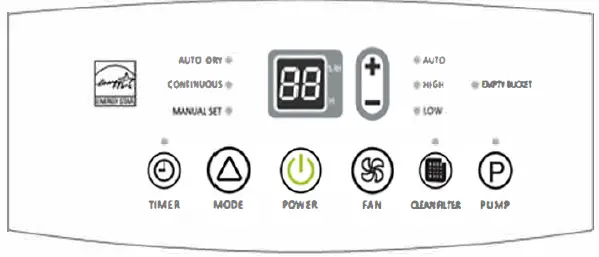
- Control Type3 (PUMP)

NOTES:
- The control panel of your model may differ from the one shown above.
- PUMP, and HEAT buttons may not be displayed on the panel if your model does not have these functions.
Starting/ Stopping the Dehumidifier
NOTES
- Before turning on the dehumidifier,be sure that the bucket is empty and fits all the way into the dehumidifer.
- Each time you unplug the dehumidifier or power is interrupted, the controls will return to the previous settings when power is restored .
- Minimum operating temperature is 38°F (3 °C)
- Humidity displayed is between 30% Relative Humidity and 90% Relative Humidity.
- Humidity can be adjusted between 30% Relative Humidity and 80% Relative Humidity.
WARNING
- Ogrounded three-prong outlet.
- Do not remove the ground prong.
- Do not use an adapter.
- Do not use an extension cord.
- Failure to follow these instructions can result in death, fire or electric shock.
Installation
- Plug into a grounded three-prong outlet.
- Press POWER to turn on the dehumidifier.
- Press FAN to choose the fan speed.
- Press Mode to choose the mode.
- Press the plus or minus button to choose the level of humidity.
- Press POWER to turn off the dehumidifier.


NOTE: The dehumidifier will retain your last settings
EMPTY BUCKET Light
If this light is on, the dehumidifier is not running. This light indicates that you need to check:
- If the bucket is full, empty it and reinstall the bucket.
- If the bucket is not in position, remove the bucket and reinstall it. Make sure the bucket fits all the way into the dehumidifier and the light is off, or the dehumidifier and the heat modes will not run.
Power
- Press POWER to turn on or tum off the dehumidifier.
Fan Speed
- Press FAN to select fan speed. 2. Choose Low, High or Auto.
- Low — Will reach the desired humidity setting slower with a lower sound level.
- High — Will reach the desired humidity setting fester
- Auto — Will provide the maximum humidity control automatically adjusting the fan speed.


Mode
- Press the Mode to select the desired humidity setting.

- Choose Auto Dry, Continuous or Manual Set
- Auto Dry: Will operate the dehumidifier only in the dry mode. Auto Fan Speed is set automatically. The Desired Humidity is set to 50% automatically.
- Continuous: Will operate the dehumidifier continuously. The Fan Speed can be adjusted. The Desired Humidity can not be adjusted. The LED display will show the room humidity level.
- Manual Set: Will operate the dehumidifier at the selected fan speed and desired humidity. If the humidity level of the room is higher than the desired humidity setting, the compressor will turn on. If the humidity level of the room is lower than the desired humidity setting, the compressor will tum off.

NOTE:
The de-icer will tum off the compressor if a low temperature condition occurs. Pressing the Mode button or pressing the plus or minus arrow button will not increase or decrease the amount of moisture removed. When the de-icer senses the correct operating temperaturô€€µ the compressor will cycle back on.
Humidity Level
- Press the Plus or Minus button to activate the humidity setting program. Digits in the digital display will flash.
- Press the Plus or Minus button again to set your desired humidity.

- Digital display will stop flashing five seconds after setting. Room humidity will be displayed.
NOTE:
Humidity can only be adjusted manually in Manual Set mode. In Continuous and Auto Dry mode, humidity level is set automatically.
Digital display
- When the dehumidifier operates in Manual Set mode. , the display shows the relative humidity of the room.
- When the timer is selected, the display shows the time when the dehumidifier will tum on or turn off, depending on the setting.
- For the heat function model, when the dehumidifier operates in heat mode, the display shows the room temperature.


NOTE
The humidity displayed is only for reference. For accurate humidity, please check a hygrometer.
Timer
To set the Timer for a 30-minute to a 24-hour delay before the dehumidifier is turned off (the dehumidifier must be On):
- Press TIMER. 1imer indicator light will come on, the display will flash. The display will show the remaining hour before the dehumidifier will turn off.

- Press the Plus or Minus button to change the delay lime, from 30 minutes to 24 hours. To set the Timer to turn on the dehumidifier, keep the previous setting:
- Tum off the dehumidifier.
- Press TIMER. the limer indicator light will flash. The display will show the remaining hours before the dehumidifier will turn on.
- Press the Plus or Minus button to change the delay time, from 30 minutes to 24 hours.

To clear the number delay program:
NOTE: The dehumidifier can be either on or off.
- Press TIMER once after it has been programmed. The display will show the remaining time.
- While the display is showing the remaining time, press TIMER again. the limer indicator light will tum off.
To see the remaining time.
- Press TIMER once after it has been programmed. The display will show the remaining time.
Clean Filter
- When the Clean Filter light is on, remove, clear, and teplece the air filter. See “Cleaning the Air Filter
- Press Clean Filter after cleaning and replacing the air filter to reset the Clean Filter.


NOTE:
When the light is on, it will remain on for 180 hours or until you press Clean Filter. After 180 hours, it will turn off automatically.
Heat (for heating function model only)
NOTE:The compressor does not operate in the HEAT mode.
- Press HEAT to select the heat mode.
- Press FAN to select the fan speed. See “Fan Speed”.
- Press the Plus or Minus button to select the temperature.
- To turn off the Heat mode, press Mode or Power.
NOTES:
- If the room temperature is above 86 °F (30 °C) \ the Heat mode will turn off. The fan keeps running.
- If the room temperature is 2 °F (1 °C) higher than the selected temperature, the Heat mode will turn off.
- If the room temperature is 2 °F (1 °C) lower than the selected temperature, the Heat will turn on.
Change between °F and °C
Press both the Plus and Minus buttons at the same time to change from °F to c or from C0 to °F.
Pump for Pump function model only)
This feature can help to pump water horizontally or vertically with a 16-foot hose included. You can also pump water to a drain, out a window or anywhere you think suitable.
IMPORTANT
You must connect the drain hose to the unit before pressing the Pump button. See Pump drain for connecting direction.
- Press PUMP to activate the pump system for active drainage.
- Once the pump button is pressed, the pump light will switch on.
NOTE
- If the pump light flashes, it means that the pump is not functioning properly
- If the drain hose is not correctly connected to the unit or is bent, the pump light will flash and the system will not work See Troubleshooting” for directions.
Draining the Dehumidifier
WARNING
- Sickness Hazard
- Do not drink water collected in water bucket.
- Doing so can result in sickness.
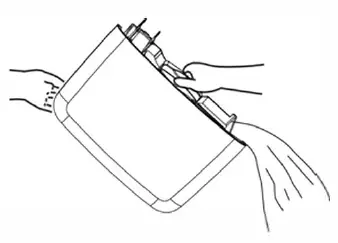
Remove Bucket
If a floor drain is not available, or you do not plan to run your dehumidifier continuously, you may want to simply empty the bucket
- Grasp sides of the bucket to slide out.

- Grasp the handle and bottom of the bucket to lit the bucket

- Pour water through an opening into a sink or tub.

- Replace the handle,and reinstall the bucket

IMPORTANT:
If the Empty bucket light comes on, the dehumidifier will not operate. Empty or adjust bucket.
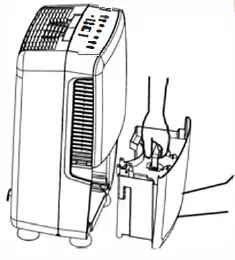
Connect Drain Hose
If you plan to run your dehumidifier continuously, you may want to choose direct draining by attaching a garden hose to the unit.
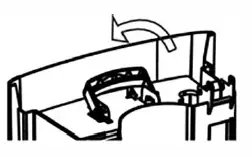
- Flip up the connector cover as the picture shown below.

- Remove bucket.
- Attach a garden hose to the drain hose connector on the inside of the dehumidifier. Hand tighten.
NOTES: The garden hose is sold seperately.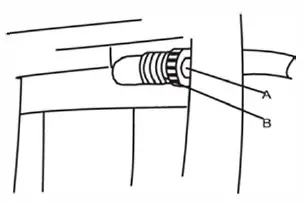
- Place the other end of garden hose into a floor drain. Check to see that the hose lies flat and is in the drain. Make sure the hose end that gose to the drain is on a lower level than the hose end that connects to the dehumidifier. The hose should not be kinked or pinched.
- Reinstall bucket.

NOTES:
- To use the bucket without the garden hose, remove the garden hose. Then reinstall the bucket.
- The bucket must be installed and properly aligned for the dehumidifier to operate with or without a garden hose connected.
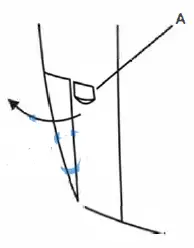
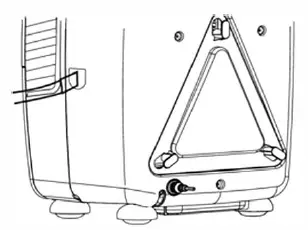
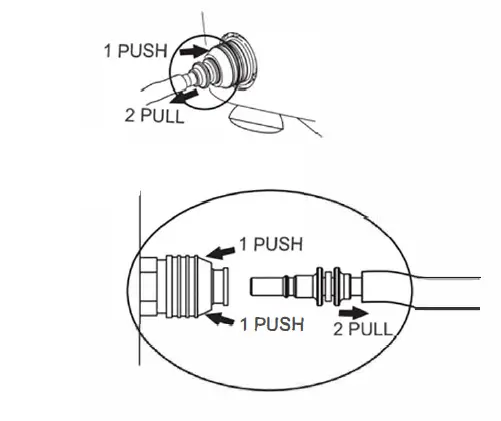
Option 3-PUMP-Drain (for Pump function model only)
This feature can help to pump water horizontally or vertically with a 16 feet hose included. You can also pump water to a floor drain, out a window or anywhere you think suitable.
NOTE:You must connect the drain hose (with connector B)to drain hose connector A before pressing the Pump button. If the pump does not function properly, see troubleshooting for directions.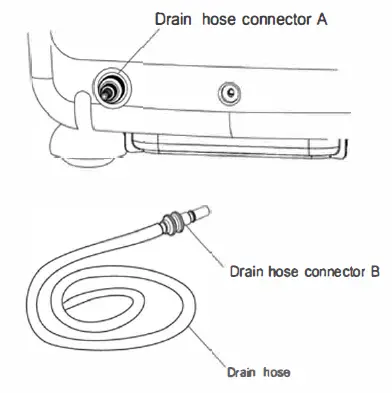
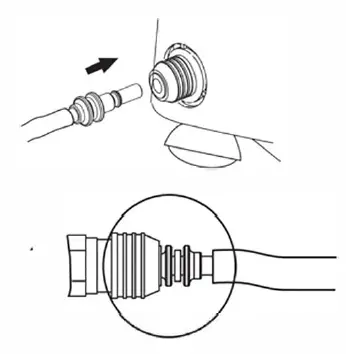
- How to connect drain hose to the unit. Push drain hose connector B into the connector A.

- How to disconnect drain hose. Push drain hose connector A in, and then pull connector B out.

Normal Sounds
When your dehumidifier is operating normally, you may hear sounds such as:
- Compressor sounds, which may be loud, this is normal.
- Air movement from the fan.
- Pump sounds, which may be loud. This is normal.
- Clicking sounds when the dehumidifier or compressor turns off and on, and when the Automatic Shut off Switch is working.
DEHUMIDIFIER CARE
Your new dehumidifier is designed to give you many years of dependable service. This section tells you how to clean and care for your dehumidifier. Call your local authorized dealer for an annual cleaning of the dehumidifier. Remember the cost of this service call is your responsibility.
Cleaning the Air Filter
The air filter is removable for easy cleaning. A clean filter helps remove dust, lint, and other particles from the air and is important for best operating efficiency. Check the filter every 30 days to see whether it needs cleaning.
- Turn off the dehumidifier.
- Remove the air intake grill.
- Take out the air filter.
- Use a vacuum cleaner to clean air filter.If the air filter is dirty , wash it in warm water with a mild detergent. Do not wash air filter in the dishwasher or use any chemical cleaners. Air dry filter completely before replacing to ensure maximum efficiency.
- Reinstall the air filter and the air intake grill.
- Turn on the dehumidifier.

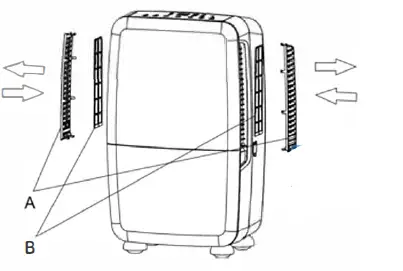
- Air intake grill
- Air filter
Cleaning the Dehumidifier
Exterior
NOTE:
Have an authorized service technician clean and service the interior coils of your product annually.
- Turn off the dehumidifier
- Dust the side grille and panels with a soft brush or the dusting attachment of your vacuum cleaner .
Water Bucket
Every few weeks, rinse the inside of the water bucket with a mild detergent to avoid the growth of mold, mildew, and bacteria.
Water Level Float
The dehumidifier has an EMPTY BUCKET light and a water level float. The bucket must be properly aligned for the water level float and the EMPTY BUCKET light to work.
NOTE: Be sure the float is snapped into place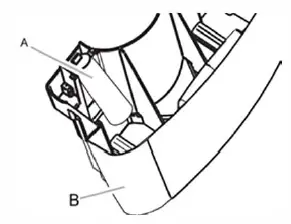
- Water level float
- Bucket
TROUBLESHOOTING
Before calling for service, try the suggestions below to see whether you can solve your problem without outside help.
A dehumidifier will not run
- Is the dehumidifier on ?
Turn on the dehumidifier
WARNING
- Plug into a grounded three-prong outlet.
- Do not remove the ground prong.
- Do not use an adapter.
- Do not use an extension cord.
- Failure to follow these instructions can result in death, fire or electric shock.
- Is the power cord plugged into a grounded three-pronounce
Plug into a grounded three-prong outlet. See Eclectica - Has a household fuse blown or has a circuit breaker tripped?
Replace the fuse or reset the circuit breaker. If the problem continues, call an electrician. See Electrical Requirements.” - Is the bucket installer properly?
Reinstalthe bucket so that it fits all the way into the dehumidifier. - Does the bucket need to be emptied?
Empty the bucket. - Is the water level float in place?
Remove the bucket. Make sure the float is snapped in place.Reinstali the bucket.
Ice Forms on coils
All models have an automatic de-icer that will shut off the compressor and allow the fan to run. This reduces the ice build-up on the coils. The compressor will cycle back on when the de-icer senses the correct operating temperature.
Dehumidifier runs but does not dehumidify
- All models have an automatic de-icer that will shut off the compressor and allow the fan to run.
When the de-icer senses the correct operating temperature, the compressor will cycle back on. - Is the control set to Continuous?
If you have selected Continuous Run, the dehumidifier will run continuously. If the humidity level is low, little or no water may be collected. - The filter is dirty or obstructed by debris.
Clean the filler.
Air coming from the dehumidifier is warm
Spghqmlaigjer displays trouble code
- displays E1, E2.
if the dehumidifier displays a trouble code, the unit will still work. But please contact customer service.
Pump system does not work
Does the pump indicator light flash?
- Check and make sure the drain hose is correctly connected to the unit.
- Press the POWER button to turn off the unit. Restart the unit by pressing the POWER button again.
ASSISTANCE OR SERVICE
Before calling for assistance or service, please check “Troubleshooting. ” It may save you the cost of a service call. If you still need help, follow the instructions below. When calling, please know the purchase date and the complete model and serial number of your appliance. This information will help us to better respond to your request If you need replacement parts If you need to order replacement parts, we recommend that you use only factory-specified replacement parts. Factory-specified replacement parts will fit right and work right because they are made with the same precision used to build every new appliance. To locate factory-specified replacement parts in your area, call your nearest designated service center. Please record your model’s information. Whenever you call to request service on your appliance, you need to know your complete model number and serial number.
You can find this information on the model and serial number label. See “Electrical Requirements” for the location of the model and serial number label. Please record the model and serial number information below. Also, record the purchase date of your appliance and the store’s name, address, and telephone number.
- Model Number_ _______________
- Serial Number_ ________________
- Purchase Date, ________________
- Store Name _________________ _
- Store Address ________________ _
- Store Phone_ _________________
- Keep this book and the sales slip together for future reference.
In the U.S.A
Call Customer Service toll free: 1-877-465-3566
Our consultants provide assistance with:
- Features and specifications on our appliances.
- Installation information.
- Use and maintenance procedures.
- Repair parts sales.
- Referrals t o repair parts distributors and service companies. Designated service technicians are train to fill the product warranty and provide after-warr anywhere in the United States.
For further assistance
If you need further assistance, you can write with any questions or concerns to:
- Hisense USA Corp.
- Customer Service
- 7310 McGinnis Ferry Road
- Suwanee, GA 30024
Please include a daytime phone number in your correspondence.
PRODUCT REGISTRATION
To better safeguard your product, please log on http://www.hisense-usa.com/support/productReg.asp to registrate your product. By registration, you will receive:
- Recall Notifications
Proper registration will enable us to contact you in the unlikely event of a product safety notification and,in the U.S., assist us in complying with the provisions of the Consumer Product Safety Act. - Proof of Ownership
In the case of an insurance loss such as fire, flood or theft, your registration will serve as your proof of purchase. - Quality Assurance
Return within ten days, the sooner we have your information, the better we are able to help you.
WARRANTY
For one year from the date of purchase, when this product is operated and maintained according to the instructions attached to or fuinished with the product, Hisense USA Corp.(hereafter”Hisense”) will repair or replace unit deemed defective in materials or workmanship at Hisense discretion based on the original receipt (or order confirmation for online customers).
WHAT HISENSE USA WILL NOT COVER
- Service calls to correct the installation of your product, replace home fuses or reset circuit breakers, and replace or correct home wiring.
- Repair or replacement when your product is used for other than normal, single-family household use or has been transferred from the original owner.
- Damage resulting from accident, alteration, misuse, abuse, fire, flood, acts of God, improper installation, installation not in accordance with electrical or plumbing codes, shipping damages, or use of products not approved by Hisense.
- Repair or replace units operated outside of the Contiguous United States.
- Pick-up and delivery. This product is designed for repair or replacement only.
- Packaging for the product.
- Repair or replacement for units resulting from unauthorized modifications made to the appliance.
For service or assistance, please call 1-877-465-3566. Obligations for service and parts under this warranty must be performed by Hisense or an authorized service company. Product features or specifications as described or illustrated are subject to change without notice.
Exclusions and Limitations:
This Warranty covers manufacturing defects in materials and workmanship encountered in the normal, noncommercial use of the Product, and does not cover consumer instruction, delivery, installation, set-up, adjustments, cosmetic damage or damage due to acts of nature, accident, misuse, abuse, negligence, commercial use or modification of, or to any part of the Product. This Warranty applies to the original consumer only and does not cover Products sold to consumers in used, ‘AS IS’ or “WITH ALL FAULTS’ condition, or consumables (e.g., fuses, batteries, bulbs etc.), and the Warranty is invalid if the factory-applied serial number has been altered or removed from the Product. Damage occurring to any Product returned for service that is caused by environmental hazards, improper or insecure packaging or shipping by the original consumer purchaser is excluded from coverage under this Warranty. This Warranty is valid only in the Contiguous United States and only applies to Products purchased and serviced in the Contiguous United States. Warranty will be voided if attempts of repair are performed by the consumer or any services that are NOT authorized by Hisense.
THERE ARE NO EXPRESS WARRANTIES ABOVE, AND NO WARRANTIES WHETHER EXPRESS OR IMPLIED, INCLUDING WARRANTIES OF MERCHANTABILITY OR FITNESS FOR A PARTICULAR PURPOSE SHALL APPLY AFTER THE EXPRESS WARRANTY PERIOD STATED ABOVE, AND NO OTHER EXPRESS WARRANTY OR GUARANTEE GIVEN BY ANY PERSON, FIRM OR ENTITY WITH RESPECT TO THE PRODUCT SHALL BE BINDING ON HISENSE. THIS WARRANTY IS THE EXCLUSIVE WARRANTY WITH RESPECT TO THE PRODUCT AND HISENSE IS THE EXCLUSIVE WARRANTY PROVIDER FOR THE PRODUCT. REPAIR OR REPLACEMENT IS THE EXCLUSIVE REMEDY OF THE CONSUMER. HISENSE SHALL NOT BE LIABLE FOR ANY INCIDENTAL OR CONSEQUENTIAL DAMAGES CAUSED BY THE USE, MISUSE OR INABILITY TO USE THE PRODUCT. NOTWITHSTANDING THE FOREGOING, THE CONSUMER’S RECOVERY AGAINST HISENSE SHALL NOT EXCEED THE PURCHASE PRICE OF THE PRODUCT. THIS WARRANTY SHALL NOT EXTEND TO ANYONE OTHER THAN THE ORIGINAL CONSUMER WHO PURCHASED THE PRODUCT AND IS NOT TRANSFERABLE.
Outside the Contiguous United States, this warranty does not apply. If you need assistance, first see the “Troubleshooting section. After checking “Troubleshooting”, additional help can be provided by calling Hisense at 1-877-465-3566 Mon-Fri 9 am to 6 pm EST. Write down the following information about your appliance to better help you obtain assistance or service if you should ever need it. You will need to know your complete model and serial number. You can find this information on the model and serial number label located on the product.
- Model Number ________________ _
- Serial Number ________________ _
- Purchase Date ________________ _
- Store Name ________________ _
- Store Address. ________________ _
- Store Phone, ________________ _


 Capacity, 2-speed Dehumidifier User Manual")

