
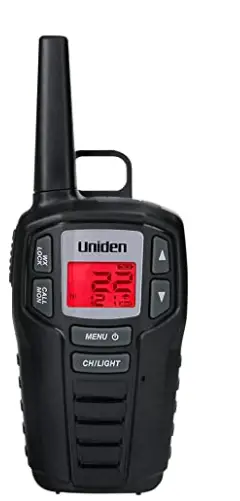
 Uniden SX307-3C Walkie Talkies Radio
Specification
- 22 FRS Channels
- Weather Channels
- 121 Privacy Codes
- Weather Alert
- Channel Scan
- 5 VOX levels
- Channel Monitor
- 10 Call tones
- Key Lock
- Roger Beep
- Beep Tone
- Battery Strength Meter
- Backlight
- Battery Save/Low BatteryAlert
- Volume Setting
- Call Button
- Last channel memory
- Up to 30-mile Range*
- Auto Squelch
- Charging Kit (model names with CK) or Y-Split micro-USB cable (model names with C)
- micro-USB Jack
- Earbud/Headphone Jack
*Range may vary depending on environmental and/or topographical conditions.
PRODUCT OVERVIEW
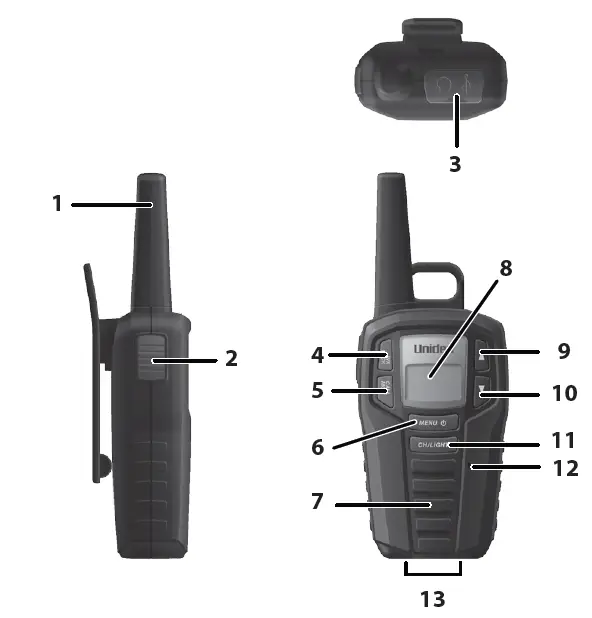
| 1 | Antenna | 8 | LCD |
| 2 | Push to Talk | 9 | CH/VOL Up |
| 3 | Headphone/micro USB jack | 10 | CH/VOL Down |
| 4 | WX/LOCK | 11 | CH/LIGHT |
| 5 | CALL/MON | 12 | Microphone |
| 6 | MENU/Power | 13 | Charging Contacts |
| 7 | Speaker |
Congratulations on your purchase of a Uniden SX307 series radio. This lightweight, palm-sized radio is a state-of-the-art device, equipped with many valuable features. Use it at sporting events, to stay in contact with family and friends, hiking, skiing, outdoors, or in a neighborhood watch for vital communication. Each radio uses 3 AA rechargeable Ni MH batteries, included.
PACKAGE CONTENTS
- If your model number contains a “C,” your package contains a micro-USB Y charging cable.
- If your model number contains “CK,” it contains a charging kit (including a charging cradle).
- If your model number contains “HS,” it contains headsets.
- Refer to the packaging for other specific contents.
INSTALL THE BATTERIES
Each radio uses 3 AA rechargeable NiMH batteries (included).
- If necessary, remove the belt clip. Press up on the belt clip latch and slide the belt clip off of the radio.
- Remove the battery compartment door by pressing on and sliding out the compartment door. Remove the cover.
- Install the 3 AA batteries into the battery compartment. Be certain to follow the +and – symbols in the compartment. Installing the batteries incorrectly will prevent the unit from operating.
- Replace the battery compartment door by sliding the door into place.
- Replace the belt clip if necessary.
- Replace the belt clip if necessary.
BATTERY LEVEL / LOW-LEVEL ALERT
This unit has a battery level meter on the display to indicate the status of the batteries. When the battery in the unit is low, the battery level meter icon![]() flashes. Recharge the batteries immediately.
flashes. Recharge the batteries immediately.
CHARGING THE RADIO
For radios with micro USB Y-cable:
- Plug one branch of the micro USB Y-Cable into each radio’s micro USB charge port.
- Insert the other end (USB) into a USB power source (computer, phone charger, etc – not included).
- Charge the batteries for 16 hours and disconnect the radio from the Y-cable after charging.
For radios with a charging cradle:
- Connect the AC adapter to DC IN 9V jack on the charger and to a standard 120V wall outlet.
- Set the charging cradle on the desk or tabletop, and place the radio in the charging cradle with the keypad facing forward.
- Make sure that the LED illuminates. Charge the batteries for 16 hours and remove the radio from the charging cradle after charging.
Warning!
- Neither the radio nor the charging cradle is waterproof.
- If the charging cradle falls into water, unplug it before attempting to remove it from the water. Allow the cradle to dry completely before reconnecting the power.
- Wipe off dirt or shake the water from your radio before placing in the charging cradle if your radio is soiled or wet.
Notes:
- Install the batteries before charging. Charge time may vary depending on the battery life remaining. For the fastest charging, turn off the radio before charging.
- If battery power is low, you cannot operate the radio even using external power. Allow the batteries to charge before using. If you try to transmit while power is low, the radio will automatically turn off.
USING THE RADIO
In order to get the most out of your new radio, read this reference guide completely before attempting to operate the radio.
TURNING THE RADIO ON AND ADJUSTING THE VOLUME
- Press and hold the
 key to turn the radio ON.
 - Press and hold the key to turn the radio OFF.
- Press the ▲ or ▼ keys to increase or decrease the volume level. L0 – L8 displays as you press the keys.
USING THE MENUS
- Press the key to enter the Menu system. Each time you press the MENU/key you advance through the system.
- Pressonce; access Privacy Codes (0 – 121).
- Presstwice; set the transmit (call) tone for your radio (1 – 10, Off)
- Pressthree times – access VOX.(Levels 1 – 5, Off)
- Pressfour times – exit Menus.
WORKING WITH CHANNELS / PRIVACY CODES
Your radio has 22 channels and 121 PrivacyCodes you can use to talk to others. In order to speak to someone, each of you must be set to the same channel/Privacy Code.
- With the radio on, press the CH/LIGHT key once. The current channel number flashes.
- Use the ▲ or ▼ keys to select other channels (1 – 22). Press and hold ▲ or ▼ keys to rapidly change channels.
- Press CH/LIGHT key again to set the selected channel.
- Presskey once. The current Privacy Code flashes.
- Use the ▲ or ▼ keys to select other privacy Codes (1 – 121). Press and hold ▲ or ▼ keys to rapidly change Privacy codes.
- Presskey three times to set the Privacy Code and exit the Menus.
VOICE OPERATED TRANSMISSION
Your radio is equipped with a user-selectable Voice Operated Transmitter (VOX) that can be used for automatic voice transmissions. The VOX feature is designed to be used with a headset with a microphone. Transmission is initiated by speaking into the headset’s microphone instead of pushing the PTT button.
To select the VOX level:
- Enter the Menu. Advance through the menu until the vox icon appears on the display. The current level (OFF, 1-5) will be indicated. Level oF (OFF) disables VOX, while levels 1-5 set the sensitivity of the vox circuit.
- Press either the ▲ or ▼ keys to select the desired VOX sensitivity level. Use level 1 for increased sensitivity to voice in normally quiet environments, and use a higher level to reduce undesired activation in very noisy environments.
CHANNEL SCAN FEATURES
Your radio has a channel scan feature that allows you to easily scan all 22 channels. When an active channel is detected, the unit pauses on that channel until the channel is clear. Then, after a 2-second delay, the radio continues scanning.
When the unit stops on an active channel, you can press the PTT button on the microphone to transmit on that channel.
To turn ON the channel scan
Quickly press CH/LIGHT then hold ▼ for 3 seconds. The channels will cycle down through all 22 channels. To reverse scan direction, press ▲. To stop scanning, press .
.
TALKING ON YOUR RADIO
- Press and hold the PTT button and speak in a clear, normal voice about 2-3 inches away from the microphone. (While you are transmitting, the tx icon displays. To avoid cutting off the first part of your transmission, pause slightly after pressing the PTT button before you start talking.)
- When you are finished speaking, release the PTT button. You can now receive upcoming calls. While receiving, the RX icon displays.
KEY LOCK
- To lock the keypad, press and hold the WX LOCK key. The icon appears on the display.
- To unlock the keypad, press and hold the WX LOCK key again. The icon disappears from the display.
Note: While the keylock is on, you can still use the radio to receive, transmit, use calls, turn the volume up or down, MON, andturn the radio on or off.
BACKLIGHT
Press and hold CH/LIGHT. A red backlight turns on. It automatically turns off after several seconds
TRANSMITTING A CALL ALERT TONE
Your radio is equipped with a call tone that will be transmitted when the CALL/MON key is pressed.
To transmit the call tone, press the CALL/MON key. The tone will be transmitted.
AUTO SQUELCH
The radio is equipped with an automatic squelch system that shuts off weak transmissions and unwanted noise due to terrain conditions or range limitations.
MONITOR MODE
Your radio allows you to listen for weak signals on the current channel at the press of a key.
To turn ON monitor mode, Press and hold CALL/MON for 2 seconds. The tx icon displays. On a channel that does not have activity, you will hear only an open-squelch hissing noise.
To turn OFF monitor mode, press and hold the CALL/MON key for 2 seconds again.
SPECIFICATIONS
- Channels:143 (22 Channels + 121 Privacy Codes)
- Operating Frequency: UHF 462.5500 – 467.7125 MHz (GMRS/FRS) 162.4000 – 162.5500 MHz (WX)
- Power Source:3 rechargeable NiMH batteries per radio
- Battery Life:12 hours typical (5/5/90 duty cycle)
Frequency Chart
| CH | Freq.[MHz] – Cross Ref. | CH | Freq.[MHz] – Cross Ref. |
| 1 | 462.5625 – FRS & GMRS 1 | 12 | 467.6625 – FRS
12 |
| 2 | 462.5875 – FRS & GMRS 2 | 13 | 467.6875 – FRS
13 |
| 3 | 462.6125 – FRS & GMRS 3 | 14 | 467.7125 – FRS
14 |
| 4 | 462.6375 – FRS & GMRS 4 | 15 | 462.5500 – GMRS
11 |
| 5 | 462.6625 – FRS & GMRS 5 | 16 | 462.5750 –
GMRS 8 |
| 6 | 462.6875- FRS &
GMRS 6 | 17 | 462.6000 – GMRS
12 |
| 7 | 462.7125 – FRS & GMRS 7 | 18 | 462.6250 –
GMRS 9 |
| 8 | 467.5625 – FRS 8 | 19 | 462.6500 – GMRS
13 |
| 9 | 467.5875 – FRS 9 | 20 | 462.6750 – GMRS
10 |
| 10 | 467.6125 – FRS
10 | 21 | 462.7000 – GMRS
14 |
| 11 | 467.6375 – FRS
11 | 22 | 462.7250 – GMRS
15 |
Note: This product is considered FRS only with 22 FRS channels in the US market. It is considered a GMRS product in the Canadian market.
CTCSS Chart (Hz)
Code: Freq: Code: Freq.
oF OFF 20 131.8
1 67.0 21 136.5
2 71.9 22 141.3
3 74.4 23 146.2
4 77.0 24 151.4
5 79.7 25 156.7
6 82.5 26 162.2
7 85.4 27 167.9
8 88.5 28 173.8
9 91.5 29 179.9
10 94.8 30 186.2
11 97.4 31 192.8
12 100.0 32 203.5
13 103.5 33 210.7
14 107.2 34 218.1
15 110.9 35 225.7
16 114.8 36 233.6
17 118.8 37 241.8
18 123.0 38 250.3
19 127.3
DCS Code List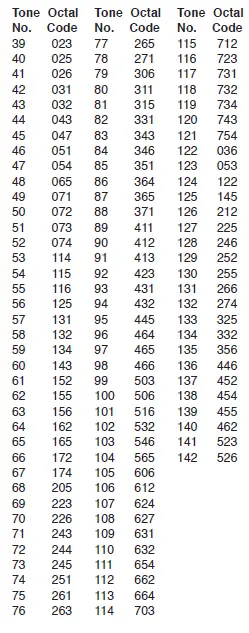
RBRC Information

As part of our commitment to protect the environment and conserve natural resources, Uniden voluntarily participates in an RBRC® industry program to collect and recycle used Ni-MH batteries within the US. Please call 1-800-8-BATTERY for information on Ni-MH battery recycling in your area. (RBRC® is a registered trade ark of the Rechargeable Battery Recycling Corporation.).
MAINTENANCE
To be safe and sure:
- Never open your radio’s case.
- Never change or replace anything in your radioexcept the batteries.
Your radio might cause TV or radio interference even when it is operating properly. To determine whether your radio is causing interference, turn it off. If the interference goes away, your radio is causing it. Try to eliminate the interference by moving your radio away from the receiver. If you cannot eliminate the interference, the FCC requires that you stop using the radio.
Hazardous Environments
Do not operate the radio in hazardous environments. An explosion or fire may result. Do not operate the radio near unshielded electrical blasting caps.
Under certain conditions, radios can interfere with blasting operations and may cause an explosion. Turn your radio OFF to prevent accidental transmission when in a blasting area or in areas posted: “Turn off two-way radio.” Construction crews often use remote-control RF devices to set off explosives.
Care and Safety
To clean the radio, use a soft cloth dampened with water. Do not use cleaners or solvents because they can harm the body of the unit and leak inside, causing permanent damage. Use a dry, lint-free cloth to clean the battery contacts. Do not submerge the unit in water. If the unit gets wet, turn it off and remove the batteries immediately.
Dry the battery compartment with a soft cloth to minimize potential water damage. Leave the battery compartment cover off overnight to ensure complete drying. Do not use the radio until the unit is completely dry.
WARNING! Read this information before using the radio. In August 1996 the Federal Communications Commission (FCC) of the United States with its action in Report and Order FCC 96-326 adopted an updated safety standard for human exposure to radiofrequency electromagnetic energy emitted by FCC-regulated transmitters.
Those guidelines are consistent with the safety standard previously set by both U.S. and international standards bodies. The design of the radio complies with the FCC guidelines and these international standards.
Never allow children to operate the radio without adult supervision and the knowledge of the following guidelines.
FCC RF EXPOSURE INFORMATION
WARNING! It is up to the user to properly operate this radio transmitter to ensure safe operation. Please adhere to the following:
Use only the supplied or approved antenna. Unauthorized antennas, modifications, or attachments could impair call quality, damage the radio, or result in a violation of FCC regulations.
Do not use the radio with a damaged antenna. If a damaged antenna comes into contact with the skin, a minor burn may result. Please contact your local dealer for a replacement antenna.
Body-Worn Operation
This device was tested for typical body-worn operations using the supplied belt clip.
To maintain compliance with FCC RF exposure requirements, body-worn operations are restricted to the supplied belt clip.
For hand-held operation, the radio should be held 1 inch from the user’s face. The use of accessories that do not satisfy these requirements may not comply with FCC RF exposure requirements and should be avoided.
For more information about RF exposure, please visit the FCC website at www.fcc.gov.
FCC PART 15 / IC COMPLIANCE
FCC ID: AMWSX237
IC: 513C-SX307
FCC PART 15 COMPLIANCE
This device complies with Part 15 of the FCC rules. Operation is subject to the following two conditions: (1) This device may not cause harmful interference, and (2) this device must accept any interference received, including interference that may cause undesired operation.
Changes or modifications not expressly approved by the party responsible for compliance could void your authority to operate the equipment.
IC COMPLIANCE
This device complies with Industry Canada license-exempt RSS standard(s). Operation is subject to the following two conditions:
- This device may not cause interference, and
- This device must accept any interference, including interference that may cause undesired operation of the device.
Changes or modifications not expressly approved by the party responsible for compliance could void your authority to operate the equipment.
ONE-YEAR LIMITED WARRANTY
Important: Evidence of original purchase is required for warranty service.
WARRANTOR: UNIDEN AMERICA CORPORATION (“Uniden”) ELEMENTS OF WARRANTY: Uniden warrants, for one year, to the original retail owner, this Uniden Product to be free from defects in materials and craftsmanship with only the limitations or exclusions set out below.
WARRANTY DURATION: This warranty to the original user shall terminate and be of no further effect 12 months after the date of original retail sale. The warranty is invalid if the Product is:
- damaged or not maintained as reasonable or necessary,
- modified, altered, or used as part of any conversion kits, sub-assemblies, or any configurations not sold by Uniden,
- improperly installed,
- serviced or repaired by someone other than an authorized Uniden service center for a defect or malfunction covered by this warranty,
- used in any conjunction with equipment or parts or as part of any system not manufactured by Uniden, or
- installed or programmed by anyone other than as detailed by the owner’s manual for this product.
STATEMENT OF REMEDY: In the event that the product does not conform to this warranty at any time while this warranty is in effect, the warrantor will either, at its option, repair or replace the defective unit and return it to you without charge for parts, service, or any other cost (except shipping and handling) incurred by the warrantor or its representatives in connection with the performance of this warranty. Warrantor, at its option, may replace the unit with a new or refurbished unit.
THE LIMITED WARRANTY SET FORTH ABOVE IS THE SOLE AND ENTIRE WARRANTY PERTAINING TO THE PRODUCT AND IS IN LIEU OF AND EXCLUDES ALL OTHER WARRANTIES OF ANY NATURE WHATSOEVER, WHETHER EXPRESS, IMPLIED, OR ARISING BY OPERATION OF LAW, INCLUDING, BUT NOT LIMITED TO ANY IMPLIED WARRANTIES OF MERCHANTABILITY OR FITNESS FOR A PARTICULAR PURPOSE. THIS WARRANTY DOES NOT COVER OR PROVIDE FOR THE REIMBURSEMENT OVERPAYMENT OF INCIDENTAL OR CONSEQUENTIAL DAMAGES. Some states do not allow this exclusion or limitation of incidental or consequential damages so the above limitation or exclusion may not apply to you.
LEGAL REMEDIES: This warranty gives you specific legal rights, and you may also have other rights which vary from state to state. This warranty is void outside the United States of America and Canada.
PROCEDURE FOR OBTAINING PERFORMANCE OF WARRANTY: If, after following the instructions in the owner’s manual you are certain that the Product is defective, pack the Product carefully (preferably in its original packaging). The Product should include all parts and accessories originally packaged with the Product. Include evidence of the original purchase and a note describing the defect that has caused you to return it. The Product should be shipped freight prepaid, by traceable means, to the warrantor:
Uniden America Corporation
C/O Saddle Creek 743 Henrietta Creek Road, Suite 100 Roanoke, TX 76262
FAQS
Yes, it does have this ability.
You can use AA rechargeable NiMH batteries.
You can use 3 AA rechargeable NiMH batteries. That is what the unit comes with as well.
Neither the radio nor the charging cradle are waterproof.
There is a lip on the clip, you pull it towards yourself and push up.
The maximum range for a walkie-talkie is usually around 5 miles, but some designs can go all the way to 36 miles. However, this range differs greatly depending on your surroundings, and the maximum distance listed usually refers to when the devices are transmitting between two high points.
Press and hold (MENU) to turn the radio on. A channel number will appear on the display. 2. Press and hold (MENU) to turn the radio off.
In summary, any two or more brands of walkie-talkie CAN be made to work with each other, provided that they are on the same frequency band, AND provided that they are or can be programmed to use the same frequencies.
Push-to-talk (PTT) button: The PTT button on the side of the radio has two main functions: – Press and hold down to initiate and call and talk; release the PTT button to listen.
The Uniden GMR2059-2CK is a powerful two-way radio delivering up to 20 miles of range in ideal conditions (up to 2 miles in urban conditions). This model supports 22 channels, each with 142 privacy codes. The GMR-2059-2CK also features Uniden’s voice scrambling feature, which helps keep your conversations private.
Two-way radios are able to communicate with each other when they are on the same radio frequency. For this reason, there is no limit to the number of walkie-talkies that can connect together, providing they are sharing a frequency.
To put it simply, for maximum power, use channels 1-7 or 15-22. Most consumer radios support two or more power modes. To get the most range, be sure that you are using high power mode on the channels that allow it. Lower power modes will not use all of your radio’s possible output power and will reduce range.
To synchronize both radios, ensure that the private code numbers on the radios are set to the same number after which you can set both walkie-talkies to the same channel. Most radios have 22 channels. To figure out what channel number your radio is on, you check the display and then save the channel.
Because you don’t have to dial a number each time you want to transmit, walkie-talkies are quick and easy to use. And best of all, they don’t rely on finicky cell phone signals. The handsets transmit directly to each other, so they still work when cell networks fail during natural disasters or power outages.
A radio button, AKA an “option button” is a UI element every web/mobile/desktop developer is familiar with. It allows choosing only one option out of a set. Radio buttons are named after the actual physical buttons used on old radios to switch between frequencies and preset stations.
Boaters often mount radios with the legal limit of 25 watts and, depending on the height of the antenna, can reach communication distances as far as 60 miles or more. Everyone on the water should have a marine radio, however, not everyone needs that much power while enjoying water activities.
Atmospheric noise from thunderstorms can interfere with HF radio. Given that many users of HF radio – for military communications or humanitarian needs, for example – operate in extreme environments, there may be more than just rain to contend with.
Press the “Scan” button to put the handheld into scanning mode and press “Manual” to enter manual programming mode. Your scanner will have a number of available channels that can be programmed. Enter the channel number you wish to use and press “Manual” again.
Perfectly suited for all boating and marine applications, the MHS050 is a 2.5-watt Waterproof* VHF Marine Radio. Equipped with a table-top drop-in charger allowing you to conveniently charge your unit this compact two-way radio is certified to meet the world standard JIS8 waterproof level.


