
HOERMANN H3G Single leaf and double leaf steel doors
Symbols used
 Fire protection
  Smoke protection
  Security door
  Acoustic rating
 Function door
 Important note
  See text section
 See illustrated section
 See installation instructions in accessory pack
  To be ordered as an accessory
  Correct procedure
  Non permissible procedure
  Welding
  Drilling
  Electric door strike
 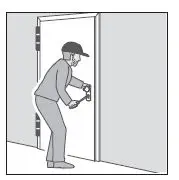 Possible burglar attack from opening side
 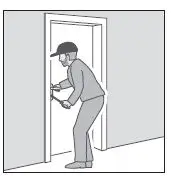 Possible burglar attack from closing side
  Escape route
  Timber
  Concrete / brickwork
 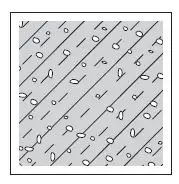 Gas concrete
  Plaster
 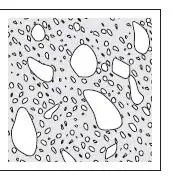 Concrete
 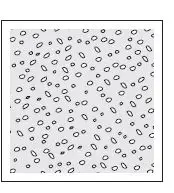 Mortar
Safety Instructions
DANGER
Danger to life while fitting the steel door
During fitting, the door or door frame can fall and kill persons. Prior to and during fitting, secure the door and frame against falling over.Only qualified and instructed personnel may perform fitting and maintenance. Electrical work may only be carried out by qualified electricians. Do not make any alterations through attachments or conversions which could impair safety. Exclude hazards caused by gas, dust, vapour, smoke, fire and explosion during welding, burning and grinding work. When welding, ensure that intumescent materials do not react as a result of heat input, as this would render the materials ineffective.
Information on the Door Features
Please observe that the door may have single features, a combination of fire protection, smoke protection, acoustic rating and burglar protection features, or may be a function door.
Fire doors and smoke tight doors
The respective approval can be found in the Internet at www.hoermann.The approval must be present at the place of use. The information given represents the minimum requirements for installation in Germany. For installation in other countries, the corresponding national allowances are valid. However, these must be based on material parameters equal to or exceeding DIN standard. Permissible F 90 A prefabricated walls with minimum wall thicknesses for fire-rated and smoke-tight doors, height ≤ 5000 mm.Observe the standards DIN 18093 (Installation of Fire Doors and DIN 18100 (Wall Openings for Doors or the country specific regulations. In individual cases, in accordance with 22 and 23 of the German building code, the manufacturer can issue a declaration of conformity. The operator / owner is responsible for the flawless condition of the door. In Germany, spring hinges must not be used on doors and hatches having the following characteristics
- Leaf weight > 80 kg
- Glazing
- Fitting in prefabricated walls exception dimensions < 1000 × 1000 mm
- Combination as smoke-tight doors acc. to DIN 18095
- Double leaf
Different regulations may apply outside Germany, however, we recommend compliance with the German regulations.
- Use only those fittings, locks, closing devices and electric attached parts that are part of the door approval or are approved by the manufacturer.
- Doors rebated on 3 sides, without a bottom seal for the shaft, should be installed at the lowest floor level.
- Gypsum plasterboard walls and wall thicknesses.
- Permissible walls and wall thicknesses.
- Backfill the frame with cement-based mineral mortar e.g. LM21 from Sakret provided it is not described differently in the corresponding installation situation.
- With T30 / EI230 the frame face does not necessarily have to be filled with mortar.
- Profile frames and corner frames with and without counter frames must be splayed prior to backfilling to ensure that they do not buckle under the pressure of the mortar.
- Use a lever handle with catch cover or a lock cylinder for fire protection, and a lock cylinder for smoke protection.
Smoke protection
- RS 65 – 1: AbP Nr. P-14 – 001829 – PR01-ift
- RS 65 – 2: AbP Nr. P-14 – 001829 – PR02-ift
- Use bottom seals and sealing wedges.
- If the frame is not completely backfilled with mortar, seal the frame connection to the adjacent structural components to provide an unbroken flexible seal on both sides.
- Use locking cylinders.
| Prüfzeugnis Nr | Wand | H3 OD H_30 OD | H3-1G H_30 D1 | 1) H3-2 VM H_30 D2 |
| P-3310/563/07-MPA BS | Knauf W 112 | ≥ 100 mm | ≥ 100 mm | ≥ 100 mm |
| P-3391/170/08-MPA BS | Knauf W 131 | ≥ 116 mm | ||
| P-3310/563/07-MPA BS | Knauf W 132 | ≥ 100 mm | ||
| P-3202/2028-MPA BS | Knauf W 352 / W 353 | ≥ 100 mm | ≥ 100 mm | ≥ 100 mm |
| P-3956/1013-MPA BS | RiGips MW 12 RF, MW 12 RFI, MW 12 HA, MW 12 DH, MW 12 BF, MW 12 RFWF, MW 12 GX | ≥ 100 mm | ≥ 100 mm | ≥ 100 mm |
| P-3014/1393-MPA BS | RiGips MW 11 DD | ≥ 100 mm | ≥ 100 mm | ≥ 100 mm |
| P-3020/0109-MPA BS | RiGips BW 13 DDRF | ≥ 165 mm | ||
| P-SAC-02/III-681 | SW 11 – SW 14 | ≥ 100 mm | ≥ 100 mm | ≥ 100 mm |
| P-3391/0890-MPA BS | SW 18 | |||
| P-2100/100/17-MPA BS | Promat 450.81 | ≥ 140 mm | ||
| P-11-003478-PR01 | B + M W 50 / 100 – W 100 / 150 | ≥ 100 mm | ||
| P-3854/1372-MPA BS | Fermacell 1 S 31/3.1 | ≥ 95 mm | ≥ 95 mm | ≥ 95 mm |
| Steel door Wall | H3-1 OD H 30-1 OD | H3-2 OD H 30-2 OD | H3-1 G H30 D1 | H3-2 VM H30 D2 | H6-1 OD | H6-2 OD | H16-1 G H90 D1 | H16-2 G H90 F-2 | H16-S1 H90 E1 | H16-1 OD H90-1 OD | H16-2 OD H90-2 OD | ||||
| Concrete DIN 1045-1, strength ≥ C12/15 | 1) k ≤ 2500 | 2) k > 2500 | 1) k ≤ 2500 | 2) k > 2500 | e ≤ 1320 | ||||||||||
| 100 | 140 | 100 | 140 | 140 | 140 | 140 | 140 | 140 | 120 | 140 | 140 | ||||
| Brickwork DIN 1053-1, strength ≥ 12, mortar group ≥ 2 | k ≤ 2500 | k > 2500 | k ≤ 2500 | k > 2500 | e ≤ 1250 and k ≤ 1750 | e ≤ 1500 and k ≤ 2500 | e ≤ 1250 k ≤ 2500 | e ≤ 1500 k ≤ 2500 | |||||||
| 115 | 175 | 115 | 175 | 175 | 175 | 115 | 175 | 175 | 240 | 175 | 115 | 175 | 175 | ||
| Gas concrete stone slabs or concrete precision blocks DIN 4165-3, strength class ≥ 4, Gas concrete slabs acc. to general official approval strength class ≥ 4.4 | k ≤ 2500 | k ≤ 2500 | e ≤ 1320 | e ≤ 2500 | e ≤ 1320 k ≤ 2500 | e ≤ 2500 k ≤ 2500 | |||||||||
| 150 | 150 | 175 | 175 | 150 | 200 | 200 | 175 | 200 | 200 | ||||||
| Prefabricated wall F90-A acc. to ABP, Observe max. height 5000 mm | 3 | 3 | 3 | 3 | |||||||||||
| Prefabricated wall F90-A DIN 4102-4 / Tab. 10.2, Observe Figure 1 .12, max. height 5000 mm | e ≤ 1320 | e ≤ 2500 | e ≤ 2750 and k ≤ 2750 | e ≤ 1250 | e ≤ 2500 | e ≤ 1320 k ≤ 2500 | e ≤ 2500 k ≤ 2500 | ||||||||
| 100 | 100 | 100 | 100 | 100 | 125 | 125 | 100 | 150 | |||||||
| Prefabricated wall F30-A Figure 2D / Observe, max. height 5000 mm | e ≤ 1250 | e ≤ 2500 | |||||||||||||
| 100 | 100 | ||||||||||||||
| Prefabricated wall F90-B DIN 4102-4 / Tab. 10.3 max. height 5000 mm | e ≤ 1250 and k ≤ 2500 | e ≤ 2500 and k ≤ 2500 | |||||||||||||
| 125 / 130 | 125 / 130 | ||||||||||||||
| Prefabricated wall F30-B AbP Nr: P – SAC-02 / III-668 | e ≤ 1125 and k ≤ 2125 | ||||||||||||||
| 185 | |||||||||||||||
| Plaster wallboards VG Orth, P–SAC 02 / III468 Observe 9/A17 | e ≤ 1250 and k ≤ 2500 | ||||||||||||||
| 100 | |||||||||||||||
Do not expose glazings on fire-rated doors to direct sunlight.
Acoustic rated doors
The overall acoustic rating is dependent on the surrounding structural components. The resulting acoustic rating of wall and door must be verified separately, as it cannot be derived from the evaluated acoustic value Rw or R of the door alone. Ensure that any seal make full contact. The floor must be smooth to ensure the sealing function of the bottom seal. Split the screed in the threshold area. Use sealing wedges and a bottom seal. Use locking cylinders. Backfill the frame completely with mortar. Glue the mitre-cut corners of the frame seal with, for example, Koratan UC°41.
Burglar protection doors
- The door fulfils its burglar-proof characteristics only if thebolt is completely closed and the key is removed.
- Use two screws each to secure the door leaves of all RC3 and RC4 doors on the hinges.
- Only use corner frames, corner frames with counter frames, profile frames and block frames for RC3, except for fitting situation H1.
- Only use corner frames, corner frames with counter frames and profile frames for RC4.
- Backfill the frame with RC2 at least in the area of the locking points, hinges, security bolts and rebate space limiters to make it permanently pressure-resistant.
- Pressure resistance approx. 10 N/mm².
- Backfill the frame of RC3 and RC4 doors all-round with pressure-resistant material. Pressure resistance approx. 10 N/mm².
- Permanently support the frame with RC2 at least in the area of the locking points, hinges, security bolts and rebate space limiters and with RC3 all-around with pressure resistant material per the following table.
| Material for frame support | RC2 | RC3 | Fire protection |
| Concrete | Yes | Yes | Yes |
| Mortar (M10 acc. to DIN V 20000-412) | Yes | Yes | Yes |
| Softwood or hardwood (C or D according to EN 338) | Yes | Yes | No |
| Promaboard by Promat | Yes | No | Yes |
| Promatect H by Promat | Yes | Yes | Yes |
| ROKU V2 by Rolf Kuhn | Yes | Yes | Yes |
| Sheet steel | Yes | No | Yes |
Fit the glazing frame to doors with glass using securing lugs or securing brackets on the attack side. For double leaf doors, measure the lower gap dimensions from the bottom bush. For anti panic doors with lever handle or push bar, use our L-bracket with protruding threshold. Make sure that visible frame fixing points and backfill parts cannot be dismantled from the attack side e.g. make visible screw drives unusable or permanently cover them after fitting the frame.
Minimum requirements for security doors
| Resistance class acc . to DIN EN V 1627 | RC2 | RC3 | RC4 |
| Brickwork DIN 1053 part 1 [mm] strength ≥ 12 | 115 | 115 | 240 |
| Reinforced concrete, at least C12 / 15 [mm] | 100 | 120 | 140 |
| Gas concrete blocks class 4 mm | 175, 115 1 | 240 | |
| Gas concrete slabs class 4 mm | 150 | ||
| Prefabricated wall Knauf W118. de, WK2 mm | 101 | ||
| Timber partition wall acc. to DIN EN 1627 | ✓ | ||
| Profile cylinder acc. to DIN 18252:2006-12 2) 3) | 21-, 31-, 71-BZ | 42-, 82-BZ | |
| Protective fittings acc to DIN 18257:2022-02 2) | ES1 ZA | ES2 ZA | ES3 ZA |
| EN 356 glazing fire protection | P5A 4 / P7B 5 | P5A 4 | |
Only single-leaf doors, we recommend wall thicknesses of 150 mm or more. Protective fitting or profile cylinder must be equipped with pull off protection (ZA). Not necessarily included in scope of delivery not in escape and rescue routes in escape and rescue routes.
Function doors
The frames need not be backfilled.
Outside application
Please observe the separate instructions art. no.: 504 855 when fitting outdoors. You will find these instructions at www.hoermann.de
Fitting
Before fitting
Before fitting, please clarify the following questions:
- What characteristics does the door have?
- Is the wall structure suitable for installing the door?
- Is the floor height known (metre line)?
- In which direction should the door open?
- Do any building regulations need to be considered?
- Does the wall need to be chiseled out in the area of the wall protective boxes?
Dimensions acc to EN 12519
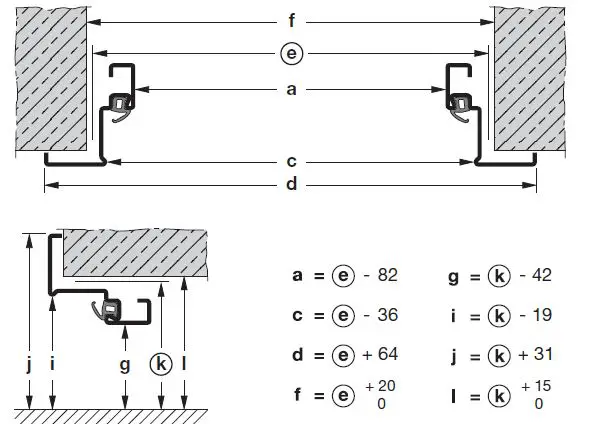
- a / g Clear opening width/height
- c / i Clear rebate width/height
- d / j Overall frame dimension width/height
- e / k Ordering width/height
- f / l Clear unfinished structure dimension width/height acc to DIN 18100.
When fitting
Observe the fitting instructions in the accessory packs.
- Use fitting material if it is supplied, e.g. dowel brackets, plugs or screws.
- Use the plugs indicated in section 2.
- In combination with corner frame and vertically perforated brick or plaster, use the dowel
- FUR 10 × 80/100 mm and follow item 2 in the fitting instructions.
- Drill the vertically perforated brick and hollow bricks without impact.
- Note a minimum edge distance of 50 mm for horizontal/vertical holes as well as the expansion direction of the dowel.
- Please note that, for frames for finished floors, the bottom fitting bracket must be removed before fitting.
- Door leaves cannot be shortened.
Information on illustrated section
| See section | Description |
| 1a | Thin rebate |
| 1b | Thick rebate |
| 1 .2a / 1 .2b | Number of fixing points |
| 1 .2c | Fitting situations |
| 1 .3a | Removing the standard door |
| 1 .3b | Removing the security door |
| 1 .4 | Assembling the corner frame |
| 1 .5 | Floor trough and fitting bracket |
| 1 .6 | Fastenings |
| 1 .7 | Minimum edge spacing and expansion direction of the dowel |
| 1 .8 | Fitting the edge recess profiles |
| 1 .9 | Tubes in the frame |
| 1 .10 | Suitable electric strikes |
| 1 .11 | Wall protective cap in gypsum board walls |
| 1 .12 | Design of GKF walls |
| 2 .0 | Fitting situations and frame shapes |
| 3 .1a | Fitting with standard hinges |
| 3 .1b | Fitting with 3 way adjustable hinges |
| 3 .3 | Adjusting the air gaps |
| 3 .4 | Removing the bottom angles for frames without bottom recesses |
| 3 .5 | Fastening the sealing wedges with silicone |
| 3 .6 | Fitting the frame seal |
| 3 .7 | Raising the door |
| 3 .8 | Tensioning the spring hinge |
| 3 .9 | Latch engagement verification |
| 3 .10 | Alteration of ventilation grille |
| 3 .11 | Alteration of glazing frame |
| 3 .12 | Intumescent coating on fire doors and smoke-tight doors |
| 3 .13 | Intumescent coatings at security bolts |
| 3 .14 | Marking of large glass surfaces |
| 3 .15 | Anti-panic doors and RC |
| 3 .16 | Block lock fitting for multiple point locking |
| 3 .17 | Anchor plate fitting for door holding magnet |
Care and Maintenance
Annual maintenance work
Check the door leaf, frame and all add-on parts such as lever handles, locks, door closers and hinges for function and corrosive damage. Grease the latch, hinge bolts and bearing rings with
multi purpose grease. Lubricate bolt locks with Teflon spray. Check the gap dimensions. Make sure that the marking is visible.Replace defective parts and use only original spare parts from the manufacturer.
Danger
Danger to life due to detached intumescent coatings The fire door loses its function if the intumescent coatings are detached. Replace intumescent coatings that have detached. Replace defective parts. Only use original spare parts from the manufacturer. If you discover defects that you yourself cannot remedy, call in a specialist company. Initial start up and maintenance of anti panic locks www.hoermann
Required surface treatment for element with standard priming
The surface of door leaf and frame consists of a primer powder coating on epoxy resin polyester basis.
- Remove the seal.
- With the exception of the intumescent coatings, sand all of the surfaces to be painted.
- Clean the surfaces thoroughly.
- Tape off the ID plate.
- For the primer and final coating, use paints that are suitable and approved by the paint manufacturer for powder coated subsurfaces.
- We recommend light and / or reflective paints.
- Please note BFS information sheet no 24 follow the directions of the paint manufacturer and test a sample surface.
- Finish the products within three months of fitting to avoid corrosion damage.
- We recommend light and/or reflective paints.
- Please note BFS information sheet no. 24 follow the directions of the paint manufacturer and test a sample surface.
- Finish the products within three months of fitting to avoid corrosion damage.
- After the paint has dried, reattach the seal.
Cleaning
Clean the surfaces with clear water or conventional paint cleaner.
Cleaning stainless steel components
Regularly clean stainless steel components by applying Edel Glanz” stainless steel cleaner (available from Hormann) with a soft cloth.
Labelling and marking
The label for door types D65-1, D65-2, D65-1 OD, D65-2 OD bears the CE conformity mark based on the (EU) Directive no. 305/2011. The European product standard used and applied
is EN 14351-1:2006 + A1:2010 Windows and doors Productstandard, performance characteristics. Windows and externalpedestrian doorsets without resistance to fire and/or smoke leakage characteristics.” The number of the corresponding CE mark or declaration of performance is indicated in the rebate area of the door on the above-mentioned label between the manufacturer logo and the CE conformity mark. The above-mentioned harmonised European product standard does not apply for doors that do not bear a CE conformity mark on their labels; thus those doors must not have a CE mark and a declaration of performance.
General
Putting the door into operation is prohibited until it has been established that the door has been installed in accordance with our specifications and its function has been properly
tested. A product‘s declaration of performance becomes invalid if an alteration to the product is carried out.
Dismantling and disposal
Dismantling is done in the reverse order of fitting. Dispose of the construction component in accordance with local regulations.
Declaration of performance
Declaration of performance www.hoermann.com


