
![]() Instruction manual
Instruction manual
Spreader GT1507
60910
Illustrations similar may vary depending on model
Please read and follow the operating instructions and safety information prior to the initial operation.
Technical changes reserved!
Illustrations, functional steps, and technical data may deviate insignificantly due to continuous further developments.
The information contained in this document may alter at any time without prior notice. No part of this document may be copied or otherwise duplicated without prior written consent. All rights reserved.
WilTec Wildanger Technik GmbH cannot be held liable for any possible mistakes in this operating manual, nor in the diagrams and illustrations shown.
Although WilTec Wildanger Technik GmbH has made every possible effort to ensure that this operating manual is complete, accurate, and up-to-date, errors cannot be ruled out entirely. If you have found an error or wish to suggest an improvement, we look forward to hearing from you. Send us an e-mail at: [email protected]
or use our contact form: https://www.wiltec.de/contacts/
The most recent version of this manual in several languages can be found in our online shop: https://www.wiltec.de/docsearch
Our postal address is:
WilTec Wildanger Technik GmbH
Königsbenden 12 52249 Eschweiler Germany
To return your goods for an exchange, repair, or other purposes, please use the following address. Attention! To allow for a trouble-free complaint or return, it is important to contact our customer service team before returning your goods.
Retourenabteilung WilTec Wildanger Technik GmbH
Königsbenden 28 52249 Eschweiler Germany
E-mail: [email protected]
Phone: +49 2403 55592–0
Fax: (+49 2403 55592–15)
Introduction
Thank you for choosing to purchase this quality product. To minimize the risk of injury, we ask you to always take some basic safety precautions when using this product. Please read this operating manual carefully and make sure that you understand it.
Keep these operating instructions in a safe place.
Safety instructions
Before assembly read the safety instructions and the notes!
- Read the safety instructions for tractor owners and tractors. Familiarise yourself with the operation of your tractor before using the spreader.
- Read all the information and safety instructions for handling the chemicals to be broadcast.
- Always wear eye and hand protection while handling and broadcasting lawn or garden chemicals.
- Never operate the tractor or spreader without wearing solid shoes, and do not let anyone ride or sit on the spreader.
- Never let children operate the tractor or spreader, and do not allow any adult to operate them without prior instruction.
- Always begin with the first (lowest) gear and with a low rotation and gradually increase the rotation if conditions allow doing so.
- When towing the spreader, do not get too close to a beck or ditch and look out for potholes and other dangers that might lead to loss of control of the spreader or tractor.
- Before operating a vehicle on a slope (hill), you must respect the safety instructions of the user’s manual vehicle concerning safety on slopes. Do not drive on steep slopes!
Open the packaging and pouch, remove all parts and check for completeness.
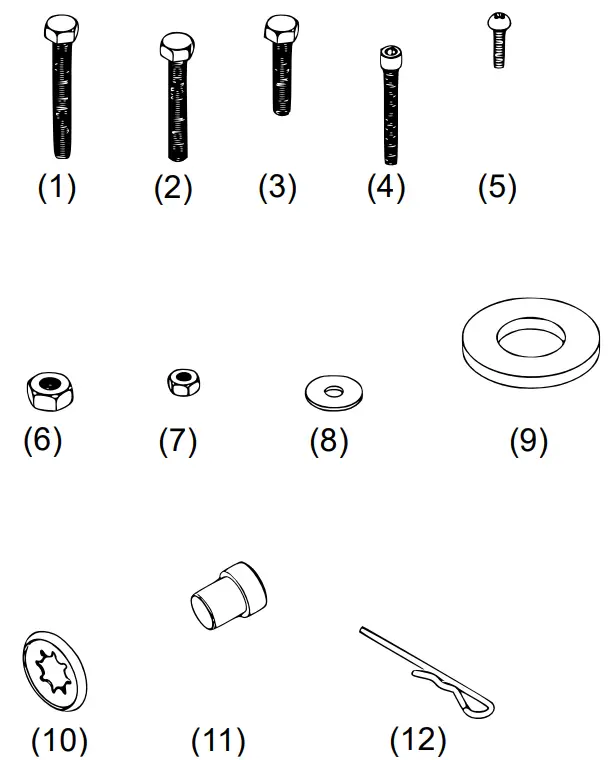
| No | Name | Qty. |
| 1 | Bolt M6×60 | 2 |
| 2 | Bolt M6×40 | 8 |
| 3 | Bolt M6×35 | 4 |
| 4 | Hexagon socket screw | 1 |
| 5 | Fillister head screw M4×20 | 1 |
| 6 | Counter nut M6 | 12 |
| 7 | Counter nut M5 | 1 |
| 8 | Big washer ⌀ 6 | 4 |
| 9 | Washer ⌀ 16 | 1 |
| 10 | End cap | 2 |
| 11 | Inner axle-bearing | 2 |
| 12 | R pin | 1 |
Assembly instructions
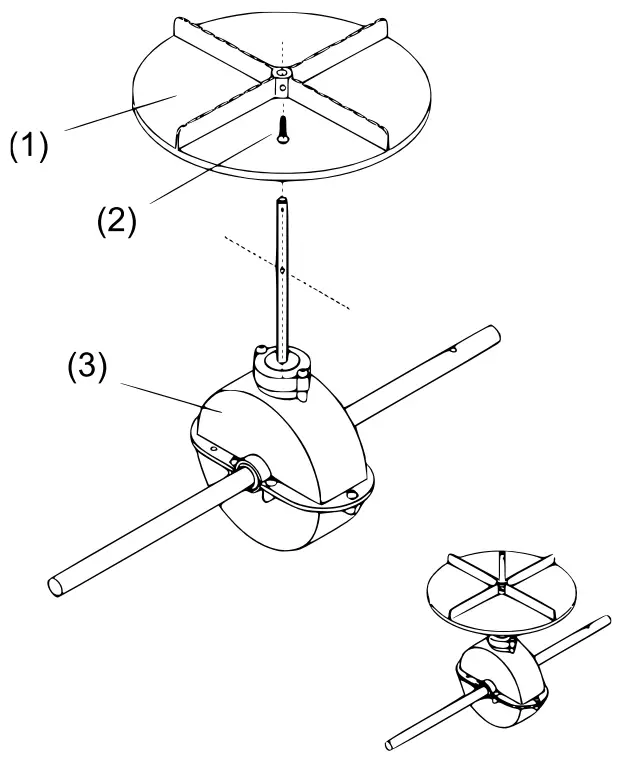
1st step
- Mount the driving wheel (1) onto the drive and axle construction (3).
- Insert the M4×20 fillister head screw (2) through the driving wheel and axle.
2nd step
- Fix the wheel frame construction on either side of the driving axle and connecting rod.
- Insert two M6×40 screws through the wheel frame into the connecting rod. Make sure that the hole on the driving axle is on the right as shown.
- Fix the mounting frame and foot to the hopper with M6×40 screws, M6 counter nuts, and big washers ⌀6.
Note: The screws and nuts do not need to be tightened yet.
Note that the bore on the driving axle must be on this side when assembling.
| No | Name |
| 1 | Right wheel frame assembly |
| 2 | Driving and axle |
| 3 | Left wheel frame assembly |
| 4 | Counter nut M6 |
| 5 | Wheel frame assembly |
| 6 | Big washer ⌀6 |
| 7 | Bolt M6×40 |
| 8 | Hopper |
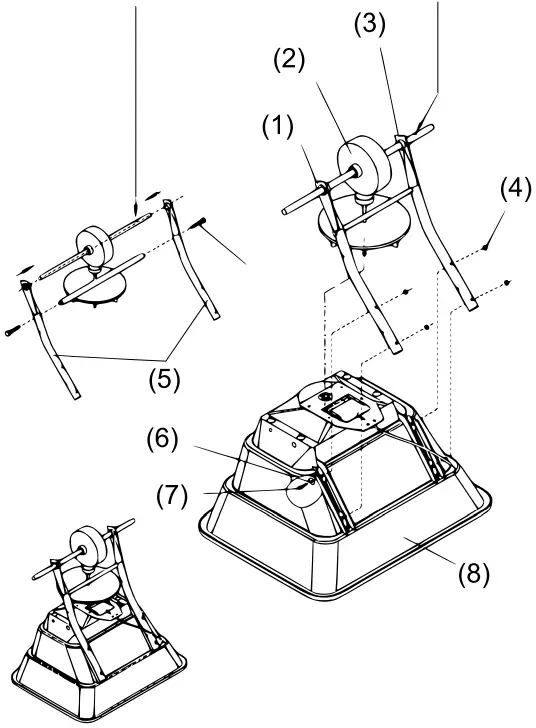
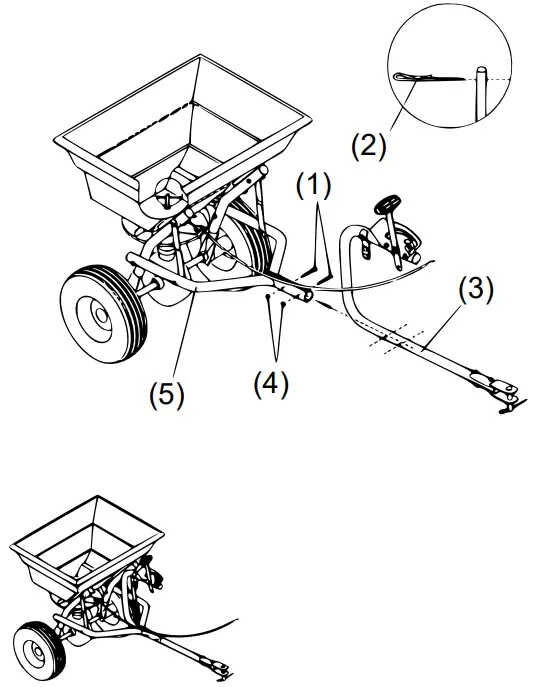
3rd step
- Mount one end of the connecting plate (5) to the wheel frame with an M6×35 screw (4) and M6 counter nut (3).
- Then mount the connecting rod to the wheel frame with an M6×60 screw (7) and M6 counter nut and fix the connecting plate to the connecting rod (1) with an M6×35 screw (6).
Note: The screws and nuts do not need to be tightened.
4th step
- Set in the inner axle box into the outer axle box, making sure that they are securely seated.
- Mount the right wheel construction to the right axle with the M5×45 hexagon socket screw and M5 counter nut, then mount the end cap on the right axle with a wooden or rubber mallet.
- Now mount the left wheel construction to the left axle inserting a ⌀16 washer, and mount the end cap on the left axle with a wooden or rubber mallet.
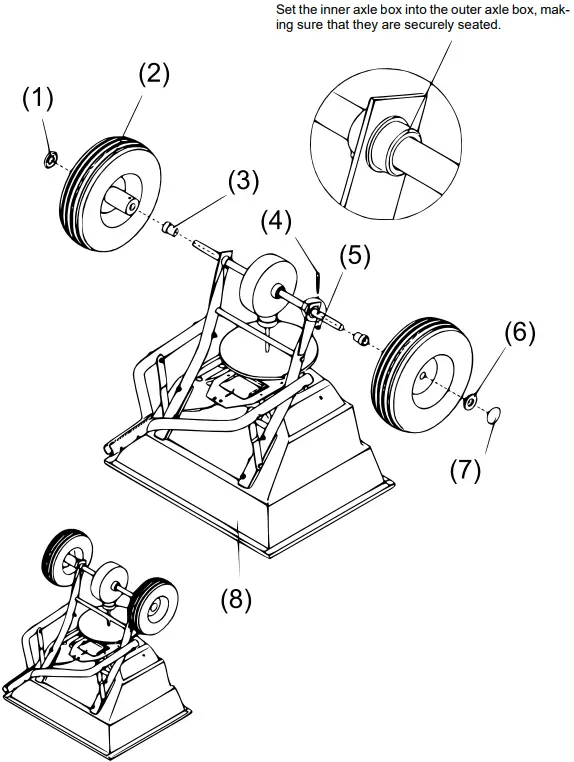
| № | Name |
| 1 | Axle end cap |
| 2 | Pneumatic tire |
| 3 | Inner axle bearing |
| 4 | Hexagon socket screw M×45 |
| 5 | Counter nut M5 |
| 6 | Washer |
| 7 | Axle end cap |
| 8 | Hopper |
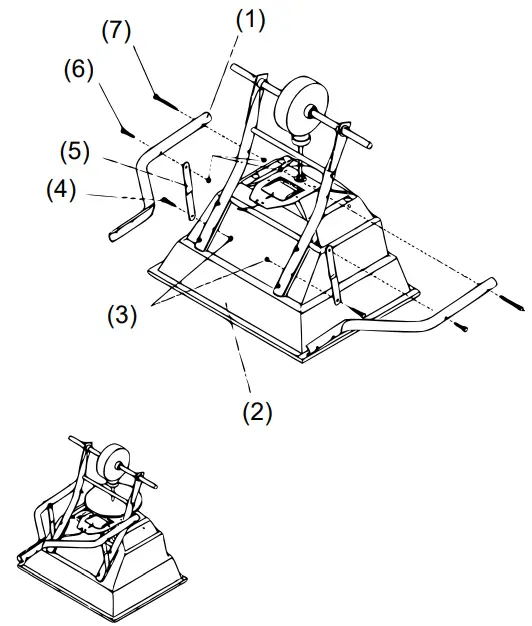
5th step
- Assemble the hopper part (5) and tube part (3) construction with an M6×40 screw (1) and M6 counter nut (4).
- Now tighten all screws and bolts mounted from the first step on, but do not tighten them too strongly, then insert the R pin (2) to the front end for securing.
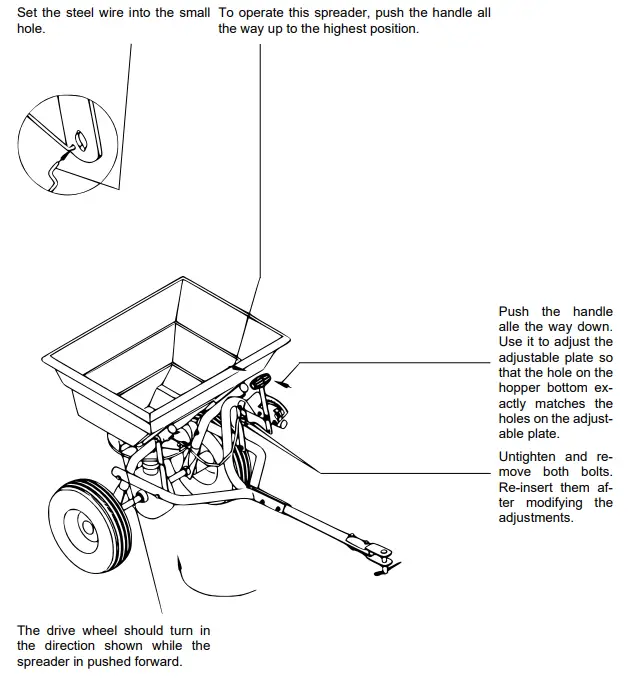
6th step: adjustments
After having finished the above-mentioned steps, the following steps do not need to be followed. They are necessary in case the individual parts do not properly match. To operate this spreader, push the handle up. You can shift the position of the wing nut on the pressure gauge and lever to adjust the spacer of the three holes between the hopper and adjustable plate according to your needs.
Exploded view
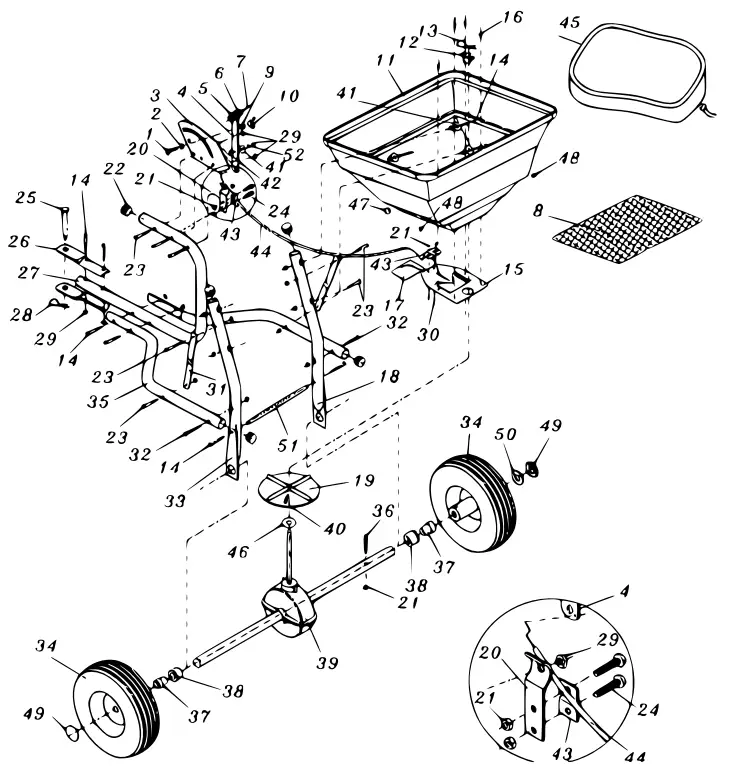
Parts list
| № | Name | Qty. | № | Name | Qty. |
| 1 | Sled screw M6×25 | 1 | 27 | Mounting tube | 1 |
| 2 | Toothed washer ⌀8 | 1 | 28 | R pin ⌀3 | 1 |
| 3 | Pressure gauge and lever part | 1 | 29 | Counter nut M6 | 18 |
| 4 | Adjustable handle rod | 1 | 30 | Screw M5×12 | 2 |
| 5 | Handlebar A | 1 | 31 | Connecting plate | 2 |
| 6 | Handlebar B | 1 | 32 | Bolt M6×60 | 1 |
| 7 | Screw M4×18 | 1 | 33 | Wheel frame assembly (right) | 2 |
| 8 | Hopper filter | 1 | 34 | Pneumatic tire | 2 |
| 9 | Spacer | 1 | 35 | Connecting rod | 2 |
| 10 | Winged nut | 1 | 36 | Hexagon socket screw M5×45 | 1 |
| 11 | Hopper | 1 | 37 | Inner axle-bearing | 2 |
| 12 | Middle cover | 1 | 38 | Outer axle-bearing | 2 |
| 13 | R pin | 1 | 39 | Driving and axle assembly | 1 |
| 14 | Bolt M6×40 | 10 | 40 | Screw M4×20 | 1 |
| 15 | Fixed plate | 1 | 41 | Big washer ⌀6 | 5 |
| 16 | Screw M5×12 | 4 | 42 | Nylon washer | 1 |
| 17 | Adjustable plate | 1 | 43 | Connecting pressure plate | 2 |
| 18 | Wheel frame assembly (left) | 1 | 44 | Control rod | 1 |
| 19 | Driving wheel | 1 | 45 | Rain protection | 1 |
| 20 | Connecting base plate | 1 | 46 | Flat washer | 1 |
| 21 | Counter nut M5 | 5 | 47 | Big end cap | 1 |
| 22 | Tube end cap | 5 | 48 | Small end cap | 2 |
| 23 | Bolt M6×35 | 7 | 49 | Axle end cap | 2 |
| 24 | Fillister head screw M5×10 | 2 | 50 | Washer ⌀16 | 1 |
| 25 | Round-headed pin | 1 | 51 | Connecting and fixing rod | 1 |
| 26 | Tow-bar connecting rod | 2 | 52 | Spring washer ⌀6 | 1 |
Important Note:
Reproduction and any commercial use (of parts) of this operating manual require written permission of WilTec Wildanger Technik GmbH.
https://www.XPOtool.com
The Tool Experts


