
XPOtool 61138 Sheet Nibbler

Read and follow the operating instructions and safety information before using for the first time.
Technical changes reserved!
Due to further developments, illustrations, functioning steps, and technical data can differ insignificantly.
Updating the documentation
If you have suggestions for improvement or have found any irregularities, please contact us.
The information contained in this document may alter at any time without previous notice. It is prohibited to copy or spread any parts of this document in any way without prior written allowance. All rights re-served.
The WilTec Wildanger Technik GmbH cannot be held accountable for any possible mistakes in this operating manual, nor in the diagrams and figures shown.
Even though, the WilTec Wildanger Technik GmbH has undergone biggest possible efforts to ensure that the operating manual is complete, faultless, and up to date, mistakes cannot be entirely avoided. If you should find a mistake or wish to make a suggestion for improvement, we look forward to hearing from you.
Send an e-mail to: [email protected] or use our contact form: https://www.wiltec.de/contacts/ The most recent version of this manual in various languages can be found in our online shop via: https://www.wiltec.de/docsearch Our postal address is: WilTec Wildanger Technik GmbH Königsbenden 12 52249 Eschweiler Germany
To return orders for exchange, repair, or other purposes, please use the following address. Attention! To allow for a smooth execution of your complaint or return, it is important to contact our customer service team before returning the goods. Returns Department WilTec Wildanger Technik GmbH Königsbenden 28 52249 Eschweiler E-mail: [email protected] Tel: +49 2403 55592–0 Fax: +49 2403 55592–15
Introduction
Thank you for purchasing this quality product. To minimise the risk of injury we urge that our clients take some basic safety precautions when using this device. Please read the operation instruc-tions carefully and make sure you have understood its content. Keep these operation instructions safe.
Technical specifications
| Model | 61138 | |
| Rated voltage (V) | 230 | |
| Rated frequency (㎐) | 50 | |
| Input power (W) | 500 | |
| No load speed (r⁄min) | 2000 (±10 %) | |
| Max. cutting thickness (㎜) | Mild steel | 1.6 |
| Stainless steel | 1.2 | |
| Aluminium | 2.5 | |
| Accessories | 2 carbon brushes, 1 operation manual, 1 service book, 1 open wrench, 1 socket hey wrench (2.5) | |
- The manufacturer reserves his right to change specifications without further notice.
- Specifications may differ from country to country.
General safety rules (for all tools)
Warning: Thoroughly read and understand all instructions. Failure to follow the instructions listed below may result in electric shock, fire and/or personal injury. Save the instructions for future reference!
Work area safety
- Keep your work area clean and well lit. Cluttered benches and dark areas lead to accidents.
- Do not operate power tools in explosive atmospheres, e.g., near flammable liquids, gases, or dust. Power tools create sparks which might ignite dust or fumes.
- Keep bystanders, children, and visitors away while operating the tool. Distractions can cause loss of control.
Electrical safety
- Power tool plugs must match the outlet. Never modify the plugs in any way. Do not use any adapter plugs with earthed power tools. Unmodified plugs and matching outlets will reduce the risk of electric shocks. Do not change the plug in any way. Double insulation eliminates the need for a three-wire earthed power cord and a grounded power supply system.
- Avoid body contact with grounded surfaces such as pipes, radiators, cookers, and re-frigerators. These provide an increased risk of electric shock if your body is grounded.
- Do not expose power tools to rain or moisture. Water entering a power tool will increase the risk of electric shocks.
- Do not abuse the cable. Never use the cable to carry a tool or pull the plug from the socket. Keep the cable away from heat, oil, sharp edges or moving parts. Immediately replace damaged cables. Damaged cables increase the risk of electric shock.
- When operating a power tool outside, use an outdoor extension cord. This type of cords is rated for outdoor use and reduce the risk of electric shocks.
Personal safety
- Stay alert, concentrate on what you are doing and use common sense when operating a power tool. Do not use the tool while tired or under the influence of drugs, alcohol, or medicine. A moment of inattention while operating power tools may result in serious personal injury.
- Dress properly. Do not wear loose clothing or jewellery. Tie long hair together. Keep your hair, clothing, and gloves away from moving parts. Loose clothes, jewellery or long hair can be caught in moving parts.
- Avoid accidental starting. Be sure that the switch is turned off before plugging in the device. Carrying tools with your finger put on the switch or plugging tools in which have the switch turned on may lead to accidents or injury.
- Remove adjusting keys or wrenches before turning the tool on. A wrench or a key that is left attached to a rotating part of the tool may result in personal injury.
- Do not overreach. Always keep proper footing and balance. Proper footing and balance enable better control of the tool in unexpected situations.
- Use safety equipment. Always wear eye protection. Dust mask, non-slip safety shoes, a hard hat and hearing protection must be used for appropriate conditions. Ordinary eye or sun glasses are no eye protection.
Tool use and care
- Use clamps or other ways to secure and support the workpiece to a stable platform. Work pieces held by hand or against your body are unstable and may lead to a loss of control.
- Do not force the tool. Use the correct tool for your application. The correct tool for the right job will work better and safer at the rate which it was designed for.
- Do not use the tool if the switch does not work properly. Any tool that cannot be controlled with the switch is dangerous and must be repaired.
- Disconnect the plug from the power source before making any adjustments, changing equipment, or storing the tool. These preventive safety measures reduce the risk of starting the tool accidentally.
- Store idle tools out of reach of children and other untrained people. Tools are dangerous in the hands of untrained users.
- Maintain tools with care. Keep cutting tools sharp and clean. Properly maintained tools with sharp cutting edges are less likely to bind and are easier to control.
- Check for misalignment or smoothly operating moving parts, broken parts and any other condition that may affect the operation. If the tool is damaged, have it serviced before re-using it. Many accidents are caused by poorly maintained tools.
- Only use equipment that is recommended by the manufacturer for your model. Equipment that may be suitable for one tool might be dangerous when used on another tool.
Service
- Tool service must be performed only by qualified repair personnel. Service or maintenance performed by unqualified personnel could result in injury.
- When servicing a tool, use only identical and original replacement parts. Follow the instructions in the “maintenance” section of the manual. Use of unauthorised parts or failure to follow mainte-nance instructions may create a risk of electric shock or injury.
Specific safety rules
- Do not let comfort or familiarity with the product (gained from repeated use) replace strict ad-herence to the nibbler safety rules. If you use this tool unsafely or incorrectly, you can suffer serious personal injury.
- Always be sure that the tool is switched off and unplugged before carrying out any work on the tool.
- Always lead the power supply cord away from the tool towards the rear.
- Do not touch the blade or the workpiece immediately after operation; it might be ex-tremely hot and could burn your skin.
- Hold the tool by the insulated gripping surfaces when performing an operation where the cutting tool may get in contact with a hidden wiring or its own cable. Contact with an electrified wire will make exposed metal parts of the tool conduct the electricity and shock the operator.
- Hold the tool firmly with both hands.
- Apply the machine to the workpiece only when switched on.
- Always switch the machine off and wait until it has come to a standstill before placing it down.
- Never allow children to use the machine.
- Some material contains chemicals which might be toxic. Take caution to prevent dust inhalation and skin contact. Follow material supplier safety data.
Warning: Save these instructions warning: misuse or failure to follow the safety rules stated in this instruction manual may cause serious personal injury.
Symbols
The following shows the symbols used for the tool.
| Voltage in Volt | V | No load speed | n |
| Amperage in Ampere | A | Revolutions per minute | rpm |
| Frequency in Hertz | Hz | Protection class II | |
Functional description
Assembly
- Installing and removing the punch and die:
Caution: Always be sure that the tool is switched off and unplugged before remov-ing or installing the punch and die.
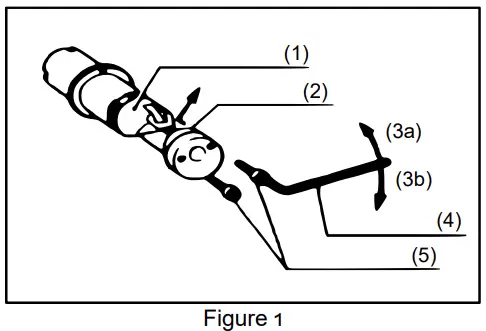
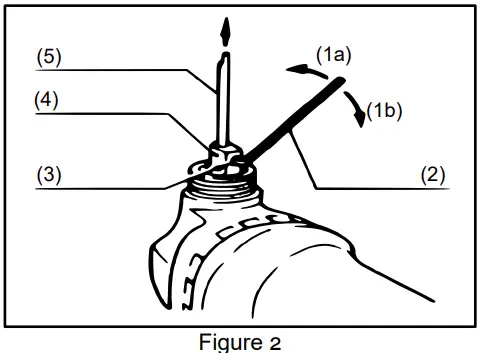
№ Name № Name 1 Blanking rod 3b Tighten 2 Punching die 4 Hex wrench 3a Loosen 5 Screw bolt - Make sure to replace the punching needle and the punching die set. When disassem-bling them, loosen the cap nut with the wrench and disassemble the rod out of the tool. Then loosen the nut fastening the punching die with a hex wrench. Disas-semble the punching die out of the rod and then loosen the screw rod fastening the punching needle with a hex wrench. Pull the punching needle out of the rod (Fig. 1 and 2).

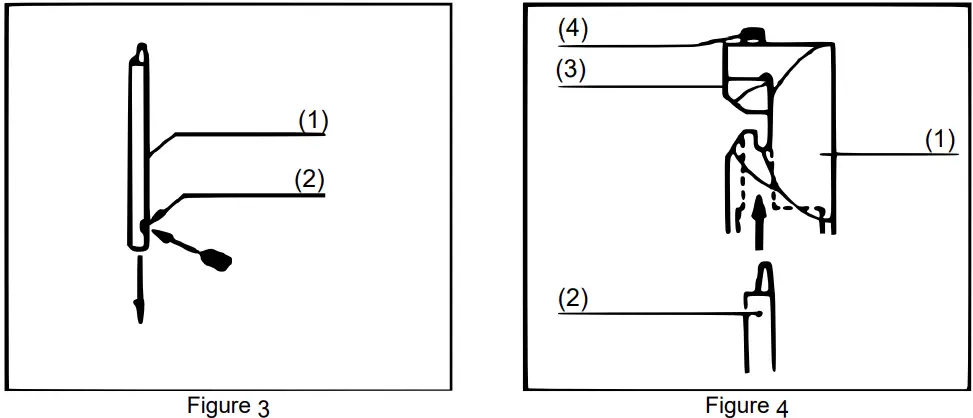
№ Name № Name 1a Loosen 3 Screw 1b Tighten 4 Clamp 2 Hex wrench 5 Punching needle - When assembling the punching needle and the punching die, insert the punching needle into the clamp to make the hole face the fastening screw rod and then
tighten it. Put the punching die into the blanking rod and tighten the fix screw cap. Finally put the blanking rod into the tool to make the punching needle insert the tool through the hole in it and tighten the screw cap to fix the blanking rod and the tool. Grease it after finishing the replacement of the punching needle and the punching die set. (Fig. 3 and 4).
№ Name № Name № Name № Name 1 Punching needle 2 Hole 1 Blanking rod 3 Punching die 2 Punching needle 4 Screw cap
Changing the position
Warning: Before changing the position of the die cut, make sure that the switch of the tool is turned off and the power plug is pulled out.
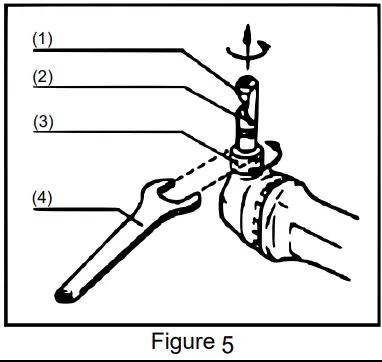
The position of the die cut can be changed within 360° according to the following steps:
- Loosen the cap nut with the attached wrench.
- Pull the blanking rod slightly and rotate it to a desired position.
- Tighten the cap nut to fix the blanking rod at the desired position.
- There are 4 fixed positions separately at 90° and 0° on the right such as 90° and 180° on the left. Locate it according to the following steps:
- Loosen the cap nut with the attached wrench.
- Pull the die cutting chip rod slightly and then slightly press it while turning the it into the desired position. The rod will be chucked at the desired position in one the four above fixed positions.
- Rotate the die cutting chip rod slightly to make sure that the rod is chucked at a fixed position.
- Tighten the cap nut and fix the rod.
| № | Name | № | Name | |
| 1 | Die cutting chip | 3 | Cap nut | |
| 2 | Blanking rod | 4 | Wrench |
Switch on and off (Fig. 6)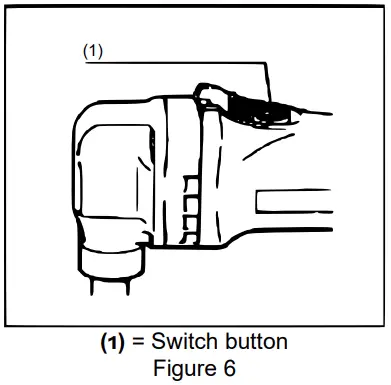
Caution: Before plugging the tool into a socket, check whether the switch works properly. Press down the trigger to see whether the back switch is turned into the off position.
To switch on: Push the back of the switch forward and press the front of the switch down to lock it. To switch off: Press the back of the switch down to turn it off.
Thickness gauge (Fig. 7)
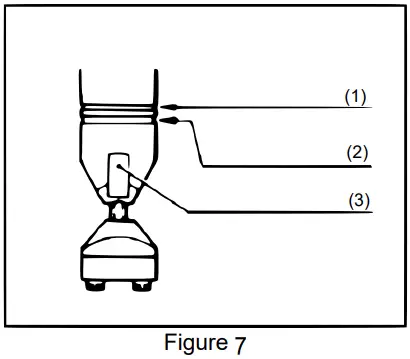
- The recess of the blanking rod is considered as a measuring scale which indicates the allowable thickness of the die cut.
- The gap on the blanking rod indicates the line of the cut. The width of the gap is the same as the width of the cut. Make sure to align the cutting line on the work piece with the gap.
- Pre-grease: Coat the cutting line of the workpiece with oil to increase the efficiency and strengthen the durability. It’s especially important when cutting aluminium.
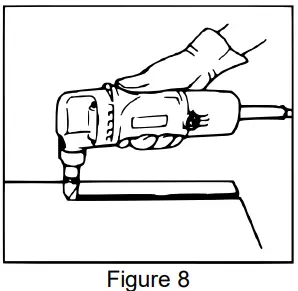
- Method of die cut (Fig. 8): Hold the electric tool to make the die cut chip at right angles (90°) to the workpiece being cut and push the machine slightly according to the cut direction.
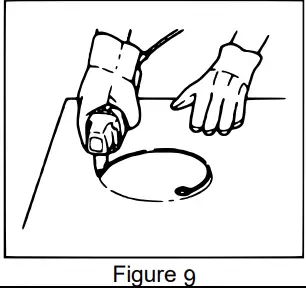
- Cut-outs (Fig. 9): Cut-outs can be done by first opening a round hole of at least 21 mm in diameter which the cutting head can be inserted into.
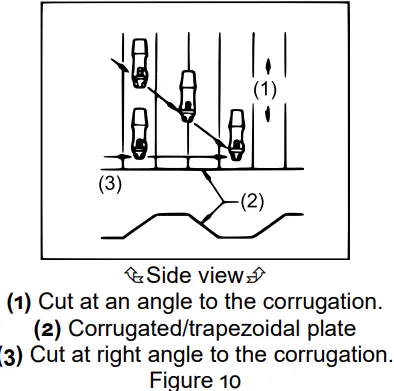
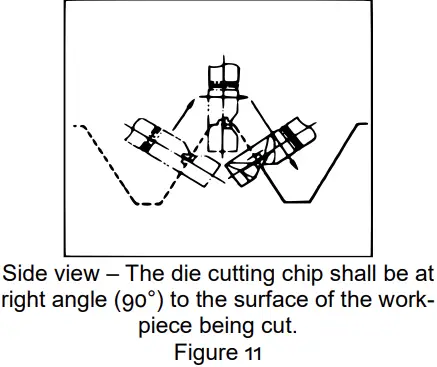
Cutting corrugated or trapezoidal metal sheets When cutting corrugated or trapezoidal metal sheets, make the punch face the cut direction whether to cut it at an angle or at right angles. When operating the direction of holding the tool must run parallel to the corrugating direction. Make sure that the die cutting chip works at right angles (90°) to the workpiece being cut (Fig. 10 and 11).
Caution: Always be sure that the tool is switched off and unplugged before attempting to perform inspection or maintenance.
- The tool and its air vents must be kept clean. Regularly clean the tool’s air vents or when the vents start to become dirty.
- Check all the screws periodically if they are loose and tighten them if so.
- Check the cable insulation regularly.
Replacing carbon brushes
- Remove and check the carbon brushes regularly. Replace when the tool produces obvious sparks or the brushes are strongly worn down.
- Both carbon brushes should be replaced at the same time. Only use the original brushes provided.
- Use a screwdriver to remove the brush holder caps. Take out the worn carbon brushes, insert the new ones and secure the brush holder caps.
Caution: Be sure to re-install the knob after inserting new carbon brush.
- After replacing brushes, plug in the tool and break in brushes by running the tool without for about 10 min. Then check the tool while running, when releasing the switch trigger. If the tool is not working well, ask your authorised service centre for repair.
- To maintain product safety and reliability, repairs or any other maintenance should be performed by and an authorised service partner, always using original replacement parts.
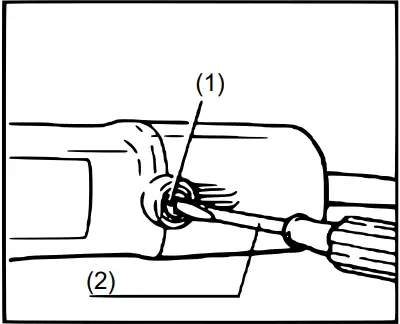
| № | Name | № | Name |
| 1 | Brush holder cap | 2 | Screwdriver |
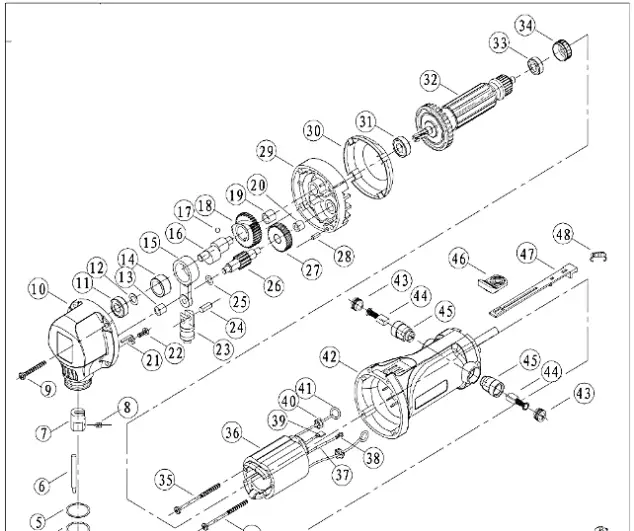
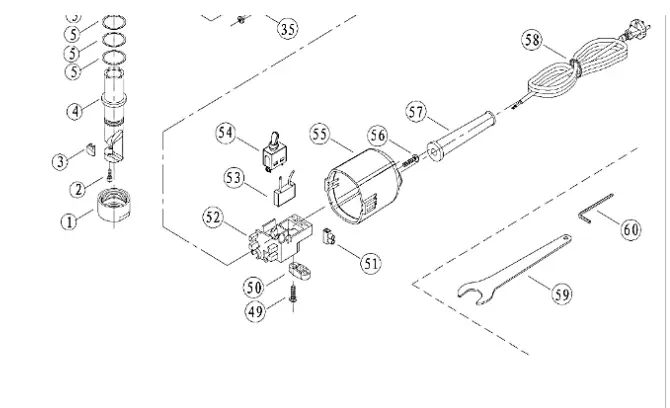
Parts list and exploded view
| № | Name | Unit | Qty | № | Name | Unit | Qty |
| 1 | Lock nut | pc | 1 | 31 | Ball bearing | set | 1 |
| 2 | Hex socket screw | pc | 2 | 32 | Armature | pc | 1 |
| 3 | Bottom punching die | pc | 1 | 33 | Ball bearing 607–2Z | set | 1 |
| 4 | Blanking rod | pc | 1 | 34 | Labyrinth rubber ring | pc | 1 |
| 5 | Copper washer | pc | 3 | 35 | Tapping screw | pc | 2 |
| 6 | Punching needle | pc | 1 | 36 | Stator | pc | 1 |
| 7 | Punching needle holder | pc | 1 | 37 | Glass fibre tube | M | 0.1 |
| 8 | Hex socket clamping screw | pc | 1 | 38 | Connection button | pc | 2 |
| 9 | Tapping screw | pc | 4 | 39 | Connection button | pc | 4 |
| 10 | Head case | set | 1 | 40 | Inductor | pc | 2 |
| 11 | Ball bearing 608–2Z | pc | 1 | 41 | Tension spring | pc | 2 |
| 12 | Copper washer | pc | 1 | 42 | Engine housing | pc | 1 |
| 13 | Retaining oil bearing | pc | 1 | 43 | Brush holder cap | pc | 2 |
| 14 | Needle bearing | pc | 1 | 44 | Carbon brushes | pc | 2 |
| 15 | Connecting rod | pc | 1 | 45 | Brush holder | pc | 2 |
| 16 | Crank shaft | pc | 1 | 46 | Switch button | pc | 1 |
| 17 | Steel ball | pc | 1 | 47 | Switch bar | pc | 1 |
| 18 | Transmission | pc | 1 | 48 | Switch spring | pc | 1 |
| 19 | Needle bearing hk0810 | pc | 1 | 49 | Cross tapping screw st4.2×16 | pc | 2 |
| 20 | Needle bearing hk0609 | pc | 1 | 50 | Strain relief | pc | 1 |
| 21 | Stopper | pc | 1 | 51 | Terminal lock | pc | 1 |
| 22 | Stud | pc | 1 | 52 | Switch stand | pc | 1 |
| 23 | Block stamp | pc | 1 | 53 | Capacitor | pc | 1 |
| 24 | Pin | pc | 1 | 54 | Switch | pc | 1 |
| 25 | Copper washer | pc | 1 | 55 | Rear cover | pc | 1 |
| 26 | Mild gear spindle | pc | 1 | 56 | Tapping screw | pc | 2 |
| 27 | Big gear | pc | 1 | 57 | Cord guard | pc | 1 |
| 28 | Cylindrical pin | pc | 1 | 58 | Cord | pc | 1 |
| 29 | Middle cover | pc | 1 | 59 | Opening wrench | pc | 1 |
| 30 | Baffle plate | pc | 1 | 60 | Socket hex wrench | pc | 1 |
Disposal regulations
EU guidelines regarding the disposal of scrap electric appliances (WEEE, 2012/19/EU) were imple-mented in the law related to electrical and electronic equipment and appliances. All WilTec electric devices that fall under the WEEE regulations are labelled with the crossed-out wheeled waste bin logo. This logo indicates that this electric equipment must not be disposed with the domestic waste. The company WilTec Technik GmbH has been registered in the German registry EAR under the WEEE-registration number DE45283704. Disposal of used electrical and electronic appliances (intended for use in the countries of the European Un-ion and other European countries with a separate col-lection system for these appliances). The logo on the article or on its packaging points out that this article must not be treated as normal house-hold waste but must be disposed to a recycling collec-tion point for electronic and electrical waste equipment. By contributing to the correct disposal of this article you protect the environment and the health of your fellow men. Environment and health are threatened by inap-propriate disposal. Material recycling helps reduce the consumption of raw materials. Additional information on recycling this article can be provided by your local community, municipal waste disposal facilities, or the store where you purchased the article.
Address:
WilTec Wildanger Technik GmbH Königsbenden 12 / 28 D-52249 Eschweiler
Important notice:
The reprint or reproduction, even of excerpts, and any commercial use, even in part, of this instruction manual require the written permission of WilTec Wildanger Technik GmbH.https://www.XPOtool.com Item 61138 The Tool Experts


