ZebraNet 802.11ac Radio Wireless Print Server Instruction Manual

Installation Instructions
This kit includes the parts and documentation necessary to install the ZebraNet 802.11ac Radio Wireless
Print Server Option/Maintenance Kit into the following printers:
- ZT410/ZT420
- ZT411/ZT421
- ZT510
- ZT610/ZT620
Read these instructions thoroughly before installing this kit.
 IMPORTANT: If the print server is being used in countries outside of the USA, Canada, or Japan, a qualified service technician must perform this installation.
![]() NOTE: Check the part number in the media side of the ZT410/ZT420 Printers. This kit is used on ZT410/ZT420 Printers with the letter A in the 6th position of the part number. Example: ZT4x0A-xxxxxxxx.
NOTE: Check the part number in the media side of the ZT410/ZT420 Printers. This kit is used on ZT410/ZT420 Printers with the letter A in the 6th position of the part number. Example: ZT4x0A-xxxxxxxx.
If the part number does not have the letter A in the 6th position of the part number, the printer firmware must be updated to version V75.20.14Z or later before installation.
![]() NOTE: Installing this print server disables the ZT410/ZT420 PrintTouch capability. After installation,
NOTE: Installing this print server disables the ZT410/ZT420 PrintTouch capability. After installation,
Bluetooth devices must be paired with the printer manually.
Parts List
Before proceeding, verify that the kit contains the following items

ZEBRA and the stylized Zebra head are trademarks of Zebra Technologies Corp., registered in many jurisdictions
worldwide. All other trademarks are the property of their respective owners. © 2020 Zebra Technologies Corp. and/or its affiliates. All rights reserved. | www.zebra.c
| ? | Item | Description | Qty |
| Ref | Wireless Print Server 802.11ac Radio Option/Maintenance Kit, Region A (USA and Canada) | ||
| Wireless Print Server 802.11ac Radio Option/Maintenance Kit, Region B (Japan) | |||
| Wireless Print Server 802.11ac Radio Option/Maintenance Kit, Region C (All other countries other than regions, A and B) | |||
| 1 | ZebraNet Print Server 802.11ac Accessory Card | 1 | |
| 2 | ZebraNet Print Server 802.11ac Antenna | 1 | |
| 3 | ZT400 Compliance Label | 1 | |
| 4 | ZT510 Compliance Label | 1 | |
| 5 | ZT600 Compliance Label | 1 | |
| 6 | Screws, M3 × 0.5 × 6 | 2 |
Tools Required
 Metric Hexalobular Wrench Set
- Phillips Screwdriver Set
- Antistatic Wriststrap and Mat
- Programming Guide for ZPL II, ZBI 2, Set-Get-Do, Mirror, and WML or Internet access to download the guide from com.
 Metric Hexalobular Wrench Set
Prepare for Installation
![]() CAUTION: Turn off (O) the printer and disconnect it from the power source before performing the following procedure.
CAUTION: Turn off (O) the printer and disconnect it from the power source before performing the following procedure.![]() CAUTION—ESD: Observe proper electrostatic safety precautions when handling static-sensitive components such as circuit boards and printheads.
CAUTION—ESD: Observe proper electrostatic safety precautions when handling static-sensitive components such as circuit boards and printheads.
- Connect yourself to an antistatic
- Are you replacing an existing option card?
| If… | Then… |
| Yes | Go to Remove the Old Option Card. |
| No | Go to Remove the Cover Plate on page 5. |
Remove the Old Option Card
- See Figure 1 to verify the slots that can be used for the various option cards.
Figure 1 Option Card Locations (ZT610 shown)
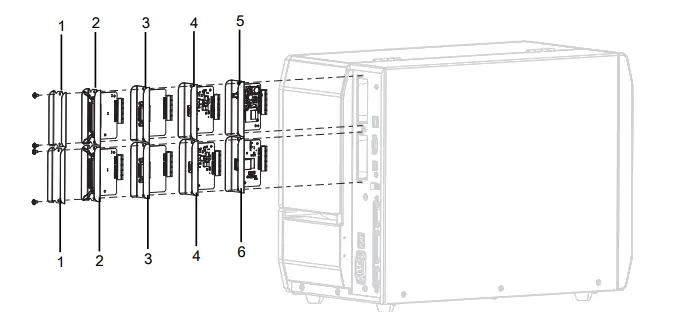
| 1 | Blank cover |
| 2 | Parallel port |
| 3 | Applicator interface |
| 4 | USB Host |
| 5 | Wireless (only in this location) |
| 6 | Internal print server IPV4 (only in this location) |
- See Figure 2. Remove the two option card mounting screws that secure it to the top slot.
Figure 2 Remove the Option Card (ZT610 shown)
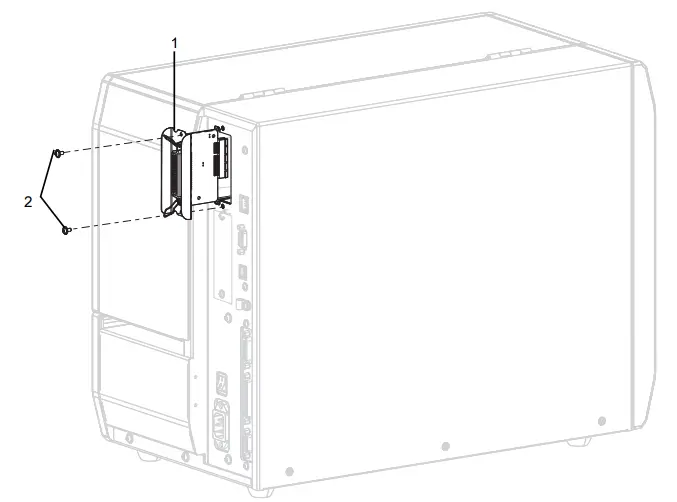
| 1 | Option card |
| 2 | Mounting screws (2) |
- Slide the option card out of the printer.
- Go to Install the ZebraNet 802.11ac Radio Print Server on page 6
Remove the Cover Plate
- See Figure 3. Remove the blank cover covering the top slot by removing the two mounting screws.
Figure 3 Remove the Blank Cover (ZT610 shown)
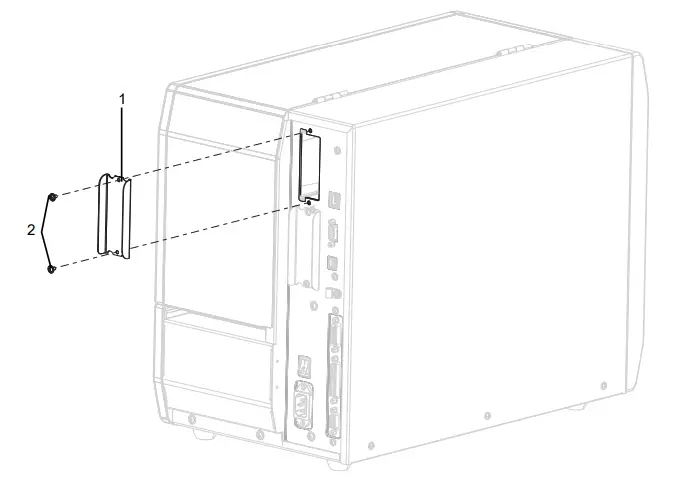
| 1 | Blank cover |
| 2 | Mounting screws (2) |
Install the ZebraNet 802.11ac Radio Print Server
- See Figure 4. Align the print server card with the option card guide slots in the top slot of the
Figure 4 Install the New ZebraNet Print Server Card (ZT610 shown)
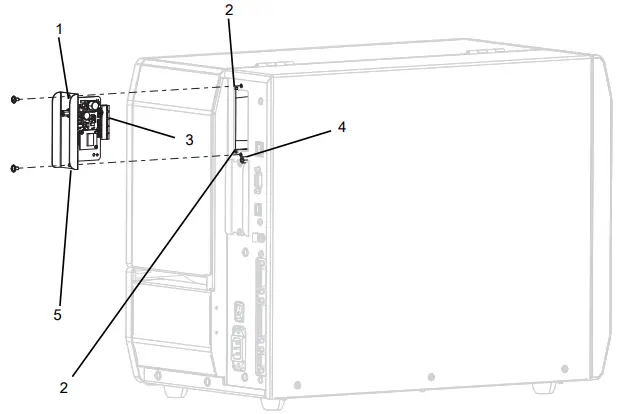
| 1 | Wireless print server card |
| 2 | Option card guide slots (2) |
| 3 | Wireless print server card connector |
| 4 | Locating post |
| 5 | Locating notch |
- Slowly slide the wireless option card into the printer until it
- Ensure that the option card connector is aligned with the main logic board connector, and then push in the card on the top and bottom until the card is flush with the back of the printer.
- Install the two mounting
- See Figure 5. To install the external antenna, screw the antenna onto the RF connector extending out of the option
Figure 5 Close-up of Antenna Installation
- See Figure 5. To install the external antenna, screw the antenna onto the RF connector extending out of the option
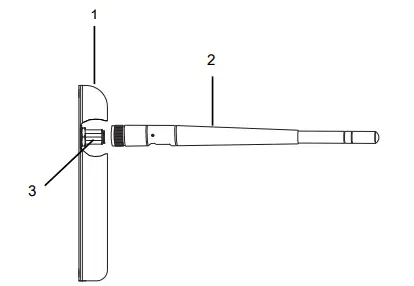
| 1 | Option card mounting plate |
| 2 | RF antenna |
| 3 | RF connector |
Which printer are you working on?.
| If you have a… | Then… |
| ZT600 Series or ZT510 Printers | Go to Apply the Compliance Label on ZT600 Series and ZT510 Printers on page 8. |
| ZT400 Series Printers | Go to Apply the Compliance Label on ZT400 Series Printers on page 9. |
Apply the Compliance Label on ZT600 Series and ZT510 Printers
- Open the media door and remove the
- Locate the Product Label (1), already in

Apply the Compliance Label on ZT400 Series Printers
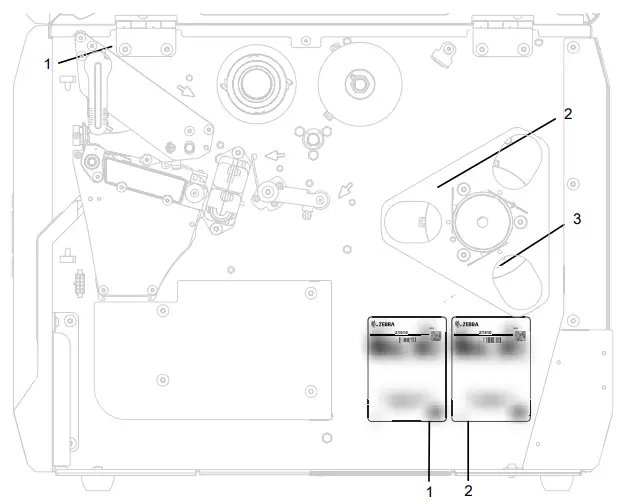
- Open the media door and remove the
- See Figure 6. Locate the Product Label, already in
Figure 6 Locate the Product Label
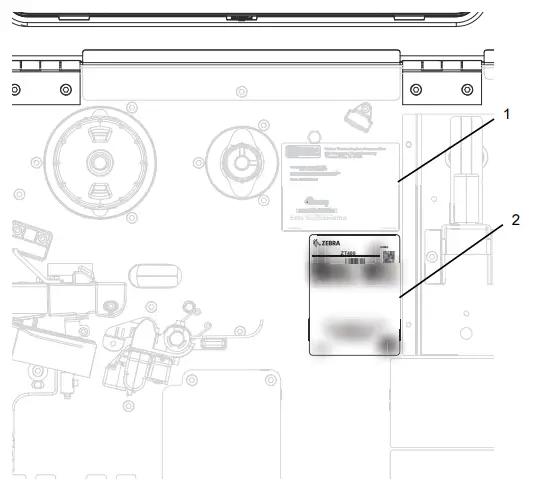
| 1 | Product label |
| 2 | Compliance label |
- Select the proper compliance label for the
- Peel the backing off of the label, (ZT10/ZT420 Printers), and then install the label below the product label as shown in Figure 6.
- Reinstall the
- Reconnect the AC power cord and all data cables, and then turn on (l) the
Configure the Printer for Wi-Fi Operation
- Connect the printer to your computer using a USB or serial
- Is the printer to be used in the United States, Canada, or Japan?
| If… | Then… |
| Yes | a. The country codes have been preset at the factory and cannot be changed. b. Go to step 3. |
| No | The country code must be set for your wireless board.
a. To determine the country codes available on the printer, issue the following command to return all commands related to WLAN settings. ! U1 getvar “wlan” b. Locate the wlan.country.code command in the results and view the country codes available for the printer. c. Send the following command with the appropriate country code value. When this value has been set, it cannot be changed. ! U1 setvar “wlan.country_code” “value” d. Go to step 3. |
- Do you need to pair a Bluetooth device?
| If… | Then… |
| No | Go to Resume Printer Operation on page 15. |
| Yes | Go to Bluetooth Pairing on page 11. |
Bluetooth Pairing
Which type of printer do you have?
| If you have a… | Then… |
| ZT600 Series ZT510 | 1. Turn on Bluetooth on your device. 2. Hold up the device to the NFC logo on left side of the printer, next to the control panel. 3. Follow the prompts on the device and the printer to pair them. |
| ZT411 or ZT421 | Go to Manually Pairing ZT411 and ZT421 Printers on page 11. |
| ZT410 or ZT420 | Go to Manually Pairing ZT410 and ZT420 Printers on page 12. |
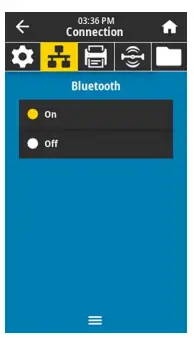
Manually Pairing ZT411 and ZT421 Printers
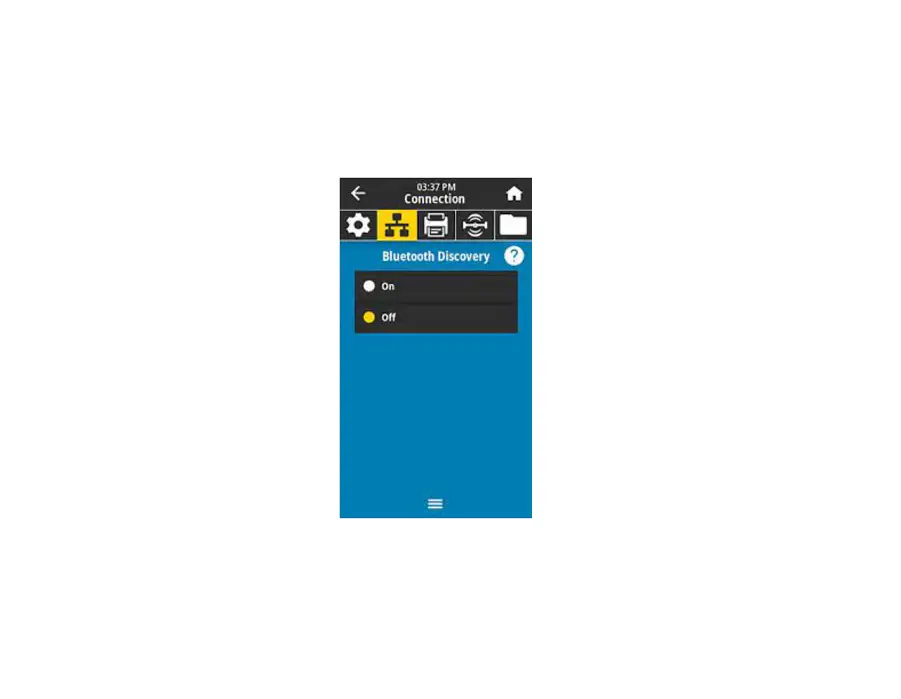
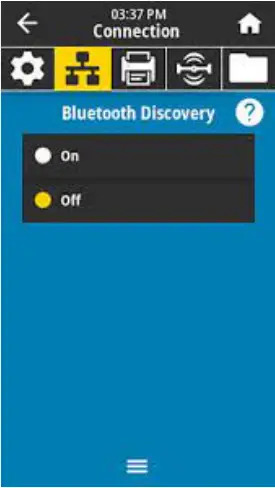
- From the printer’s home screen, navigate to Connection > Bluetooth >

- Touch On to enable Bluetooth on the
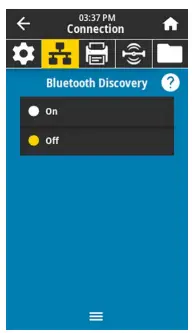
- Navigate to Connection > Bluetooth > Bluetooth Discovery

- Touch On to enable Bluetooth discoverable mode on theThe printer is now discoverable to Bluetooth devices. Use the Bluetooth options on the device to pair it with the printer. For other Bluetooth features available on your printer, go to zebra.com/zt411-info or zebra.com/zt421-info
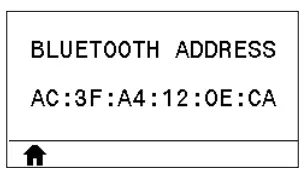
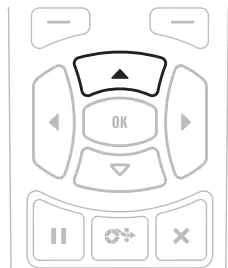
Manually Pairing ZT410 and ZT420 Printers
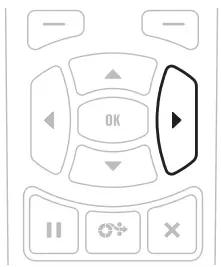
- From the printer’s display screen, press LEFT SELECT to select the Home

The printer displays the Home Menu
- Use the ARROW buttons to navigate to the BLUETOOTH menu
The Bluetooth menu is selected - Press OK.

The printer displays the Bluetooth MAC address.
Resume Printer Operation
- Reinstall media and ribbon (if used).
- Close the media
- If you disconnected the AC power cord and interface cables, reconnect them, and then turn on the printer
- If necessary, press Pause to resume printer
The installation is complete.
Read More About This Manual & Download PDF:
References
 Zebra Technologies | Visible. Connected. Optimized.
-
Zebra Technologies | Visible. Connected. Optimized.
-
Printer Parts | Printer Repair Parts | Zebra
-
ZT411 Industrial Printer Support & Downloads | Zebra
-
ZT421 Industrial Printer Support & Downloads | Zebra
-
Zebra Technologies | Visible. Connected. Optimized.
-
Printer Parts | Printer Repair Parts | Zebra
-
ZT411 Industrial Printer Support & Downloads | Zebra
-
ZT421 Industrial Printer Support & Downloads | Zebra


