![]()
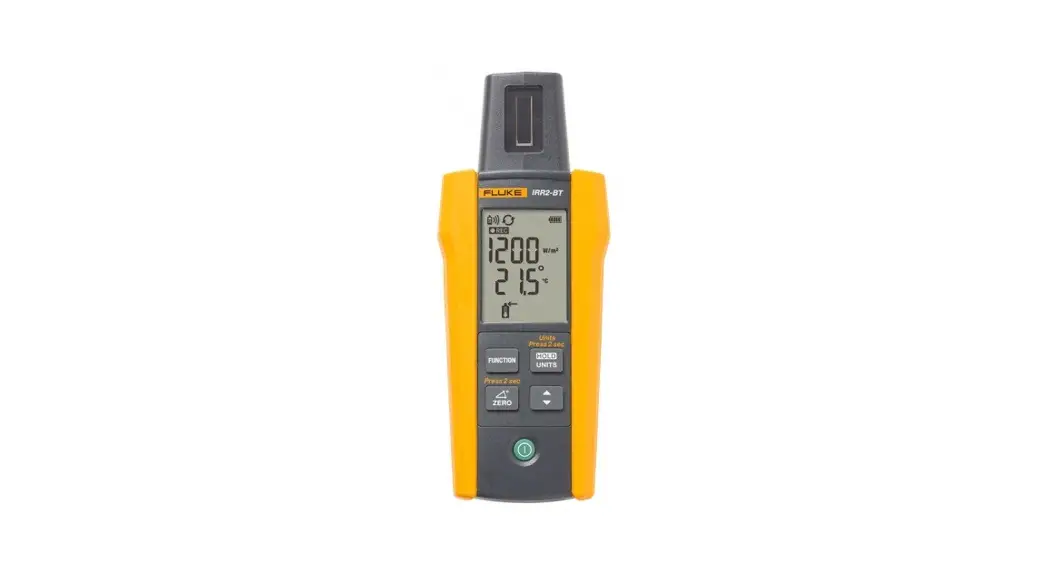
IRR2-BT
Solar Irradiance Meter Pro
Users Manual
Contents hide
Introduction
The Fluke IRR2-BT Solar Irradiance Meter Pro (the Meter or Product) provides digital measurements related to photovoltaic (PV) panels.
The Meter measures and reads:
- Solar irradiation (W/m2) on the surface of a photovoltaic (PV) panel
- Temperature (°F or °C) on the surface of a photovoltaic (PV) panel
- Inclination (degrees) of a photovoltaic (PV) panel
- Cardinal degrees with the compass function The Meter can wirelessly transfer measurements to the SMFT-1000 PV Analyzer (the Analyzer). This data is used for IV curve performance analysis of the solar panel and other measurements of the roof slope and the compass.
Note
The Meter does not connect to smart phones and other smart devices.
When the date and time on the Meter and the Analyzer match and the Meter is out of wireless connection range with the Analyzer, the Meter automatically records the data to memory.
This data can be transferred later to the SMFT-1000.
PN 5339484 (English) 8/2022
©2022 Fluke Corporation. All rights reserved.
Specifications are subject to change without notice. All Product names are trademarks of their respective companies.
Kit Components
The Product contains these items:
- 1 IRR2-BT Solar Irradiance Meter Pro
- 1 External Temperature Probe with Suction Cup
- 1 Carrying Case with Shoulder Strap
- 1 Mounting Bracket
- 4 AA IEC LR6 Batteries
- 1 User Manual
Safety Information
A Warning identifies hazardous conditions and procedures that are dangerous to the user.
A Caution identifies conditions and procedures that can cause damage to the Product or the equipment under test.
A Caution identifies conditions and procedures that can cause damage to the Product or the equipment under test.
To prevent possible fire or personal injury:
- Read all safety information before you use the Product.
- Carefully read all instructions.
- Do not alter the Product and use only as specified, or the protection supplied by the Product can be compromised.
- Do not use the Product if it operates incorrectly.
- Do not use the Product if it is altered or damaged.
- Have an approved technician repair the Product.
Symbols
The table below lists the symbols that can be used on the Product or in this document.
| Symbol | Description |
| Consult user documentation. | |
| WARNING. RISK OF DANGER. | |
| Battery or battery compartment. | |
 | Conforms to European Union directives. |
| This product complies with the WEEE Directive and its marking requirements. The affixed label indicates that you must not discard this electrical/electronic product in domestic household waste. Do not dispose of this product as unsorted municipal waste. For information about take-back and recycling programs available in your country, see the Fluke website. |
Product Overview
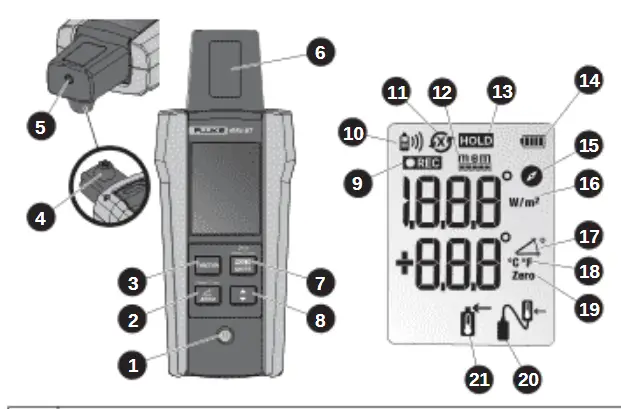
| 1 | ON/OFF Button |
| 2 | Angle Reset Button Use Angle Reset to measure the angle difference between the solar panel and the surface |
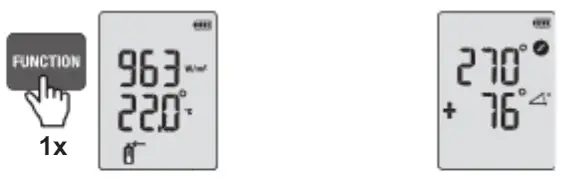
| 3 | Function key for Irradiance, Temperature, Compass, and Angle measurements |
| 4 | Integrated Temperature Sensor for panel surface measurement |
| 5 | External Temperature Probe Socket |
| 6 | Photovoltaic Irradiance Sensor |
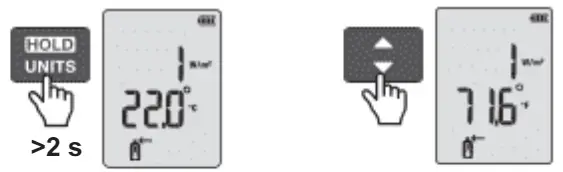
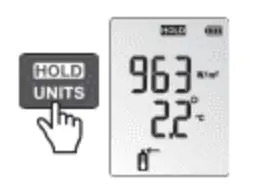
| 7 | Hold Button to hold measurement on the display Push Hold for 2 seconds to enable the Temperature Units Change mode |
| 8 | Temperature Units Switch Button (°F or °C) |
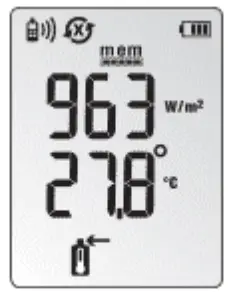
| 9 | Recording/Data Log |
| 10 | Wireless Connection Indicator (Range: up to 50 m/150 ft) |
| 11 | Synchronized |
| 12 | Memory Full Indicator |
| 13 | Hold Indicator |
| 14 | Battery Level Indicator |
| 15 | Compass Function Indicator |
| 16 | Irradiance Units Indicator |
| 17 | Angle Function Indicator |
| 18 | Temperature Units Indicator (°F or °C) |
| 19 | Angle Reset Indicator |
| 20 | External Temperature Probe Indicator |
| 21 | Integrated Temperature Sensor Indicator |
Operation
Use the Analyzer to adjust the recording settings, memory, and clock synchronization. See SMFT-1000 Users Manual for more information.
- Power ON/OFF
 At power on, the Meter shows the available memory in hours for 2 seconds. The total memory capacity allows continuous recording for 17 hours. Partial memory records for less time.
 The display shows the Irradiance/Temperature mode 2 seconds after power up.
 - Move the Meter within wireless range of the main Analyzer. The range is up to 50 m (150 ft) with a clear line-of-sight view (no sight obstruction).
 shows on the display when the Meter has wireless connection to the Analyzer.NoteIf already installed on the roof, it is not necessary to move the Meter. Instead, move the Analyzer near the building to establish the connection. When connection is established, you can synchronize both units from the ground.
 - When connected, the Analyzer sends the command to the Meter for synchronization,
 shows on the display.

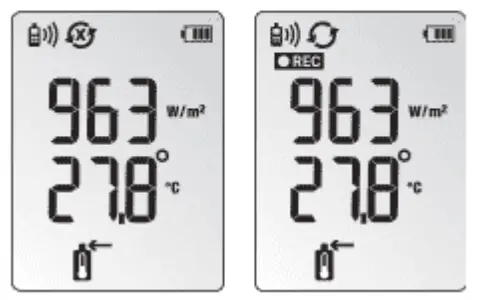
The Meter automatically starts recording the irradiance and temperature data and REC shows on the display until the memory is full.
When the Meter is not synced,  blinks on the display and REC turns off
wireless connection, see the SMFT-1000 Users Manual.
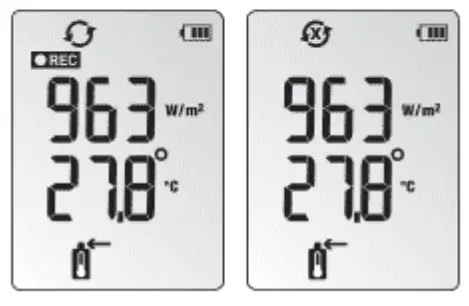
When the memory on the Meter is full:
- REC is off
 turns ON
- blinks on the display to indicate that the data cannot download to the Analyzer
To show measurements on the display: Change Function Screens
Change Temperature Units
Connect the External Temperature Probe
HOLD Function
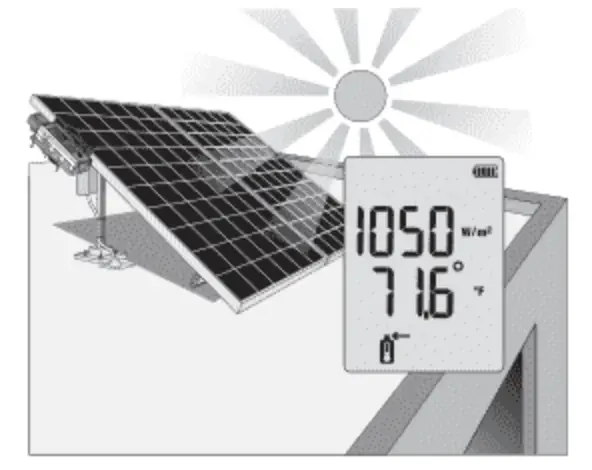
Irradiance and Internal Sensor Temperature Measurements
To measure irradiance and temperature, install the Meter and the bracket on the solar panel.
Note
For a spot check measurement, position the Meter directly on the PV panel. The internal, embedded conductive sensor in the back of the Meter automatically takes the temperature reading
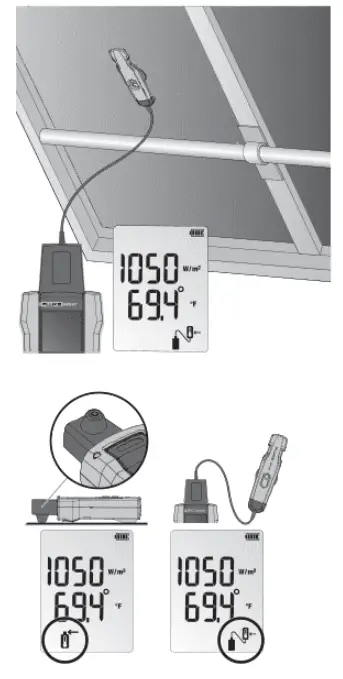
The external temperature probe also takes temperature measurements.
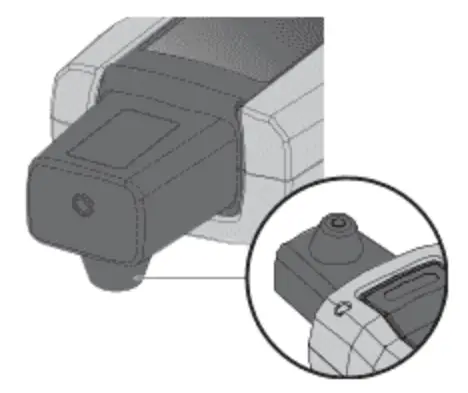
External Temperature Probe Connection
Connect the temperature probe to the top of the Meter. The screen automatically shows
when connected. The icon indicates that the temperature is now read by the external probe.
Place the Meter on or beside the PV panel and connect the temperature probe with the suction cup to the underside of the PV panel. Secure the temperature probe to the panel with electrical tape
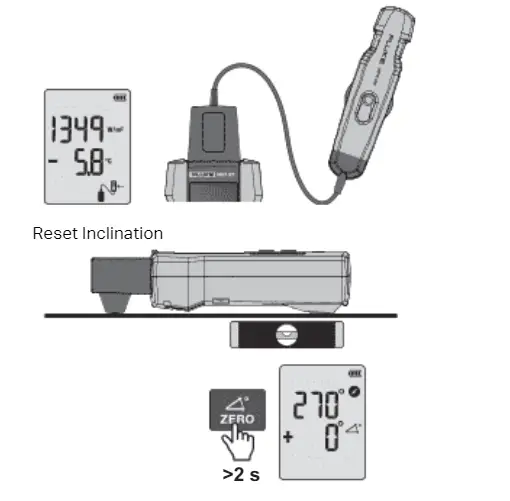
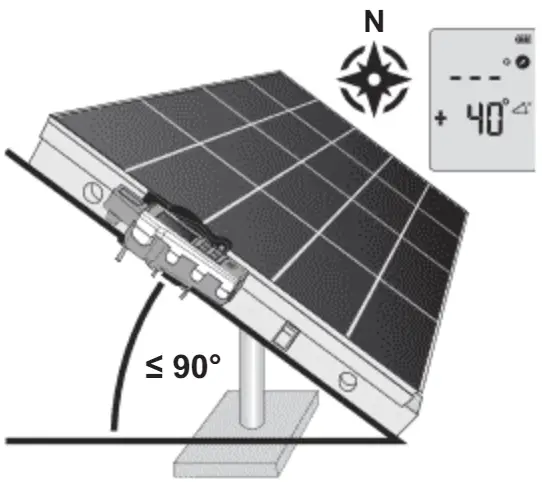
Inclination and Cardinal Direction
Place the Meter directly onto the PV panel to get accurate tilt. For surfaces of rooftops with inclinations different than 0°, push for 2 seconds to reset the angle and measure the true inclination of a solar panel. Secure a probe to the solar panel with optional electrical or similar tape to assure reliable mounting.
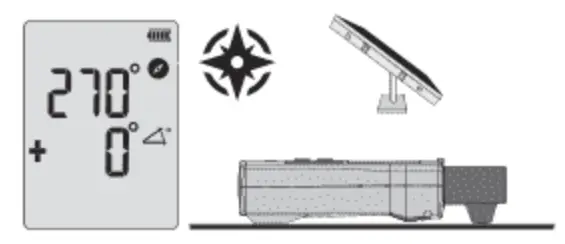
The compass measurement requires a two-step process for accurate cardinal direction.
- Do irradiance, temperature, and inclination measurements with Meter placed on and aligned with the PV panel. The compass function shows — on the LCD when the tilt angle is above 20 degrees. At a tilt angle of >20 degrees any compass reading shown will be inaccurate due to the influence by surrounding metal objects.
- Do the compass measurement away from the PV panel by holding the meter or placing meter on a horizontal surface (0 degrees to 20 degrees tilt) pointing the tip of the meter in the direction that the PV panel faces. Keep away from any metal objects.
Note
The compass measurement is in reference to magnetic north. The measurement is unreliable if the Meter is placed on or near objects containing metal (such as solar panels, metal roofs, and concrete surfaces with rebar)
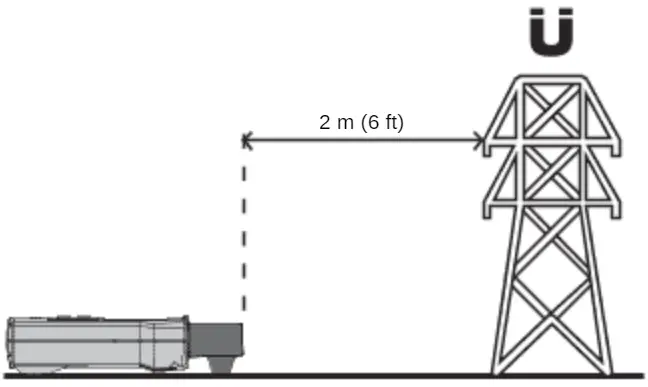
Compass Calibration
The Product contains a compass. The compass is affected by metal in the environment.
Always recalibrate the compass:
- Before the first use.
- Each time you change the batteries.
- When you change geographical locations.
- When there is a significant change in the environment, for example, new metal fittings.
- Do the calibration outdoors, at least 2 m (6 ft) away from any metal objects.

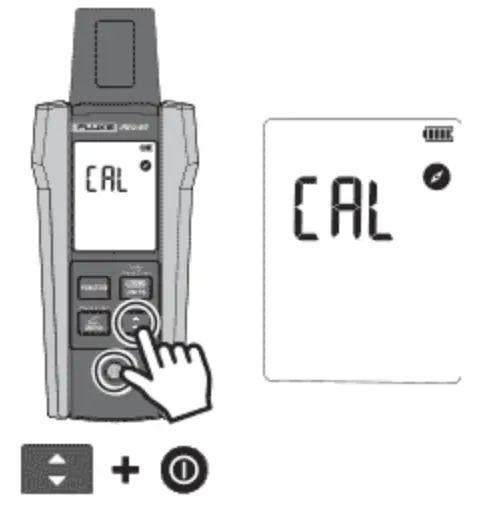
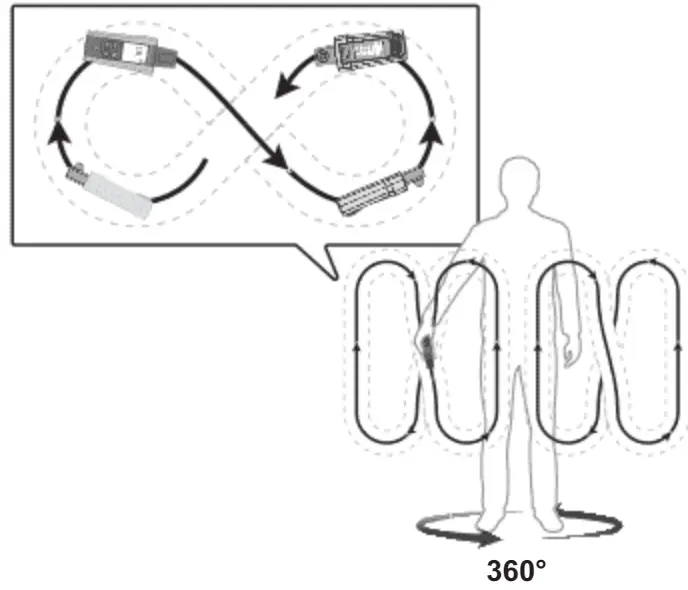
- Push and hold the Switch button as you power on the Product to enter compass calibration mode. The Product shows CAL and the compass icon.

- Slowly turn the Product around all three axis in the space using figure 8 movement (approximately 3 seconds/movement). Continue turning the product while slowly rotating your body 360 degrees for three complete body rotations at a steady pace, take at least 1 minute to complete the body rotation.

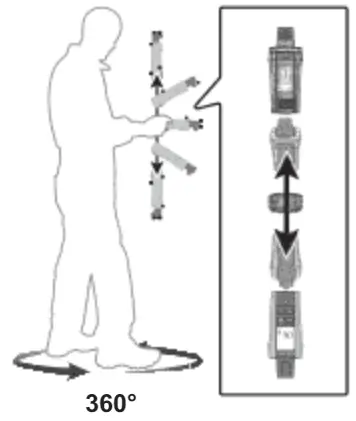
- Slowly turn the Product around on the vertical axis (approximately 2 seconds/movement). Continue to turn the product while slowly rotating your body 360 degrees for one complete rotation at a steady pace, take at least 1 minute to complete the body rotation.

- Turn off the Product. The Product stores the calibration data.
Maintenance Battery Replacement
To prevent damage to the Meter:
- Remove the batteries if the Product is not used for an extended period of time, or if stored in temperatures above 50 °C. If the batteries are not removed, battery leakage may result.
- Be sure that the battery polarity is correct to prevent battery leakage
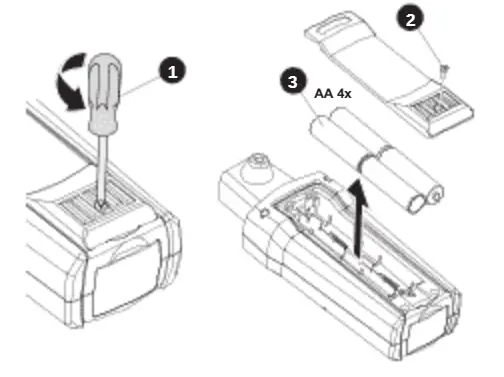
The battery compartment on the back of the Product makes it easy to install or change the batteries. Use four (4) AA IEC LR6 batteries.
Note
Batteries are not pre-installed in the Meter.
- Turn off the Product.
- Use a screw driver to unscrew the captive screw.
- Remove the battery cover.
- Install batteries.
- Replace the battery cover and secure it with the provided screw.
- Recalibrate the compass
Product Disposal
Dispose of the Product in a professional and environmentally appropriate manner:
- Delete personal data on the Product before disposal.
- Remove batteries that are not integrated into the electrical system before disposal and dispose of batteries separately.
- If this Product has an integral battery, put the entire Product in the electrical waste.
Cleaning
Periodically wipe the case with a damp cloth and mild detergent.
To prevent damage to the Meter:
- The Product contains no user-serviceable parts. To avoid injury, or damage to the Meter, do not open the case.
- To avoid damaging the Product, do not use abrasives or solvents to clean the Product case
Storage
During long periods of non-use (>60 days), remove the battery and store separately from the Product.
Service and Parts
Only a qualified technician should service the Product. For service information, contact your nearest Fluke dealer or service center
Specifications
Irradiance
Measuring range ……………… 100 to 1400 W/m²
Note
Calibration is performed at a solar spectral irradiance of AM1.5 (ASTM G-173).
Resolution ………………………… 1 W/m²
Measuring Accuracy ……….. ±(5 % + 5 Digit)
Temperature Measurement
Measuring range (°C) ………. -30 °C to 100 °C (-22 °F to 212 °F)
Resolution ………………………… 0.1 °C (0.2 °F / 1 °F @ >100 °F)
Measuring Accuracy ……….. ±1 °C (±2 °F) @ -10 °C to 75 °C (14 °F to 167 °F), ±2 °C (±4 °F) @ -30 °C to -10 °C (-22 °F to 14 °F) and 75 °C to 100 °C (167 °F to 212 °F
Note
Temperature measurement response time: ~30 sec.
Inclination Angle
Measuring range ……………… -90° to +90°
Resolution ………………………… 0.1°
Measuring Accuracy ……….. ±1.5° @ -50° to +50° ±2.5° @ -85° to -50° and +50° to +85° ±3.5° @ -90° to -85° and +85° to +90°
Note
Inclination accuracy is specified as the angle between a vertical and the absolute horizontal plane/true horizontal baseline. The Product is calibrated to true horizontal 0°.
Compass
Measuring Range …………….. 0° to 360°
Resolution ………………………… 1°
Measuring Accuracy ……….. ±7°
Note
Measurements valid for device inclination between -20° and +20° to horizontal. Outside that range, — shows on the LCD. Result is in reference to magnetic north.
Memory
Type ………………………………….. EEPROM
Size (kB/records) ……………… 64 kB/6400
Recording Time ……………….. up to 17 hours
RTC …………………………………………. Yes (super CAP supply)
Communication ……………………. LBT: only with SMFT models
Size …………………………………………. 150 mm x 80 mm x 35 mm (5.90 in x 3.14 in x 1.37 in)
Weight ……………………………………. 231g (0.5 lb)
Power Supply and Battery Life
Batteries …………………………… 4x AA IEC LR6
Batteries …………………………… 4x AA IEC LR6
Battery Life (typical) ………… 50 hours
Temperature
Operating
IRR2-BT ……………………….. -20 °C to 35 °C, 95 % RH 35 °C to 50 °C, 40 % RH
80PR-IRR ……………………… -30 °C to 100 °C
80PR-IRR ……………………… -30 °C to 100 °C
Storage …………………………….. -30 °C to 60 °C (humidity <80 %)
Altitude ………………………………….. 2000 m maximum
Ingress Protection ……………….. IEC 60529: IP40
Electromagnetic Compatibility (EMC)
International …………………. IEC 61326-1: Portable
Electromagnetic Environment, CISPR 11: Group 1, Class A
Group 1: Equipment has intentionally generated and/or uses conductively-coupled radio frequency energy that is necessary for the internal function of the equipment itself.
Class A: Equipment is suitable for use in all establishments other than domestic and those directly connected to a low-voltage power supply network that supplies buildings used for domestic purposes. There may be potential difficulties in ensuring electromagnetic compatibility in other environments due to conducted and radiated disturbances.
Caution: This equipment is not intended for use in residential environments and may not provide adequate protection to radio reception in such environments.
Korea (KCC) ……………………… Class A Equipment (Industrial Broadcasting & Communication Equipment)
Class A: Equipment meets requirements for industrial electromagnetic wave equipment and the seller or user should take notice of it. This equipment is intended for use in business environments and not to be used in homes.
Wireless Radio Module
Frequency Range ……………. 2.402 GHz to 2.480 GHz
Output Power …………………… 8 dBm
SIMPLIFIED EU DECLARATION OF CONFORMITY
Hereby, Fluke declares that the radio equipment contained in this Product is in compliance with Directive 2014/53/EU. The full text of the EU declaration is available
LIMITED WARRANTY
This Fluke product will be free from defects in material and workmanship for 1 year from the date of purchase. This warranty does not cover fuses, disposable batteries, or damage from accident, neglect, misuse, alteration, contamination, or abnormal conditions of operation or handling. Resellers are not authorized to extend any other warranty on Fluke’s behalf. To obtain service during the warranty period, contact your nearest Fluke authorized service center to obtain return authorization information, then send the product to that Service Center with a description of the problem.
THIS WARRANTY IS YOUR ONLY REMEDY. NO OTHER WARRANTIES, SUCH AS FITNESS FOR A PARTICULAR PURPOSE, ARE EXPRESSED OR IMPLIED. FLUKE IS NOT LIABLE FOR ANY SPECIAL, INDIRECT, INCIDENTAL OR CONSEQUENTIAL DAMAGES OR LOSSES, ARISING FROM ANY CAUSE OR THEORY.
Since some states or countries do not allow the exclusion or limitation of an implied warranty or of incidental or consequential damages, this limitation of liability may not apply to you.
![]()
Copyright © 2009 – 2023, ManualOwl.com. All rights reserved.
Trademarks and brands are the property of their respective owners
Shop for Fluke products online at: www.MyFlukeStore.com
1.888.610.7664


