
![]()
COLORDASHPARH7XIP RGB LED Par Lighting
User Manual
Model ID: COLORDASHPARH7XIP
Edition Notes
The COLORdash Par H7XIP User Manual includes a description, safety precautions, installation, programming, operation and maintenance instructions for the COLORdash Par H7XIP as of the release date of this edition.
Trademarks
Chauvet, Chauvet Professional, the Chauvet logo, and COLORdash are registered trademarks or trademarks of Chauvet & Sons, LLC (d/b/a Chauvet and Chauvet Lighting) in the United States and other countries. Other company and product names and logos referred to herein may be trademarks of their respective companies.
Copyright Notice
The works of authorship contained in this manual, including, but not limited to, all design, text and images are owned by Chauvet.
© Copyright 2023 Chauvet & Sons, LLC. All rights reserved.
Electronically published by Chauvet in the United States of America.
Manual Use
Chauvet authorizes its customers to download and print this manual for professional information purposes only. Chauvet expressly prohibits the usage, copy, storage, distribution, modification, or printing of this manual or its content for any other purpose without written consent from Chauvet.
Document Printing
For best results, print this document in color, on letter size paper (8.5 x 11 in), double-sided. If using A4 paper (210 x 297 mm), configure the printer to scale the content accordingly.
Intended Audience
Any person installing, operating, and/or maintaining this product should completely read through the guide that shipped with the product, as well as this manual, before installing, operating, or maintaining this product.
Disclaimer
Chauvet believes that the information contained in this manual is accurate in all respects. However, Chauvet assumes no responsibility and specifically disclaims any and all liability to any party for any loss, damage or disruption caused by any errors or omissions in this document, whether such errors or omissions result from negligence, accident or any other cause. Chauvet reserves the right to revise the content of this document without any obligation to notify any person or company of such revision, however, Chauvet has no obligation to make, and does not commit to make, any such revisions. Download the latest version from www.chauvetprofessional.com.
Document Revision
This COLORdash Par H7XIP User Manual is the 1st edition of this document. Go to www.chauvetprofessional.com for the latest version.
Before You Begin
What Is Included
- COLORdash Par H7XIP
- Seetronic Powerkon IP65 power cable
- Gel frame holder (6.5 in /165 mm)
- Gel frame
- Quick Reference Guide
Claims
Carefully unpack the product immediately and check the container to make sure all the parts are in the package and are in good condition.
If the box or the contents (the product and included accessories) appear damaged from shipping, or show signs of mishandling, notify the carrier immediately, not Chauvet. Failure to report damage to the carrier immediately may invalidate a claim. In addition, keep the box and contents for inspection.
For other issues, such as missing components or parts, damage not related to shipping, or concealed damage, file a claim with Chauvet within 7 days of delivery.
Text Conventions
| Convention | Meaning |
| 1–512 | A range of values |
| 50/60 | A set of values of which only one can be chosen |
| Settings | A menu option not to be modified |
| <ENTER> | A key to be pressed on the product’s control panel |
Symbols
| Symbol | Meaning |
| Critical installation, configuration, or operation information. Not following these instructions may make the product not work, cause damage to the product, or cause harm to the operator. | |
| Important installation or configuration information. The product may not function correctly if this information is not used. | |
| Useful information. |
![]() The term “DMX” used throughout this manual refers to the USITT DMX512-A digital data transmission protocol.
The term “DMX” used throughout this manual refers to the USITT DMX512-A digital data transmission protocol.
FCC Compliance
This device complies with Part 15 Part B of the FCC Rules. Operation is subject to the following two conditions:
- This device may not cause harmful interference, and
- This device must accept any interference received, including interference that may cause undesired operation.
Any changes or modifications not expressly approved by the party responsible for complia nce could voidthe user’s authority to operate the equipment.
Safety Notes
Read all the following safety notes before working with this product. These notes contain important information about the installation, usage, and maintenance of this product.![]() This product contains no user-serviceable parts. Any reference to servicing in this User Manual will only apply to properly trained, certified technicians. Do not open the housing or attempt any repairs.
This product contains no user-serviceable parts. Any reference to servicing in this User Manual will only apply to properly trained, certified technicians. Do not open the housing or attempt any repairs.![]() All applicable local codes and regulations apply to proper installation of this product.
All applicable local codes and regulations apply to proper installation of this product.
- The luminaire should be positioned so that prolonged staring into the luminaire at a distance closer than 3.28 ft (1 m) is not expected.
- If the external flexible cable or cord of this luminaire is damaged, it shall be replaced by a special cord or cord exclusively available from the manufacturer or its service agent.
- The light source contained in this luminaire shall only be replaced by the manufacturer or its service agent or a similar qualified person.
- The luminaire is intended for professional use only.
- CAUTION:
- This product’s housing may be hot when operating. Mount this product in a location with adequate ventilation, at least 20 in (50 cm) from adjacent surfaces.
- When transferring the product from extreme temperature environments, (e.g., cold truck to warm humid ballroom) condensation may form on the internal electronics of the product. To avoid causing a failure, allow the product to fully acclimate to the surrounding environment before connecting it to power.
- Flashing light is known to trigger epileptic seizures. User must comply with local laws regarding notification of strobe use.
- ALWAYS:
- Disconnect from power before cleaning the product.
- When using an IP65-rated product in an outdoor environment, use IP65- (or higher) rated power and data cable.
- Replace and secure IP-rated protective covers to all power, data, USB, or other ports when not in use.
- Use a safety cable when mounting this product overhead.
- Connect this product to a grounded and protected circuit
- DO NOT:
- Open this product. It contains no user-serviceable parts.
- Look at the light source when the product is on.
- Leave any flammable material within 50 cm of this product while operating or connected to power.
- Connect this product to a dimmer or rheostat.
- Operate this product if the housing, lenses, or cables appear damaged.
- Submerge this product (adhere to standards for the published IP rating). Regular outdoor operation is fine.
- Permanently install outdoors in locations with extreme environmental conditions. This includes, but is not limited to:
- Exposure to a marine/saline environment (within 3 miles of a saltwater body of water).
- Locations where normal temperatures exceed the temperature ranges in this manual.
- Locations that are prone to flooding or being buried in snow.
- Other areas where the product will be subject to extreme radiation or caustic substances.
- ONLY use the hanging/mounting bracket to carry this product.
- The maximum ambient temperature is 113 °F (45 °C). Do not operate this product at higher temperatures.
- The minimum startup temperature is -4°F (-20°C). Do not start the product at lower temperatures.
- The minimum ambient temperature is -22°F (-30°C). Do not operate the product at lower temperatures.
- To eliminate unnecessary wear and improve its lifespan, during periods of non-use completely disconnect the product from power via breaker or by unplugging it.
- In the event of a serious operating problem, stop using immediately.
If a Chauvet product requires service, contact Chauvet Technical Support.
Expected LED Lifespan
Over time, use and heat will gradually reduce LED brightness. Clustered LEDs produce more heat than single LEDs, contributing to shorter lifespans if always used at full intensity. The average LED lifespan is 40,000 to 50,000 hours. To extend LED lifespan, maintain proper ventilation around the product, and limit the overall intensity.
Introduction
Description
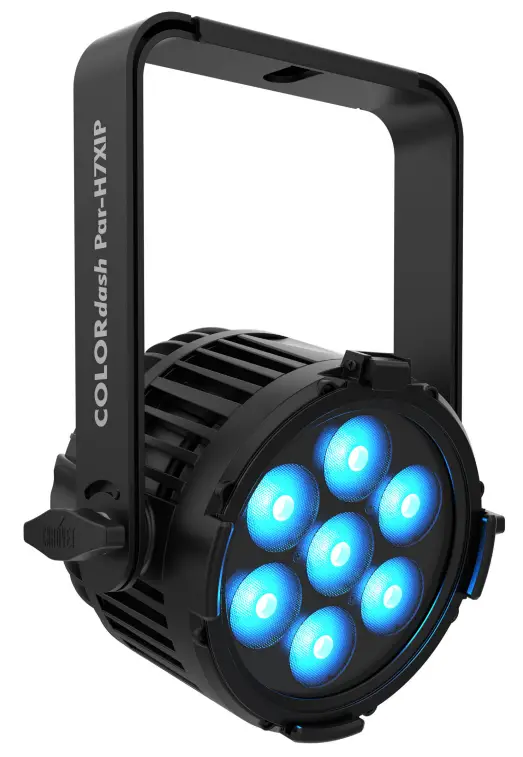
The COLORdash Par H7XIP is a 7.4 pound die-cast portable RGBAW+UV LED wash with a precise palette of subtle to saturated colors. Smooth 16-bit fading on four selectable dimming profiles, and multiple PWM frequencies for flicker-free output, make the COLORdash Par H7XIP the perfect choice whether in the rig, on the floor, inside, outside, live, or on camera. Program easily through the OLED display or at a distance via RDM.
Features
- Rugged RGBWA-UV LED wash for events where indoor/outdoor flexibility is needed
- At home in any weather conditions with IP rated power and DMX connections
- Adjustable PWM (Pulse Width Modulation) to avoid flickering on camera
- RDM (Remote Device Management) for added flexibility
- Selectable, smooth dimming curves for eliminate flicker and choppiness in fades
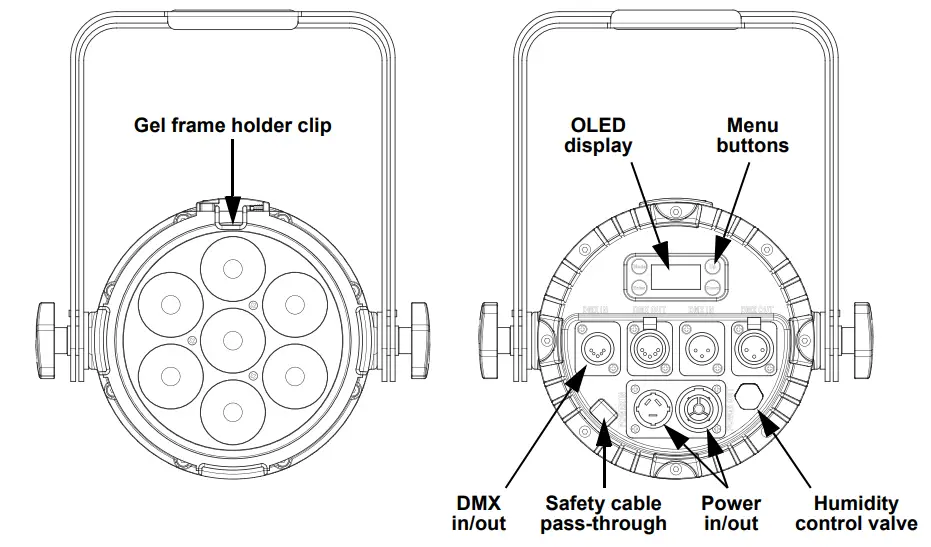
- Easy to read OLED display with password protection and touchscreen interface
- Advanced optics provide exceptional color mixing and high efficiency
- Double-bracketed yoke with omega bracket doubles as floor stand
Product Overview
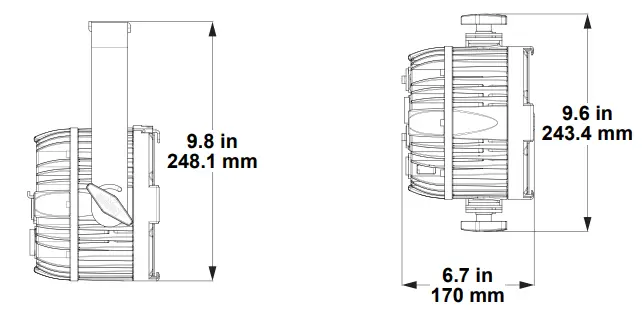
Product Dimensions
Setup
AC Power
The COLORdash Par H7XIP has an auto-ranging power supply and it can work with an input voltage range of 100 to 240 VAC, 50/60 Hz.
To determine the product’s power requirements (circuit breaker, power outlet, and wiring), use the current value listed on the label affixed to the product’s back panel, or refer to the product’s specifications chart. The listed current rating indicates the product’s average current draw under normal conditions.
 Always connect the product to a protected circuit (a circuit breaker or fuse). Make sure the product has an appropriate electrical ground to avoid the risk of electrocution or fire.
- To eliminate unnecessary wear and improve its lifespan, during periods of non-use completely disconnect the product from power via breaker or by unplugging it.
![]() Never connect the product to a rheostat (variable resistor) or dimmer circuit, even if the rheostat or dimmer channel serves only as a 0 to 100% switch.
Never connect the product to a rheostat (variable resistor) or dimmer circuit, even if the rheostat or dimmer channel serves only as a 0 to 100% switch.
AC Plug
The COLORdash Par H7XIP comes with a power input cable terminated with a Seetronic Powerkon A connector on one end and an Edison plug on the other end (U.S. market). If the power input cable that came with the product has no plug, or if the plug needs to be changed, use the table below to wire a plug.
| Connection | Wire (U.S.) | Wire (Europe) | Screw Color |
| AC Live | Black | Brown | Yellow or Brass |
| AC Neutral | White | Blue | Silver |
| AC Ground | Green/Yellow | Green/Yellow | Green |
Power Linking
It is possible to power link up to 16 COLORdash Par H7XIP products at 100 V, 19 products at 120 V, 34 products at 208 V, 37 products at 230 V, or up to 38 products at 240 V. Never exceed this number. Power- linking cables can be purchased separately.
DMX Linking
The COLORdash Par H7XIP can be linked to a DMX controller using a 3- or 5-pin DMX connection. If using other DMX-compatible products with this product, it’s possible to control each individually with a single DMX controller.
DMX Personalities
The COLORdash Par H7XIP uses a 3- or 5-pin DMX data connection for the 6CH, 8CH, 9CH, 13CH, and 14CH DMX personalities.
- Refer to the Introduction for a brief description of each DMX personality.
- Refer to the Operation chapter to learn how to configure the COLORdash Par H7XIP to work in these personalities.
- The Control Channel Assignments and Values section provides detailed information regarding the DMX personalities.
For information about DMX standards, Master/Slave connectivity, or the DMX cables needed to link this product to a DMX controller, download the DMX Primer from the
Chauvet website: www.chauvetprofessional.com.
Remote Device Management (RDM)
Remote Device Management, or RDM, is a standard for allowing DMX-enabled devices to communicate bi-directionally along existing DMX cabling. Check the DMX controller’s User Manual or with the manufacturer as not all DMX controllers have this capability. The COLORdash Par H7XIP supports RDM protocol that allows feedback to make changes to menu map options.
Master/Slave Connectivity
The Master/Slave mode allows an COLORdash Par H7XIP (the master) to control one or more COLORdash Par H7XIP products (the slaves) without a DMX controller. One COLORdash Par H7XIP becomes the master when running an auto program or in Static mode.
Each slave’s control panel must be configured to operate in Slave mode. During Master/Slave operation, the slaves will operate in unison with the master.
![]() DO NOT connect a DMX controller to products operating in Master/Slave mode. The DMX controller signals may interfere with the signals from the master.
DO NOT connect a DMX controller to products operating in Master/Slave mode. The DMX controller signals may interfere with the signals from the master.
 The Operation section of this manual provides detailed instructions on how to configure the master and slaves.
- For more information about DMX standards or the DMX cables needed to link this product to a DMX controller, download the DMX primer from the Chauvet website: www.chauvetprofessional.com.
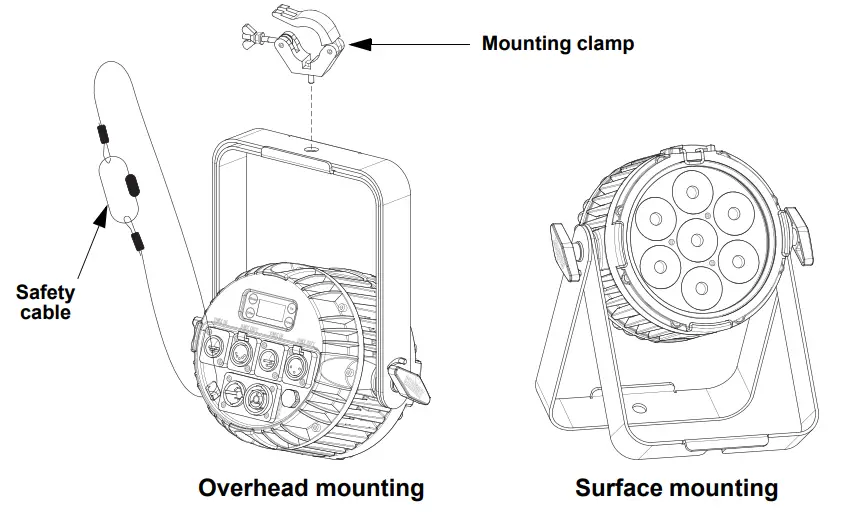
Mounting
Before mounting the product, read and follow the safety recommendations indicated in the Safety Notes. For our Chauvet Professional line of mounting clamps, go to http://trusst.com/products/.
Orientation
Always mount this product in a safe position, making sure there is adequate room for ventilation, configuration, and maintenance.
Rigging
Chauvet recommends using the following general guidelines when mounting this product.
- Before deciding on a location for the product, make sure there is easy access to the product for maintenance and programming purposes.
- Make sure that the structure onto which you are mounting the product can support the product’s weight. See the Technical Specifications for weight information.
- When mounting the product overhead, always use a safety cable. Mount the product securely to a rigging point, whether an elevated platform or a truss.
- When rigging the product onto a truss, use a mounting clamp of appropriate weight capacity.
Procedure
The COLORdash Par H7XIP comes with an adjustable yoke to which a mounting clamp (sold separately) can be directly attached. Make sure the clamp is capable of supporting the weight of this product. For the Chauvet Professional line of mounting clamps, go to http://www.trusst.com/products. Mounting Diagram
Operation
Control Panel Description
| Button | Function |
| <MENU> | Exits from the current menu or function |
| <ENTER> | Enables the currently displayed menu or sets the selected value into the selected function |
| <UP> | Navigates upwards through the menu list or increases the value when in a function |
| <DOWN> | Navigates downwards through the menu list or decreases the value when in a function |
Passcode
When prompted, enter the following passcode: <UP>, <DOWN>, <UP>, <DOWN>, <ENTER>.
This passcode cannot be changed.
Menu Map
Refer to the COLORdash Par H7XIP product page on www.chauvetprofessional.com for the latest menu map.
| Main Level | Programming Levels | Description | |
| DMX Address | 001–507 | Sets the starting address | |
| DMX Channel | 6CH | 6-channel: RGBAWUV | |
| 8CH | 8-channel: dimmer, RGBAWUV, strobe | ||
| 9CH | 9-channel: 16-bit dimmer, RGBAWUV, strobe | ||
| 13CH | 13-channel: dimmer, RGBAWUV, strobe, color macro, color temperature, auto programs and speed, dimmer mode | ||
| 14CH | 14-channel: 16-bit dimmer, RGBAWUV, strobe, color macro, color temperature, auto programs and speed, dimmer mode | ||
| Static | Fixed Color | R | Red |
| G | Green | ||
| B | Blue | ||
| A | Amber | ||
| W | White | ||
| UV | Ultraviolet (UV) | ||
| RG | Red/Green | ||
| RB | Red/Blue | ||
| RA | Red/Amber | ||
| RW | Red/White | ||
| RUV | Red/UV | ||
| GB | Green/Blue | ||
| GA | Green/Amber | ||
| GW | Green/White | ||
| GUV | Green/UV | ||
| BA | Blue/Amber | ||
| BW | Blue/White | ||
| BUV | Blue/UV | ||
| AW | Amber/White | ||
| AUV | Amber/UV | ||
| WUV | White/UV | ||
| RGB | Red/Green/Blue | ||
| RGA | Red/Green/Amber | ||
| Main Level | Programming Levels | Description | |
| Static (cont.) | Fixed Color (cont.) | RGW | Red/Green/White |
| RGUV | Red/Green/UV | ||
| RBA | Red/Blue/Amber | ||
| RBW | Red/Blue/White | ||
| RBUV | Red/Blue/UV | ||
| RAW | Red/Amber/White | ||
| RAUV | Red/Amber/UV | ||
| RWUV | Red/White/UV | ||
| GBA | Green/Blue/Amber | ||
| GBW | Green/Blue/White | ||
| GBUV | Green/Blue/UV | ||
| GAW | Green/Amber/White | ||
| GAUV | Green/Amber/UV | ||
| GWUV | Green/White/UV | ||
| BAW | Blue/Amber/White | ||
| BAUV | Blue/Amber/UV | ||
| BWUV | Blue/White/UV | ||
| AWUV | Amber/White/UV | ||
| RGBA | Red/Green/Blue/Amber | ||
| RGBW | Red/Green/Blue/White | ||
| RGBUV | Red/Green/Blue/UV | ||
| RGAW | Red/Green/Amber/White | ||
| RGAUV | Red/Green/Amber/UV | ||
| RGWUV | Red/Green/White/UV | ||
| RBAW | Red/Blue/Amber/White | ||
| RBAUV | Red/Blue/Amber/UV | ||
| RBWUV | Red/Blue/White/UV | ||
| RAWUV | Red/Amber/White/UV | ||
| GBAW | Green/Blue/Amber/White | ||
| GBAUV | Green/Blue/Amber/UV | ||
| GBWUV | Green/Blue/White/UV | ||
| GAWUV | Green/Amber/White/UV | ||
| BAWUV | Blue/Amber/White/UV | ||
| RGBAW | Red/Green/Blue/Amber/White | ||
| RGBAUV | Red/Green/Blue/Amber/UV | ||
| RGBWUV | Red/Green/Blue/White/UV | ||
| RGAWUV | Red/Green/Amber/White/UV | ||
| RBAWUV | Red/Blue/Amber/White/UV | ||
| GBAWUV | Green/Blue/Amber/White/UV | ||
| RGBAWUV | Red/Green/Blue/Amber/White/UV | ||
| Color Temperature | Warm White 1 | Preset white color temperatures | |
| Warm White 2 | |||
| Warm White 3 | |||
| Neutral White 1 | |||
| Neutral White 2 | |||
| Neutral White 3 | |||
| Daylight 1 | |||
| Main Level | Programming Levels | Description | ||
| Static (cont.) | Color Temperature (cont.) | Daylight 2 | Preset white color temperatures | |
| Daylight 3 | ||||
| Daylight 4 | ||||
| Manual Color Mixer | Red | 000–255 | Combine red, green, blue, amber, white, and ultraviolet to make a custom color (0–100%) | |
| Green | ||||
| Blue | ||||
| Amber | ||||
| White | ||||
| UV | ||||
| Auto show | Auto 1–5 | 001–100 | Automatic programs and speed | |
| Master/ Slave | Master | DMX mode (Master) | ||
| Slave | Slave mode | |||
| Dimmer Speed | Off | Linear dimmer | ||
| Dimmer1–3 | Dimmer speed, fast (1) to slow (3) | |||
| White Balance | Off | Uses factory default white setting | ||
| Manual | Red | 125–255 | Sets maximum red value | |
| Green | Sets maximum green value | |||
| Blue | Sets maximum blue value Sets maximum amber value | |||
| Amber | ||||
| White | Sets maximum white value | |||
| UV | Sets maximum UV value | |||
| LED Frequency | 600Hz | Sets the Pulse Width Modulation frequency | ||
| 1200Hz | ||||
| 2000Hz | ||||
| 4000Hz | ||||
| 6000Hz | ||||
| 25kHz | ||||
| Back Light | 10S | Display turns off after 10 seconds | ||
| 30S | Display turns off after 30 seconds | |||
| 2Min | Display turns off after 2 minutes | |||
| Always On | Display stays on | |||
| Key Lock | On | Locks the display. Passcode: <UP>, <DOWN>, <UP>, <DOWN>, <ENTER> | ||
| Off | ||||
| Information | Fixture Hours | <_______ H> | Shows hours product has been on | |
| Version | <V__________ > | Shows the current firmware version | ||
| UID | <_ _ _ _ _ _ _ _ _ _ _ _> | Shows the product UID | ||
| Reset Factory | NO | Reset to factory default settings | ||
| YES | ||||
| System Update | Put the update file into the USB stick and connect it to the device through an adapter cable. | Update firmware via USB to DMX adapter cable | ||
| NO | ||||
| YES | ||||
Configuration (DMX)
Use control configurations to operate the product with a DMX controller.
Control Personalities
To set the control personality:
- Go to the DMX Channel main level.
- Select the desired personality from 6CH, 8CH, 9CH, 13CH, or 14CH.
- See the Starting Address section for the highest starting address you can select for each personality.
- Make sure that the starting addresses on the various products do not overlap due to the new personality setting.
Starting Address
Each product will respond to a unique starting address from the controller. All products with the same starting address will respond in unison. To set the starting address:
- Go to the DMX Address main level.
- Select the starting address (001–507).
- The highest assignable starting address for 6CH is 507.
- The highest assignable starting address for 8CH is 505.
- The highest assignable starting address for 9CH is 504.
- The highest assignable starting address for 13CH is 500.
- The highest assignable starting address for 14CH is 499.
Control Channel Assignments and Values
| 6CH | 8CH | 9CH | 13CH | 14CH | Function | Value | Percent/Setting |
| – | 1 | 1 | 1 | 1 | Dimmer | 000 ⇔ 255 | 0–100% |
| – | – | 2 | – | 2 | Fine dimmer | 000 ⇔ 255 | 0–100% |
| 1 | 2 | 3 | 2 | 3 | Red | 000 ⇔ 255 | 0–100% |
| 2 | 3 | 4 | 3 | 4 | Green | 000 ⇔ 255 | 0–100% |
| 3 | 4 | 5 | 4 | 5 | Blue | 000 ⇔ 255 | 0–100% |
| 4 | 5 | 6 | 5 | 6 | Amber | 000 ⇔ 255 | 0–100% |
| 5 | 6 | 7 | 6 | 7 | White | 000 ⇔255 | 0–100% |
| 6 | 7 | 8 | 7 | 8 | Ultraviolet | 000 ⇔ 255 | 0–100% |
| – | 8 | 9 | 8 | 9 | Strobe | 000 ⇔ 010 011 ⇔ 255 | No function Strobe, slow to fast |
| 6CH | 8CH | 9CH | 13CH | 14CH | Function | Value | Percent/Setting |
| – | – | – | 9 | 10 | Color macro | 000 ⇔ 010 011 012 ⇔ 029 030 031 ⇔ 049 050 051 ⇔ 069 070 071 ⇔ 089 090 091 ⇔ 109 110 111 ⇔129 130 131 ⇔ 149 150 151 ⇔ 169 170 171 ⇔ 200 201 ⇔ 255 | No function Red full Red full, green increases Red and green full Green full, red decreases Green full Green full, blue increases Green and blue full Blue full, green decreases Blue full Blue full, red increases Red and blue full Red full, blue decreases Red full Red full, green and blue increase Red, green, and blue full Blue full, red and green decrease Blue full Red, green, and blue full Color temperature, warm to cool |
| – | – | – | 10 | 11 | Color temperature | 000 ⇔ 005 006 ⇔ 025 026 ⇔ 050 051 ⇔ 075 076 ⇔ 100 101 ⇔ 125 126 ⇔ 150 151 ⇔ 175 176 ⇔ 200 201 ⇔ 225 226 ⇔ 250 251 ⇔ 255 | No function Warm white 1 Warm white 2 Warm white 3 Neutral white 1 Neutral white 2 Neutral white 3 Daylight 1 Daylight 2 Daylight 3 Daylight 4 No function |
| – | – | – | 11 | 12 | Automatic programs | 000 ⇔ 010 011 ⇔ 060 061 ⇔ 110 111 ⇔ 160 161 ⇔ 210 211 ⇔ 255 | No function Automatic program 1 utomatic program 2 Automatic program 3 Automatic program 4 Automatic program 5 |
| – | – | – | 12 | 13 | Program speed | 000 ⇔ 255 | Automatic program speed, slow to fast |
| – | – | – | 13 | 14 | Dimmer mode | 000 ⇔ 051 052 ⇔ 101 102 ⇔ 152 153 ⇔ 203 204 ⇔ 255 | Preset dimmer speed from display menu Linear dimmer Dimmer mode 1 (fastest) Dimmer mode 2 Dimmer mode 3 (slowest) |
Configuration (Standalone)
Fixed Color
To select a preset fixed color combination:
- Go to the Static main level.
- Select the desired combination of R (red), G (green), B (blue), A (amber), W (white), and/or UV (ultraviolet), from R, G, B, A, W, UV, RG, RB, RA, RW, RUV, GB, GA, GW, GUV, BA, BW, BUV, AW, AUV, WUV, RGB, RGA, RGW, RGUV, RBA, RBW, RBUV, RAW, RAUV, RWUV, GBA, GBW, GBUV, GAW, GAUV, GWUV, BAW, BAUV, BWUV, AWUV, RGBA, RGBW, RGBUV, RGAW, RGAUV, RGWUV, RBAW, RBAUV, RBWUV, RAWUV, GBAW, GBAUV, GBWUV, GAWUV, BAWUV, RGBAW, RGBAUV, RGBWUV, RGAWUV, RBAWUV, GBAWUV, or RGBAWUV.
Color Temperature
To select a preset color temperature:
- Go to the Static main level.
- Select the Color Temperature option.
- Select the color temperature, from Warm White 1, Warm White 2, Warm White 3, Neutral White 1, Neutral White 2, Neutral White 3, Daylight 1, Daylight 2, Daylight 3, or Daylight 4.
Manual Color Mixer
To manually mix a custom static color:
- Go to the Static main level.
- Select the Manual Color Mixer option.
- Select the color value to alter, from Red, Green, Blue, Amber, White, or UV.
- Set the value of the selected color, from 000–255.
Configuration (Settings)
Master/Slave
The Master/Slave mode allows a group of COLORdash Par H7XIP products (the slaves) to simultaneously duplicate the output of another COLORdash Par H7XIP (the master) without a DMX controller.
To set each of the slaves:
- Go to the Master/Slave main level
- Select Slave.
To set the master:
- Go to the Master/Slave main level
- Select Master.
- Select a standalone setting.
- The master is the one that runs a program whether in Auto or Static mode.
- Do not connect a DMX controller to the products configured for Master/Slave operation. The DMX controller may interfere with signals from the master.
- The master should be the first product in the daisy chain.
Dimmer Speed
This setting determines how fast the output of the COLORdash Par H7XIP changes when the output value is modified. It provides four different options to simulate the dimming curve of an incandescent lighting product. To select a specific dimmer profile, do the following:
- Go to the Dimmer Speed main level.
- Select a dimmer curve (Off, Dimmer 1, Dimmer 2, or Dimmer 3).
![]() Off: The output is proportional (linear) to the dimmer channel value.
Off: The output is proportional (linear) to the dimmer channel value.
Dimmer 1–3: The output follows the dimmer value based on the corresponding dimmer curve,
Dimmer 1 being the fastest.
White Balance
This setting determines the maximum output values for each color, which affects the appearance of the total color output.
- Go to the White Balance main level.
- Select from Off (uses factory default white setting) or Manual (uses a custom white balance).
- Select the color value to alter, from Red, Green, Blue, Amber, White, or UV.
- Set the maximum value of the selected color, from 125–255.
LED Frequency
To adjust the frequency of the pulse width modulation:
- Go to the LED Frequency main level.
- Select the frequency, from 600Hz, 1200Hz, 2000Hz, 4000Hz, 6000Hz, or 25kHz.
Back Light
To set how long before an inactive display will turn off:
- Go to the Back Light main level.
- Select the length of the backlight timer, from 10S (10 seconds), 30S (30 seconds), 2Min (2 minutes), or Always On.
Key Lock
To lock the display with a passcode:
- Go to the Key Lock main level.
- Select On (lock the display) or Off (unlock the display).
Information
To view essential product information:
- Go to the Information main level.
- Select Fixture Hours, Version, or UID.
Factory Reset
To reset the product to factory settings:
- Go to the Reset Factory main level.
- Select NO (to cancel) or YES (to reset the product configuration).
System Update
To update the firmware with a USB to DMX adapter cable:
- Go to the System Update main level.
- Follow the instructions (Put the update file into the USB stick and connect it to the device through an adapter cable).
- Select NO (to cancel) or YES (to update the firmware).
Maintenance
Product Maintenance
Dust build-up reduces light output performance and can cause overheating. This can lead to reduction of the light source’s life and/or mechanical wear. To maintain optimum performance and minimize wear, clean your lighting products at least twice a month. However, be aware that usage and environmental conditions could be contributing factors to increase the cleaning frequency.
To clean the product, follow the instructions below:
- Unplug the product from power.
- Wait until the product is at room temperature.
- Use a vacuum (or dry compressed air) and a soft brush to remove dust collected on the external surface/vents.
- Clean all transparent surfaces with a mild soap solution, ammonia-free glass cleaner, or isopropyl alcohol.
- Apply the solution directly to a soft, lint free cotton cloth or a lens cleaning tissue.
- Softly drag any dirt or grime to the outside of the transparent surface.
- Gently polish the transparent surfaces until they are free of haze and lint.
![]() Always dry the transparent surfaces carefully after cleaning them.
Always dry the transparent surfaces carefully after cleaning them.
Technical Specifications
| Dimensions and Weight | |||||||
| Length | Width | Height | Weight | ||||
| 6.7 in (170 mm) | 9.6 in (243.4 mm) | 9.8 in (248.1 mm) | 7.4 lb (3.4 kg) | ||||
| Note: Dimensions in inches are rounded. Power | |||||||
| Power Supply Type | Range | Voltage Selection | |||||
| Switching (internal) | 100 to 240 VAC, 50/60 Hz | Auto-ranging | |||||
| Parameter | 100 V, 60 Hz | 120 V, 60 Hz | 208 V, 60 Hz | 230 V, 50 Hz | 240 V, 50 Hz | ||
| Consumption | 72 W | 71 W | 69 W | 68 W | 68 W | ||
| Operating Current | 0.726 A | 0.604 A | 0.352 A | 0.318 A | 0.311 A | ||
| Power linking | 12 A | 12 A | 12 A | 12 A | 12 A | ||
| current (products) | (16 products) | (19products) | (34 products) | (37 products) | (38products) | ||
| Power I/O | U.S./Worldwide | UK/Europe | |||||
| Power Input Connector | Seetronic Powerkon IP65 | Seetronic Powerkon IP65 | |||||
| Power Output Connector | Seetronic Powerkon IP65 | Seetronic Powerkon IP65 | |||||
| Power Cable plug | Edison | Local plug | |||||
Light Source
| Type | Color | Quantity | Power | Current | Lifespan |
| LED | RGBAW+UV | 7 | 84 W | 513 mA | 50,000 hours |
| Photometrics | ||
| Beam Angle | Field Angle | Illuminance @ 5 m |
| 23° | 37.9° | 583 lux |
Thermal
| Maximum External Temperature | Cooling System |
| 113 °F (45 °C) | Convection |
DMX
| 1/O Connector | Channel Range |
| 3- and 5-pin XLR | 6ch, 8ch, 9ch, 13ch, or 14ch |
Ordering
| Product Name | Item Name | Item Code | UPC Number |
| COLORdash Par H7XIP | COLORDASHPARH7XIP | 10031875 | 781462222239 |

Contact Us
| General Information | Technical Support |
| Chauvet World Headquarters Address: 3360 Davie Rd. Davie, FL 33314 Voice: (954) 577-4455 Fax: (954) 929-5560 Toll Free: (800) 762-1084 | Voice: (844) 393-7575 Fax: (954) 756-8015 Email: [email protected] Website: www.chauvetprofessional.com |
| Chauvet U.K. Address: Unit 1C Brookhill Road Industrial Estate Pinxton, Nottingham, UK NG16 6NT Voice: +44 (0) 1773 511115 Fax: +44 (0) 1773 511110 | Email: [email protected] Website: www.chauvetprofessional.eu |
| Chauvet Benelux Address: Stokstraat 18 9770 Kruishoutem Belgium Voice: +32 9 388 93 97 | Email: [email protected] Website: www.chauvetprofessional.eu |
| Chauvet France Address: 3, Rue Ampère 91380 Chilly-Mazarin France Voice: +33 1 78 85 33 59 | Email: [email protected] Website: www.chauvetprofessional.eu |
| Chauvet Germany Address: Bruno-Bürgel-Str. 11 28759 Bremen Germany Voice: +49 421 62 60 20 | Email: [email protected] Website: www.chauvetprofessional.eu |
| Chauvet Mexico Address: Av. de las Partidas 34 – 3B (Entrance by Calle 2) Zona Industrial Lerma Lerma, Edo. de México, CP 52000 Voice: +52 (728) 690-2010 | Email: [email protected] Website: www.chauvetprofessional.mx |
![]()
Warranty & Returns
For warranty terms and conditions and return information, please visit our website.
For Customers in the United States and Mexico: www.chauvetlighting.com/warranty-registration.
For Customers in the United Kingdom, Republic of Ireland, Belgium, the Netherlands, Luxembourg,
France, and Germany: www.chauvetlighting.eu/warranty-registration.


