![]()

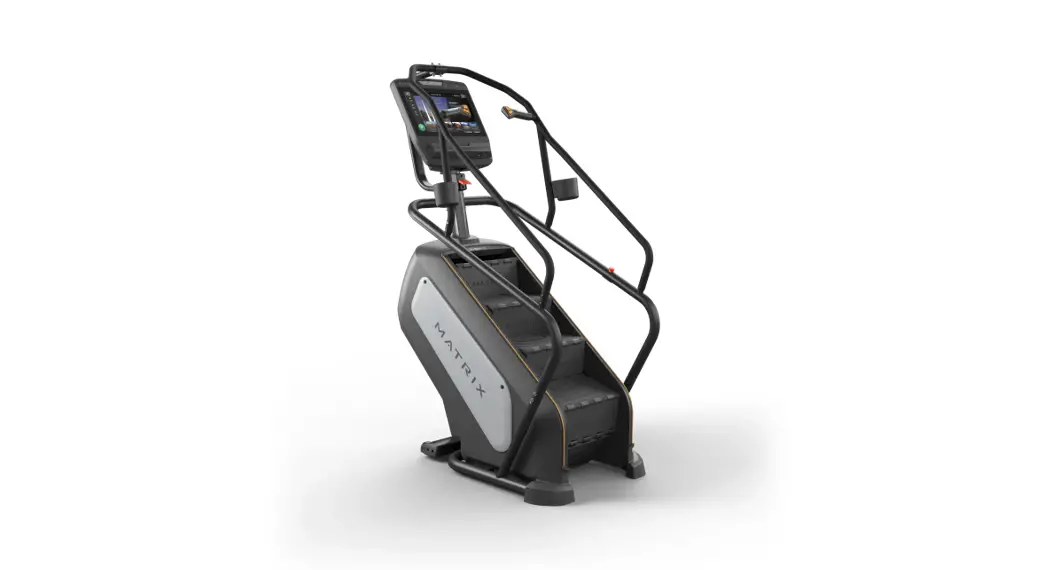
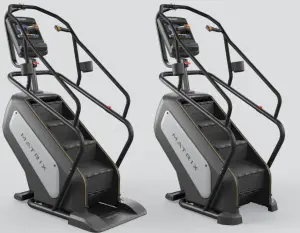
PERFORMANCE CLIMEIMILL
ENDURANCE CLIMEIMILL
 IMPORTANT PRECAUTIONS
SAVE THESE INSTRUCTIONS
When using a ClimbMill, basic precautions should always be followed, including the following: Read all instructions before using this equipment. It is the responsibility of the owner to ensure that all users of this equipment are adequately informed of all warnings and precautions.
This equipment is for indoor use only. This training equipment is a Class S product designed for use in a commercial environment such as a fitness facility.
DANGER!
TO REDUCE THE RISK OF ELECTRICAL SHOCK:
Always unplug the equipment from the electrical outlet immediately after using, before cleaning, performing maintenance, and putting on or taking off parts.
WARNING!
TO REDUCE THE RISK OF BURNS, FIRE, ELECTRICAL SHOCK, OR INJURY TO PERSONS:
- At NO time should children under the age of 14 use the unit.
- Children over the age of 14 or disabled persons should not use the unit without adult supervision.
- Close supervision is necessary when the exercise device is used by or near children or disabled persons.
- At NO time should pets or children under the age of 14 be closer to the treadmill than 10 feet.
- Children over the age of 14 should not use the treadmill without adult supervision.
- This product must be used for its intended purpose as described in this Owner’s Guide.
- Incorrect or excessive exercise may cause injury. If you experience any kind of pain, including but not limited to chest pains, nausea, dizziness, or shortness of breath, stop exercising immediately and consult your physician before continuing.
- Heart rate monitoring systems may be inaccurate. Over-exercising may result in serious injury or death. If you feel faint, stop exercising immediately.
- Keep hands and loose clothing away from moving parts.
- Do not wear clothes that might catch on any part of the unit.
- Always wear athletic shoes while using this equipment.
- Do not wear clothes that might catch on any part of the treadmill.
- Always wear athletic shoes while using this equipment.
- Do not jump on the unit.
- At no time should more than one person be on the unit while in operation.
- This unit should not be used by persons weighing more than specified in the OWNER’S MANUAL SPECIFICATIONS SECTION. Failure to comply will void the warranty.
- To prevent electrical shock, never drop or insert any object into any opening.
- Never operate the unit if it has a damaged cord or plug if it is not working properly, if it has been dropped or damaged, or immersed in water.
- Keep the power cord away from heated surfaces.
- Do not operate where aerosol (spray) products are being used or where oxygen is being administered.
- Never operate the exercise device with the air opening blocked. Keep the air opening clean, free, of lint, hair, and the like.
- Do not remove the side covers unless instructed by Customer Tech Support. Service should only be done by an authorized service technician.
CAUTION!
CONSULT A PHYSICIAN BEFORE USING THIS EQUIPMENT. READ OWNER’S MANUAL BEFORE USE.
It is essential that this equipment is used only indoors, in a climate-controlled room. If this equipment has been exposed to colder temperatures or
high moisture climates, it is strongly recommended that the equipment is warmed up to room temperature before first-time use.
POWER REQUIREMENTS
ELECTRICAL REQUIREMENTS
For your safety and to ensure performance, the ground on this circuit must be non-looped (isolated). Please refer to NEC article 210-21 and 210-23. Failure to follow these electrical requirements could void the Matrix limited warranty.
GROUNDING INSTRUCTIONS DANGER!
The unit must be grounded. If it should malfunction or break down, grounding provides a path of least resistance for electric current to reduce the risk of electric shock. The unit is equipped with a cord having an equipment-grounding conductor and a grounding plug. The plug must be plugged into an appropriate outlet that is properly installed and grounded in accordance with all local codes and ordinances. Improper connection of the equipment-grounding conductor can result in a risk of electric shock. Check with a qualified electrician or serviceman if you are in doubt as to whether the product is properly grounded. Do not modify the plug provided with the product. If it will not fit the outlet, have a proper outlet installed by a qualified electrician.
110 V PRODUCTS
110 V products require the use of a 100-125 V, 60 Hz, and a minimum of a 15A circuit, with a non-looped (isolated) neutral/ground for power. This unit can be daisy-chained together with up to 4 units per 15A circuit. Matrix daisy-chain cord adapters are sold separately.
220 V UNITS|
220 V units require the use of a 216-250 V, 50 Hz, and a minimum of a 15A circuit, with a nonlooped (isolated) neutral/ ground for power. This ClimbMill can be daisy-chained together with up to 4 ClimbMills per 15A circuit. Matrix daisy-chain cord adapters are sold separately.
DIGITAL TV
An additional power adapter is not needed for the add-on TV or consoles with the integrated digital TV tuner. An RG6 coaxial cable with ‘F-type’ compression fittings will need to be connected between the video source and each add-on digital TV unit.
FCC REGULATIONS (USA ONLY)
This equipment has been tested and found to comply with the limits for a Class B digital device, pursuant to part 15 of the FCC rules. These limits are designed to provide reasonable protection against harmful interference in a residential installation. This equipment generates, uses, and can radiate radio frequency energy and, if not installed and used in accordance with the instructions, may cause harmful interference to radio communications. However, there is no guarantee that interference will not occur in a particular installation. If this equipment does cause harmful interference to radio or television reception, which can be determined by turning the equipment off and on, the user is encouraged to try to correct the interference by one or more of the following measures:
- Reorient or relocate the receiving antenna
- Increase the separation between the equipment and receiver
- Connect the equipment into an outlet on a circuit different from that to which the receiver is connected
- Consult the dealer or an experienced radio/TV technician for help
FCC RF Radiation Exposure Statement:
- This Transmitter must not be co-located or operating in conjunction with any other antenna or transmitter.
- This equipment complies with FCC RF radiation exposure limits set forth for an uncontrolled environment. This equipment should be installed and operated with a minimum distance of 20 centimeters between the radiator and your body.
 ASSEMBLY
UNPACKING
Unpack the equipment where you will be using it. Place the carton on a level flat surface. It is recommended that you place a protective covering on your floor. Never open the box when it is on its side.
IMPORTANT NOTES
- All video and power outlets must be functional on the day of delivery/assembly of the product. The client is responsible for any additional installation charges associated with return visits.
- During each assembly step, ensure that ALL nuts and bolts are in place and partially threaded.
- Several parts have been pre-lubricated to aid in assembly and usage. Please do not wipe this off. If you have difficulty, a light application of lithium grease is recommended.
WARNING!
There are several areas during the assembly process that special attention must be paid. It is very important to follow the assembly instructions correctly and to make sure all parts are firmly tightened. If the assembly instructions are not followed correctly, the equipment could have parts that are not tightened and will seem loose and may cause irritating noises. To prevent damage to the equipment, the assembly instructions must be reviewed and corrective actions should be taken.
NEED HELP?
If you have questions or if there are any missing parts, contact Customer Tech Support.
TOOLS REQUIRED:
- 6mm Allen Wrench
- 5mm Allen Wrench
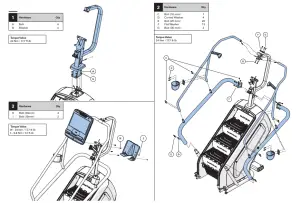
PARTS INCLUDED:
- 1 Base Frame
- 1 Console Mast
- 1 Console Mast Cover
- 2 Upper Handlebars
- 2 Lower Handlebars
- 2 Bottle Holders
- 1 Sweat Collector Tray (PERFORMANCE)
- 1 Control Zone (PERFORMANCE)
- 2 End Caps (ENDURANCE)
- 1 Power Cord
- 1 Hardware Kit
Console sold separately
 BEFORE YOU BEGIN
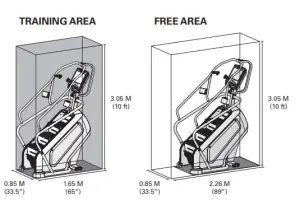
LOCATION OF THE UNIT
Place the unit on a level and stable surface away from direct sunlight. The intense UV light can cause discoloration on the plastics. Locate your unit in an area with cool temperatures and low humidity. Please leave a clear zone behind the unit that is at least 24” (610 mm). This zone must be clear of any obstruction and provide the user with a clear exit path from the machine. Do not place the unit in any area that will block any vent or air openings. The unit should not be located in a garage, covered patio, near water, or outdoors.
HEIGHT REQUIREMENTS
The ClimbMill adds 30 – 38” (76 – 96.5cm) to a user’s height. For example, a 6’ (183cm) tall user will be 8’6” – 9’ 2” (259.5 – 279.5cm) off the floor.
PROPER USAGE
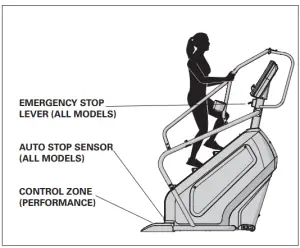
MOUNTING THE CLIMB MILL
- Stand directly behind the ClimbMill. Grasp either the upper or lower handle bars and step onto the ClimbMill until you are within comfortable reach
of the console, emergency stop lever, and remote handlebar controls. - There are two emergency stop buttons the ClimbMill. An emergency stop lever is located on the console mast below the display, and an emergency stop button is located on the lower right side handlebar.
- The CONTROL ZONE will bring the step surfaces to a complete stop upon detecting an object. The AUTO STOP SENSOR will bring the step surfaces to a complete stop upon detecting an object under the bottom step.
- To determine proper workout position, stand on the steps within comfortable reach of the console. Maintain a constant distance from the console and
remote handlebar controls. Keep your knees slightly bent at all times.
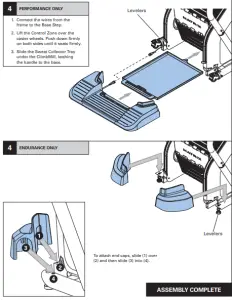
LEVELING THE EQUIPMENT
Locate a level, stable surface to position the equipment. The equipment has levelers located below the bottom step. To access the levelers, remove the end caps (ENDURANCE) or CONTROL ZONE (PERFORMANCE). CAUTION: There is an electrical plug located under the CONTROL ZONE and will need to be unplugged before the cover can be completely removed. Use an Allen wrench to level the unit. Once stable, replace parts as they were removed. A carpenter’s level is recommended.
NOTE: There are only two levelers on the equipment.
WARNING!
Our equipment is heavy, use care and additional help if necessary when moving. Failure to follow these instructions could result in injury.
CLIMBMILL SPM (STEPS PER MINUTE)
| LEVEL | 1 | 2 | 3 | 4 | 5 | 6 | 7 | 8 | 9 | 10 | 11 | 12 | 13 | 14 | 15 | 16 | 17 | 18 | 19 | 20 | 21 | 22 | 23 | 24 | 25 |
| SPM | 24 | 30 | 36 | 42 | 48 | 54 | 60 | 66 | 72 | 78 | 84 | 90 | 96 | 102 | 108 | 114 | 120 | 126 | 132 | 138 | 143 | 148 | 153 | 158 | 162 |
USING THE HEART RATE FUNCTION
The heart rate function on this product is not a medical device. While heart rate grips can provide a relative estimation of your actual heart rate, they should not be relied on when accurate readings are necessary. Some people, including those in a cardiac rehab program, may benefit from using an alternate heart rate monitoring system like a chest or wrist strap. Various factors, including the movement of the user, may affect the accuracy of your heart rate reading. The heart rate reading is intended only as an exercise aid in determining heart rate trends in general. Please consult your physician.
WARNING!
Heart rate monitoring systems may be inaccurate. Over-exercising may result in serious injury or death. If you feel faint, stop exercising immediately.
 MAINTENANCE
 MAINTENANCE
- Any and all part removal or replacement must be performed by a qualified service technician.
- DO NOT use any equipment that is damaged and or has worn or broken parts. Use only replacement parts supplied by your country’s local MATRIX dealer.
- MAINTAIN LABELS AND NAMEPLATES: Do not remove labels for any reason. They contain important information. If unreadable or missing, contact your MATRIX dealer for a replacement.
- MAINTAIN ALL EQUIPMENT: Preventative maintenance is the key to smooth operating equipment as well as keeping your liability to a minimum. Equipment safety levels can only be maintained if inspections for damage and wear occur at regular intervals.
- Ensure that any person(s) making adjustments or performing maintenance or repair of any kind is qualified to do so. MATRIX dealers will provide service and maintenance training at our corporate facility upon request.
WARNING!
Disconnect all power before servicing or moving the equipment. To remove power from the ClimbMill, the power cord must be disconnected from the wall outlet. To clean, wipe surfaces down with soap and slightly damp cloth only; never use solvents.
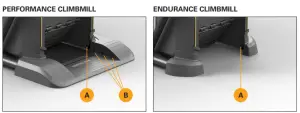
A) Clean Auto Stop Sensors (2) monthly
B) Clean Control Zone IR sensors (6) monthly
| MAINTENANCE SCHEDULE | |
| ACTION | FREQUENCY |
| Unplug the unit. Clean entire frame and shrouds using water and a mild soap or other Matrix-approved solution (cleaning agents should be alcohol and ammonia-free). | DAILY |
| ENDURANCE: Unplug the ClimbMill and remove the access panel. Clean chain of old grease and re-apply a lithium-based grease to each chain link | MONTHLY |
| Check step motion and stability to ensure the ClimbMill does not rock or wobble | QUARTERLY |
| Check all connecting joint areas for tightness of bolt assemblies.
| QUARTERLY |
| Ensure that there is little, or no free play at all joint assemblies once bolts have been tightened. Installation of washer kits may be required if the free play does not come out from tightening bolts. | QUARTERLY |
| Unplug the ClimbMill and remove the access panel. Clean sprockets of old grease and re-apply a lithium-based grease to sprocket teeth. | QUARTERLY |
| Unplug the ClimbMill and clean the AUTO STOP SENSORS (located under the bottom step) and IR sensor windows on Control Zone with a cotton swab, water, and a mild soap or other Matrix approved solution (cleaning agents should be alcohol and ammonia-free). | QUARTERLY |
| ASCENT | ASCENT LOWER BODY | ELLIPTICAL | |||||||
| CONSOLE | LED / GROUP TOUCH PREMIUM LED TRAINING LED | LED / GROUP TOUCH PREMIUM LED TRAINING LED | LED / GROUP TOUCH PREMIUM LED TRAINING LED | ||||||
| Max User Weight | 182 kg / 400 lbs | 182 kg / 400 lbs | 182 kg / 400 lbs | ||||||
| Product Weight | 194 kg / 427.7 lbs | 192.2 kg / 423.7 lbs | 191.5 kg / 422.2 lbs | 197 kg / 434.3 lbs | 195.2 kg / 430.3 lbs | 194.5 kg / 428.8 lbs | 190 kg / 418.9 lbs | 188.2 kg / 414.9 lbs | 187.5 kg / 413.4 lbs |
| Shipping Weight | 230.8 kg / 508.8 lbs | 229 kg / 504.9 lbs | 228.3 kg / 503.3 lbs | 240.8 kg / 530.9 lbs | 239 kg / 526.9 lbs | 238.3 kg / 525.4 lbs | 230.8 kg / 508.8 lbs | 229 kg / 504.9 lbs | 228.3 kg / 503.3 lbs |
| Overall Dimensions (L x W x H1* | 178 x 74 x 181 cm / 70.1″ x 29.1″ x 71.3″ | 178 x 74 x 181 cm / 70.1″ x 29.1″ x 71.3″ | 178 x 74 x 181 cm / 70.1″ x 29.1″ x 71.3″ | ||||||
Please note, 0.91 meters (36”) is the ADA recommended clearance width for individuals in wheelchairs.* Ensure a minimum clearance width of 0.6 meters (24”) for access to and passage around MATRIX equipment.
![]()
© 2021 Johnson Health Tech
Rev 1.3 C


