FOS technologies VINTAGE 500 Decorative Reflector Halogen Lamp

Summarize
Thank you for choosing our company’s products. Please read this manual thoroughly and carefully, so that you can use it for reference. This manual contains important information on the installation and use of high power LED light. Please strictly follow these instructions when installing and using. This lamp is beautiful in appearance, highly efficient and energy-saving, durable and suitable for indoor use. The products fully comply with the international standard DMX512 agreement, which can be controlled by a single unit, or can be used in conjunction with each other. It is suitable for large-scale theatrical performances, theaters, studios, and other places. When receiving the product, please check whether the product is damaged due to transportation and check the following accessories:
- Power input conversion line ———— 1 pcs
- DMX input conversion line ———- 1 pcs
- DMX output conversion line ———— 1 pcs
- User manual——————– 1 PCS
Main performance
- OLED display with power indication, signal indication.
- 1peice of 750W Halogen light bulb,32pcs RGB LEDs
- LED controlled strobe, color wheel, and self-propelled effects.
- 4/6/9channels for choice.
- Over-temperature automatic protection.
- Super halogen brightness can be adjusted.
- Innovative grayscale adjustment technology makes dimming changes smoother.
Safety instructions
All personnel involved in the installation and maintenance of this equipment must understand:
- Qualified as an Electronic Technician.
- The lamp can’t be shipped unless it passes a strict inspection before leaving the factory. In order to ensure the normal and safe operation of these conditions, the user must comply with the following safety regulations and precautions in this manual.
- Key point: The manufacturer will not be responsible for any accidents and losses caused by unauthorized changes to the equipment without following the normal operation of this manual and without permission.
Equipment Installation and Maintenance Note:
- Pay particular attention to whether the power supply voltage is consistent with the voltage marked by the host, and ensure that the voltage used is within the voltage range identified by the technical parameters.
- Make sure the lamp is well grounded.
- When moving or installing, take care to avoid metal hard objects hitting the lamp body.
- If you do not use the lamp for a long time, disconnect the power.
- Make sure the power cord is not curled or scratched by sharp objects. Always check the equipment and power cord. If the external cord of this lighting equipment is damaged, the cord must be replaced by the manufacturer or its service agent or a qualified person to avoid danger. Do not use the lighting equipment during lightning storms and disconnect the power supply. High voltage will destroy the lighting equipment.
- The maximum ambient temperature (Ta) is 40°C.
- After the lamp is stable, the surface temperature of the lamp is 60°C. Don’t look directly at the light source, because sensitive people can cause epilepsy (especially for people with epilepsy).
- In the range of 1m from the front of the lighting equipment, no objects are allowed to be shielded. Combustible items (such as cloth, wood, paper, etc.) are not allowed within a range of 0.5m around the lighting equipment.
- When the lighting equipment is hung above the ground, it must be verified that it can withstand the weight of the device that is suspended 10 times. Ensure that the external protection, ropes, and hardware are secure, and then use one or more protective measures, such as an insurance rope. In the process of moving the lamp, it is not allowed to directly hold the cord and can only be moved by the handle.
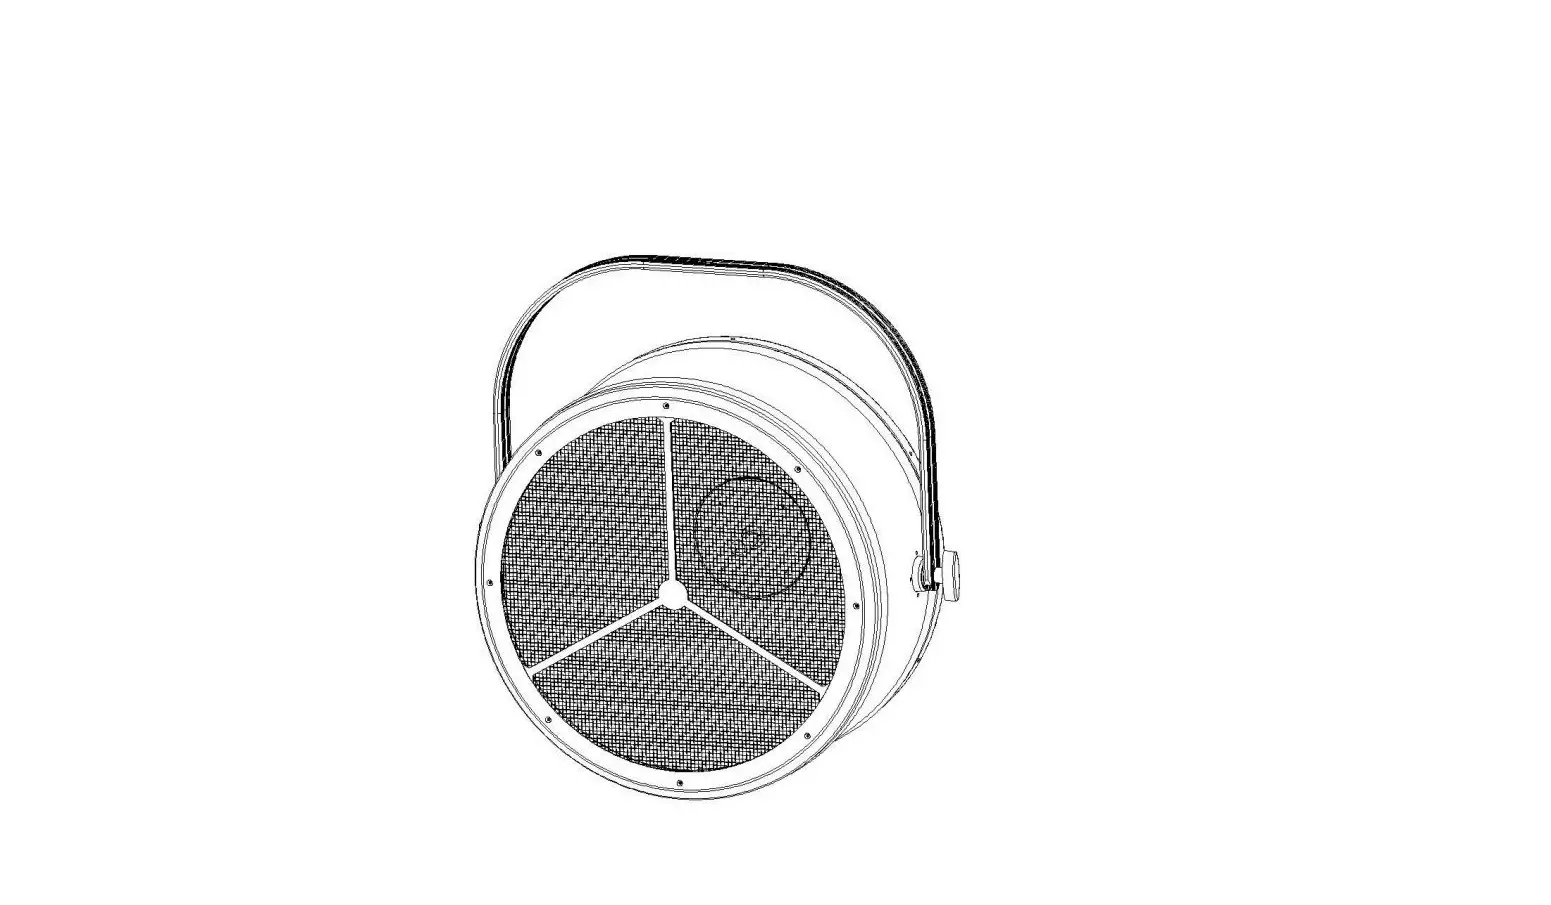
Dimensions

CONTROL PANEL
Button
- SET:
Callout the main menu, or exit the current menu (that is, return to the previous menu and give up options or parameters) - UP
Upwards browse menu item or parameter increment - DOWN
Browse down menu items or decrement parameters - ENTER
Confirm selections or parameters (ie go to the next menu, or exit the current menu and save the selection or parameters
Display
OLED display signal indication information in the upper left corner, the function is as follows:
- No sign——No external control signal access
- DMX OK——External DMX512 signal access
- Sla OK——Slave signal access
- Master——Master mode
Common settings
Manual control
- Display the xxx page of large font address code,
- Press ENTER to enter Main Menu,
- Press the UP or DOWN key to press MANUAL (manual dimmer).
- Press ENTER to enter the adjustment menu ,
- Press UP or DOWN to browse the following menus (7 total):
- LAMP Halogen dimming
- RED red LED dimming
- GREEN green LED dimming
- BLUE blue LED dimming
- STROB LED strobe
- SPEED LED Built-in program self-propelled speed adjustment
- MACRO LED Built-in program self-propelled, the highest priority, greater than 9 effective, each 5 number to switch an effect
If you want to adjust one of the options, press ENTER to enter, then press UP or DOWN to set the parameters and press ENTER to confirm.
Static color
- The xxx page of the large font address code is displayed on the boot. Press ENTER to enter Main Menu,
- Press UP or DOWN to find DEMO_RUN,
- Press ENTER to confirm entry, browse through the menu below
- Press ENTER to confirm the selected color. At this time, the lighting equipment will play static color light
- RED (red)
- GEN (green)
- BLU (blue)
- YEL (yellow)
- CYN (cyan)
- PUR (purple)
- AWHI (mixed white)
- 3200 (3200K white)
- 5600 (5600K white)
- 6500 (6500K white)
- 8500 (8500K white)
- 1000 (1000K white)
- CHCL (Color change program)
- STOB (strobe program)
- FADE (fade program)
Slave setting
In slave mode, the lighting equipment is not controlled by any signal and the slave operates. The slave mode setting method is as follows:
- Enter SETTING (Setup menu)
- Press UP or DOWN to find MasSla
- Press ENTER to enter
- Press UP or DOWN to find Slav
- Press ENTER to confirm
Master setting method:
- Enter SETTING (Setup menu)
- Press UP or DOWN to find MasSla
- Press ENTER to enter
- Press UP or DOWN to find Mast (master)
- Press ENTER to confirm
Note: Set up the master slave One of the Lighting equipment is set as the master and the other is the slave (DMX mode). Then all the lights are synchronized with the master. Note that there can only be one host.
Setting DMX address
In DMX mode, the lighting equipment receives the control signal through the address. The address of the first channel of the lighting equipment is called the start address. If there are 3 channels for a fixture and the start address is set to 1, then the channel occupied by this lamp has 1, 2, and 3 channels. If you want to add another lighting equipment, the starting address can be set to 4, and the occupied channels have 4, 5, and 6 channels. And so on. If different fixtures are assigned the same address, then the different fixtures receive the same control signal. If you want to control each lighting equipment individually, you need to allocate the unoccupied start address of 1-512 to the lighting equipment (also ensure that the rear channel of the lighting equipment is unoccupied), and record it for later inquiry.
4/6/9 Channel mode selection
- Enter DMX512 (DMX menu)
- Press UP or DOWN to find ChMo and enter,
- Press the UP or DOWN button to select the number of channel modes (4CH/6CH/9CH) and confirm with entering.
- Set the running status when the DMX signal is not received in the DMX mode
- Enter the DMX512 menu and press ENTER,
- Then press UP or DOWN to find Sign
- Press ENTER to enter
- Press UP or DOWN to select Stop / Hold (hold the last received signal, default)
- Select the option you want to press ENTER to confirm or press ESC to cancel the setting and return.
DMX channel function
A total of 3 modes, the default is 9-channel mode, can enter the DMX512 menu to change
4 Channel definition: LAMP+HSV
| Channe l | value | function |
| CH1: | 000-255 | Halogen dimming 0~100% |
| CH2 | 000-255 | LED chromaticity(H) |
| CH3 | 000-255 | LED Saturability(S) |
| CH4 | 000-255 | LED purity (V) |
6 channel definition:
| Channe l | value | function |
| CH1: | 000-255 | Halogen dimming 0~100% |
| CH2 | 000-255 | Red LED dimming 0~100% |
| CH3 | 000-255 | Green LED dimming 0~100% |
| CH4 | 000-255 | Blue LED dimming 0~100% |
| CH5 | 000-255 | macro speed |
| CH6 | 000-255 | Macro run effect selection |
9 channel definition(default):
| Channe l | value | function | |
| CH1 | 000-255 | dimming 0~100% | |
| strobe | |||
| 000-005 | no strobe | ||
| 006-064 | strobe 1(fast-slow) | ||
| 065-069 | no strobe | ||
| 070-084 | strobe 2: Fast-forward and slow-out (faster to | ||
| 085-089 | slower) | ||
| 090-104 | no strobe | ||
| 105-109 | strobe 3: Slow forward (faster to slower) | ||
| 110-124 | no strobe | ||
| CH2 | 125-129 130-144 | strobe 4: Random strobe (faster to slower) no strobe | |
| 145-149 | strobe 5: Randomly fast forward (slow to fast) | ||
| 150-164 | no strobe | ||
| 165-169 | strobe 6: Randomly go in and out slowly (faster to | ||
| 170-184 | slower) | ||
| 185-189 | no strobe | ||
| 190-204 | strobe 7: Pulse strobe (faster to slower) | ||
| 205-255 | no strobe | ||
| strobe 8: Random Pulse Strobe (faster to slower) | |||
| no strobe | |||
| CH3 | 000-255 | Halogen dimming | 0~100% |
| CH4 | 000-255 | Red LED dimming | 0~100% |
| CH5 | 000-255 | Green LED dimming | 0~100% |
| CH6 | 000-255 | Blue LED dimming | 0~100% |
| CH7 | 000-255 | Macro speed setting | |
| CH8 | 000-255 | Macro effect selection | |
| CH9 | 000-255 | Color wheel | |

DMX512 menu
| Main menu | Item | Options | remark |
|
DMX512 DMX menu | ADDR Set the address code | value: 1-512 | Defaults:1 |
| ChMo Channel mode selection | 4CH | 4 channel mode | |
| 6CH | 6 channel mode | ||
| 9CH (Default) | 9 channel mode | ||
| Sign Operation without DMX signal | STOP Stop running | ||
| HOLD Keep the last signal received | (Default) |
Manual dimming menu
| Main menu | item | Options | remark |
|
MANUAL | LAMP | 000-255 | Halogen dimming 0~100% |
| RED | 000-255 | Red LED dimming 0~100% | |
| GREEN | 000-255 | Green LED dimming 0~100% | |
| BLUE | 000-255 | Blue LED dimming 0~100% | |
| STROB | 000-255 | LED strobe | |
| SPEED | 000-255 | Macro speed setting | |
| MACRO | 000-255 | Macro effect selection |
DEMO_RUN Demo mode menu
| item | Options | remark |
| RED | red | |
| GEN | green | |
| BLU | blue | |
| YEL | yellow | |
| CYN | cyan | |
| PUR | purple | |
| AWHI | Mixed white | |
| DEMO | 3200 | 3200K |
| 5600 | 5600K | |
| 6500 | 6500K | |
| 8500 | 8500K | |
| 1000 | 10000K | |
| CHCL | Change color | |
| STOB | strobe | |
| FADE | fade |
Auto-run program menu
| Main menu | item | option | remark |
| AUTO_ RUN | SPEEDuto-run speedauto-run speed | 1~50 | 1~50 |
| PROJ Effect selection | 1~50 | 46-50 same effect |
Setting menu
| Main menu | Submenu | Submenu | Submenu | |||
|
SETTING | Reload Data overload | Yes | Reload | |||
| No | Don’t reload | |||||
| MasSla Master/slave setting | Mast | Master mode (Slave presses DMX mode to run synchronously with the master. Note that only one master can be set. The master will exit master mode when it reaches DMX mode) | ||||
| Slav | SLAVE Mode | |||||
| Tempra Temperature control switch settings, ultra-high | Tempe Temperature switch enable | ON | ||||
| OFF | ||||||
| CapT | Get | LED | board | real-time | ||
| temperature reduces output. | Temperature capture | temperature | |||
| SetT Temperature setting | 0-125℃, Default | 60℃ | |||
| BackLi | 15s (Default) | 15s without information after the operation of the screen | |||
| on | Screen on | ||||
| Rotate | 0° | normal display | |||
| 180° | Reverse display | ||||
| LampCal | -128~127 | Lamp calibration caution!) | ( | Use | |
| SofVer | Software version information query | ||||
Technical Parameters
- Voltage: AC 100 or AC 240V, 50/60HZ
- Power: 700W
- Lamp: Halogen 750W Lamp
- LED 96pcs 3in1 RGB LEDs
- LED life: 50000h
- Channels: 4/6/9 channels option
- Agreement: DMX-512
- Control mode: DMX512 ; master/slave
- Materials: Aluminum alloy
- IP rate: IP20
- Dimension: 639*330*661 mm
- N.W.: 7.5kg


