![]()
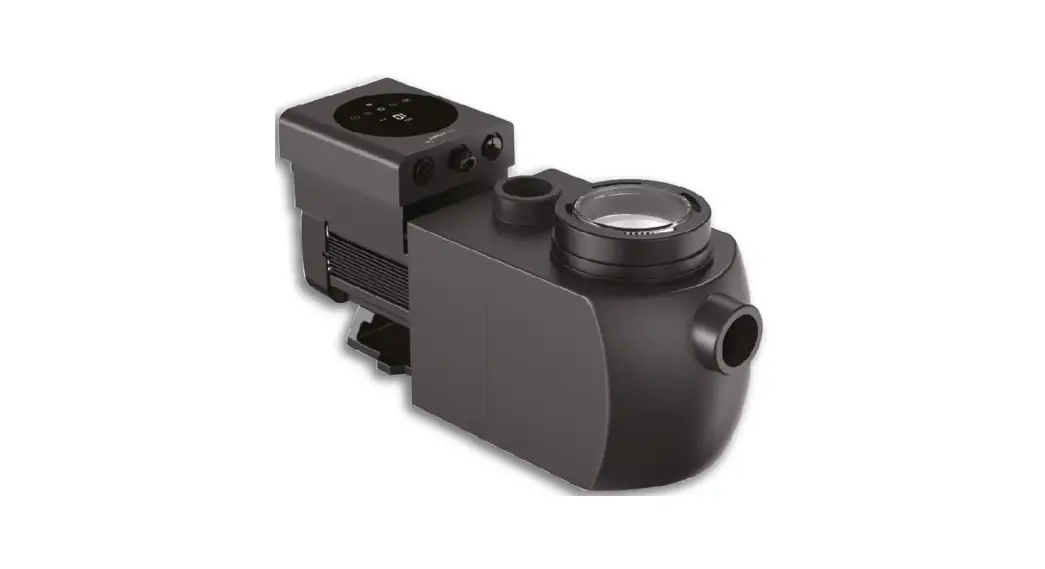
ELITE VS Pool Pump
Installation Manual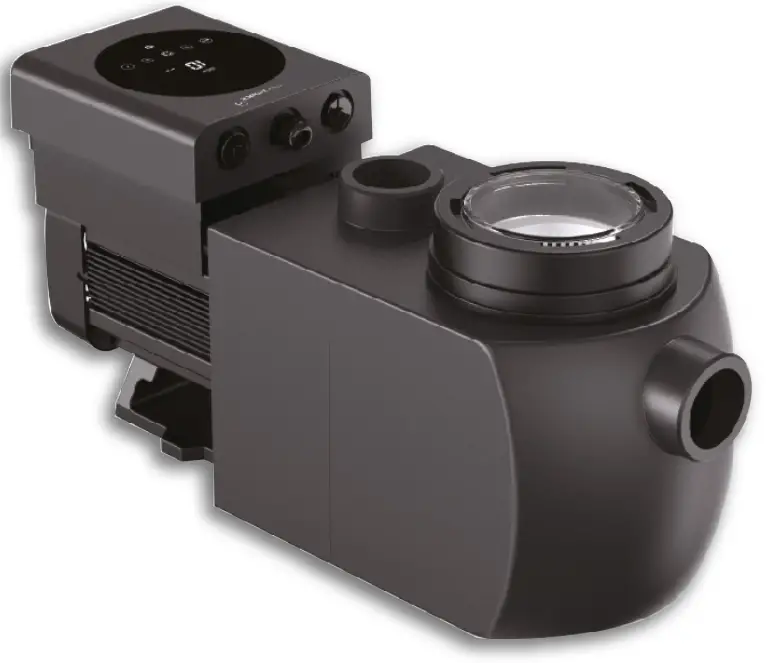


ELITE VS Pool Pump
CONGRATULATIONS AND THANK YOU FOR PURCHASING OUR ELITE INVERTER POOL PUMPS eFlow Series. THIS MANUAL CONTAINS IMPORTANT INFORMATION THAT WILL HELP YOU IN OPERATING AND MAINTAINING THIS PRODUCT.
![]() PLEASE READ THE MANUAL CAREFULLY BEFORE INSTALLATION & OPERATION AND RETAIN IT FOR FUTURE REFERENCE.
PLEASE READ THE MANUAL CAREFULLY BEFORE INSTALLATION & OPERATION AND RETAIN IT FOR FUTURE REFERENCE.
![]() Adherence to the directions for use in this manual is extremely important for health and safety. Failure to strictly adhere to the requirements in this manual may result in personal injury, property damage and affect your ability to make a claim under the manufacturer’s warranty provided with your product. Products must be used, installed and operated in accordance with this manual. You may not be able to claim on the manufacturer’s warranty in the event that your product fault is due to failure to adhere this manual.
Adherence to the directions for use in this manual is extremely important for health and safety. Failure to strictly adhere to the requirements in this manual may result in personal injury, property damage and affect your ability to make a claim under the manufacturer’s warranty provided with your product. Products must be used, installed and operated in accordance with this manual. You may not be able to claim on the manufacturer’s warranty in the event that your product fault is due to failure to adhere this manual.
IMPORTANT SAFETY INSTRUCTIONS
![]() This guide provides installation and operation instructions for this pump. If you have any other questions about this equipment, please consult your supplier.
This guide provides installation and operation instructions for this pump. If you have any other questions about this equipment, please consult your supplier.
1.1 When installing and using this electrical equipment, basic safety precautions should always be followed, including the following:
- RISK OF ELECTRICAL SHOCK.
Pool pump must be installed on a RCD protected circuit.
Check your local state regulations and wiring rules. - This pump is for use with permanently installed in-ground or above-ground swimming pools and may also be used with hot tubs and spas with a water temperature under 50°C. Due to the fixed installation method, this pump is not suggested to be used on above-ground pools that can be readily disassembled for storage.
- The pump is not submersible.
- Never open the inside of the drive motor enclosure.
1.2 All installations must be fitted with earth leakage or residual current protection devices, having a rated residual operating current not exceeding 30mA.
- Fill the pump with water before starting. Do not run the pump dry. In case of dry run, mechanical seal will be damaged and the pump will start leaking.
- Before servicing the pump, switch OFF power to the pump by disconnecting the main circuit to the pump and release all pressure from pump and piping system.
- Never tighten or loosen screws while the pump is operating.
- Ensure that the inlet and outlet of the pump are unblocked with foreign matter.
TECHNICAL SPECIFICATIONS
| Model | Advised Pool Volume | INPUT POWER | Voltage (V/Hz) | Max Flow (L /m) | Head Max (m) | Circulation | ||
| Power KW | Power HP | Flow at 8mh L/min | Flow at 10m L/min | |||||
| Elite VS 300 | 30~50 | 0.07~0.76 | 1.0 | 220~240 50/60 | 400 | 11.5 | 300 | 210 |
| Elite VS 400 | 40~70 | 0.07~1.03 | 1.5 | 220~240 50/60 | 450 | 14.5 | 400 | 340 |
| Elite VS 500 | 50~80 | 0.075~1.34 | 2.0 | 220~240 50/60 | 500 | 17.5 | 500 | 440 |
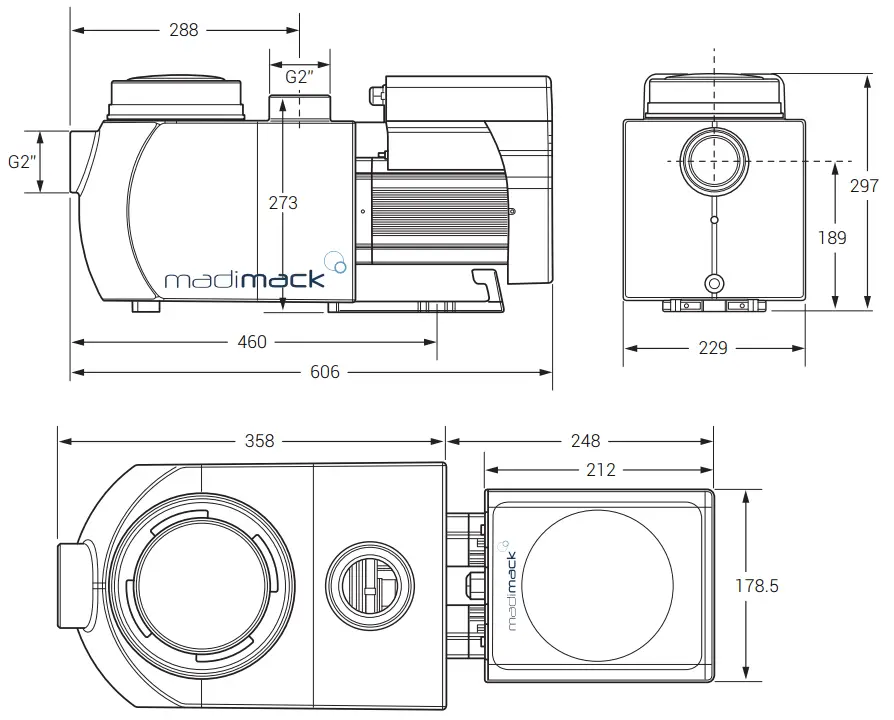
OVERALL DIMENSION (mm)
INSTALLATION
4.1. Tools required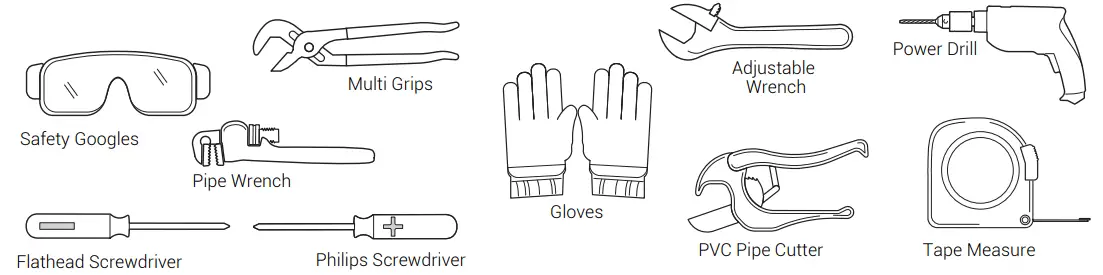
4.2. Pump Location
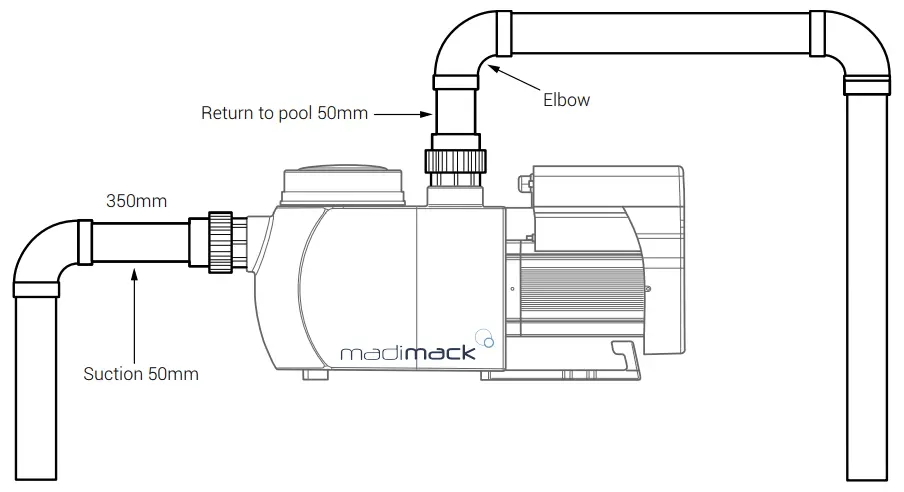
The pump should be installed in an area with at least 150mm distance around the unit away from any obstacles and away from any corrosive products.
- Install the pump as close to the pool as possible, to reduce friction loss and improve efficiency, use short, direct suction and return piping.
- To avoid direct sunshine, heat or rain, it is recommended to place the pump indoors or in the shade.
- DO NOT install the pump in a damp or non-ventilated location. Keep pump and motor at least 150mm away from obstacles, pump motors require free circulation of air for cooling.
- The pump should be installed horizontally and fixed in the hole on the support with screws to prevent unnecessary noise and vibration.
4.4. Valves and Fittings
It is recommended to install isolation valves on the suction and return lines for easier maintenance of the pool pump.
4.3. Piping
Suction and return connections on the pool pumps are 50mm pressure pipe dimensions.
- For optimization of the pool plumbing, it is recommended to use a pipe with size of 63mm. When installing the inlet and outlet fittings (joints), use the special sealant for PVC material.
- The dimension of suction line should be the same or larger than the inlet line diameter, to avoid pump sucking air, which will affect the efficiency of the pump.
- Plumbing on the suction side of the pump should be as short as possible.
- For most installations we recommend installing a valve on both the pump suction and return lines, which is more convenient r for routine maintenance. However, we lso recommend that a valve, elbow, or tee installed on the suction line should be no close r. to the front of the pump than seven times the suction line diamete n
- Pump outlet piping system should be equipped with a check valve to prevent the pump from the impact of medium recirculatio and pump-stopping water hammer.
* The pump inlet/ outlet union size: optional with metric 50 or 40mm.
2) Below water level system should have an isolation valves installed on suction and return line for maintenance; however, the suction gate valve should be no closer than seven times the suction pipe diameter as described in this section.
3) A check valve shopuld be installed if there are long pipe runs aboave water level or if is significant height between the return line and the outlet of the pump.
4) Be sure to install check valves when plumbing in parallel with other pumps. This helps prevent reverse rotation of the impeller and motor.
4.5 Check before initial startup
- Check whether pump shaft rotates freely;
- Check whether power supply voltage and frequency conform to the nameplate;
- Facing the fan blade, the direction of motor rotation should be clockwise;
- It is forbidden to run the pump without water.
4.6 Application conditions
| Ambient temperature | Indoor installation, temperature range: -10 ~ 42°C |
| Water temperature | 5°C ~ 50°C |
| Salt pools | Salt concentration up to 0.5%, i.e. 5g/L |
| Humidity | RH, (20 + 2) |
| Altitude | Not exceed 1000m above sea level |
| Installation | The pump can be installed max. 2m above water level |
| Insulation | Class F, IP55 |
SETTING AND OPERATION
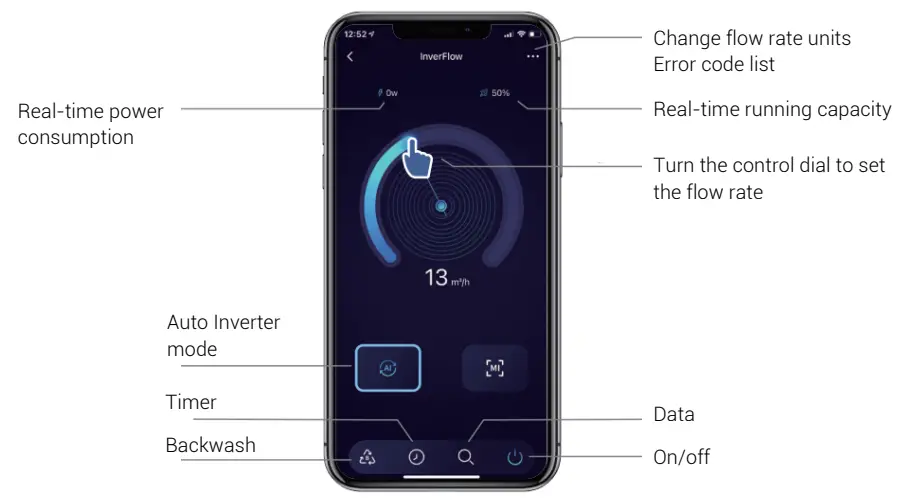
5.1 Display on control panel:

| 1 | Power Consumption |
| 2 | Running capacity/ Flow rate |
| 3 | WIFI Indicator |
| 4 | Unit of flow |
| 5 | Timer period |
| 6 | Timer 1/2/3/4 |
| Backwash/ Unlock Hold down this button to unlock the screen. Single press for Backwash activation. | |
 | Switch between Adaptive Mode and Manual Mode Auto Inverter Mode: The running capacity will be automatically adjusted between 30%-100% according to the preset flow rate. Manual Inverter Mode: The running capacity will be set manually between 30%-100%. The default mode is Adaptive mode. |
 | UP To change the value (capacity/flow/time). DOWN |
| Timer setting | |
| On/ Off |
5.2 Startup
Before operation.
Fill the basket with water before starting up the pump.
When the power is switched on, the screen will fullu illuminate for 5 seconds, check whether power supply voltage and frequency conform to the nameplate;
Refer to section 4.4 before proceeding.
When the screen is locked, only the button![]() will light up; Press and hold
will light up; Press and hold![]() for more than 3 seconds, other buttons will all light up. The screen will automatically lock up when there is no operation for more than 1 minute and the brightness of the screen is reduced by 1/3 of the normal display. Short press
for more than 3 seconds, other buttons will all light up. The screen will automatically lock up when there is no operation for more than 1 minute and the brightness of the screen is reduced by 1/3 of the normal display. Short press![]() to wake up the screen and observe the relevant operating parameters.
to wake up the screen and observe the relevant operating parameters.
The default flow range for Madimack Elite VS is as below:
| Model | Default flow rate range |
| Elite VS 300 | 5~20 L/min |
| Elite VS 400 | 5~25 L/min |
| Elite VS 500 | 5~30 L/min |
5.3 Self- priming
When switched on for the fist time after installation, the pump will start self-priming automatically and followed by self-learning.
Self-priming:
The system performs the self-priming in Boost mode, it will count down from 1500s and stop automatically when the system detects the pump is full of water.
Self-learning:
After the self-priming is completed, the system will perform a self-learning program to define the optimum performance rate. This is done by detecting the system designed pressure including pipe length, size and the filter condition. This will take 180 seconds and will define the range of available flow.
Remark:
The pump is delivered with self-priming enabled. Each time the pump restarts, it will perform self-priming automatically. The user can enter the parameter setting to disable the default self-priming function (see 5.8)
If the default self-priming function is disabled, and the pump has not been used for a long time, the water level in basket may drop, the user could manually activate the Boost mode of priming to fill it (see 5.8), the adjustable period is from 600s to 1500s (default value is 600s).
The user could press![]() for for more than 3 seconds to exit the Boost mode, The system will have a 180s self-learning process after end the Boost mode.
for for more than 3 seconds to exit the Boost mode, The system will have a 180s self-learning process after end the Boost mode.
5.4 Backwash
Start the Backwash procedure by pressing the backwash button (![]() ). Once activated the timer will start to count down on the main screen. Use
). Once activated the timer will start to count down on the main screen. Use![]() to change the length of backwash time required.
to change the length of backwash time required.
| Default | Setting range | |
| Time | 180s | Press |
| Running capacity | 100% | 80~100%, enter the parameter setting (see 5.8) |
If backwash is completed or you wish to stop high speed, either press (ON/OFF) button or press![]() for 3 seconds to return to previous operating speed.
for 3 seconds to return to previous operating speed.
5.6 Manual-Inverter Mode
The running capacity can be set manually according to different application needs. To Reset, just power it OFF, then ON again.
| 1 | Unlock the screen, press | |
| 2 | Press | |
| 3 | Press |
When manual inverter mode is set, a % of the maximum capacity of the pump will be displayed. This can be set using the ![]() buttons.
buttons.
5.5 Auto-Inverter Mode
Auto inverter mode uses the latest in Adaptive control technology.
Sensing the length of the pipe, equipment and fiter condition.
After setting the water flow, the pump will automatically detect the system pressure and adjust the running capacity.
Litres per minute will be constant wont change.
| 1 | Hold | |
| 2 | Press is equivalent to 80% capacity after self-priming. | |
| 3 | The flow rate could be adjusted, by pressing | |
| 4 | The unit of flow rate could be changed to lpm, IMPgpm or US GPM, by pressing both | |
| 5 | Press |
Note:
After the fit self-priming, the pump will redefine the adjustable flow range. If the change last for 5 minutes, the pump will perform a self-priming and self-learning procedure (see section 5.3).
After the redefinition of flow range, the pump will automatically adjust the running capacity to reach the set flow.
5.7 Timer mode
The timer mode can be set when different speeds throughout the day are required. For example if a suction cleaner is used and requires a higher flow rate.
| 1 | Enter timer setting by pressing |
| 2 | Press |
| 3 | Press |
| 4 | Press |
| 5 | |
| 6 | |
| 7 |
Note: Overlapping timers will be considered as invalid, the pump will only run based on the previous valid setting.
During timer setting, if you want to return to the previous setting, hold both ![]() for 3 seconds.
for 3 seconds.
5.8 Parameter Setting
| Restore factory setting. | Under off mode, hold both |
| Check the software version. | Under off mode, hold both |
| Boost mode of priming. | Under on mode, hold both |
| Enter parameter setting as shown. | Under off mode, hold both |
| Parameter Address | Description | Default Setting | Setting Range |
| 1 | PIN3 | 100% | 30~100%, by 5% increments |
| 2 | PIN2 | 80% | 30~100%, by 5% increments |
| 3 | PIN1 | 40% | 30~100%, by 5% increments |
| 4 | Self-priming/ Backwash capacity | 100% | 80~100%, by 5% increments |
| 5 | Control mode of Analog Input. | 0 | 0: current control 1: voltage control |
| 6 | Enable or disable the priming that occurs at start. | 25 | 25:enables 0:disables |
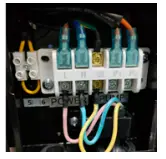
EXTERNAL CONTROL
External control can be enabled via following contacts. If more than one external control is enabled, the priority is as below: Digital Input >Analog Input > RS485 > Panel control
Connector location for Quick connect between Madimack
Pool Heat pump and other pump requirements (RS485, Digital inputs).
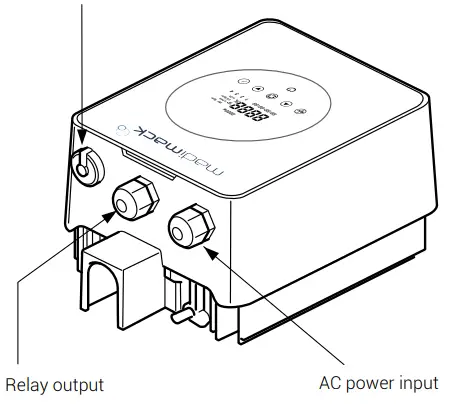
RELAY OUTPUT
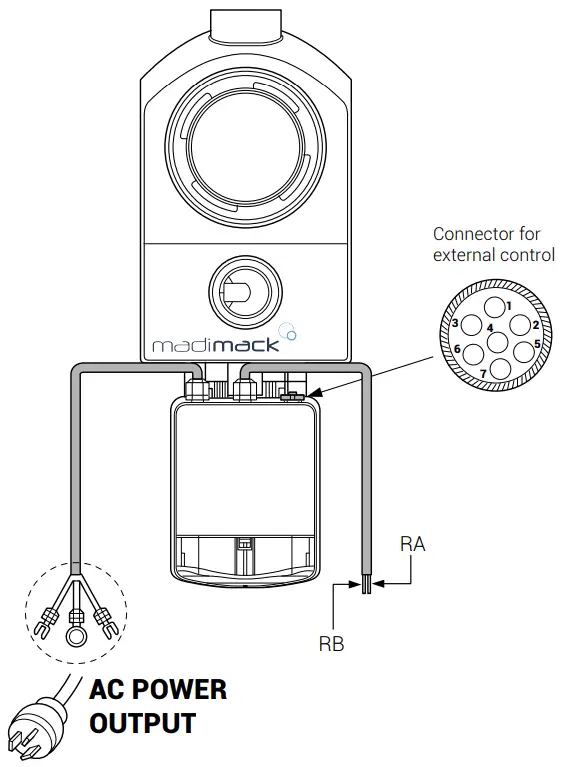
| Name | Color | Description | Setting Range |
| PIN 1 | Red | Digital Input 4 | 30-100%, by 5% increments |
| PIN 2 | Black | Digital Input 3 | 30-100%, by 5% increments |
| PIN 3 | White | Digital Input 2 | 30-100%, by 5% increments |
| PIN 4 | Grey | Digital Input 1 | 30-100%, by 5% increments |
| PIN 5 | Yellow | Digital Ground | 30-100%, by 5% increments |
| PIN 6 | Green | RS485 A | 30-100%, by 5% increments |
| PIN 7 | Brown | RS485 B | 30-100%, by 5% increments |
| PIN 8 | Blue | Analog Input 0 (0~10V or 0~20mA) | 30-100%, by 5% increments |
| PIN 9 | 0 range | Analog Ground | 30-100%, by 5% increments |
Remark: Above table sums up the associated input signals.
When Analog input is required, 9 PINS connector with wirings will be provided.
continue EXTERNAL CONTROL
a. Digital input
Running capacity is determined by the state of digital input, (5 pin)
When PIN4 connect with PIN5, the pump will be mandatory to stop; if disconnected, the digital controller will be invalid;
When PIN3 connect with PIN5, the pump will be mandatory to run at 100%; if disconnected, the control priority will be back on panel control;
When PIN2 connect with PIN5, the pump will be mandatory to run at 80%; if disconnected, the control priority will be back on panel control;
When PIN1 connect with PIN5, the pump will be mandatory to run at 40%; if disconnected, the control priority will be back on panel control;
The capacity of inputs (PIN1/PIN2/PIN3) could be modfied according to the parameter setting..
b. RS485:
To connect with PIN6 and PIN7, the pump could be controlled via Modbus 485 communication protocol.
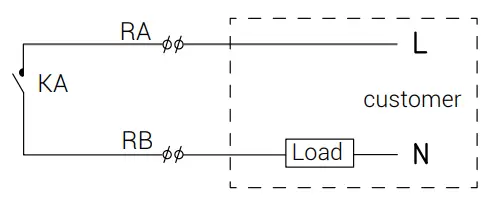
c. Relay output (optional):
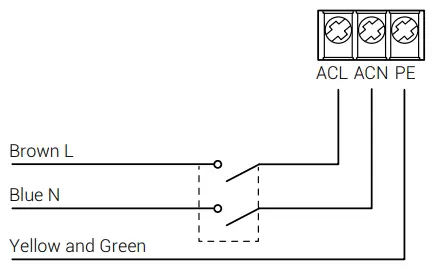
Connect terminal L & N to enable external control. An additional on-off Relay is necessary while bearing power is greater than 500W (2.5A).
PROTECTION AND FAILURE
7.1 High Temperature Warning and Speed Reduction
In “Auto-Inverter/Manual-Inverter Mode” and “Timer mode” (except backwash/self-priming), when the pump control system reaches the high temperature warning trigger threshold (81°C), it enters the high temperature warning state; when the temperature drops from the high temperature warning release threshold (78°C), the high temperature warning state is released. The display area alternately displays AL01 and running speed or flow.
- If AL01 displayed for the fit time, the running capacity will be automatically reduced as below:
a. If current operating capacity is higher than 85%, the running capacity will be automatically reduced by 15%;
b. If current operating capacity is higher than 70%, the running capacity will be automatically reduced by 10%;
c. If current operating capacity is lower than 70%, the running capacity will be automatically reduced by 5%. - Suggestion for non-fit displayed of AL01: check the module temperature every 2 minutes. Compared with the temperature in the previous period, for every 1-degree Celsius increase, the speed will decrease by 5%.
7.2 Undervoltage protection
When the device detects that the input voltage is less than 200V, the device will limit the current running speed
When input voltage is less than or equal to 180V, the running capacity will be limited to 70%;
When the input voltage range is within 180V ~ 190V, the running capacity will be limited to 75%;
When the input voltage range is within 190V ~ 200V, the running capacity will be limited to 85%.
7.3 Troubleshooting
| Problem | Possible causes and solution |
| Pump does not start. | •Power Supply fault, disconnected or defective wiring. •Fuses blown or thermal overload open. •Check the rotation of the motor shaft for free movement and lack of obstruction. •Because of long time lying idle. Unplug the power supply and manually rotate motor rear shaft a few times with a screwdriver. |
| Pump does not prime. | •Make sure the pump basket is filled with water and the 0-ring of cover is clean. •Loose connections on the suction side. •Strainer basket or skimmer basket loaded with debris. •Suction side clogged. •Distance between pump inlet and liquid level is higher than 2m, height of pump installation should be lowered. |
| Low Water Flow. | •Pump does not prime. •Air entering suction piping. •Basket full of debris. •Inadequate water level in pool. |
| Pump being noisy | •Air leak in suction piping, cavitation caused by restricted or undersized suction line or leak at any joint, low water level in pool, and restricted discharge return lines. •Vibration caused by improper installation, etc. •Damaged motor bearing or impeller (need to contact the supplier for repair). |
continue PROTECTION AND FAILURE
7.4 Error code
When the device detects an error (except for the running capacity reduction strategy and 485 communication failure), it will power off automatically and display an error code. Errors can be sometimes caused by power surge or power interference and can be reset by powering down for 1min and restarting. I f error persist, contact your local dealer or service technician.
| Item | Error Code | Description |
| 1 | E001 | Abnormal input voltage |
| 2 | E002 | Output over current |
| 3 | E101 | Heat sink over heat |
| 4 | E102 | Heat sink sensor error |
| 5 | E103 | Master driver board error |
| 6 | E104 | Phase -deficient protection |
| 7 | E105 | AC current sampling circuit failure |
| 8 | E106 | DC abnormal voltage |
| 9 | E107 | PFC protection |
| 10 | E108 | Motor power overload |
| 11 | E201 | Circuit board error |
| 12 | E203 | RTC time reading error |
| 13 | E204 | Display Board EEPRO Mreading failure |
| 14 | E205 | Communication Error |
| 15 | E207 | No water Protection |
| 16 | E208 | Pressure sensor failure |
| 17 | E 209 | Loss of prime |
MAINTENANCE
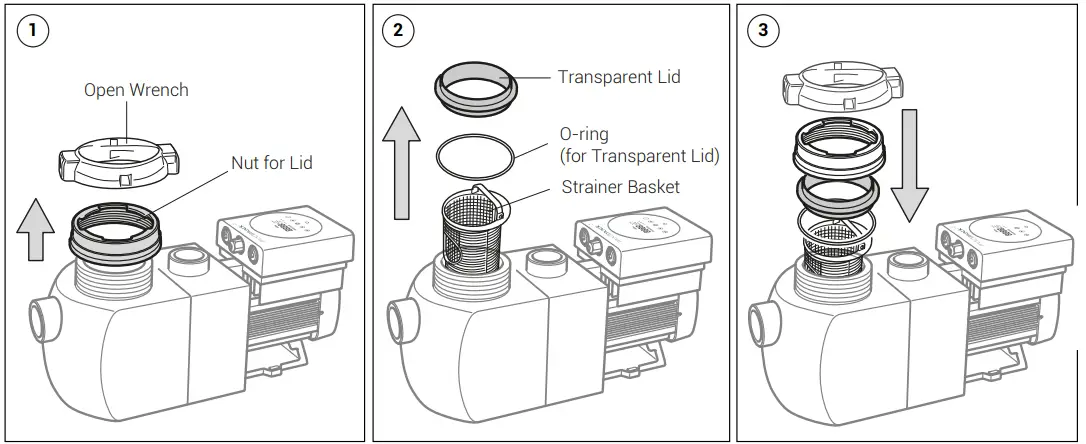
Empty the strainer basket frequently. The basket should be inspected through the transparent lid and emptied when there is an evident stack of rubbish inside. The following instructions should be followed:
- Disconnected the power supply.
- Unscrew the strainer basket lid anti-clockwise and remove.
- Lift up the strainer basket.
- Empty the trapped refuse from the basket, rinse out the debris if necessary.
Note: Do not knock the plastic basket on a hard surface as it will cause damage - Inspect the basket for signs of damage, replace it.
- Check the lid O-ring for stretching, tears, cracks or any other damage
- Replace the lid, hand tightening is sufficient.
Note: Periodically inspect and clean the strainer basket will help prolong its life.
Lid Cleaning
WIFI OPERATION
InverFlow Download

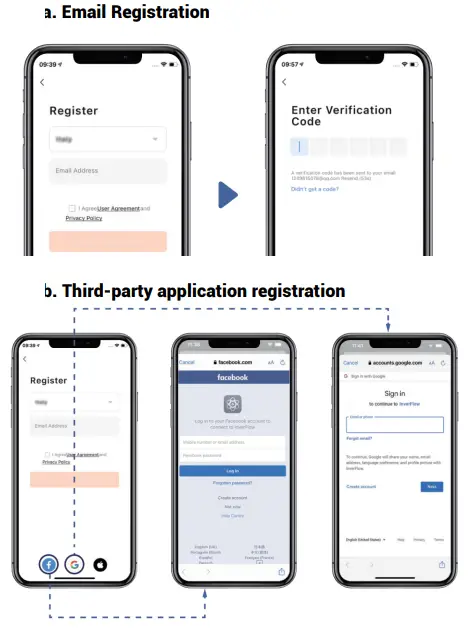
Account registration
Register by email or third-party application

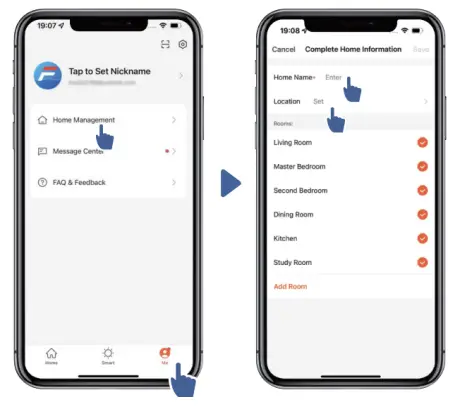
 Create Home
Please set home name and choose the location of the device. (It is recommended to set the location so the weather can be shown in the App for your convenience).
 App pairing
Please make sure your pump is turned on before you start.
WiFi and Bluetooth
Pool pump WiFi only compatible with 2.4Ghz band and combined 2.4/5Ghz band.
- Please ensure your phone is connected to the home WiFi and has a strong connection at the pool pump location. Also, please enable Bluetooth.
- First, Unlock the screen by holding the Unlock button for 3seconds until a beep noise can be heard and the screen is illuminated.
- Press
 button, (for 5 seconds) until hearing a beep, then release and
  will flash.
 - Click “Add Device”

continue WIFI OPERATION
Operation
1) Using Auto Inverter mode:
 2) Using Manual Inverter mode:

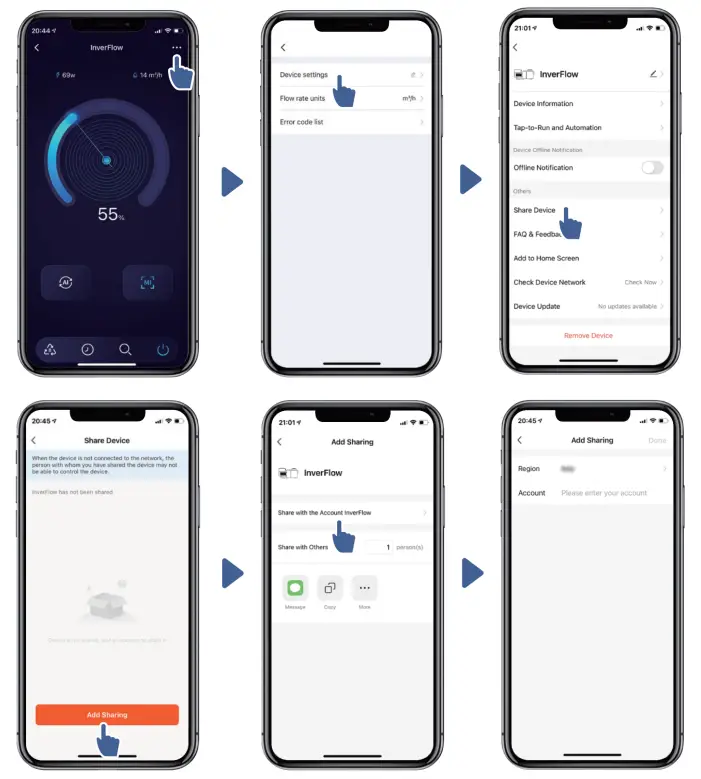
Sharing Devices with your family members
After pairing, if your family members also want to control the device, please let your family members register “InverFlow” fit, and then the adminstrator can operate as below:
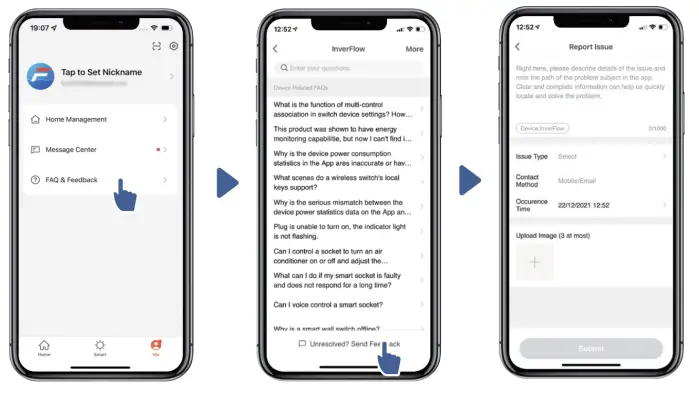
Feedback
If you have any problem while using, welcome to send feedback.
Notice:
- Weather forecast is just for reference;
- The power consumption data is for reference only, as it may be affected by network problems and imprecision of the calculation3) App is subject to updates without notice.
CONNECTING TO MADIMACK HEAT PUMP POOL HEATER
How to connect: Only available on late 2022 Madimack models.
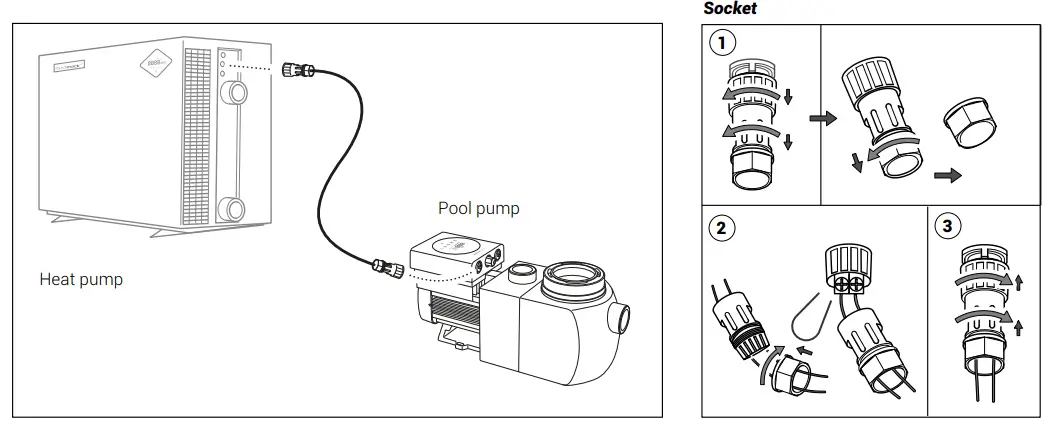
Adaptive Flow – Perfect Pairing with Madimack Pool Heat Pump
The Perfect Pairing uses the intelligent communicaiton functions of the pool heat pump fiyour pool and equipment.

- Switch pump off with so only power symbol is illuminated.
- Press and hold
 and
and  arrows for 4 seconds on until
  is displayed.
 - Press and hold and arrows again for 3 seconds or until
 is displayed.
 - Use the or arrow whilst on to adjust to the bottom number ( L/min ) optimum stated on the table on the right side.
| Pool Heater kW size | Optimum Flow rate L/min |
| 9-16 | 83 |
| 17-20 | 100 |
| 21-24 | 133 |
| 25-28 | 150 |
| 29-32 | 183 |
| 33-36 | 200 |
| 37-40 | 283 |
CUSTOMIZED SOCKET
| P1/P2: Sticker ”Pump Output E.L.V” 5/6: Sticker ”Control Input” | Internal original terminal sticker, same as before: “5 6” “POWER” “PUMP” |
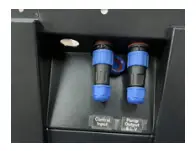 |  |
| Inside P1/P2 warning sticker “Disconnect 240v” | The socket will be assembled in the factory. |
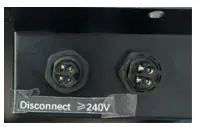 | 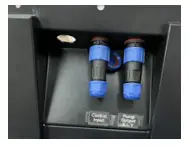 |
DIAGRAM
11.1 Exploded view
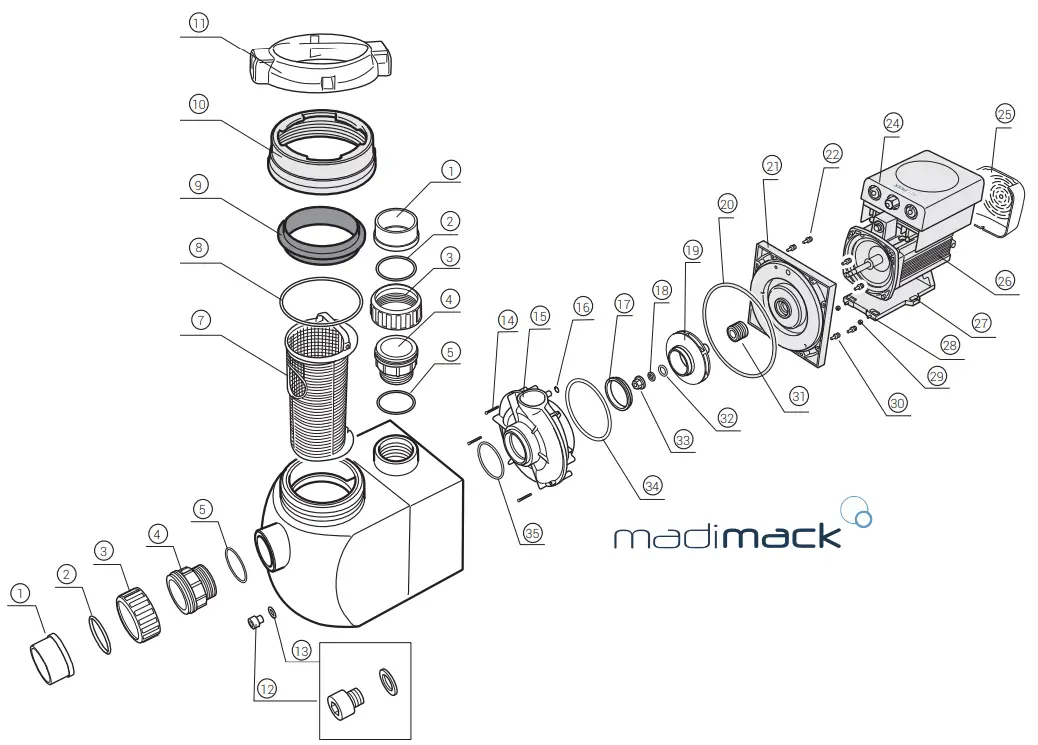
| NO. | Name | QTY |
| 1 | T Union | 2 |
| 2 | O-ring | 2 |
| 3 | Union Nut | 2 |
| 4 | Transition Joint | 2 |
| 5 | O-Ring for Transition Joint | 1 |
| 6 | Pumb Body | 1 |
| 7 | Strainer Basket | 1 |
| 8 | O-ring (for Transparent Lid) | 1 |
| 9 | Transparent Lid | 1 |
| 10 | Nut for Lid | 1 |
| 11 | Open Wrench | 1 |
| 12 | Drain Plug | 1 |
| 13 | O-ring | 1 |
| 14 | Cross recess head screw | 1 |
| 15 | Volute | 1 |
| 16 | O-ring | 1 |
| 17 | Turnable Ring | 1 |
| 18 | Spring Washer | |
| 19 | Impeller | 1 |
| 20 | O-ring | 1 |
| 21 | Sealplate | 1 |
| 22 | Pressure sensor | 8 |
| 23 | Washer | 8 |
| 24 | Inverter controller | 1 |
| 25 | Fan cover | 4 |
| 26 | Motor | 4 |
| 27 | Base | 1 |
| 28 | Cross recess head screw | 1 |
| 29 | Hex Nut | 1 |
| 30 | Socket Head Cap Screw | 1 |
| 31 | Mechanical Seal | 1 |
| 32 | O-Ring | 1 |
| 33 | Nut for Impeller | |
| 34 | O-Ring | |
| 35 | O-Ring |
WARRANTY & EXCLUSIONS
![]()

STANDARD CONDITIONS – Australia and New Zealand Madimack Pool products. Pty Ltd, distributes Pool products and provides the following warranties:
STATUTORY RIGHTS
- The benefits to the consumer under this warranty are in addition to other rights and remedies of the consumer under the laws in relation to the goods and services to which the warranty relates; and
- Our good come with guarantees that cannot be excluded under Autralian Consumer Law. You may be entitled to a replacement or refund for a major failure and for compensation for any other loss or damage, You are also entitiled to have the goods repaired if the goods fil to be of acceptable quality and the failure does not amount to a major failure.
LIMITED WARRANTY
Madimack warrants that its products are free from defects in materials and manufacture for 1 2months from date of supply by Madimack plus 90 days allow for installation and supply (unless otherwise specified). Madimack will at its discretion, except in the circumstances described below, eother repair or replace any product proven to be defective during warranty period for either materials or manufacture or alternately pay the cost of repair or replacement within 90 days of the receipt of the defective product, barring unforeseen delays. This warranty is for domestic installation only, is personal to the original purchaser and does not pass any subsequent purchaser(s).
- To the extent permitted by law, Madimack will not be liable for products which fail of become defctive during the warranty period as a result of freezing, accident, negligence, improper installation, water chemistry, misuse, tampering or lack of care.
- To the extent permitted by law, except as set out in this Warranty, Madimack excludes all statutory or implied conditions and warranties and any other liability it may have to the Customer (including liability for indirect consequential loss) that may arise under statute or at law including without limitation for breach of contract, in tort (including negligence) or under any other cause of action.
- To the extent permitted by law, except as set out in this Warranty, Madimack limits its liability under any condition or warranty which cannot be legally excluded in relation to the supply of Goods and Services to:
1. Reparing the Goods:
2. Replacing the Good or Supplying equivalent Goods or Services again;
3. Paying the cost of replacing the Goods or of supplying equivalent Goods or Services again; o
4. Paying the costs of repairing the Goods.
Claims made for warranty, labour or infield support will not be accepted by Madimack, unless evidence is provided that installation has been completed in accordance with standard warranty conditions. Please refer to specific program document for details.
WHAT TO DO IF YOU HAVE WARRANTY CLAIM
The faulty product is to be retured to the place of purchase, or where installed by an approved agent to an authorised warranty agent. No returns will be received directly from end consumers by Madimack.
You are responsible for arranging removal of the defective product and arranging installation of the repaired or replacement product, all transportation (and any applicable insurance costs) of transporting the products to the supplier and transporting the replaced or repaired product from the supplier. All returns are subject to Madimack’s written approval and must be accompanied by either:
- A Field Inspection Report authorised by the Local Customer Service Manager or Authorised Agent; or
- A “Return Goods Authorisation” formobtained from Madimack prior to shipment.

DISPOSAL
Observe all safety and warning information during installation and operation.
13.1 DISPOSAL CONSIDERATIONS![]() The transport and protective packaging has been selected from materials which are environmentally friendly for disposal, and can normally be recycled. Recycling the packaging reduces the use of raw materials in the manufacturing process and also reduces the fiwrappings, bags etc. are disposed of safely and kept out of the reach of babies and young children. Danger of suffocation.
The transport and protective packaging has been selected from materials which are environmentally friendly for disposal, and can normally be recycled. Recycling the packaging reduces the use of raw materials in the manufacturing process and also reduces the fiwrappings, bags etc. are disposed of safely and kept out of the reach of babies and young children. Danger of suffocation.
13.2 DISPOSING OF YOUR ELECTRICAL PRODUCT![]() Electrical devices marked with this label may not be disposed of in domestic waste at the end of their service life.
Electrical devices marked with this label may not be disposed of in domestic waste at the end of their service life.
Electrical and electronic appliances often contain valuable materials. They also contain specific materials, compounds and components, which were essential for their correct function and safety. These could be hazardous to human health and to the environment if disposed of with your domestic waste or if handled incorrectly. Please do not, therefore, dispose of your old appliance with your household waste.
Please dispose of those materials by contacting your local authorities and ask for the correct method of disposal. Please ensure that your old appliance poses no risk to children while being stored prior to disposal.
By disposing of this product in accordance with the regulations, you protect the environment and the health of those around you from negative consequences.


