![]() © 2021 Moxa Inc. All rights reserved.
© 2021 Moxa Inc. All rights reserved.
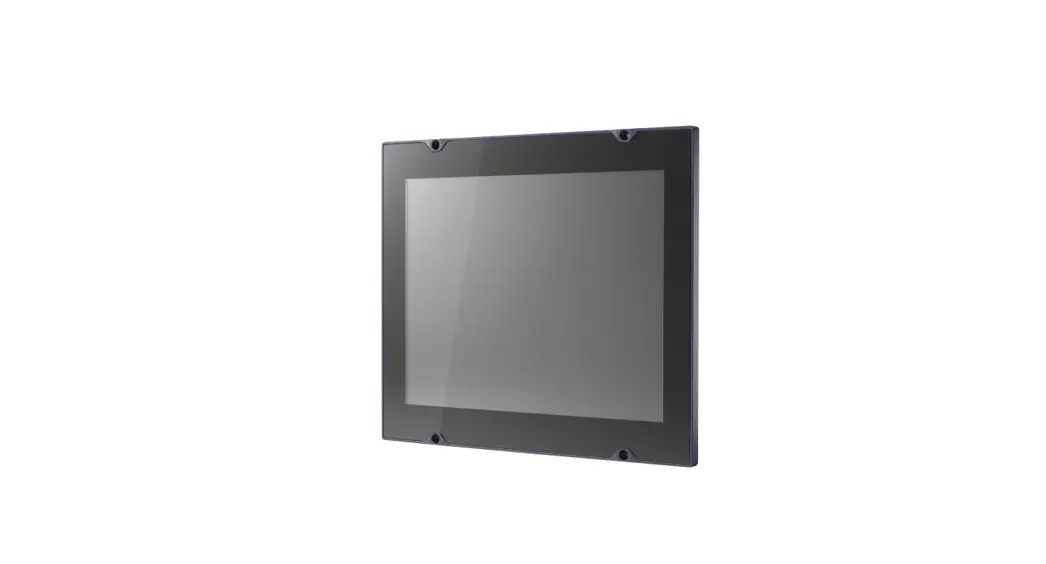
MPC-2121 Series
Quick Installation Guide
Version 1.1, January 2021
Technical Support Contact Information
www.moxa.com/support
P/N: 1802021210011![]()
Overview
The MPC-2121 12-inch panel computers with E3800 Series processors deliver a reliable and durable platform of wide versatility for use in industrial environments. All interfaces come with IP66-rated M12 connectors to provide anti-vibration and waterproof connections. With a software selectable RS-232/422/485 serial port and two Ethernet ports, the MPC-2121 panel computers support a wide variety of serial interfaces as well as high-speed IT communications, all with native network redundancy.
Package Checklist
Before installing the MPC-2121, verify that the package contains the following items:
- 1 MPC-2121 panel computer
- 1 2-pin terminal block for DC power input
- 6 panel mounting screws
- 1 M12 phone jack power cable
- 1 M12 Type A USB cable
- Quick installation guide (printed)
- Warranty card
NOTE: Please notify your sales representative if any of the above items are missing or damaged.
Hardware Installation
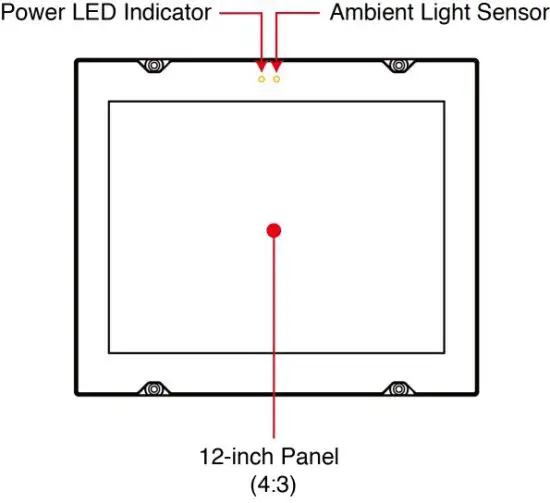
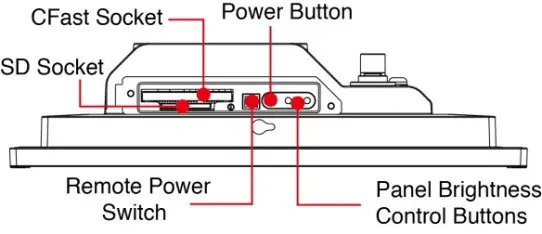
Front View
Left Side View
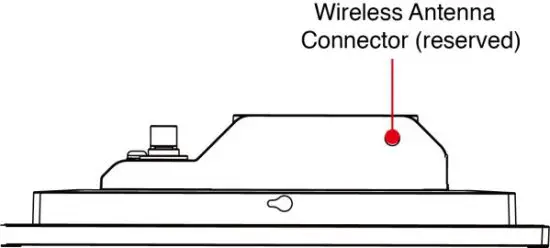
Bottom View
Right Side View
Ambient Light Sensor
The MPC-2121 comes with an ambient light sensor located on the upper part of the front panel.
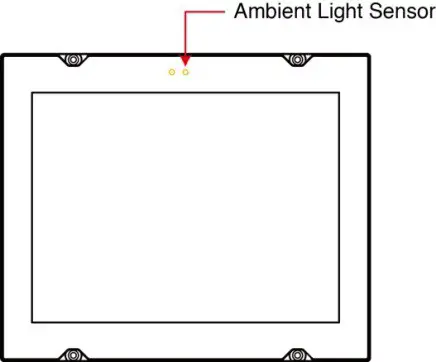
The ambient light sensor helps automatically adjust the brightness of the panel with the ambient light condition. This function is disabled by default and has to be enabled before it can be used. For details, refer to the MPC-2121 Hardware User’s Manual.
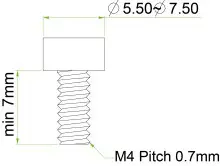
Front-panel Mounting
The MPC-2121 can also be mounted using the front panel. Use the four screws on the front panel to attach the front panel of the computer to a wall. Refer to the following figures for the location of the screws.
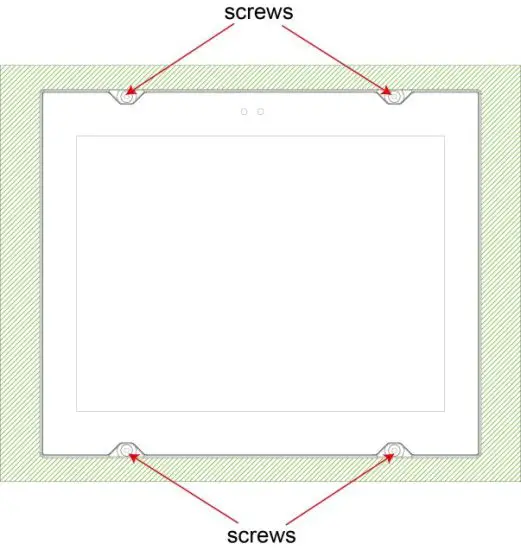
Refer to the figure on the right for the specifications of the mounting screws.
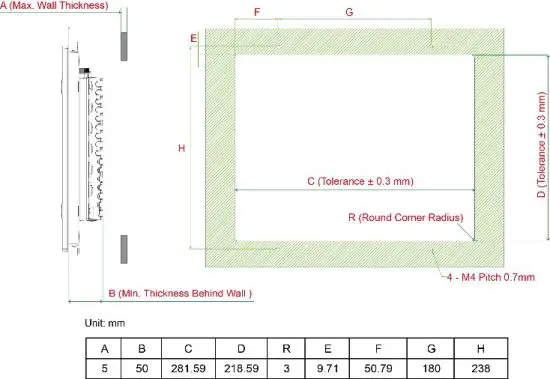
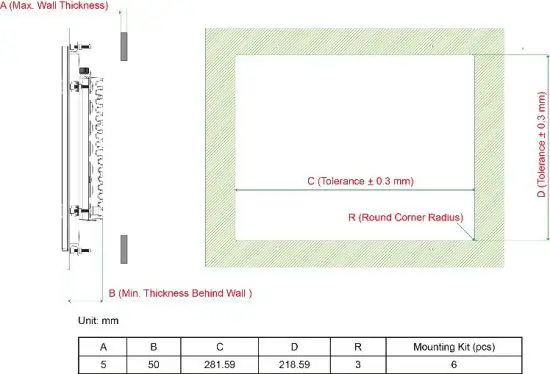
Rear-panel Mounting
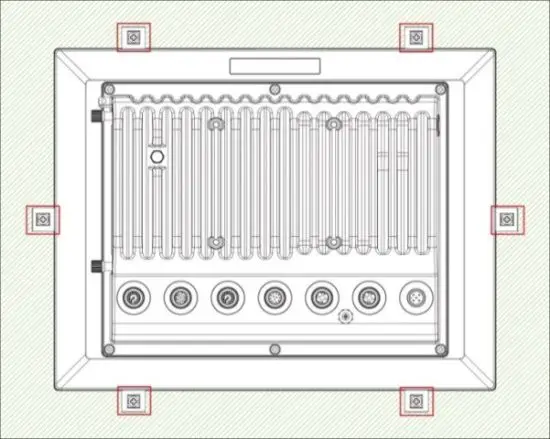
A panel-mounting kit consisting of 6 mounting units is provided in the MPC-2121 package. Refer to the following illustrations for the dimensions and the cabinet space required to panel mount the MPC-2121.
To install the panel-mounting kit on the MPC-2121, follow these steps:
- Place the mounting units in the holes provided on the rear panel and push the units to the left as shown in the illustration below:


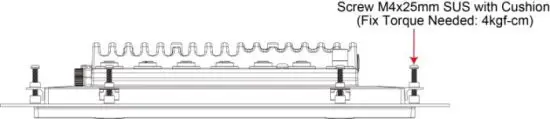
- Use a torque of 4Kgf-cm to fasten the mounting screws and secure the panel-mounting kit units onto a wall.
 Display-control Buttons
The MPC-2121 is provided with two display-control buttons on the right panel.

 Display-control Buttons
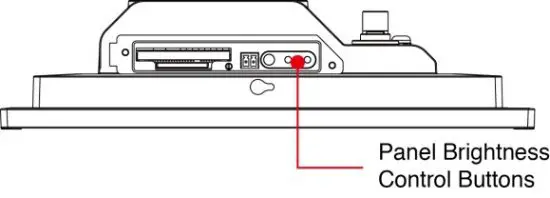
The display-control buttons can be used as described in the following table:
Symbol and Name | Usage | Function | |
| Press |
NOTE: You can change the function of the Power button in the OS settings menu. | ||
| Press and hold for 4 seconds | Power off | ||
| + – | Brightness + | Press | Manually increase the brightness of the panel |
| Brightness – | Press | Manually decrease the brightness of the panel | |
 ATTENTION
The MPC-2121 comes with a 1000-nit display, the brightness level of which is adjustable up to level 10. The display is optimized for use in the -40 to 70°C temperature range. However, if you are operating the MPC-2121 at an ambient temperature of 60°C or higher, we recommend setting the brightness level of the display to 8 or lower in order to extend the lifetime of the display.
Connector Description
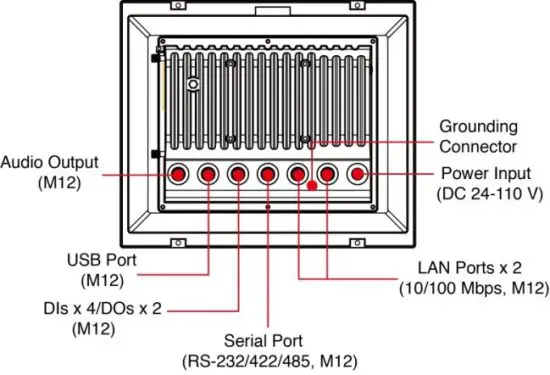
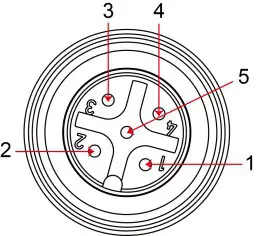
DC Power Input
The MPC-2121 can be supplied power through a DC power input using an M12 connector. The DC pin assignments are as shown in the following figure:
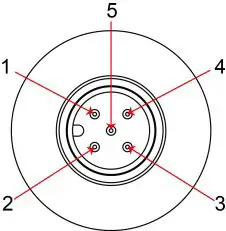
| Pin | Definition |
| 1 | V+ |
| 2 | – |
| 3 | V- |
| 4 | – |
| 5 | – |
Serial Ports
The MPC-2121 offers one software-selectable RS-232/422/485 serial port with an M12 connector. The pin assignments for the ports are shown in the table below:
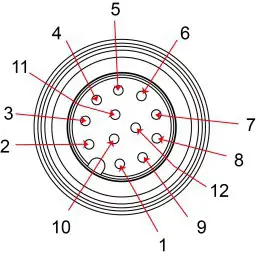
| Pin | RS-232 | RS-422 | RS-485 |
| 1 | RI | – | – |
| 2 | RXD | TX+ | – |
| 3 | DTR | RX- | D- |
| 4 | DSR | – | – |
| 5 | CTS | – | – |
| 6 | DCD | TX- | – |
| 7 | TXD | RX+ | D+ |
| 8 | RTS | – | – |
| 9 | GND | GND | GND |
| 10 | GND | GND | GND |
| 11 | GND | GND | GND |
| 12 | – | – | – |
Ethernet Ports
The pin assignments for the two Ethernet 10/100 Mbps ports with M12 connectors are shown in the following table:
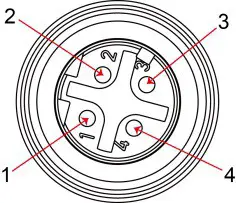
| Pin | Definition |
| 1 | TD+ |
| 2 | RD+ |
| 3 | TD- |
| 4 | RD- |
USB Ports
A USB 2.0 port with an M12 connector is available on the rear panel. Use this port to connect a mass-storage drive or other peripheral.
| Pin | Definition |
| 1 | D- |
| 2 | VCC |
| 3 | – |
| 4 | D+ |
| 5 | GND |
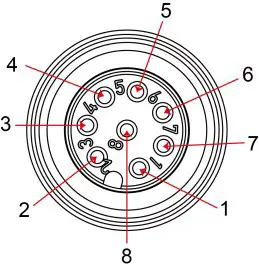
Audio Port
The MPC-2121 comes with an audio output port with an M12 connector. Refer to the following figure for the pin definitions.
| Pin | Definition |
| 1 | Detect |
| 2 | Line out _L |
| 3 | Line out _R |
| 4 | GND |
| 5 | Speaker out- |
| 6 | Speaker out+ |
| 7 | GND |
| 8 | GND |
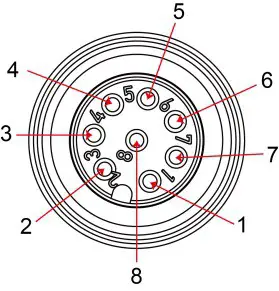
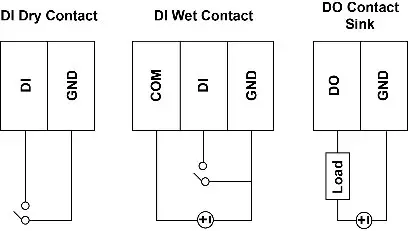
DIO Port
The MPC-2121 is provided with a DIO port, which is an 8-pin M12 connector that includes 4 DIs and 2 DOs. For wiring instructions, refer to the following diagrams and the pin assignment table.
| Pin | Definition |
| 1 | COM |
| 2 | DI_0 |
| 3 | DI_1 |
| 4 | DI_2 |
| 5 | DI_3 |
| 6 | DO_0 |
| 7 | GND |
| 8 | DO_1 |
Installing a CFast Card or an SD Card
MPC-2121 provides two storage options—CFast card and SD card. The storage slots are located on the left panel. You can install the OS in the CFast card and save your data in the SD card. For a list of compatible CFast models, check the MPC-2121 component compatibility report available on Moxa’s website.
To install the storage devices, do the following:
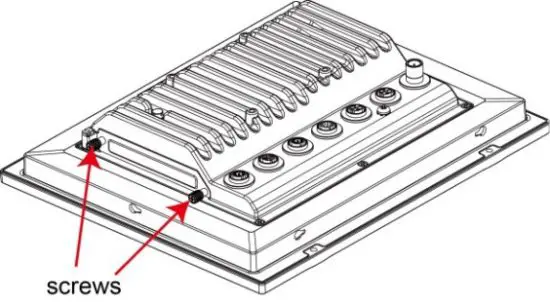
- Remove the two screws on the storage-socket cover.
 The top slot is for the CFast card while the lower slot is for the SD card, as indicated by the following illustration:
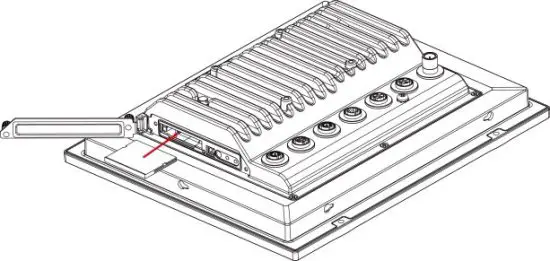
- Insert a CFast or SD card into the respective slot using the push-push mechanism.
CFast Card SD Card
 - Reattach the cover and secure it with screws.
 The top slot is for the CFast card while the lower slot is for the SD card, as indicated by the following illustration:
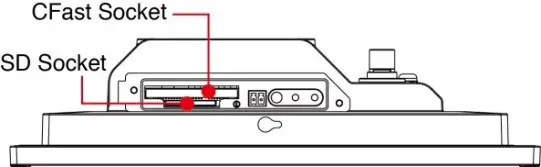
 SD Card
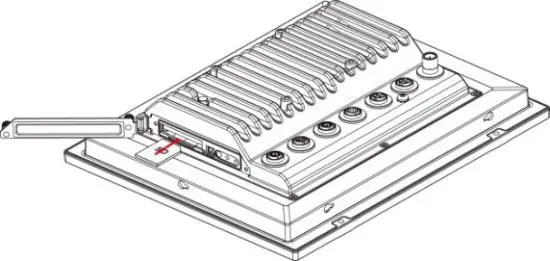
Real-time Clock
The real-time clock (RTC) is powered by a lithium battery. We strongly recommend that you do not replace the lithium battery without help from a qualified Moxa support engineer. If you need to change the battery, contact the Moxa RMA service team. The contact details are available at:
https://www.moxa.com/en/support/repair-and-warranty/product-repair -service.
![]() ATTENTION
ATTENTION
There is a risk of explosion if the clock’s lithium battery is replaced with an incompatible battery.
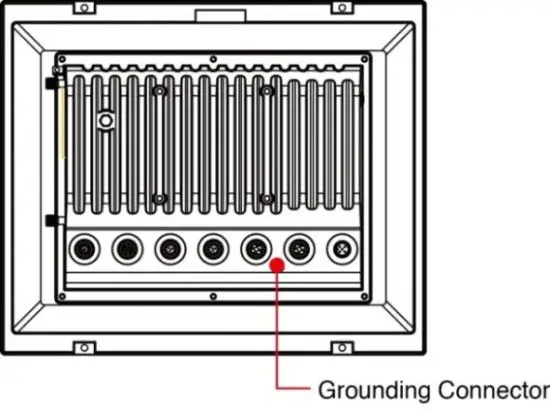
Grounding the MPC-2121
Proper grounding and wire routing help to limit the effects of noise from electromagnetic interference (EMI). Run the ground connection from the ground screw to the grounding surface prior to connecting the power source.
Powering On/Off the MPC-2121
Connect an M12 Connector to Power Jack Converter to the MPC-2121’s M12 connector and connect a 40 W power adapter to the converter. Supply power through the power adapter. After you have connected a power source, the system power turns on automatically. It takes about 10 to 30 seconds for the system to boot up. You can change the power-on behavior of your computer by changing the BIOS settings.
To power off the MPC-2121, we recommend using the “shut down” function provided by the OS installed on the MPC. If you use the Power button, you may enter one of the following states depending on the power management settings in the OS: standby, hibernation, or system shutdown mode. If you encounter problems, you can press and hold the Power button for 4 seconds to force a hard shutdown of the system.


