FUJIFILM GFX 50R Medium Format Mirrorless Camera User Guide
Contents
GFX 50R fi rmware version 2.30 adds or updates the features listed below. For the latest manuals, visit the following website.
http://fujifilm-dsc.com/en/manual/
| No. | Description | GFX 50RP | SeeP | Ver. |
| 1 | The behavior of the front command dial has been changed to accommodate lenses not equipped with aperture rings. | 7 | 1 | 2.30 |
| 2 | The camera now displays the color temperature se- lected via the color temperature option in the white balance menu. | 10, 12 | 2,3 | 2.00 |
| 3 | The camera now displays an external power supply icon when drawing power from an optional AC-15V AC power adapter. | 10, 12 | 2,3 | 2.00 |
| 4 | The maximum number of pictures that can be stored in a single folder has changed from 9,999 to 999. | 85 | 4 | 2.00 |
| 5 | g CLASSIC Neg. and X ETERNA/CINEMA options have been added to H IMAGE QUALITY SETTING >FILM SIMULATION in the shooting menu. | 90 | 5 | 2.00 |
| 6 | A SMOOTH SKIN EFFECT item has been added to H IMAGE QUALITY SETTING in the shooting menu. | 91 | 6 | 2.00 |
| 7 | A LOW LIGHT PRIORITY AF-S item has been add- ed to G AF/MF SETTING in the shooting menu. | 102 | 6 | 2.00 |
| 8 | Improved the performance of G AF/MF SETTING > FACE/EYE DETECTION SETTING in the shooting menu. | 104 | 7 | 2.00 |
| 9 | The A SHOOTING SETTING > FOCUS BKT item inthe shooting menu now offers a choice of MANUALand AUTO focus bracketing options. | 115 | 9 | 2.00 |
| No. | Description | GFX 50RP | SeeP | Ver. |
| 10 | The procedure for rating pictures has changed. As a result, the content of the playback information dis- plays has changed and a RATING item has been added to the playback menu. | 130,131,145 | 11,12,13 | 2.00 |
| 11 | The APERTURE (PROGRAM SHIFT) options for D BUTTON/DIAL SETTING > COMMAND DIAL SETTING > FRONT COMMAND DIAL 1 through FRONT COMMAND DIAL 3 and REAR COMMANDDIAL have been changed to APERTURE. | 176 | 14 | 2.30 |
| 12 | An APERTURE SETTING option has been added to D BUTTON/DIAL SETTING in the setup menu. | 178 | 15 | 2.30 |
| 13 | The procedure for adjusting aperture has been changed to accommodate lenses not equipped with aperture rings. | 206 | 16 | 2.30 |
| 14 | The software that can be used with the D CONNECTION SETTING > PC CONNECTION MODE option in the setup menu has changed. | 187 | 17 | 2.00 |
Changes and Additions
Changes and additions are as follows.
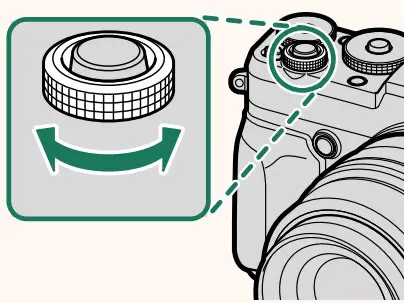
The Command Dials
Rotate or press the command dials to:
| Front command dial | Rear command dial | |
 | 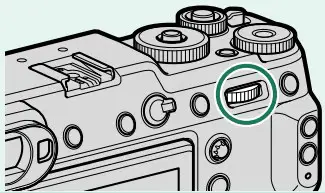 | |
 | • Select menu tabs or page through menus • Adjust aperture 1, 2 • Adjust exposure compensation 4 • Adjust sensitivity 1 • View other pictures during playback | • Highlight menu items • Choose the desired combination of shutter speed and aperture (program shift) • Choose a shutter speed 1 • Adjust settings in the quick menu • Choose the size of the focus frame • Zoom in or out in full frame playback • Zoom in or out in multi-frame playback |
 | —- | • Zoom in on the active focus point 3 • Press and hold to choose the manual focus mode focus display 3 • Zoom in on the active focus point during playback |
- Can be changed using DBUTTON/DIAL SETTING > COMMAND DIAL SETTING.
- If the lens is equipped with an aperture ring with a “C” position, the camera command dials can be used to adjust aperture when the aperture ring is rotated to C.
- Available only if FOCUS CHECK is assigned to a function button.
- Exposure compensation dial rotated to C.
The Electronic Viewfi nder
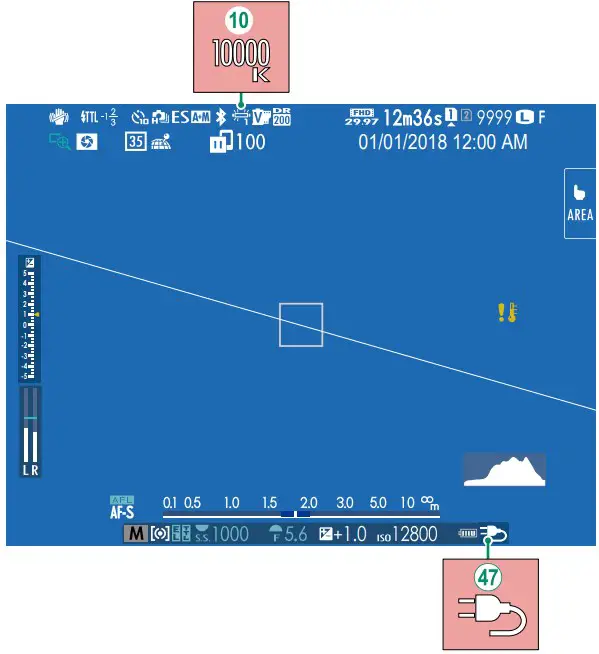
When a color temperature is selected for white balance (GFX 50R Owner’s Manual P 95), the chosen value now appears in the display.
The camera now displays an external power supply icon when drawing power from an optional AC-15V AC power adapter.
The LCD Monitor
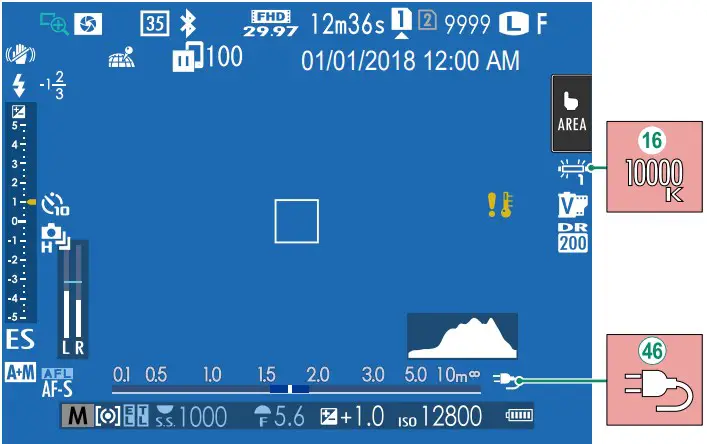
When a color temperature is selected for white balance (GFX 50R Owner’s Manual P 95), the chosen value now appears in the display.
The camera now displays an external power supply icon when drawing power from an optional AC-15V AC power adapter.
Continuous Shooting (Burst Mode)
Press the drive button and select I CONTINUOUS. The camera will take pictures while the shutter button is pressed; shooting ends when the shutter button is released or the memory card is full.
- If fi le numbering reaches 999 before shooting is complete, the remaining pictures will be recorded to a new folder.
- Shooting ends when the memory card is full; the camera will record all photos shot to that point. Burst shooting may not begin if the space available on the memory card is insuffi cient.
- Frame rates may slow as more shots are taken.
- Frame rate varies with the scene, shutter speed, sensitivity, and focus mode.
- Depending on shooting conditions, frame rates may slow or the fl ash may not fi re.
- Recording times may increase during burst shooting.
FILM SIMULATION
Simulate the eff ects of diff erent kinds of fi lm, including blackand white (with or without color fi lters). Choose a palette according to your subject and creative intent.
| Option | Description |
| c PROVIA/STANDARD | Standard color reproduction. Suited to a wide range ofsubjects, from portraits to landscapes. |
| d Velvia/VIVID | A high-contrast palette of saturated colors, suited to na-ture photos. |
| e ASTIA/SOFT | Enhances the range of hues available for skin tones in por-traits while preserving the bright blues of daylight skies. Recommended for outdoor portrait photography. |
| i CLASSIC CHROME | Soft color and enhanced shadow contrast for a calm look. |
| g PRO Neg. Hi | Offers slightly more contrast than h PRO Neg. Std.Recommended for outdoor portrait photography. |
| h PRO Neg. Std | A soft-toned palette. The range of hues available for skintones is enhanced, making this a good choice for studio portrait photography. |
| g CLASSIC Neg. | Enhanced color with hard tonality to increase imagedepth. |
| X ETERNA/CINEMA | Soft color and rich shadow tone suitable for film lookmovie. |
| a ACROS* | Take black-and-white photos with rich gradation and out-standing sharpness. |
| b MONOCHROME* | Take pictures in standard black and white. |
| f SEPIA |
| GFX 50R Owner’s Manual: P 91 Ver. 2.00 SMOOTH SKIN EFFECT | |||
| Smooth complexions. | |||
| Option | Description | ||
| STRONG | Choose for a strong effect. | ||
| WEAK | Choose for a weak effect. | ||
| OFF | Turn the effect off. | ||
| N | SMOOTH SKIN EFFECT options have also been added to. | ||
| • H IMAGE QUALITY SETTING > EDIT/SAVE CUSTOM SETTING(GFX 50R Owner’s Manual P 99)• C PLAY BACK MENU > RAW CONVERSION(GFX 50R Owner’s Manual P 137)• D BUTTON/DIAL SETTING > EDIT/SAVE QUICK MENU(GFX 50R Owner’s Manual P 173, 195)• D BUTTON/DIAL SETTING > FUNCTION (Fn) SETTING(GFX 50R Owner’s Manual P 174, 198) | |||
| GFX 50R Owner’s Manual: P 102 Ver. 2.00 LOW LIGHT PRIORITY AF-S | |||
| Selecting ON increases exposure times for low-light AF, allowing faster focus when lighting is poor. | |||
| Options | |||
| ON | OFF | ||
FACE/EYE DETECTION SETTING

Intelligent Face Detection sets focus and exposure for human faces anywhere in the frame, preventing the camera from focusing on the background in group portraits. Choose for shots that emphasize portrait subjects. You can also choose whether the camera detects and focuses on eyes when Intelligent Face Detection is on. Choose from the following options:
| Option | Description |
| FACE ON/EYE OFF | Intelligent Face Detection only. |
| FACE ON/EYE AUTO | The camera automatically chooses which eye to focuson when a face is detected. |
| FACE ON/RIGHT EYE PRIORITY | The camera focuses on the right eye of subjects de-tected using Intelligent Face Detection. |
| FACE ON/LEFT EYE PRIORITY | The camera focuses on the left eye of subjects detect-ed using Intelligent Face Detection. |
| FACE OFF/EYE OFF | Intelligent Face Detection and eye priority off. |
- If the subject moves as the shutter button is pressed, the face may not be in the area indicated by the green border when the picture is taken.
- In some modes, the camera may set exposure for the frame as a
whole rather than the portrait subject. - The face selected by the camera is indicated by a green border.
- If there is more than one face in the frame, the camera will select the face closest to the center; other faces are indicated by white borders.
- If the selected subject leaves the frame, the camera will wait a set time for its return and consequently the green frame may sometimes appear in locations where no face is seen.
- Depending on shooting conditions, face selection may be suspended at the close of burst shooting.
- Faces can be detected with the camera in vertical or horizontal orientation.
- If the camera is unable to detect the subject’s eyes because they are hidden by hair, glasses, or other objects, the camera will instead focus on faces.
- Face/eye detection options can also be accessed via shortcuts.
| GFX 50R OwneFOCUS BKT | r’s Manual: P 115 Ver. 2.00 | |
| Choose from AUTO and MANUAL focus bracketing modes.• MANUAL: In MANUAL mode, you choose the following. | ||
| Option | Description | |
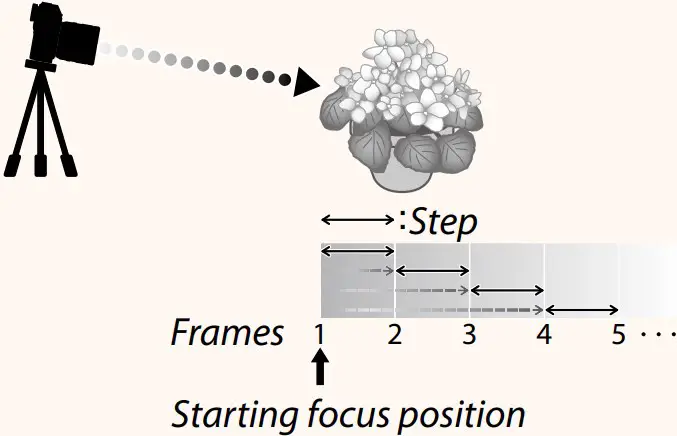
| FRAMES | Choose the number of shots. | |
| STEP | Choose the amount focus changes with each shot. | |
| INTERVAL | Choose the interval between shots. | |
| Focus and FRAMES/STEPThe relation between focus and the options chosen for FRAMES andSTEP is shown in the illustration. :Step
| ||
AUTO: In AUTO mode, the camera calculates FRAMES and STEP
automatically.
- Select ASHOOTING SETTING in the shooting menu, highlight FOCUS BKT, and press MENU/OK.
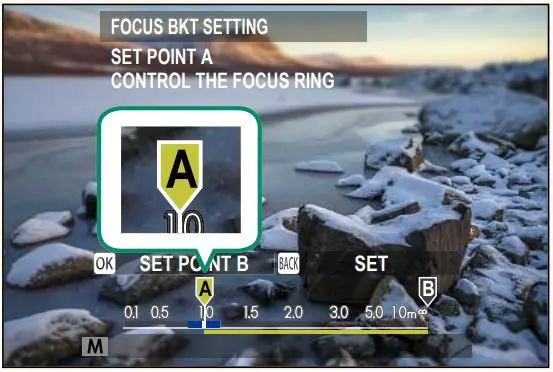
- Select AUTO and choose an INTERVAL. The view through the lens will be displayed.
- Focus on the nearest end of the subject and press MENU/OK. The selected focus distance appears as A on the focus distance indicator.
The same focus range can be chosen by focusing on the farthest end of the subject fi rst.
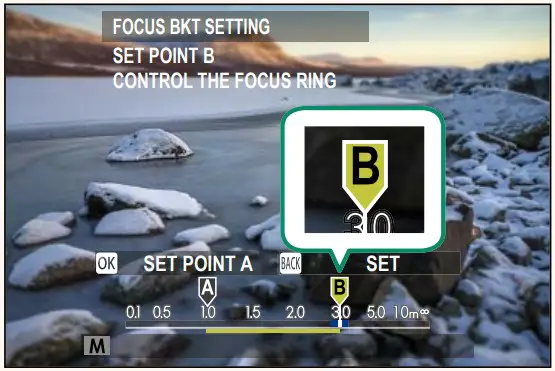
- Focus on the farthest end of the subject and press DISP/BACK. The selected focus distance (B) and focus range (A to B) appear on the focus distance indicator.
- Take photographs. The camera will calculate values for FRAMES and STEP automatically. The number of frames will appear in the display.
The Playback Display
This section lists the indicators that may be displayed during playback.
For illustrative purposes, displays are shown with all indicators lit.
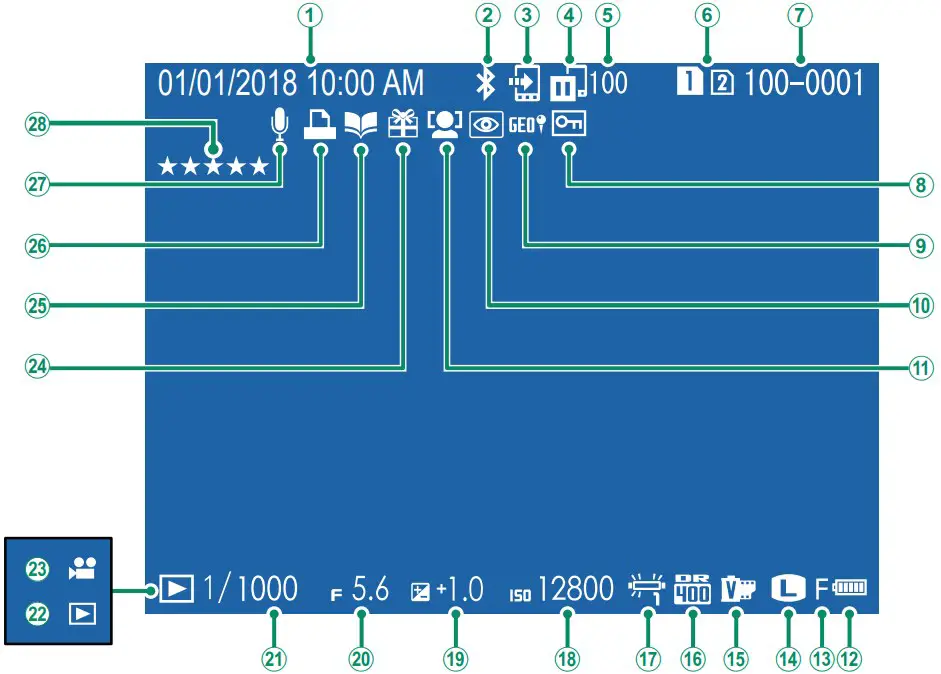
- Date and time
- Bluetooth ON/OFF
- Image transfer order
- Image transfer status
- Number of frames selected for upload
- Card slot
- Frame number
- Protected image
- Location data
- Red-eye removal indicator
- Face detection indicator
- Battery level
- Image quality
- Image size
- Film simulation
- Dynamic range
- White balance
- Sensitivity
- Exposure compensation
- Aperture
- Shutter speed
- Playback mode indicator
- Movie icon
- Gift image
- Photobook assist indicator
- DPOF print indicator
- Voice memo
- Rating …….. 13
The DISP/BACK Button
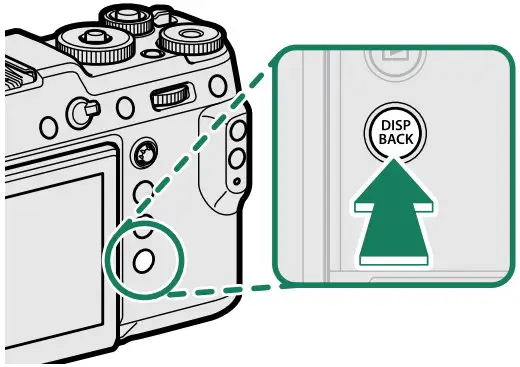
The DISP/BACK button controls the display of indicators during playback.
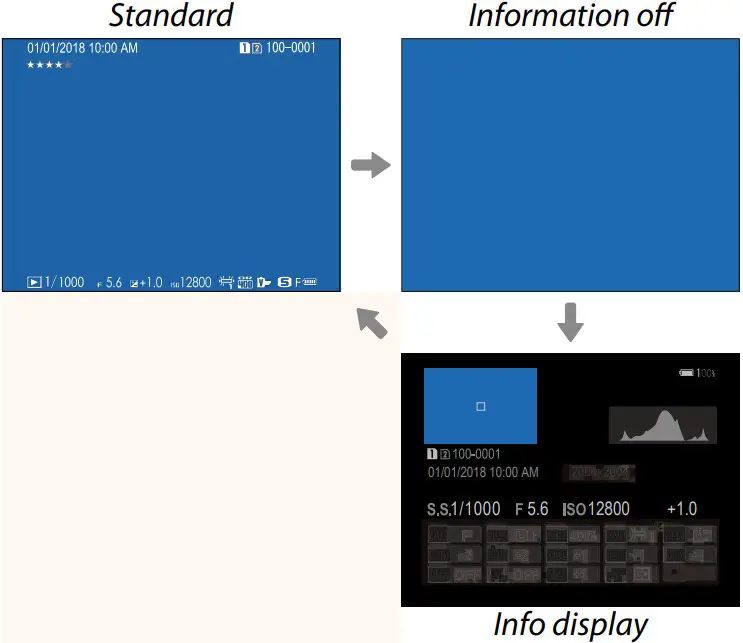
The Info Display
In the info display, you can press the focus stick (focus lever) up to cycle through a series of information and histogram displays.
Favorites: Rating Pictures
Pictures can be rated via the RATING item in the playback menu
| GFX 50R Owner’s Manual: P 145 Ver. 2.00 RATING | |
| Rate pictures using stars. | |
| 1 Select RATING in the playback menu.2 Rotate the front command dial to choose a picture and the rear command dial to choose a rating of from 0 to 5 stars (“I”). | |
| N | • The focus stick (focus lever) can be used in place of the front com- |
| mand dial to choose a picture.• The rating dialog can also be displayed by pressing the Fn3 button in single-frame, nine-frame, or hundred-frame playback.• Use touch controls to zoom in or out. | |
| Option | Description |
| FRONT COMMANDDIAL 1 | Assign shutter speed (S.S. (PROGRAM SHIFT)) or aper-ture (APERTURE) 1 to FRONT COMMAND DIAL 1. |
| FRONT COMMAND DIAL 2 | Assign shutter speed (S.S. (PROGRAM SHIFT)), ap-erture (APERTURE) 1, exposure compensation (EXP. COMPENSATION) 2, sensitivity (ISO), or no role (NONE) to FRONT COMMAND DIAL 2 or FRONT COMMAND DIAL 3. |
| FRONT COMMAND DIAL 3 | |
| REAR COMMAND DIAL | Assign shutter speed (S.S. (PROGRAM SHIFT)), ap-erture (APERTURE) 1, exposure compensation (EXP. COMPENSATION) 2, sensitivity (ISO), or no role (NONE) to the rear command dial. |
- If the lens is equipped with an aperture ring with a “C” position, the camera command dials can be used to adjust aperture when the aperture ring is rotated to C.
- Exposure compensation dial rotated to C.
- COMMAND DIAL SETTING can also be accessed by pressing and holding the Fn2 button.
- You can also press the Fn2 button to cycle through settings in the order FRONT COMMAND DIAL 1, FRONT COMMAND DIAL 2, and FRONT COMMAND DIAL 3.
- The Fn2 button can be assigned other roles using DBUTTON/DIAL SETTING > FUNCTION (Fn) SETTING. The role described above can also be assigned to other function buttons.
| GFX 50R Owner’s Manual: P 178 Ver. 2.30 APERTURE SETTING | |||
| Choose the method used to adjust aperture when using lenses with no aperture rings. | |||
| Option | Description | ||
| AUTO +o MANUAL | Rotate the front command dial to choose the aperture. Rotatepast minimum aperture to choose A (auto). | ||
| AUTO | Aperture is selected automatically; camera functions in exposuremode P (program AE) or S (shutter-priority AE). | ||
| MANUAL | Rotate the front command dial to choose the aperture; camerafunctions in exposure mode A (aperture-priority AE) or M (man- ual). | ||
| N | This option can be assigned to a function button. | ||
| GFX 50R Owner’s Manual: P 206 Ver. 2.30 Lenses with No Aperture Rings | |
| The method used to adjust aperture can be selected using D BUTTON/DIAL SETTING > APERTURE SETTING. Whenan option other than AUTO is selected, aperture can be adjusted using the front command dial.
| |
| N | Aperture control defaults to the front command dial, but can be reas-signed to the rear command dial using D BUTTON/DIAL SETTING >COMMAND DIAL SETTING. |
| Option | Description |
| USB CARD READER | Connecting the camera to a computer via USB automaticallyenables data transfer mode, allowing data to be copied to the computer. The camera functions normally when not connected. |
USB TETHER SHOOTING AUTO | The camera can be controlled from a computer connectedvia USB. Photographs can be taken remotely and automat- ically downloaded to computers running Capture One, Adobe® Photoshop® Lightroom® + Tether Plugin, or FUJIFILM X Acquire. FUJIFILM X Acquire can also be used to save and load camera settings. The camera functions normally when not connected. |
| USB TETHER SHOOTING FIXED | As for USB TETHER SHOOTING AUTO, except that thecamera remains in “tethered shooting” mode when the com- puter is not connected, allowing the computer to resume control when the connection is re-established after an acci- dental disconnection or other disruption. Note that at default settings, pictures are not recorded to the memory card. |
| WIRELESS TETHER SHOOTING FIXED | Choose this option for wireless remote photography. Select anetwork using D CONNECTION SETTING > NETWORK SETTING. |
USB RAW CONV./ BACKUP RESTORE | Connecting the camera to a computer via USB automatical-ly enables USB RAW conversion/backup restore mode. The camera functions normally when not connected.• USB RAW CONV. (requires FUJIFILM X RAW STUDIO): Use the cam-era’s image processing engine to rapidly convert RAW filesto high-quality JPEG images.• BACKUP RESTORE (requires FUJIFILM X Acquire): Save and load camera settings. Reconfigure the camera in an instant or share settings with other cameras of the same type. |
| N | Visit the websites below to learn more about or download the followingcomputer software:• Capture One Express Fujifilm:https://www.captureone.com/products-plans/capture-one-express/fujifilm• Capture One Pro Fujifilm:https://www.captureone.com/explore-features/fujifilm• Adobe® Photoshop® Lightroom® + Tether Plugin:https://fujifilm-x.com/global/products/software/adobe-photoshop-lightroom-tether-plugin/• FUJIFILM X Acquire:https://fujifilm-x.com/products/software/x-acquire/• FUJIFILM X RAW STUDIO:https://fujifilm-x.com/products/software/x-raw-studio/• RAW FILE CONVERTER EX powered by SILKYPIX:https://fujifilm-x.com/support/download/software/raw-file-converter-ex-powered-by-silkypix/ |
7-3, AKASAKA 9-CHOME, MINATO-KU, TOKYO 107-0052, JAPAN
https://fujifilm-x.com
![]()
References
 Model Selection
 FUJIFILM Digital Camera X Series & GFX – USA
-
Adobe Photoshop Lightroom Classic + Tether Plugin | Software | FUJIFILM X Series & GFX – Global
-
FUJIFILM X Acquire | Software | FUJIFILM Digital Camera X Series & GFX – USA
-
FUJIFILM X RAW STUDIO | Software | FUJIFILM Digital Camera X Series & GFX – USA
-
Firmware: Camera | FUJIFILM Digital Camera X Series & GFX – USA
-
RAW FILE CONVERTER EX 3.0 powered by SILKYPIX | Software | FUJIFILM Digital Camera X Series & GFX – USA
-
Discover Capture One for Fujifilm
-
Free photo editing software for Fujifilm


