RICE LAKE 250-10-4 Bariatric Scale with Handrail and Chair Seat Software User Manual
Revision History
This section tracks and describes the current and previous manual revisions for awareness of major updates and when the updates took place.
Table i. Revision Letter History
| Revision | Date | Description |
| D | August 17, 2022 | Established a revision history; formatted content to match other medical manuals; software version 11525 |
Introduction
The 250-10-4 barbaric handrail scale with fold down chair seat is designed for weighing bariatrics and ensures sound, accurate weighing information. A non-skid platform paired with side rails assists persons who need extra support and safety. The fold down chair allows patients to sit down while being weighed. The scale is set up to use motion sensing technology, to determine the actual weight of a moving patient. The weight is displayed on the indicator and can be displayed in pounds or kilograms and has a 1,000 lb capacity.
![]() Manuals, resources and warranties are available from Rice Lake Weighing Systems website at www.ricelake.com/health
Manuals, resources and warranties are available from Rice Lake Weighing Systems website at www.ricelake.com/health
FCC Compliance
United States
This equipment has been tested and found to comply with the limits for a Class A digital device, pursuant to Part 15 of the FCC Rules. These limits are designed to provide reasonable protection against harmful interference when the equipment is operated in a commercial environment. This equipment generates, uses, and can radiate radio frequency energy and, if not installed and used in accordance with the instruction manual, may cause harmful interference to radio communications. Operation of this equipment in a residential area is likely to cause harmful interference in which case the user will be required to correct the interference at his own expense.
Canada
This digital apparatus does not exceed the Class A limits for radio noise emissions from digital apparatus set out in the Radio Interference Regulations of the Canadian Department of Communications.
Safety
Safety Definitions:
![]() DANGER
DANGER
Indicates an imminently hazardous situation that, if not avoided, will result in death or serious injury. Includes hazards that are exposed when guards are removed.
![]() WARNING
WARNING
Indicates a potentially hazardous situation that, if not avoided, could result in serious injury or death. Includes hazards that are exposed when guards are removed.
![]() CAUTION
CAUTION
Indicates a potentially hazardous situation that, if not avoided, could result in minor or moderate injury.
IMPORTANT
Indicates information about procedures that, if not observed, could result in damage to equipment or corruption to and loss of data.
General Safety
![]()
Do not operate or work on this equipment unless this manual has been read and all instructions are understood. Failure to follow the instructions or heed the warnings could result in injury or death. Contact any Rice Lake Weighing Systems dealer for replacement manuals.
WARNING
Failure to heed could result in serious injury or death.
- Ensure every individual who operates or works with this unit has read and understands all safety information.
- Do not transport the scale while someone is on the scale.
- Do not allow minors (children) or inexperienced persons to operate this scale.
- Do not use in the presence of flammable materials.
- Do not use this product if any of the components are loose or cracked.
- Do not use near water.
- Do not use the scale on slippery surfaces, such as a wet floor.
- Do not use this scale when a person’s body or feet are wet, such as after taking a bath.
- Do not place fingers into slots or possible pinch points.
- To avoid cross contamination, the scale should be cleaned regularly.
- Prior to cleaning, make sure the scale is disconnected from the power source.
- People with disabilities, or who are physically frail, should always be assisted by another person when using this scale.
IMPORTANT
- Do not drop the scale or subject it to violent shocks.
- Do not jump on the scale.
- For accurate weighing, the scale must be placed on a flat, stable surface.
- Operating at voltages and frequencies other than specified could damage the equipment.
- Avoid contact with excessive moisture.
- Do not make alterations or modifications to the scale.
- Rice Lake Weighing Systems offers optional AC adapters; utilizing an adapter not supplied by Rice Lake
- Weighing Systems voids all warranties and approvals.
- Weight exceeding the maximum capacity may damage the scale.
Assembly
Unpacking
A minimum of two people should transport, unpack and assemble the scale for their own personal safety and to ensure the integrity of the scale. Use caution while removing packaging and unpacking the scale. After unpacking, visually inspect the 250- 10-4 barbaric handrail scale with seat to ensure all components are included and undamaged. If parts were damaged in shipment, notify Rice Lake Weighing Systems and the shipper immediately.
Parts contained in the shipping box include:
- The scale
- This manual
- 6 mm Allen key
- Six AA non-rechargeable batteries
Repackaging
Retain the packaging for use in the event that the scale must be returned or moved. The product must be properly packed with sufficient packing materials. Whenever possible, use the original carton and packing materials when shipping the scale back.
IMPORTANT
Damage caused by improper packaging is not covered by the warranty.
Scale Setup
Use the following steps to set up the barbaric handrail scale with seat.
- Move the box into the area where the weighing process will occur. It’s recommended to place the scale on a hard, level surface for the most accurate weightiness. Thin carpeting is fine, but not recommended.
- Using two people, remove the scale out of the packaging material that it came in by lifting the scale out of the box by the scale base.
IMPORTANT Do not lift the scale out of the box by its handle as this can cause the hinges to break. - Gently set the scale platform down to the floor.
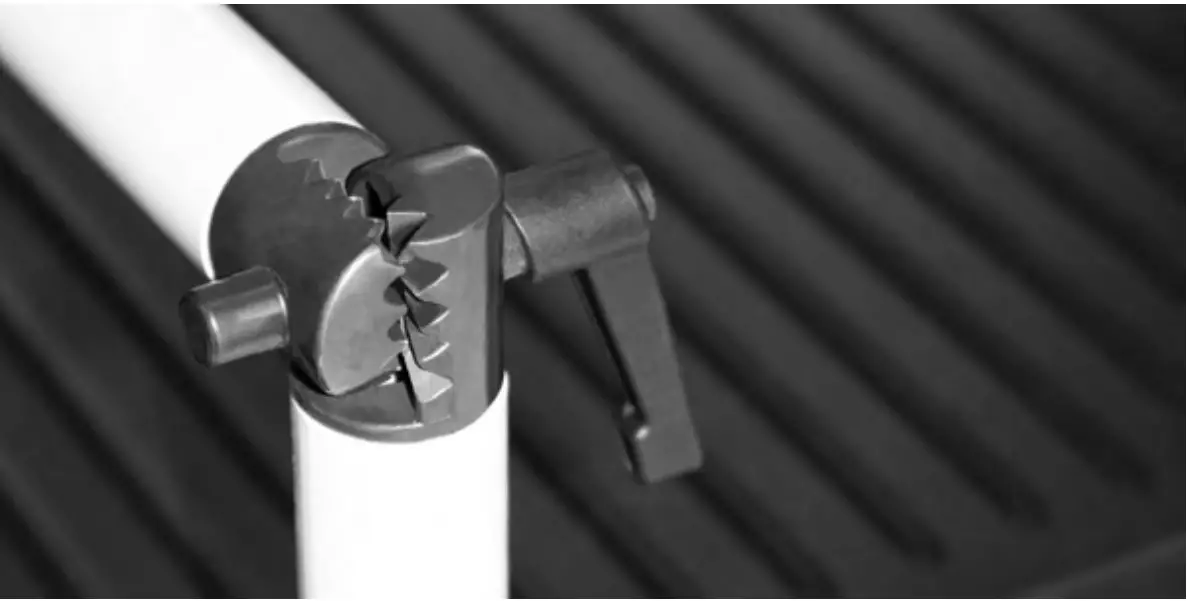
- Loosen the handles using the Allen key and unfold and set upright (handles shown in Figure 2-1).
- Tighten the two hinges on the scale by rotating the two handles. This will secure the handrail mounted indicator.
Figure 2-1. Secure the Handrail by Tightening the Durable Hinges
- Screw in all four legs.
- Attached the wrap around rails.
- Tighten the hex screw head using the enclosed 6 mm Allen key to stabilize the scale.
Adjusting Scale Feet
There must be adequate clearance between the scale base and the floor so screw each foot out counterclockwise two full turns. This will ensure that there is enough clearance between the scale base and the floor. Gently set the scale base down to the floor. There should be minimal clearance between the scale base and the floor without having the scale base actually touching the floor. By not having clearance around the scale base will cause inaccurate weighments.
It’s also important to make sure that the scale is completely level. Gently press down on all corners of the scale base to ensure that there are no high spots or rocking of the scale base.
Unfold Platform Seat
The 250-10-4 comes with a fold down seat for those patients who need to be weighed while seated. To unfold the seat, simply pull down on the seat bottom as shown in Figure 2-2.
Figure 2-2. Unfolding the Seat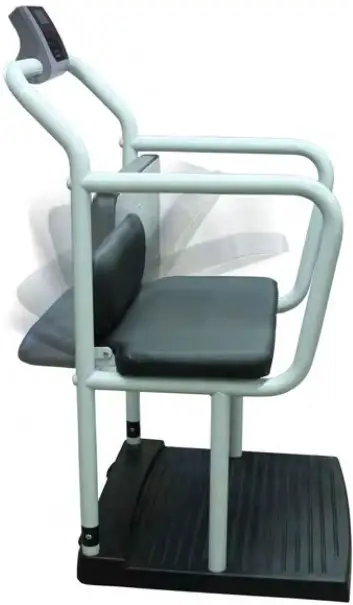
Insert Batteries
The six AA batteries supplied with the scale provide an average of 25 hours of continuous use. To install the batteries:
- Turn thumbscrew counterclockwise then remove battery cover.
- Insert batteries into the battery chamber as illustrated.
Figure 2-3. Battery Chamber
- Put the cover in place and turn the thumbscrew clockwise to secure.

![]()
Remove the batteries prior to storing if the product is not going to be used for an extended period of time.
![]()
If the LO BAT indicator activates, for accurate weighing, replace the batteries or connect the scale to an AC power source as soon as possible.
Power Connection
An optional AC power adapter can be used when a power outlet is available.
IMPORTANT
Only use power adapters supplied by or purchased from Rice Lake Weighing Systems. The use of a power adapter not from Rice Lake Weighing Systems voids the warranty
Figure 2-4. Power Connection Site
![]()
The battery Annunciation on the display turns off when using an AC power connection. The brightness of the back light is reduced to 60% when using battery power.
Operation
This section describes the front panel and includes procedures for operation of the scale.
Figure 3-1. Front Panel Keypad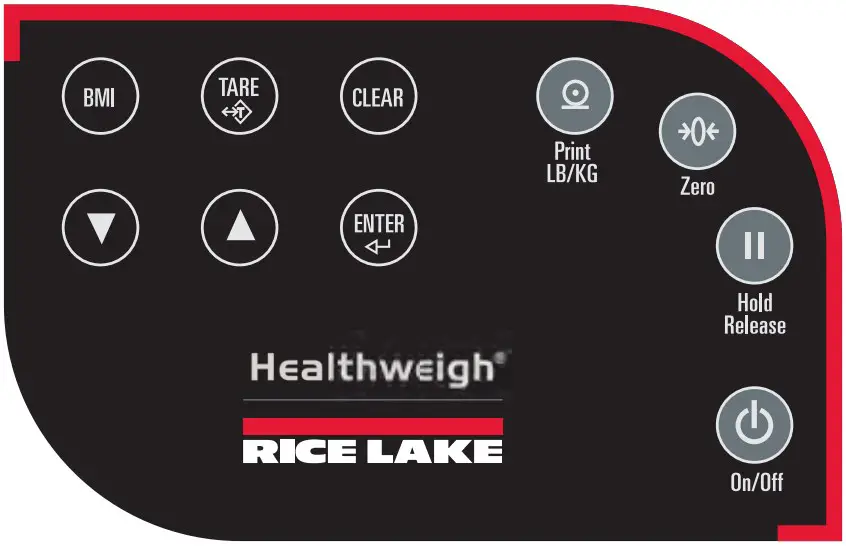
Key Descriptions
The display has 10 front panel keys. Key functions are described in the table below.
IMPORTANT
The front panel keys are very sensitive, so only a gentle press is required.
Table 3-1. Key Functions
| Key | Name | Function |
| On/Off | On/Off | Powers the scale on or off |
| Print LB/KG | Print LB/KG | Sends data out from the RS-232 port; Allows to toggle between kilograms and pounds providing that it is enabled in Configuration mode; Cannot toggle while in the BMI mode |
| Zero | Zero | Only functions if the current weight is stable and less than 2% of the capacity of the scale. Anything over 2% requires a re calibration |
| HoldRelease | Hold Release | Displays most current weight value on the display and holds that value when the patient is off the scale. A second press releases the weight value. Not active while in BMI mode |
| BMI | BMI | Pressing the BMI key enables access to the BMI (Body Mass Index) mode (defaults when scale is turned on). The patient is gets on the scale, weight stabilizes and press the BMI key. The display then asks for the patient height to calculate out the patient BMI. |
| TARET | TARE | Used to remove the weight initially of anything on the scale that shouldn’t be included in the total weight of the patient on the scale |
| CLEAR | CLEAR | When using the BMI function, the display looks for a height entry. Pressing Clear changes this entry back to 190.0 cm (default) or 5 ft, 7.5 in.Once BMI is displayed, pressing the Clear key exits BMI |
| ENTER | ENTER | Used to accept height in BMI mode; accepts the value of the parameter last entered and moves to the next stage Pressing and holding Enter during startup will display ID. This is the first setup on entering into configuration mode |
| Up Arrows | Adjusts the value of the flashing digit/numberAdjusts height input (0.5 in/0.5 cm) while in BMI mode | |
| Down Arrows | Adjusts the value of the flashing digit/number Adjusts height input (0.5 in/0.5 cm) while in BMI mode |
Weighing
Use the following steps to weigh.
- Press to turn on the scale. 0.0 appears on the display along with the ZERO annun ciator.
- Place the patient on the scale. The patient’s weight is displayed, the LOCK annun ciator is on and the indicator beeps to indicate the end of the weighing process.
- Press to change the display from lb to kg and vice-versa.
- Press and hold until OFF displays to turn off the scale
Hold/Release Function
Use the following steps to use the Hold/Release function.
- Press to turn on the scale. 0.0 prompts along with ZERO on the display.
- Press once the patient’s weight stabilizes. The patient’s weight and the HOLD and LOCK annunciators remain on the display when the patient is off the scale.
- Press again to return the scale to zero.
Pressing will not work while using Hold/Release function.
Pressing prior to the patient getting on the scale will also hold the weight display
Preset Tare
Use the following steps for the Preset Tare function prior to patient weighing if additional items are being used by the patient.
- Press to turn on the scale. 0.0 appears on the display along with the ZERO annunciator.
- Place additional item(s) on the scale.
- Press until the display returns to 0.0 and NET annunciator appears on the display.
- Remove additional item(s) from the scale. The weight displays with a negative symbol to the left of it.
Note Not removing the additional item(s) prior to patient weighing will also work. - Position the patient and additional item(s) on the scale. The display identifies the patient weight. The NET annunciator is still active. The weight of the additional item(s) remains stored in memory for the duration of this weigh in.
- To cancel the tare weight, remove patient from the scale and press until NET disappears from the display and the display turns back to 0.0 and GROSS appears.
![]()


