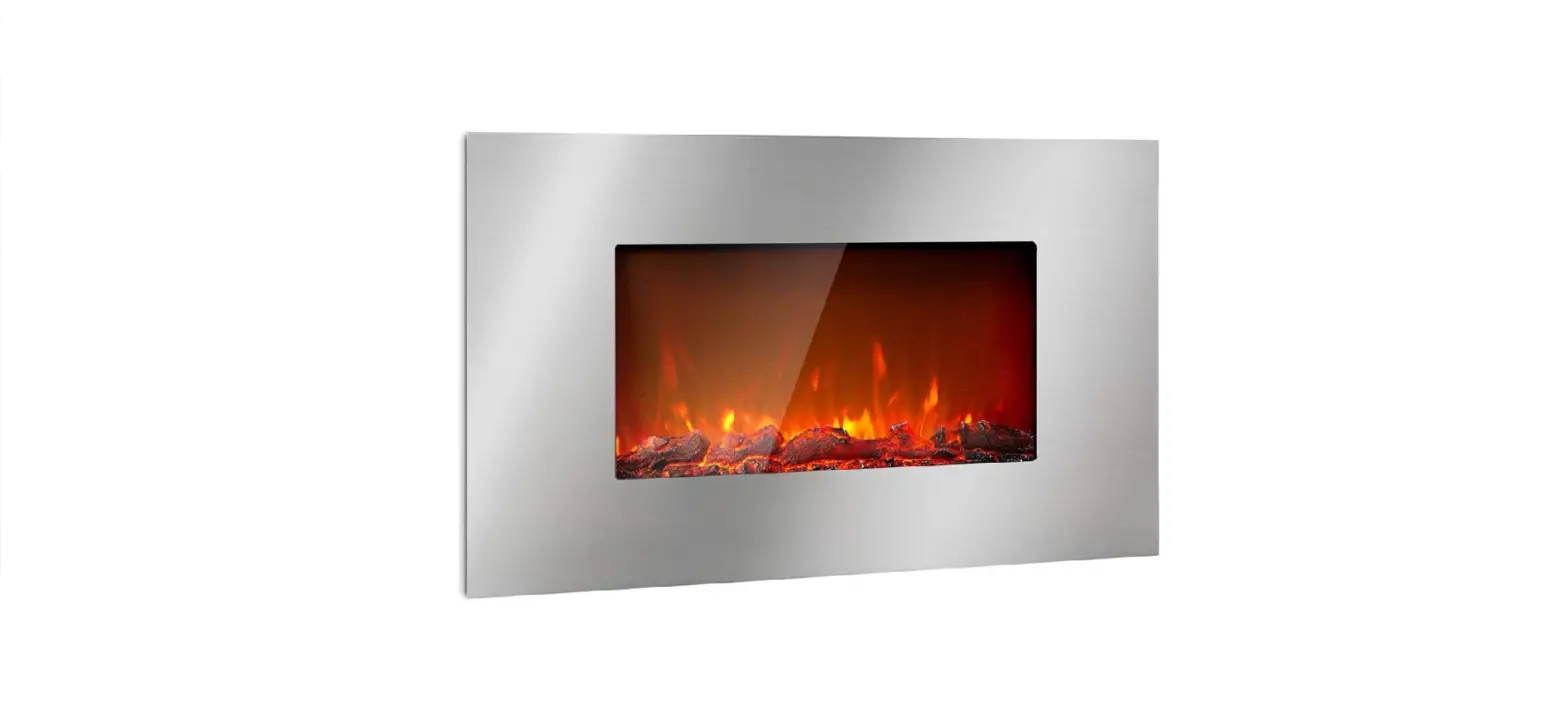

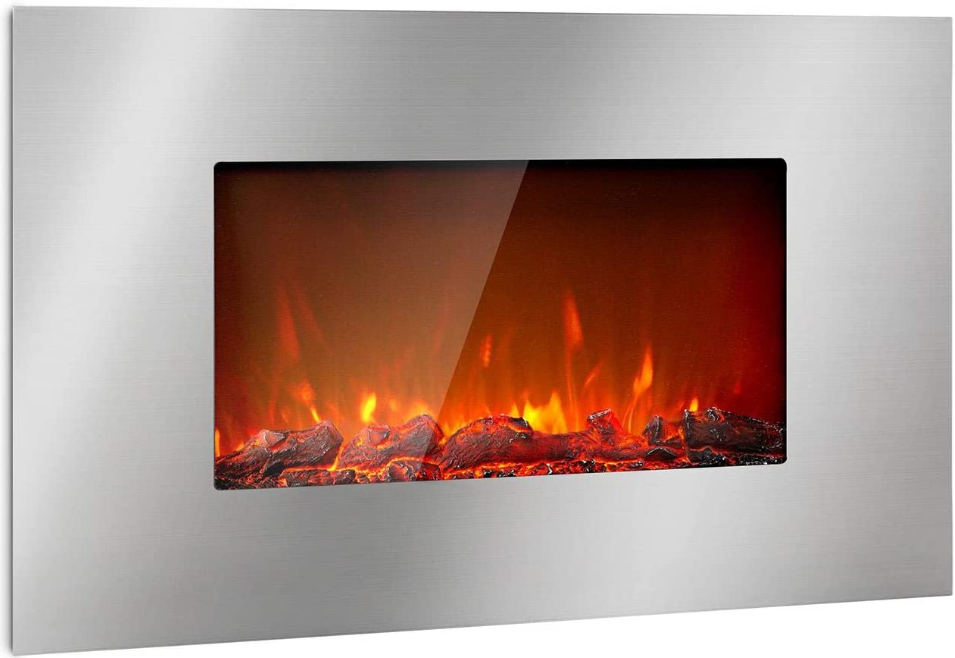
KLARSTEIN 10034250 LAUSANNE Electric Fireplace Heater
Dear Customer,
Congratulations on purchasing this device. Please read the following instructions carefully and follow them to prevent possible damages. We assume no liability for damage caused by disregard of the instructions and improper use. Scan the QR code to get access to the latest user manual and more product information.
TECHNICAL DATA
| Item number | 10034250, 10034251 |
| Power supply | 220-240 V ~ 50 Hz |
| Power | 1400-1600 W |
MANUFACTURER & IMPORTER (UK)
Manufacturer:
Chal-Tec GmbH, Wallstrasse 16, 10179 Berlin, Germany.
Importer for Great Britain:
Berlin Brands Group UK Ltd
PO Box 1145
Oxford, OX1 9UW
United Kingdom
PRODUCT DATA SHEET
| Model identifier(s): | 10034250, 10034251 | |||||
| Item | Symbol | Value | Unit | Item | Unit | |
| Heat output | Type of heat input, for electric storage local space heaters only | |||||
| Nominal heat output | Pnom | 1.6 | kW | manual heat charge control, with integrated thermostat | N/A | |
| Minimum heat output (indicative) | Pmin | 0.7 | kW | manual heat charge control with room and/or outdoor temperature feedback | N/A | |
| Maximum continuous heat output | Pmax,c | 1.6 | kW | electronic heat charge control with room and/or outdoor temperature feedback | N/A | |
| Auxiliary electricity consumption | fan assisted heat output | N/A | ||||
| At nominal heat output | elmax | 1,456 | kW | Type of heat output/room temperature control | ||
| At minimum heat output | elmin | 0,732 | kW | single stage heat output and no room temperature control | no | |
| In standby mode | elSB | 0,00035 | W | Two or more manual stages, no room temperature control | no | |
| with mechanic thermostat room temperature control | no | |||||
| with electronic room temperature control | no | |||||
| electronic room temperature control plus day timer | no | |||||
| electronic room temperature control plus week timer | yes | |||||
| Other control options (multiple selections possible) | ||||||
| room temperature control, with presence detection | no | |||||
| room temperature control, with open window detection | no | |||||
| with distance control option | no | |||||
| with adaptive start control | no | |||||
| with working time limitation | no | |||||
| with black bulb sensor | no | |||||
| Contact details | Chal-Tec GmbH, Wallstraße 16, 10179, Berlin, Germany | |||||
SAFETY INSTRUCTIONS
- Do not use the appliance until it is securely fi xed as described in this manual.
- Check that the voltage indicates on the data plate corresponds with that of the local network before connecting the appliance to the mains power supply.
- If the supply cord is damaged, it must be replaced by a qualifi ed engineer in order to avoid a hazard.
- The fi replace heater must not be positioned directly under the power socket.
- Keep furniture, curtains and other fl ammable material at least 1 meter away from the appliance.
- Do not leave the appliance unattended during use.
- Do not leave the appliance unattended whilst connected to the mains supply.
- Keep out of reach of children and do not allow them to operate this appliance.
- This appliance is intended for household use only and should not be used for industrial purposes.
- Do not operate this appliance after a malfunction or after being damaged in any way.
- Repairs to electrical appliances should only be performed by a qualifi ed electrician.
- Improper repairs may place user at serious risk.
- Do not run the mains cable under carpets, rugs, etc.
- Do not allow the mains cable to hang over sharp edges or come in contact with hot surfaces.
- In order to avoid overheating, do not cover the heater.
- Do not use this heater with a programmer, timer, separate remote control system or any other device that switches the heater on automatically, since a fi re risk exists if the heater is covered or positioned incorrectly.
- Never immerse the product in water or any other liquid for any reasons.
- Do not use this heater in the immediate surroundings of a bath, a shower or a swimming pool.
- Do not use the appliance outdoors.
- Do not use if you have wet hands.
- Never use the appliance on or near hot surfaces.
- Do not operate with a damaged cord.
- Before cleaning the appliance, make sure it is unplugged from the power and that it is completely cooled.
- Do not clean the appliance with abrasive chemicals.
- Never use accessories that are not recommended or supplied by the manufacturer. It could cause danger to the user or damage to the appliance.
- This device may be only used by children 8 years old or older and persons with limited physical, sensory and mental capabilities and / or lack of experience and knowledge, provided that they have been instructed in use of the device by a responsible person who understands the associated risks.
- Children should be supervised to ensure that they do not play with the appliance.
CAUTION
Risk of burns! Some parts of this product can become very hot and cause burns. Particular attention has to be given where children and vulnerable people are present.
INSTALLATION
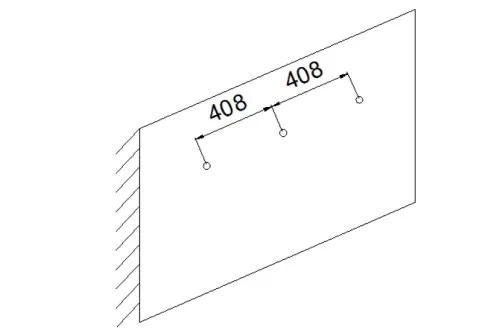
Select the wall location where you want to hang your electric fireplace heater. Draw a horizontal line using a level and mark 3 drill holes for the anchor screws. The holes are for mounting of fireplace and it shall be level so that the fireplace can be mounted properly and leveled. Marking out the hole positions on wall according to the picture.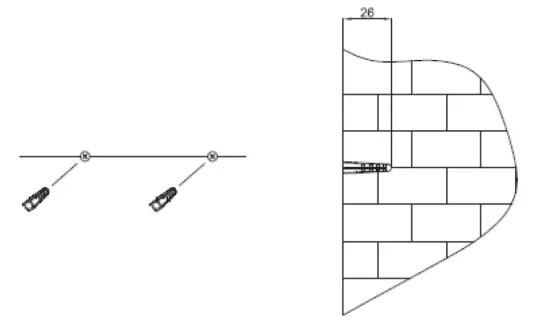
Drill 3 holes 8 mm (0.3 in) in diameter and 26mm (1.02 in) deep on the market locations. For the holes that do not hit stud, use the supplied wall anchor. Install the wall anchors into the holes and gently tap them into place with a hammer until the flange of wall anchor is flush with the wall surface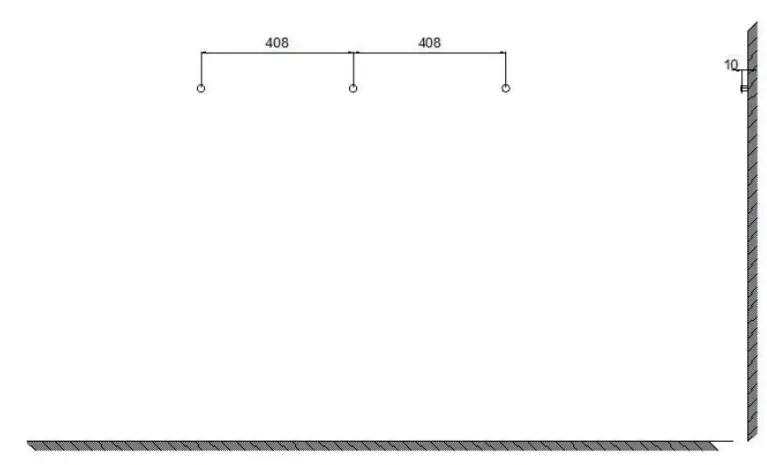
Use the 3 anchor screws screw into the wall as shown in the picture.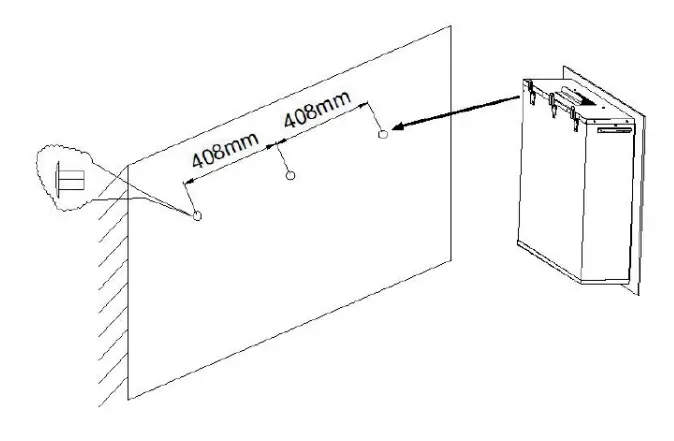
Mount the fireplace on wall using the slots of the metal bracket at the back of the fireplace. Make sure that the screw is completely engaged into the metal bracket at the back of the fireplace.
DISPLAY INDICATORS
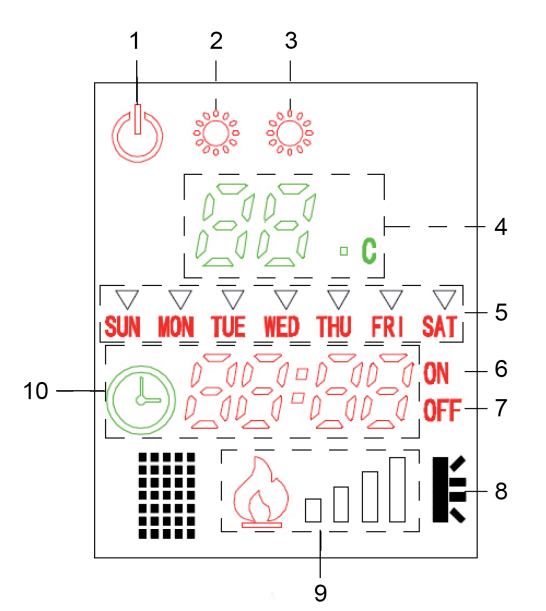
| 1 | On/Off | 6 | Timer on |
| 2 | Heating 1 | 7 | Timer off |
| 3 | Heating 2 | 8 | Window detection |
| 4 | Temperature display | 9 | Brightness |
| 5 | Day of the week | 10 | Time display |
Note: The unit switches off automatically if the temperature suddenly drops by 5-10°C (by opening a window). In this case, the window detection indicator (8) lights up.
CONTROL PANEL AND KEY FUNCTIONS

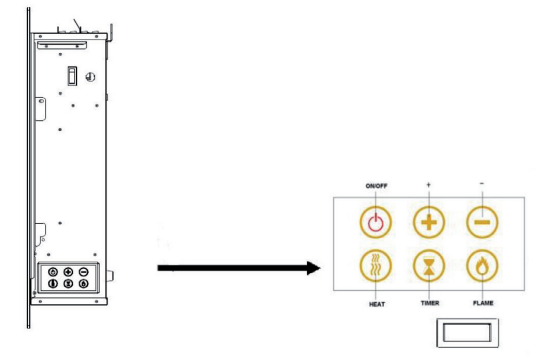
REMOTE CONTROL AND KEY FUNCTIONS
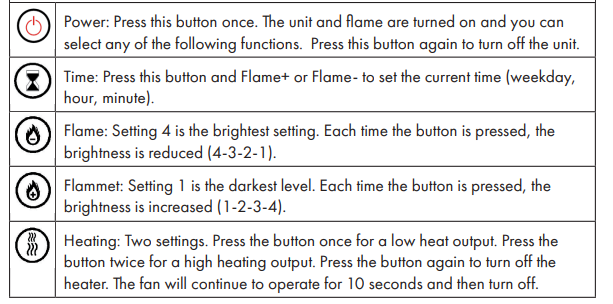
 | Power: Press this button once. The unit and flame are turned on and you can select any of the following functions. Press this button again to turn off the unit. | 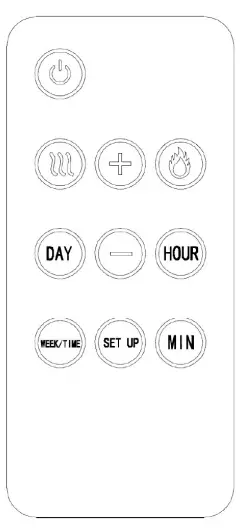
|
 | Set the current day of the week. Press the DAY button to set the current day of the week before entering the settings for the week. Press the DAY button, then press the [+] or [-] button to set the day of the week. Press the HOUR button, then press the [+] or [-] button to set the hours. Press the MIN button and then the [+] or [-] button to set the minutes. | |
 | Set hours | |
 | Set minutes | |
 | Set weekly timer: Press this button to set a timer for each day of the week. Then press SET UP to select the week timer ON/OFF. Use the [+] or [-] button to set the start time from Monday to Sunday. Press the HOUR button, then press the [+] or [-] button to set the hours. Press the MIN button and then the [+] or [-] button to set the minutes. |
 | Press the button after pressing WEEK to turn the weekly timer ON or OFF. |
 | Press the button to adjust the brightness. |
 | Heating: Two settings. Press the button once for a low heat output. Press the button twice for high heat output. Press the button again to turn off the heater. The fan will continue to operate for 10 seconds and then turn off. Use the [+] or [-] button to set the temperature between 15-30°C. The fan will continue to work for 10 seconds and then turn off. |
CLEANING AND CARE
Note: Turn off the unit and unplug it from the power outlet. Wait until the unit has completely cooled down before cleaning it.
- Use a vacuum cleaner to clean the ventilation slots and grilles.
- Remove dust on the outside surfaces with a damp (not wet) cloth.
- Do not use strong cleaning agents or abrasives.
- Do not spray the device with liquids or immerse it in water or other liquids.
- Never open the heater housing.
Storage
Keep the unit in a dust-free place during the low season. Pack it in the original carton. Wind the heater cable cleanly to avoid damaging the cable.
HINTS ON DISPOSAL
If there is a legal regulation for the disposal of electrical
and electronic devices in your country, this symbol on the product or on the packaging indicates that this product must not be disposed of with household waste. Instead, it must be taken to a collection point for the recycling of electrical and electronic equipment. By disposing of it in accordance with the rules, you are protecting the environment and the health of your fellow human beings from negative consequences. For information about the recycling and disposal of this product, please contact your local authority or your household waste disposal service.
This product contains batteries. If there is a legal regulation for the disposal of batteries in your country, the batteries must not be disposed of with household waste. Find out about local regulations for disposing of batteries. By disposing of them in accordance with the rules, you are protecting the environment and the health of your fellow human beings from negative consequences.


