![]()
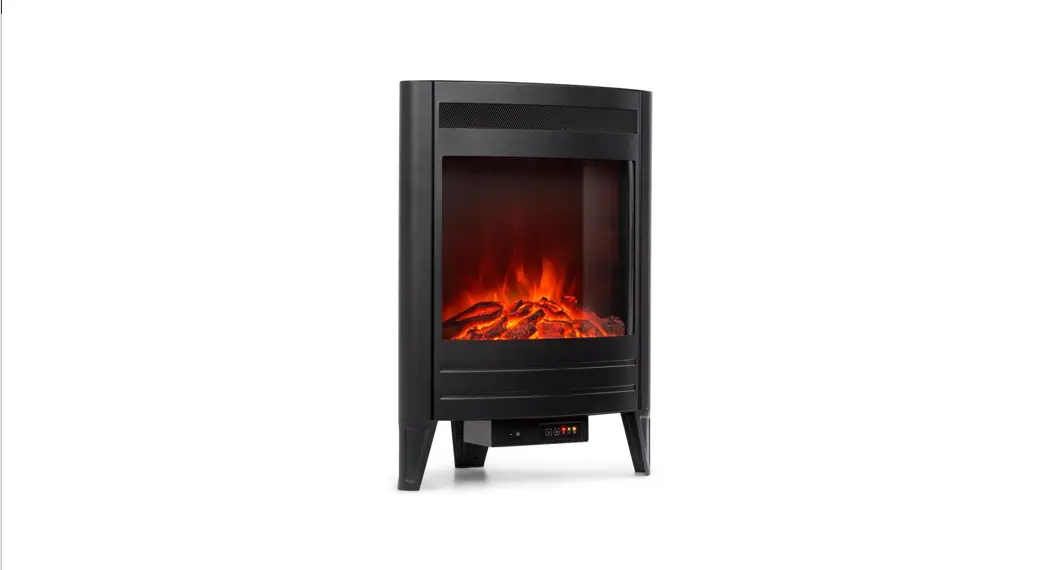
VIENNA
Fireplace Heater
10033112
Note: The device is not suitable for use as a primary heat source.
Dear Customer,
Congratulations on purchasing this device. Please read the following instructions carefully and follow them to prevent possible damage. We assume no liability for damage caused by disregard of the instructions and improper use. Scan the QR code to get access to the latest user manual and more product information.

TECHNICAL DATA
| Item number | 10 0 33112 |
| Power supply | 220-240 V~ 50 Hz |
| Power | max. 1600-1900 W |
| Weight | 11.73 kg |
SAFETY INSTRUCTIONS
When using any electrical appliance, basic safety precautions should always be followed including the following.
- Check that the voltage of the main circuit corresponds with the rating of the appliance before operating.
- Please ensure that the appliance is used on a stable, level, and heat-resistant surface.
- DO NOT immerse cords, plugs, or any part of the appliance in water or any other liquid.
- DO NOT leave the appliance unattended while it is operating.
- Close supervision is necessary when any appliance is used by or near children.
- Take care when any appliance is used near pets.
- This appliance can be used by children aged 8 years and above and persons with reduced physical, sensory or mental capabilities or lack of experience and knowledge
if they have been given supervision or instruction concerning the use of the appliance in a safe way and understand the hazards involved. - Children should not play with the appliance.
- Cleaning and user maintenance should not be undertaken by children without supervision.
- Switch off at the wall socket then remove the plug from the socket when not in use or before cleaning.
- If the supply cord or appliance is damaged, stop using the appliance immediately and seek advice from the manufacturer, its service agent or a similarly qualified person.
- DO NOT let the cord hang over the edge of a table or counter or let it come into contact with any hot surfaces.
- The use of accessory attachments other than those supplied is not recommended.
- DO NOT pull the plug out by the cord as this may damage the plug and/or the cable.
- DO NOT use this product for anything other than its intended use.
- This appliance is for household use only.
- DO NOT carry the appliance by the power cord.
- DO NOT use any extension cord with this appliance.
- DO NOT use the appliance outdoors.
- This heater is not equipped with a device to control the room temperature. DO NOT use this heater in small rooms when they are occupied by persons not capable of leaving the room on their own unless constant supervision is provided.
- Always ensure that the heater is placed on a firm level surface.
- Ensure that the heater is not positioned close to curtains, furniture, or any combustible materials as this could create a fire hazard.
- Never sit or stand on the fire.
- Never cut off the plug and hardwire into a fixed fused spur.
- The heater must not be located immediately below the main socket outlet.
- DO NOT cover the heater as this may lead to a fire risk.
- DO NOT obstruct any of the openings of the heater.
- DO NOT insert any object through any openings on the heater.
- Check the heater from time to time for accumulated dust.
- DO NOT use the heater in areas where flammable liquids are stored or where flammable fumes may be present.
- DO NOT cover the cord under the carpeting. DO NOT cover with throw rugs, runners or the like. Arrange the cord away from traffic areas and where it could be tripped over.
- This appliance has hot and arcing or sparking parts inside.
- DO NOT use it in areas where gasoline, paint, or flammable liquids are used or stored.
- This fireplace should not be used as a drying rack for clothing. DO NOT hang
- Christmas stockings or other decorations on or near this product.
- DO NOT operate the heater on a timer, or leave it on overnight.
- When not being used, please unplug the heater from the main socket.
- Keep the mains lead away from the hot body of the heater and ensure that it is not pulled tight between the socket and the heater.
- Always unplug the heater and allow it to cool before moving it from one location to another.
- WARNING! This product must be installed correctly, failure to do so may cause damage to your product and/or your surroundings.
- DO NOT attempt to dismantle or repair any part of the heater.
- This should only be done by a qualified service agent.
- In the unlikely event the appliance develops a fault, stop using it immediately and seek advice from the Customer Support Team.
PRODUCT DESCRIPTION
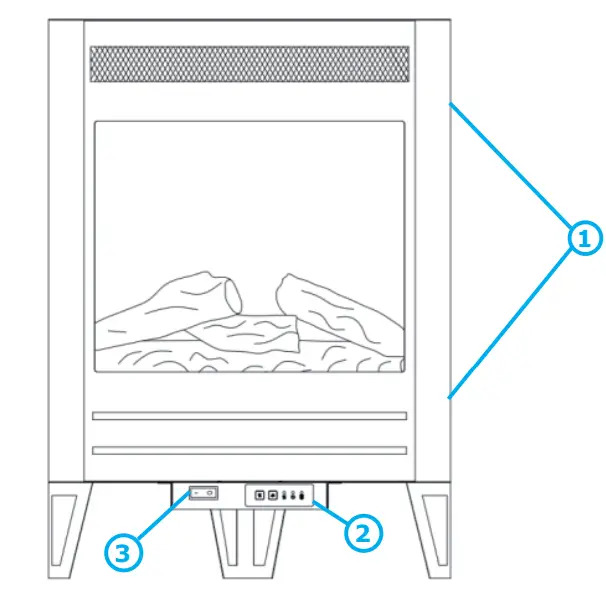 |  |
- Main body
- Control panel
- Power switch
- Remote control
POSITIONING
![]() Warning: Danger of electric shock and other injuries
Warning: Danger of electric shock and other injuries
This product must be installed as depicted in this instruction manual.
Placement
In order to prevent accidental dumping of machines, the heater needs to be fixed.

- At least 40mm away from the sides of the wall, Drill an 8mm diameter hole, and Pressure expansion screws into the holes.
- Fixed attachment to the floor in order.
- Place the heater at the installation location.
- Push the plate into the rear feet of the heater.
OPERATION
The appliance can be operated either by the switches located on the bottom left-hand side of the heater body .or by supplied remote control as shown in the photo below.
Operation panel
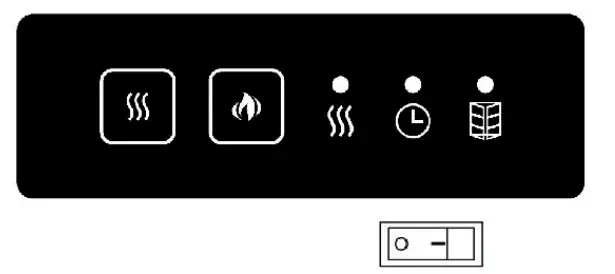
| Heating level control Press 1x:1900 W. Indicator light | |
| Control of decorative light for coal bed and fl a Press 1x: bright light. |
Display
| Heating level: | red= 1900 W blue= 950 W | |
| Timer | ||
| Open window recognition function | ||
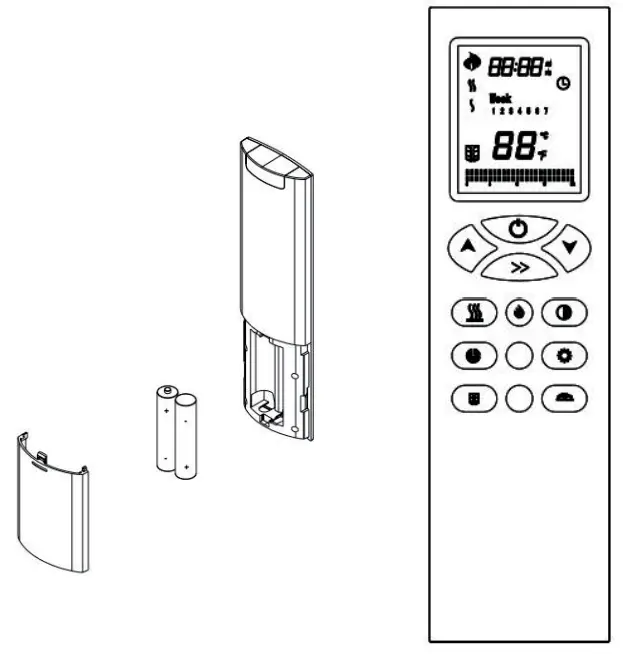
Remote control
Turn on the main power switch, the buzzer beeps once to indicate that the machine is
powering on, then the machine is in a standby state.
Keys
| Turn on the appliance. The flame lights up. The flame icon appears on the LCD screen of the remote control. Week, time (24h system), and temperature setting are displayed normally. Press it again, and the screen of the remote control will turn off. | |
| Turning the flame and the charcoal bed on and off. | |
| Adjusts the flame brightness. | |
| Adjust the brightness of the coal bed. | |
| Heating level control Press 1x: 1900 W. The display of the remote control Press 2x: 950 W. The LCD screen displays Press 3x drücken: Turn off the heating function. Note: in case the heating elements are turned on by remote control, whether the heating elements work or not depends on the temperature setting and ambient temperature. They work only when the temperature setting is above the ambient temperature. | |
| Temperature setting from 7 °C to 30 °C. Increase or decrease the number by 1. | |
Press once, and the corresponding figure flashes. Press | |
| Timer parameter setting Press 1x: the LCD displays “1” to indicate Monday. Now the temperature setting flashes. Press | |
| Press 1x: Turn on the timing function. The indicator and the appliance. Press 2x: Turn the timing function off. After the timing function is turned on, it works according to the parameter settings. The LCD screen Note: when the time, week, and timing parameters are changed, you need to switch on-off the timing key to transfer the timing parameters to the | |
Press 1x: Press once to turn on the Open Window function, the LCD screen displays After the Open Window function is turned on, the program firstly detects if the heating function is turned on. If it is turned on, the program will save |
MAINTENANCE AND CLEANING
Inserting the batteries into the remote control
The remote control requires 2x AAA size batteries (not included)
Open the battery compartment by sliding the cover down and inserting the batteries noting the polarity indicated in the battery compartment.
Cleaning
![]() Warning: Danger of electric shock
Warning: Danger of electric shock
Pull the plug before cleaning.
Lassen Sie kein Wasser oder andere Flüssigkeiten ins Innere laufen.
![]() Caution: Danger of burns
Caution: Danger of burns
Allow the product to completely cool before handling or cleaning it.
- Switch off and unplug from the power supply before cleaning.
- Using a soft, moist cloth, with or without a mild soap solution, carefully clean the exterior surface of the product.
TROUBLESHOOTING
Safety Cut-Out device
To ensure against the potential hazard caused by blockage of the air outlet, this unit is equipped with an automatic overtemperature safety cut-out device. When the device is activated the heater will not operate. If this occurs, the unit can be reset using the following procedure:
- Turn the fire off by depressing the on/off switch on the unit.
- Unplug the power cord from the electrical mains supply socket and leave it disconnected for at least 15 minutes.
- Ensure that the air vents are free from obstruction.
- Plug the power cord back into the main socket.
- Turn the fire back on.
- If the fire fails to operate, check the fuse in the plug.
- If the fuse in the plug is OK and the fire is still not functioning, contact a qualified service person.
| Problem | Cause | Check |
| The stove turns off and will not turn on. | The stove has overheated and the safety device has caused the thermal switch to disconnect or the home circuit breaker has opened. | Reset the switch by turning the main power switch off and waiting 5 minutes then turning it back on. |
| The flame is not moving. | Flame motor defective. | Call a qualified service technician to replace the flame motor. |
DISPOSAL CONSIDERATIONS
 If there is a legal regulation for the disposal of electrical and electronic devices in your country, this symbol on the product or on the packaging indicates that this product must not be disposed of with household waste. Instead, it must be taken to a collection point for the recycling of electrical and electronic equipment. By disposing of it in accordance with the rules, you are protecting the environment and the health of your fellow human beings from negative consequences. For information about the recycling and disposal of this product, please contact your local authority or your household waste disposal service.
This product contains batteries. If there is a legal regulation for the disposal of batteries in your country, the batteries must not be disposed of with household waste. Find out about local regulations for disposing of batteries. By disposing of them in accordance with the rules, you are protecting the environment and the health of your fellow human beings from negative consequences.
MANUFACTURER & IMPORTER (UK)
Manufacturer:
Chal-Tec GmbH, Wallstrasse 16, 10179 Berlin, Germany.
Importer for Great Britain:
Chal-Tec UK limited
Unit 6 Riverside Business Centre
Brighton Road
Shoreham-by-Sea
BN43 6RE
United Kingdom
Information requirements for electric local space heaters
| Model identifier(s): | 10032112 | |||||
| Item | Symbol | Value | Unit | Item | Unit | |
| Heat output | Type of heat input, for electric storage local space heaters only | |||||
| Nominal heat output | P nom | 1.8 | kW | manual heat charge control, with integrated thermostat | no | |
| Minimum heat output (indicative) | P min | 0 | kW | manual heat charge control with room and/or outdoor temperature feedback | no | |
| Maximum continuous heat output | P max | 1.8 | kW | electronic heat charge control with room and/or outdoor temperature feedback | no | |
| Auxiliary electricity consumption | fan assisted heat output | no | ||||
| At nominal heat output (fan motor) | el max | N/A | kW | Type of heat output/room temperature control | ||
| At minimum heat output (fan motor) | el min | N/A | kW | single-stage heat output and no room temperature control | no | |
| In standby mode | else | 0 | kW | Two or more manual stages, no room temperature control | no | |
| with mechanic thermostat room temperature control | no | |||||
| with electronic room temperature control | no | |||||
| electronic room temperature control plus day timer | no | |||||
| electronic room temperature control plus week timer | yes | |||||
| Other control options (multiple selections possible) | ||||||
| room temperature control, with presence detection | no | |||||
| room temperature control, with open window detection | yes | |||||
| with distance control option | no | |||||
| with adaptive start control | no | |||||
| with working time limitation | no | |||||
| with black bulb sensor | no | |||||
| Contact details | Chal-Tec GmbH, WallstraBe 16, 10 79, Berlin, Germany | |||||
![]()


