
Schneider Electric SRVSMB001 Easy UPS Modbus Card
Important Safety Information
Read the instructions carefully and look at the equipment to become familiar with the device before trying to install, operate, service or maintain it. The following special messages may appear throughout this document or on the equipment to warn of potential hazards or to call attention to information that clarifies or simplifies a procedure.
- The addition of this symbol to either product safety label indicates that an electrical hazard exists which will result in personal injury if the instructions are not followed.
- This is the safety alert symbol. It is used to alert you to potential personal injury hazards. Obey all safety messages that follow this symbol to avoid possible injury or death.
DANGER: DANGER indicates a hazardous situation which, if not avoided, will result in death or serious injury.
WARNING: indicates a hazardous situation which, if not avoided, could result in death or serious injury.
CAUTION: indicates a hazardous situation which, if not avoided, could result in minor or moderate injury.
NOTICE: is used to address practices not related to physical injury.
Product Description
The Modbus card provides UPS systems with the functionality of communication with PCs through MODBUS protocol:
- Implements MODBUS RTU protocol
- Provides MODBUS functions including read Holding Registers and write Registers.
- Provides RS485 interface
- Provides surge protection
Supported Devices
The Modbus Card can be installed in any compatible device that is equipped with Intelligent Card Slot, including:
- Easy UPS On-Line: SRVS series UPS
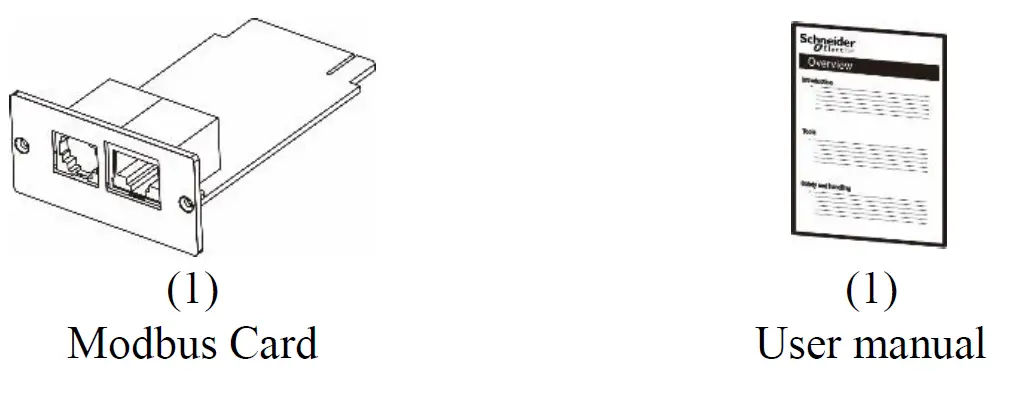
Package Contents
The packaging is recyclable; save it for reuse or dispose of it properly.
Special Precautions
- If the card must be stored prior to installation; store it in a dry place.
- The storage temperature range is from -10ºC to +70ºC.
Recycle
The shipping materials are recyclable. Save them for later use, or dispose of them properly.
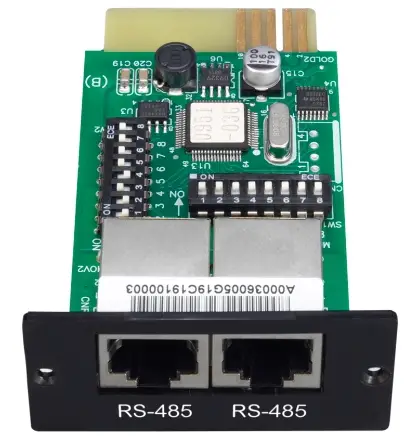
Product Overview
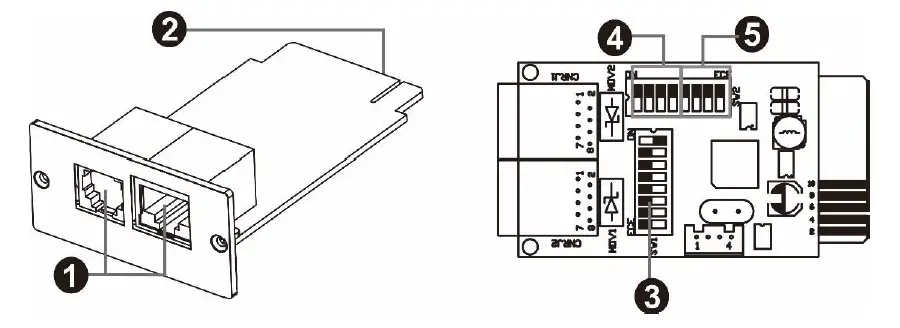
- RS-485 port
- Golden finger
- Address switch
- Communication setting
- Resistance switch
Specifications
| Physical | Dimensions with package Width x Height x Depth | 168 mm (6.61in) x 42 mm (1.65in) x 132 mm (5.2in) |
| Dimensions without package Width x Height x Depth | 52.4 mm (2.06in) x 26 mm (1.02in) x 80 mm (3.15in) | |
| Weight with package | 0.12 kg (0.26 lb) | |
| Weight without package | 0.03 kg (0.07 lb) | |
| Temperature | Operating | 0 to 40°C (32 to 104°F) |
| Storage | -10 to 70°C (13.4 to 158°F) | |
| Humidity | Operating | 0 to 95% relative humidity, non-condensing |
| Supported Protocol | Modbus RTU | |
| Power Consumption | Operating | 0.5 W (max.) |
| Standby | 0.3 W (max.) | |
| Supported Power | 12 V (10 V – 14 V) | |
| Communication Interface | Console Communication | RJ45 port |
| UPS | Golden finger | |
| Firmware Upgrading | RS485 | |
Installation & Operation
Follow the steps below when installing and using this modbus card:
- Configure Modbus ID (Refer to the next section “Configuration” for details.)
- Configure communication format (Refer to the next section “Configuration” for details.)
- Insert the modbus card into the intelligent card slot.

- With the UPS turned off, connect the modbus card to a computer using a RJ45 cable. (Refer to the next section “Configuration” for details.)

Configuration
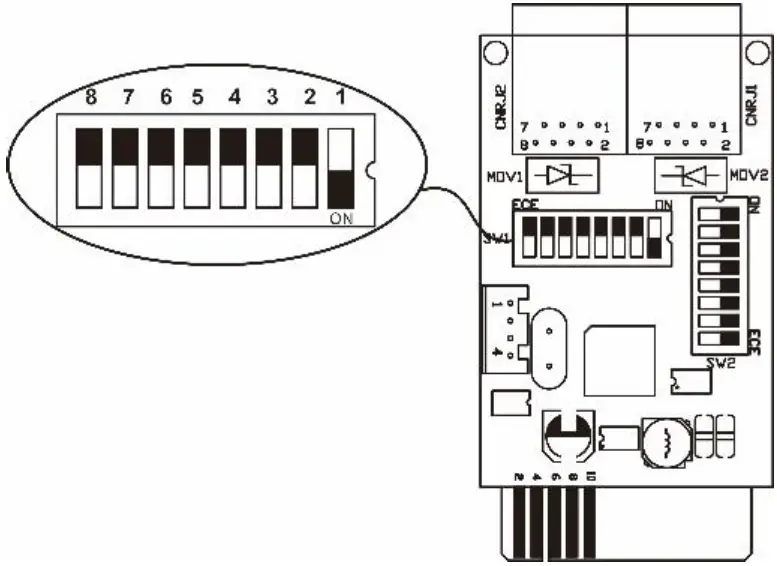
Machine ID Configuration
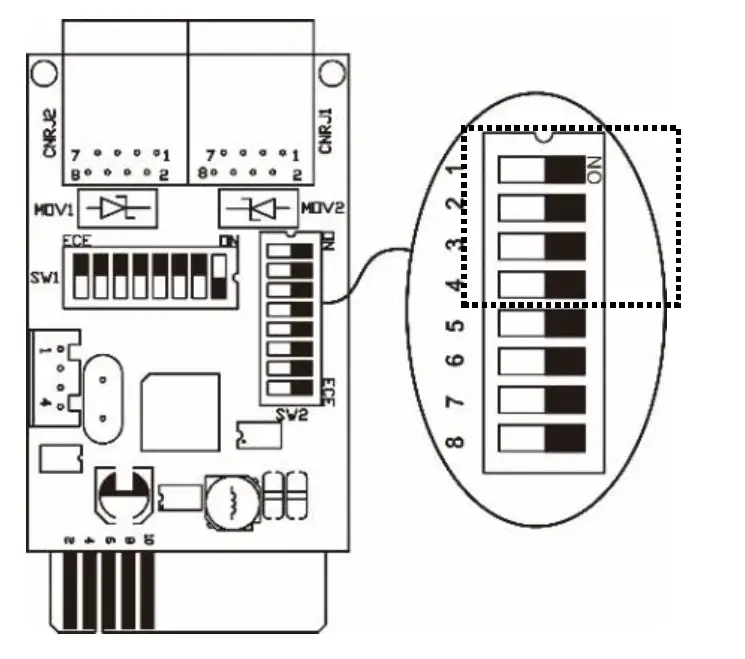
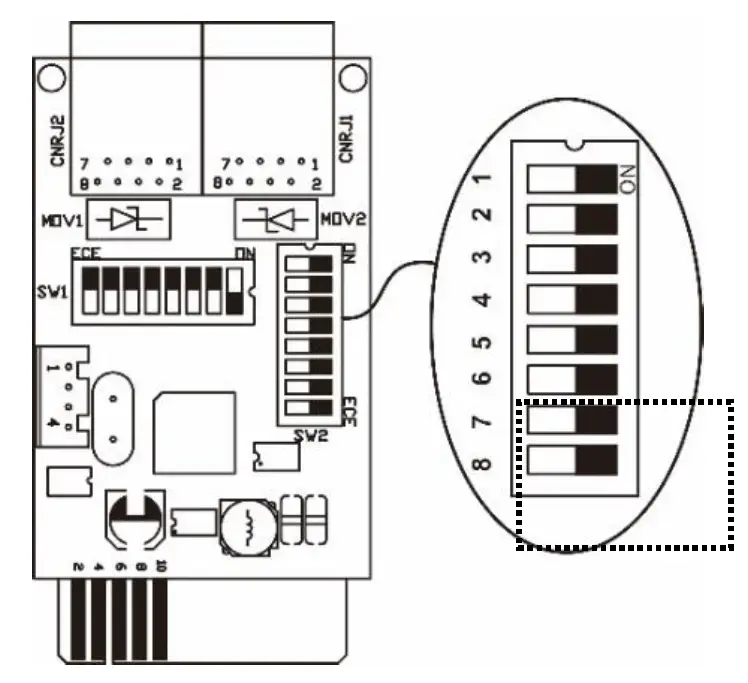
The registry settings of each card may be configured through the 8 switches on SW1. Switches 8 to 1 are numbered from left to right as shown on the figure on the left. When user slides the switch position downwards, its setting is 1. When pushed upwards, the setting is 0. In this example, the registry setting of the card is 0x01. See the appendix section for more details.
Communication Format Configuration
| Function | Bit Setting | Meaning | |
| Baud rate | # 2 | # 1 | |
| OFF | OFF | 2400bps | |
| OFF | ON | 4800bps | |
| ON | OFF | 9600bps | |
| ON | ON | 19200bps(default) | |
| Parity check | # 4 | # 3 | |
| OFF | OFF | Even parity | |
| ON | OFF | Odd parity | |
| OFF | ON | No parity check 1 stop bits (Default) | |
| ON | ON | No parity check 2 stop bits | |
RS-485 Resistance Configuration
| Function | Bit # | Setting | Meaning |
| Push up resistance | # 6 | ON | Enable (Default) |
| OFF | Disable | ||
| Push down resistance | # 7 | ON | Enable (Default) |
| OFF | Disable | ||
| Terminate resistance | # 8 | ON | Enable (Default) |
| OFF | Disable |
Interface Configuration
RS-485 Pin Configuration
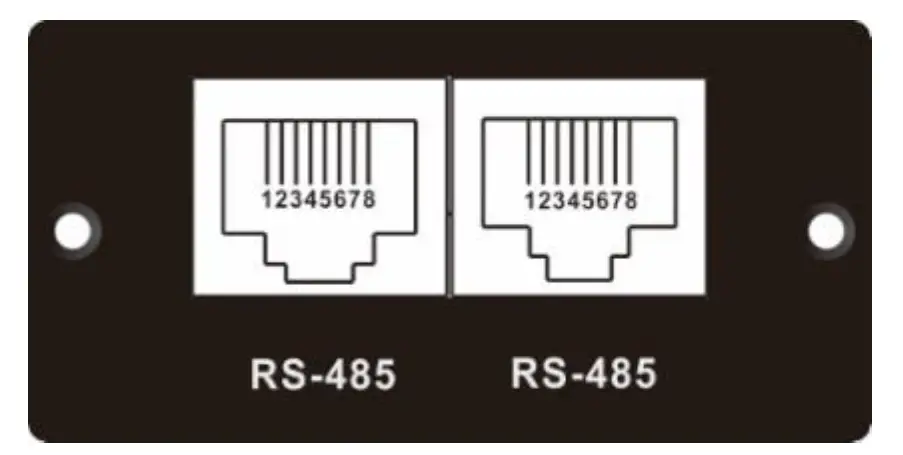
| Pin | Function |
| 4 | RS-485 – B |
| 5 | RS-485 – A |
| 8 | GND |
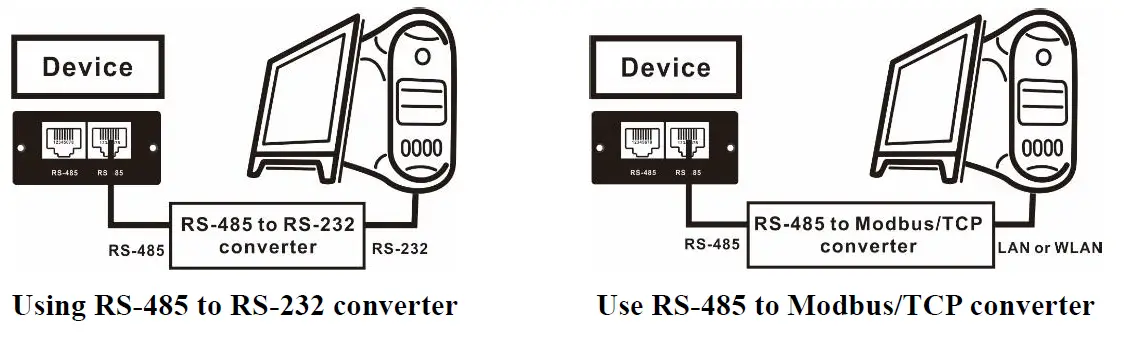
Connection
First, use one RS-485 to RS-232 converter or RS-485 to Modbus/TCP converter as media converter between Modbus card and computer. Refer to the illustration below for wiring connection between RJ45 and media converter:
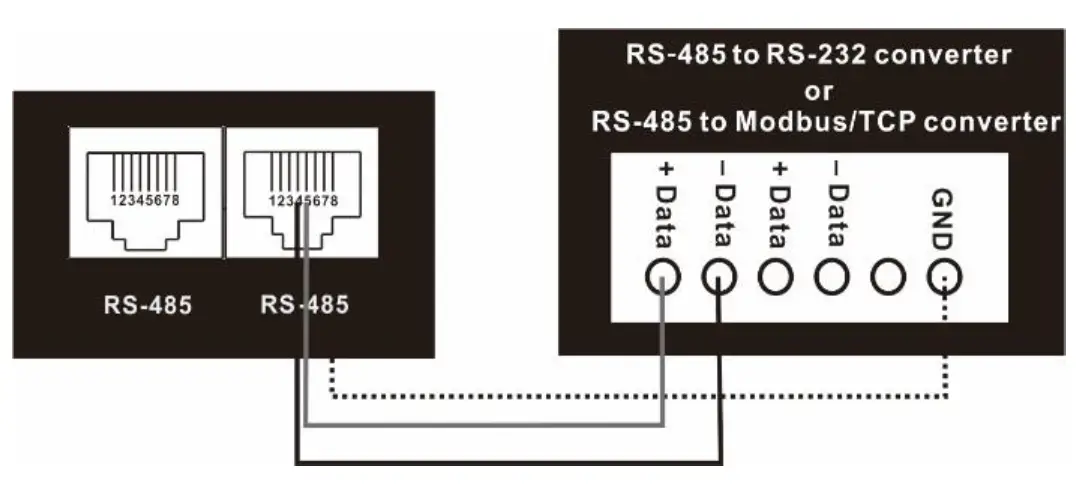
Wiring connection between RJ45 and media converter Then, follow the diagram below when connecting to a personal computer.
Multiple Wiring
Multiple connection is also possible by pairing one modbus card to one UPS at a single time. This type of wiring connection allows the monitoring of 31 UPSs (maximum) from a single computer.

Software Monitoring
- Install SchneiderUPS monitoring software in your PC. After software is installed successfully, its software shortcut icon “ ” will appear on the system tray.
- Select modbus communication setting. You can set up Modbus related parameters here. Refer to “SchneiderUPS” software user manual for the detailed settings

- After configurations are complete, you may monitor each Modbus device by clicking “View” function on task bar.


APPENDIX: Machine ID Configuration Table (SW1) √=ON ×=OFF
| SW1 ID | Bit 1 | Bit 2 | Bit 3 | Bit 4 | Bit 5 | Bit 6 | Bit 7 | Bit 8 |
| 1 | √ | × | × | × | × | × | × | × |
| 2 | × | √ | × | × | × | × | × | × |
| 3 | √ | √ | × | × | × | × | × | × |
| 4 | × | × | √ | × | × | × | × | × |
| 5 | √ | × | √ | × | × | × | × | × |
| 6 | × | √ | √ | × | × | × | × | × |
| 7 | √ | √ | √ | × | × | × | × | × |
| 8 | × | × | × | √ | × | × | × | × |
| 9 | √ | × | × | √ | × | × | × | × |
| 10 | × | √ | × | √ | × | × | × | × |
| 11 | √ | √ | × | √ | × | × | × | × |
| 12 | × | × | √ | √ | × | × | × | × |
| 13 | √ | × | √ | √ | × | × | × | × |
| 14 | × | √ | √ | √ | × | × | × | × |
| 15 | √ | √ | √ | √ | × | × | × | × |
| 16 | × | × | × | × | √ | × | × | × |
| 17 | √ | × | × | × | √ | × | × | × |
| 18 | × | √ | × | × | √ | × | × | × |
| 19 | √ | √ | × | × | √ | × | × | × |
| 20 | × | × | √ | × | √ | × | × | × |
| 21 | √ | × | √ | × | √ | × | × | × |
| 22 | × | √ | √ | × | √ | × | × | × |
| 23 | √ | √ | √ | × | √ | × | × | × |
| 24 | × | × | × | √ | √ | × | × | × |
| 25 | √ | × | × | √ | √ | × | × | × |
| 26 | × | √ | × | √ | √ | × | × | × |
| 27 | √ | √ | × | √ | √ | × | × | × |
| 28 | × | × | √ | √ | √ | × | × | × |
| 29 | √ | × | √ | √ | √ | × | × | × |
| 30 | × | √ | √ | √ | √ | × | × | × |
| 31 | √ | √ | √ | √ | √ | × | × | × |
| 32 | × | × | × | × | × | √ | × | × |
| 33 | √ | × | × | × | × | √ | × | × |
| 34 | × | √ | × | × | × | √ | × | × |
| 35 | √ | √ | × | × | × | √ | × | × |
| 36 | × | × | √ | × | × | √ | × | × |
| 37 | √ | × | √ | × | × | √ | × | × |
| 38 | × | √ | √ | × | × | √ | × | × |
| 39 | √ | √ | √ | × | × | √ | × | × |
| 40 | × | × | × | √ | × | √ | × | × |
| 41 | √ | × | × | √ | × | √ | × | × |
| 42 | × | √ | × | √ | × | √ | × | × |
| 43 | √ | √ | × | √ | × | √ | × | × |
| 44 | × | × | √ | √ | × | √ | × | × |
| 45 | √ | × | √ | √ | × | √ | × | × |
| 46 | × | √ | √ | √ | × | √ | × | × |
| 47 | √ | √ | √ | √ | × | √ | × | × |
| 48 | × | × | × | × | √ | √ | × | × |
| 49 | √ | × | × | × | √ | √ | × | × |
| 50 | × | √ | × | × | √ | √ | × | × |
| 51 | √ | √ | × | × | √ | √ | × | × |
| 52 | × | × | √ | × | √ | √ | × | × |
| 53 | √ | × | √ | × | √ | √ | × | × |
| 54 | × | √ | √ | × | √ | √ | × | × |
| 55 | √ | √ | √ | × | √ | √ | × | × |
| 56 | × | × | × | √ | √ | √ | × | × |
| 57 | √ | × | × | √ | √ | √ | × | × |
| 58 | × | √ | × | √ | √ | √ | × | × |
| 59 | √ | √ | × | √ | √ | √ | × | × |
| 60 | × | × | √ | √ | √ | √ | × | × |
| 61 | √ | × | √ | √ | √ | √ | × | × |
| 62 | × | √ | √ | √ | √ | √ | × | × |
| 63 | √ | √ | √ | √ | √ | √ | × | × |
| 64 | × | × | × | × | × | × | √ | × |
| 65 | √ | × | × | × | × | × | √ | × |
| 66 | × | √ | × | × | × | × | √ | × |
| 67 | √ | √ | × | × | × | × | √ | × |
| 68 | × | × | √ | × | × | × | √ | × |
| 69 | √ | × | √ | × | × | × | √ | × |
| 70 | × | √ | √ | × | × | × | √ | × |
| 71 | √ | √ | √ | × | × | × | √ | × |
| 72 | × | × | × | √ | × | × | √ | × |
| 73 | √ | × | × | √ | × | × | √ | × |
| 74 | × | √ | × | √ | × | × | √ | × |
| 75 | √ | √ | × | √ | × | × | √ | × |
| 76 | × | × | √ | √ | × | × | √ | × |
| 77 | √ | × | √ | √ | × | × | √ | × |
| 78 | × | √ | √ | √ | × | × | √ | × |
| 79 | √ | √ | √ | √ | × | × | √ | × |
| 80 | × | × | × | × | √ | × | √ | × |
| 81 | √ | × | × | × | √ | × | √ | × |
| 82 | × | √ | × | × | √ | × | √ | × |
| 83 | √ | √ | × | × | √ | × | √ | × |
| 84 | × | × | √ | × | √ | × | √ | × |
| 85 | √ | × | √ | × | √ | × | √ | × |
| 86 | × | √ | √ | × | √ | × | √ | × |
| 87 | √ | √ | √ | × | √ | × | √ | × |
| 88 | × | × | × | √ | √ | × | √ | × |
| 89 | √ | × | × | √ | √ | × | √ | × |
| 90 | × | √ | × | √ | √ | × | √ | × |
| 91 | √ | √ | × | √ | √ | × | √ | × |
| 92 | × | × | √ | √ | √ | × | √ | × |
| 93 | √ | × | √ | √ | √ | × | √ | × |
| 94 | × | √ | √ | √ | √ | × | √ | × |
| 95 | √ | √ | √ | √ | √ | × | √ | × |
| 96 | × | × | × | × | × | √ | √ | × |
| 97 | √ | × | × | × | × | √ | √ | × |
| 98 | × | √ | × | × | × | √ | √ | × |
| 99 | √ | √ | × | × | × | √ | √ | × |
| 100 | × | × | √ | × | × | √ | √ | × |
| 101 | √ | × | √ | × | × | √ | √ | × |
| 102 | × | √ | √ | × | × | √ | √ | × |
| 103 | √ | √ | √ | × | × | √ | √ | × |
| 104 | × | × | × | √ | × | √ | √ | × |
| 105 | √ | × | × | √ | × | √ | √ | × |
| 106 | × | √ | × | √ | × | √ | √ | × |
| 107 | √ | √ | × | √ | × | √ | √ | × |
| 108 | × | × | √ | √ | × | √ | √ | × |
| 109 | √ | × | √ | √ | × | √ | √ | × |
| 110 | × | √ | √ | √ | × | √ | √ | × |
| 111 | √ | √ | √ | √ | × | √ | √ | × |
| 112 | × | × | × | × | √ | √ | √ | × |
| 113 | √ | × | × | × | √ | √ | √ | × |
| 114 | × | √ | × | × | √ | √ | √ | × |
| 115 | √ | √ | × | × | √ | √ | √ | × |
| 116 | × | × | √ | × | √ | √ | √ | × |
| 117 | √ | × | √ | × | √ | √ | √ | × |
| 118 | × | √ | √ | × | √ | √ | √ | × |
| 119 | √ | √ | √ | × | √ | √ | √ | × |
| 120 | × | × | × | √ | √ | √ | √ | × |
| 121 | √ | × | × | √ | √ | √ | √ | × |
| 122 | × | √ | × | √ | √ | √ | √ | × |
| 123 | √ | √ | × | √ | √ | √ | √ | × |
| 124 | × | × | √ | √ | √ | √ | √ | × |
| 125 | √ | × | √ | √ | √ | √ | √ | × |
| 126 | × | √ | √ | √ | √ | √ | √ | × |
| 127 | √ | √ | √ | √ | √ | √ | √ | × |
| 128 | × | × | × | × | × | × | × | √ |
| 129 | √ | × | × | × | × | × | × | √ |
| 130 | × | √ | × | × | × | × | × | √ |
| 131 | √ | √ | × | × | × | × | × | √ |
| 132 | × | × | √ | × | × | × | × | √ |
| 133 | √ | × | √ | × | × | × | × | √ |
| 134 | × | √ | √ | × | × | × | × | √ |
| 135 | √ | √ | √ | × | × | × | × | √ |
| 136 | × | × | × | √ | × | × | × | √ |
| 137 | √ | × | × | √ | × | × | × | √ |
| 138 | × | √ | × | √ | × | × | × | √ |
| 139 | √ | √ | × | √ | × | × | × | √ |
| 140 | × | × | √ | √ | × | × | × | √ |
| 141 | √ | × | √ | √ | × | × | × | √ |
| 142 | × | √ | √ | √ | × | × | × | √ |
| 143 | √ | √ | √ | √ | × | × | × | √ |
| 144 | × | × | × | × | √ | × | × | √ |
| 145 | √ | × | × | × | √ | × | × | √ |
| 146 | × | √ | × | × | √ | × | × | √ |
| 147 | √ | √ | × | × | √ | × | × | √ |
| 148 | × | × | √ | × | √ | × | × | √ |
| 149 | √ | × | √ | × | √ | × | × | √ |
| 150 | × | √ | √ | × | √ | × | × | √ |
| 151 | √ | √ | √ | × | √ | × | × | √ |
| 152 | × | × | × | √ | √ | × | × | √ |
| 153 | √ | × | × | √ | √ | × | × | √ |
| 154 | × | √ | × | √ | √ | × | × | √ |
| 155 | √ | √ | × | √ | √ | × | × | √ |
| 156 | × | × | √ | √ | √ | × | × | √ |
| 157 | √ | × | √ | √ | √ | × | × | √ |
| 158 | × | √ | √ | √ | √ | × | × | √ |
| 159 | √ | √ | √ | √ | √ | × | × | √ |
| 160 | × | × | × | × | × | √ | × | √ |
| 161 | √ | × | × | × | × | √ | × | √ |
| 162 | × | √ | × | × | × | √ | × | √ |
| 163 | √ | √ | × | × | × | √ | × | √ |
| 164 | × | × | √ | × | × | √ | × | √ |
| 165 | √ | × | √ | × | × | √ | × | √ |
| 166 | × | √ | √ | × | × | √ | × | √ |
| 167 | √ | √ | √ | × | × | √ | × | √ |
| 168 | × | × | × | √ | × | √ | × | √ |
| 169 | √ | × | × | √ | × | √ | × | √ |
| 170 | × | √ | × | √ | × | √ | × | √ |
| 171 | √ | √ | × | √ | × | √ | × | √ |
| 172 | × | × | √ | √ | × | √ | × | √ |
| 173 | √ | × | √ | √ | × | √ | × | √ |
| 174 | × | √ | √ | √ | × | √ | × | √ |
| 175 | √ | √ | √ | √ | × | √ | × | √ |
| 176 | × | × | × | × | √ | √ | × | √ |
| 177 | √ | × | × | × | √ | √ | × | √ |
| 178 | × | √ | × | × | √ | √ | × | √ |
| 179 | √ | √ | × | × | √ | √ | × | √ |
| 180 | × | × | √ | × | √ | √ | × | √ |
| 181 | √ | × | √ | × | √ | √ | × | √ |
| 182 | × | √ | √ | × | √ | √ | × | √ |
| 183 | √ | √ | √ | × | √ | √ | × | √ |
| 184 | × | × | × | √ | √ | √ | × | √ |
| 185 | √ | × | × | √ | √ | √ | × | √ |
| 186 | × | √ | × | √ | √ | √ | × | √ |
| 187 | √ | √ | × | √ | √ | √ | × | √ |
| 188 | × | × | √ | √ | √ | √ | × | √ |
| 189 | √ | × | √ | √ | √ | √ | × | √ |
| 190 | × | √ | √ | √ | √ | √ | × | √ |
| 191 | √ | √ | √ | √ | √ | √ | × | √ |
| 192 | × | × | × | × | × | × | √ | √ |
| 193 | √ | × | × | × | × | × | √ | √ |
| 194 | × | √ | × | × | × | × | √ | √ |
| 195 | √ | √ | × | × | × | × | √ | √ |
| 196 | × | × | √ | × | × | × | √ | √ |
| 197 | √ | × | √ | × | × | × | √ | √ |
| 198 | × | √ | √ | × | × | × | √ | √ |
| 199 | √ | √ | √ | × | × | × | √ | √ |
| 200 | × | × | × | √ | × | × | √ | √ |
| 201 | √ | × | × | √ | × | × | √ | √ |
| 202 | × | √ | × | √ | × | × | √ | √ |
| 203 | √ | √ | × | √ | × | × | √ | √ |
| 204 | × | × | √ | √ | × | × | √ | √ |
| 205 | √ | × | √ | √ | × | × | √ | √ |
| 206 | × | √ | √ | √ | × | × | √ | √ |
| 207 | √ | √ | √ | √ | × | × | √ | √ |
| 208 | × | × | × | × | √ | × | √ | √ |
| 209 | √ | × | × | × | √ | × | √ | √ |
| 210 | × | √ | × | × | √ | × | √ | √ |
| 211 | √ | √ | × | × | √ | × | √ | √ |
| 212 | × | × | √ | × | √ | × | √ | √ |
| 213 | √ | × | √ | × | √ | × | √ | √ |
| 214 | × | √ | √ | × | √ | × | √ | √ |
| 215 | √ | √ | √ | × | √ | × | √ | √ |
| 216 | × | × | × | √ | √ | × | √ | √ |
| 217 | √ | × | × | √ | √ | × | √ | √ |
| 218 | × | √ | × | √ | √ | × | √ | √ |
| 219 | √ | √ | × | √ | √ | × | √ | √ |
| 220 | × | × | √ | √ | √ | × | √ | √ |
| 221 | √ | × | √ | √ | √ | × | √ | √ |
| 222 | × | √ | √ | √ | √ | × | √ | √ |
| 223 | √ | √ | √ | √ | √ | × | √ | √ |
| 224 | × | × | × | × | × | √ | √ | √ |
| 225 | √ | × | × | × | × | √ | √ | √ |
| 226 | × | √ | × | × | × | √ | √ | √ |
| 227 | √ | √ | × | × | × | √ | √ | √ |
| 228 | × | × | √ | × | × | √ | √ | √ |
| 229 | √ | × | √ | × | × | √ | √ | √ |
| 230 | × | √ | √ | × | × | √ | √ | √ |
| 231 | √ | √ | √ | × | × | √ | √ | √ |
| 232 | × | × | × | √ | × | √ | √ | √ |
| 233 | √ | × | × | √ | × | √ | √ | √ |
| 234 | × | √ | × | √ | × | √ | √ | √ |
| 235 | √ | √ | × | √ | × | √ | √ | √ |
| 236 | × | × | √ | √ | × | √ | √ | √ |
| 237 | √ | × | √ | √ | × | √ | √ | √ |
| 238 | × | √ | √ | √ | × | √ | √ | √ |
| 239 | √ | √ | √ | √ | × | √ | √ | √ |
| 240 | × | × | × | × | √ | √ | √ | √ |
| 241 | √ | × | × | × | √ | √ | √ | √ |
| 242 | × | √ | × | × | √ | √ | √ | √ |
| 243 | √ | √ | × | × | √ | √ | √ | √ |
| 244 | × | × | √ | × | √ | √ | √ | √ |
| 245 | √ | × | √ | × | √ | √ | √ | √ |
| 246 | × | √ | √ | × | √ | √ | √ | √ |
| 247 | √ | √ | √ | × | √ | √ | √ | √ |
Schneider Electric Worldwide Customer Support
Customer support for this or any other Schneider Electric product is available at no charge in any of the following ways:
- Visit the Schneider Electric website to access documents in the Schneider Electric Knowledge Base and to submit customer support requests.
- www.apc.com (Corporate Headquarters) Connect to localized Schneider Electric websites for specific countries, each of which provides customer support information.
- www.apc.com/support/ Global support searching Schneider Electric Knowledge Base and using e-support.
- Contact the Schneider Electric Customer Support Center by telephone or e-mail.
- Local, country specific centers: go to www.apc.com/support/contact for contact information.
For information on how to obtain local customer support, contact the Schneider Electric representative or another distributor from whom you purchased your Schneider Electric product.


