
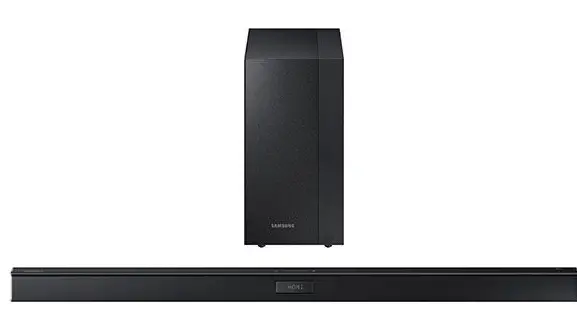
Samsung HW-J450/ZA Watt Wireless Audio Soundbar
FEATURES
TV SoundConnect
TV SoundConnect lets you listen to audio from your TV on your Soundbar via a Bluetooth connection and lets you control the sound.
HDMI
HDMI transmits video and audio signals simultaneously, and provides a clearer picture. The unit is also equipped with the ARC function which lets you listen to sound from your TV through the Soundbar via an HDMI cable. This function is only available if you connect the unit to an ARC compliant TV.
SURROUND SOUND
The SURROUND SOUND feature adds depth and spaciousness to your listening experience.
Wireless Subwoofer
Samsung’s wireless module does away with cables running between the main unit and the subwoofer. Instead, the subwoofer connects to a compact wireless module that communicates with the main unit.
Special Sound Effects
You can select different Sound Effects – STANDARD (Original Sound)/MUSIC / VOICE / SPORTS / CINEMA / NIGHT MODE – depending on the type of content you want to enjoy.
Multi-function Remote Control
You can use the supplied remote control to control various operations with the simple press of a button.
USB Host Support
You can connect and play music files from external USB storage devices such as MP3 players, USB flash memory, etc. using the Soundbar’s USB HOST function.
Bluetooth Function
You can connect a Bluetooth device to the Soundbar and enjoy music with high quality stereo sound, all without wires!
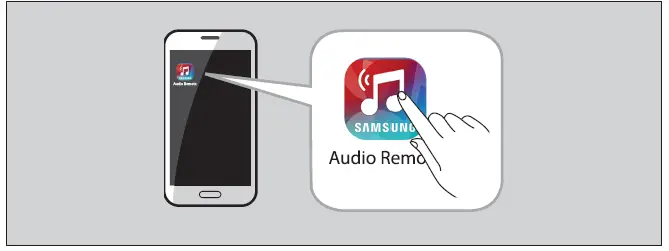
Using Samsung Audio Remote App
To control the product with your Smart Device via the Samsung Audio Remote app, download the Samsung Audio Remote App by accessing the app through Google Play store.
SAFETY INFORMATION
- To reduce the risk of fire or electric shock, do not expose this appliance to rain or moisture.
- TO PREVENT ELECTRIC SHOCK, MATCH WIDE BLADE OF PLUG TO WIDE SLOT, FULLY INSERT.
- This apparatus shall always be connected to a AC outlet with a protective grounding connection.
- To disconnect the apparatus from the mains, the plug must be pulled out from the mains socket, therefore the mains plug shall be readily operable.
- Do not expose this apparatus to dripping or splashing. Do not put objects filled with liquids, such as vases on the apparatus.
- To turn this apparatus off completely, you must pull the power plug out of the wall socket. Consequently, the power plug must be easily and readily accessible at all times
Wiring the Main Power Supply Plug (UK Only)
The mains lead on this equipment is supplied with a moulded plug incorporating a fuse. The value of the fuse is indicated on the pin face of the plug and if it requires replacing, a fuse approved to BS1362 of the same rating must be used. Never use the plug with the fuse cover removed. If the cover is detachable and a replacement is required, it must be of the same colour as the fuse fitted in the plug. Replacement covers are available from your dealer. If the fitted plug is not suitable for the power points in your house or the cable is not long enough to reach a power point, you should obtain a suitable safety approved extension lead or consult your dealer for assistance. However, if there is no alternative to cutting off the plug, remove the fuse and then safely dispose of the plug. Do not connect the plug to a mains socket as there is a risk of shock hazard from the bared flexible cord. Never attempt to insert bare wires directly into a mains socket. A plug and fuse must be used at all times.
PRECAUTIONS
Ensure that the AC power supply in your house complies with the power requirements listed on the identification sticker located on the back of your product. Install your product horizontally, on a suitable base (furniture), with enough space around it for ventilation 7~10 cm. Make sure the ventilation slots are not covered. Do not place the unit on amplifiers or other equipment which may become hot. This unit is designed for continuous use. To fully turn off the unit, disconnect the AC plug from the wall outlet. Unplug the unit if you intend to leave it unused for a long period of time.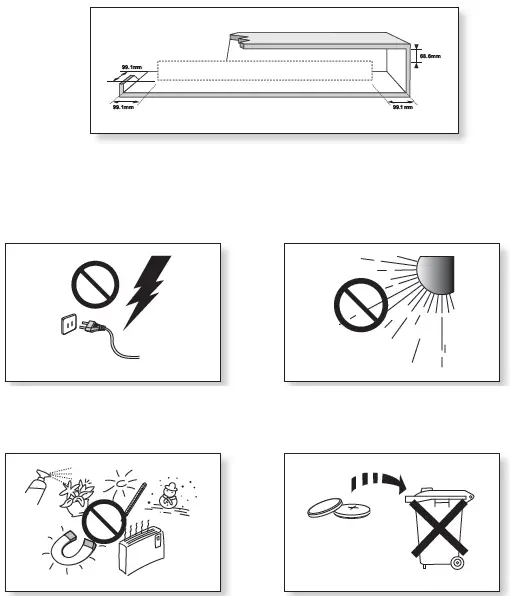
GETTING STARTED
Icons used in this manual
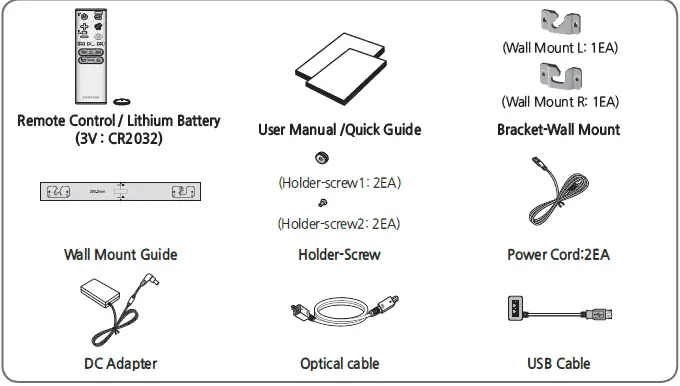
WHAT’S INCLUDED
DESCRIPTIONS
TOP/FRONT PANEL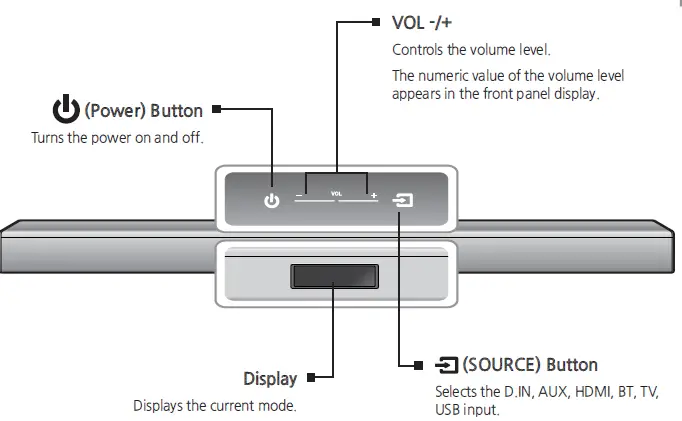
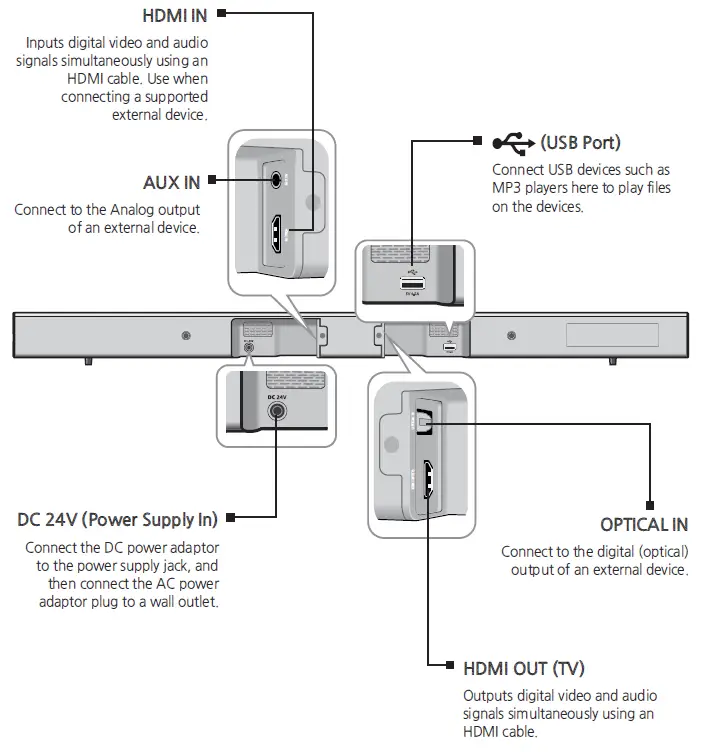
REAR PANEL
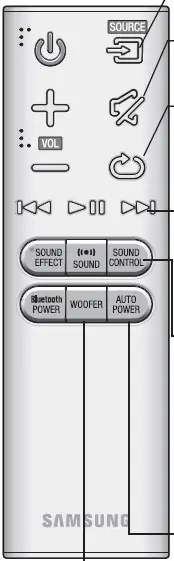
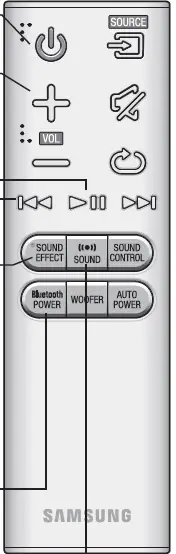
REMOTE CONTROL
- SOURCE
- MUTE
- REPEAT
- Skip Forward
- SOUND CONTROL
- AUTO POWER
- WOOFER

- POWER
- VOLUME
- Skip Back
- SOUND EFFECT
- Bluetooth POWER
- SOUND

Installing the Battery in the Remote Control
CONNECTIONS
Installation Precautions
- Install on a vertical wall only.
- For the installation, avoid a location with high temperature or humidity, or a wall that cannot sustain the weight of the set.
- Check the strength of the wall. If the wall is not strong enough to support the unit, reinforce the wall or install the unit on a different wall that can support the unit’s weight.
- Purchase and use the fixing screws or anchors appropriate for the kind of wall you have (plaster board, iron board, wood, etc.). If possible, fix the support screws into wall studs.
- Purchase wall mounting screws according to the type and thickness of the wall you will mount the Soundbar on.
- Diameter : M5
- Length: L 35 mm or longer recommended
- Connect cables from the unit to external devices before you install it on the wall.
- Make sure the unit is turned off and unplugged before you install it. Otherwise, it may cause an electric shock.
- Place the installation guide against the wall surface.
- The installation guide must be level.
- Install at least 5 cm below the TV, if the TV is mounted on the wall.
- Mark the location where the screws will go through on the wall using a pen, and then remove the installation guide.
- Fasten the wall mounts and screws to the marked locations.
- The left and right mounts are different shapes.
- Secure the two holder screws to the screw holes on the back of the Soundbar’s main body, one on the left and one on the right.
- Insert the USB cable into the back of the Soundbar before installing it on the wall.
- Set the holder screws on the back of the Soundbar into the grooves of the wall mount. For safe installation, make sure to push the holder screws all the way to the bottom of the grooves.

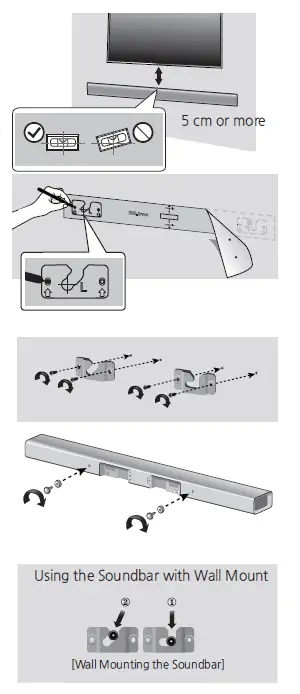
DETACHING THE WALL MOUNT
- Pull the Soundbar upwards as shown in the figure to separate it from the wall mount.
- Do not hang onto the installed unit and avoid striking or dropping the unit.
- Secure the unit firmly to the wall so that it does not fall off. If the unit falls off, it may cause an injury or damage the product.
- When the unit is installed on a wall, please make sure that children do not pull any of the connecting cables, as it may cause it to fall.
- For the optimal performance of a wall mount installation, install the speaker system at least 5 cm below the TV, if the TV is mounted on the wall.
- For your safety, if you do not mount the unit on the wall, install it on a secure, flat surface where it is unlikely to fall.
INSTALLING THE BRACKET WITHOUT REFERRING TO THE WALL-MOUNT INSTALLATION GUIDE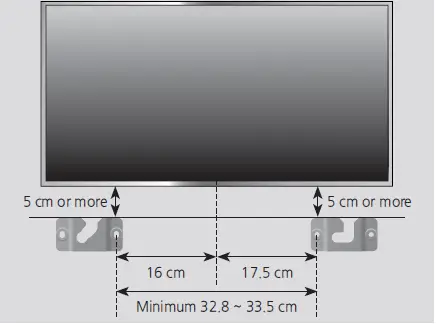
- Place the “Wall Mount L” on the desired wall surface while paralleled to the floor as shown above, and fix a screw through the hole on its right end.
- Place the “Wall Mount R” on the desired wall surface while paralleled to the floor as shown above, and fix a screw through the hole on its left end.
- If Wall Mount L/R are to be mounted beneath the TV, check their fixing hole positions in steps 1 and 2, so that they are aligned appropriately to the center of the TV’s bottom.
- Fix screws through the rest of holes
CONNECTION
CONNECTING THE WIRELESS SUBWOOFER
The Subwoofer’s linking ID is preset at the factory and the main unit and subwoofer should link (connect wirelessly) automatically when the main unit and subwoofer are turned on. If the Link indicator ( ) does not light when the main unit and subwoofer are turned on, please set the ID by following the procedure below.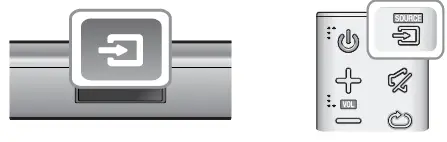
CONNECTING AN EXTERNAL DEVICE USING AN HDMI CABLE
HDMI is the standard digital interface for connecting to such TVs, projectors, DVD players, Blu-ray players, set top boxes, and more. Because HDMI transmits the highest quality digital signal, you can enjoy superior video and audio – as it was originally created at the digital source.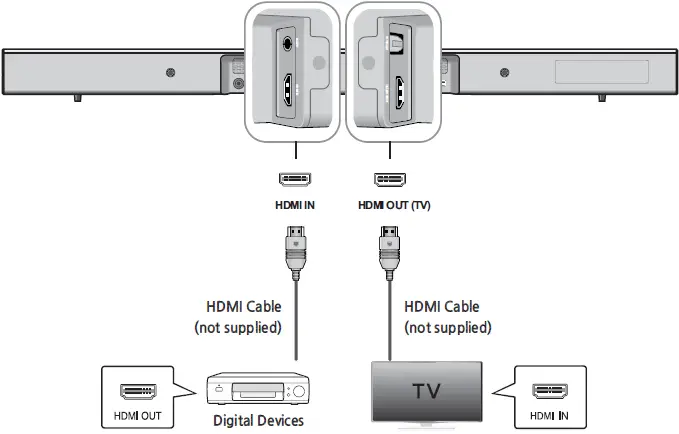
CONNECTING AN EXTERNAL DEVICE USING AUDIO (ANALOGUE) CABLE OR OPTICAL (DIGITAL) CABLE
This unit comes equipped with one optical in digital jack and one audio Analogue in jack, giving you two ways to connect it to a TV.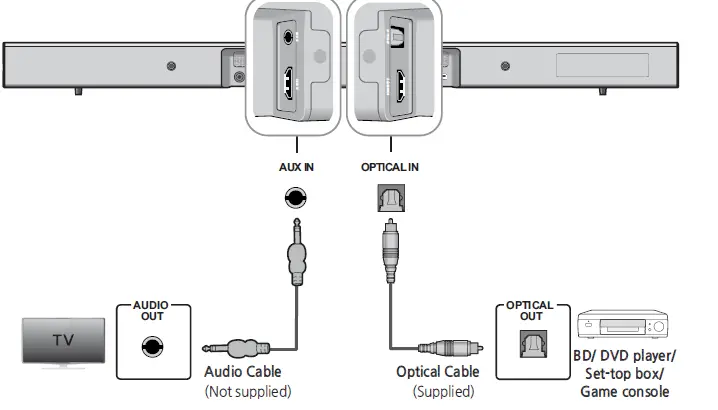
FUNCTIONS
INPUT MODE
Press the ( ) button on the main unit’s top panel or the (SOURCE) button on the remote control to select the mode you want.
ARC (HDMI OUT)
- ARC (Audio Return Channel) transfers digital audio signal to the HDMI OUT (ARC) port.
- Connect the TV supporting ARC to the Soundbar with an HDMI cable.
- Turn on the TV, and turn on the Soundbar’s Anynet+.
- Press the ( ) button on the main unit’s top panel or the (SOURCE) button on the remote control to select the D.IN mode
BLUETOOTH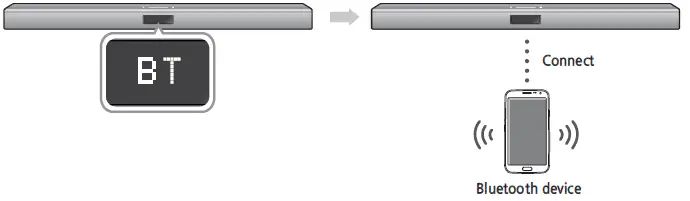
USING SAMSUNG AUDIO REMOTE APP
Install Samsung Audio Remote App
To control the product with your Smart Device via the Samsung Audio Remote app, download the Samsung Audio Remote App by accessing the app through Google Play store
Accessing the Samsung Audio Remote App
After you install the Samsung Audio Remote app, follow the instructions in the app
SOFTWARE UPDATE
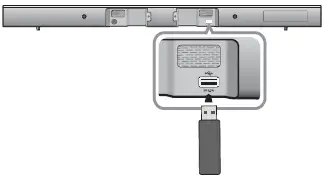
Samsung may offer updates for the Soundbar’s system firmware in the future. If an update is offered, you can update the firmware by connecting a USB device with the firmware update stored on it to the USB port on your Soundbar. Note that if there are multiple update files, you must load them onto the USB device singly and use them to update the firmware one file at a time. Please visit Samsung.com or contact the Samsung call center to receive more information about downloading updates files.
TROUBLESHOOTING
| The unit will not turn on. | |
| • Is the power cord plugged into the outlet? | ➔ Connect the power plug to the outlet. |
| A function does not work when the button is pressed. | |
| • Is there static electricity in the air? | ➔ Disconnect the power plug and connect it again. |
| Sound is not produced. | |
| • Is the Mute function on?
• Is the volume set to minimum? | ➔ Press the Mute button to cancel the function.
➔ Adjust the Volume. |
| The remote control does not work. | |
| • Are the batteries drained?
• Is the distance between the remote control and main unit too far? | ➔ Replace with new batteries.
➔ Move closer to the unit. |
| The TV SoundConnect (TV pairing) failed. | |
| • Does your TV support TV SoundConnect?
• Is your TV firmware the latest version? • Does an error occur when connecting? • Reset the TV MODE and connect again. | ➔ TV SoundConnect is supported by some Samsung TVs released from 2012 on. Check your TV to see if it supports TV SoundConnect.
➔ Update your TV with the latest firmware. ➔ Contact the Samsung call center. ➔ Press and hold the +# button for 5 seconds to reset the TV SoundConnect connection. |
| The red LED on the subwoofer blinks and the subwoofer is not producing sound. | |
| • Your subwoofer may not be connected to the main body of the product. | ➔ Try to connect your subwoofer again. (See Page 13) |
| The subwoofer drones and vibrates noticeably. | |
| • Try to adjust the vibration of your subwoofer. | ➔ Press the WOOFER button on your remote control to adjust its value (between SW-12 and SW+6). |
SPECIFICATIONS
|
GENERAL | USB | 5V/0.5A | |
|
Weight | Main Unit | 1.62 kg | |
| Subwoofer | 4.6 kg | ||
| Dimensions (W x H x D) | Main Unit | 957.5 x 59.5 x 66.5 mm | |
| Subwoofer | 179 x 361 x 299.5 mm | ||
| Operating Temperature Range | +5 °C to +35 °C | ||
| Operating Humidity Range | 10 % to 75 % | ||
|
AMPLIFIER | Rated Output Power | Main Unit | 80W/CH, 3 OHM, THD = 10%, 1kHz |
| Subwoofer | 140W, 3 OHM, THD = 10%, 70Hz | ||
| S/N Ratio (Analogue Input) | 65 dB | ||
| Separation (1kHz) | 65 dB | ||
Contact SAMSUNG WORLD WIDE
| Area | Contact Centre ( | Web Site |
| ` Europe | ||
| AUSTRIA | 0800 – SAMSUNG (0800 –
7267864) | www.samsung.com/at/support |
|
BELGIUM |
02-201-24-18 | www.samsung.com/be/support (Dutch) www.samsung.com/be_fr/
support (French) |
| BOSNIA | 051 331 999 | www.samsung.com/support |
| BULGARIA | 07001 33 11 , sharing cost | www.samsung.com/bg/support |
| CROATIA | 062 726 786 | www.samsung.com/hr/support |
| CZECH | 800 – SAMSUNG (800-726786) | www.samsung.com/cz/support |
| DENMARK | 70 70 19 70 | www.samsung.com/dk/support |
| FINLAND | 030-6227 515 | www.samsung.com/fi/support |
| FRANCE | 01 48 63 00 00 | www.samsung.com/fr/support |
|
GERMANY | 0180 6 SAMSUNG bzw.
0180 6 7267864* (*0,20 €/Anruf aus dem dt. Festnetz, aus dem Mobilfunk max. 0,60 €/Anruf) |
|
| CYPRUS | 8009 4000 only from landline, toll
free |
|
|
GREECE | 80111-SAMSUNG (80111 726
7864) only from land line (+30) 210 6897691 from mobile and land line | |
| HUNGARY | 0680SAMSUNG (0680-726-786)
0680PREMIUM (0680-773-648) | http://www.samsung.com/hu/
support |
| ITALIA | 800-SAMSUNG (800.7267864) | www.samsung.com/it/support |
| Area | Contact Centre ( | Web Site |
| LUXEMBURG | 261 03 710 | www.samsung.com/support |
| MONTENEGRO | 020 405 888 | www.samsung.com/support |
| SLOVENIA | 080 697 267
090 726 786 | www.samsung.com/si/support |
| NETHERLANDS | 0900-SAMSUNG (0900-7267864)
(€ 0,10/Min) | www.samsung.com/nl/support |
| NORWAY | 815 56480 | www.samsung.com/no/support |
|
POLAND | 0 801-172-678* lub +48 22
607-93-33 ** * (całkowity koszt połączenia jak za 1 impuls według taryfy operatora ** (koszt połączenia według taryfy operatora) |
|
| PORTUGAL | 808 20 7267 | www.samsung.com/pt/support |
| ROMANIA | 08008 SAMSUNG (08008 726
7864) TOLL FREE No. | www.samsung.com/ro/support |
| SERBIA | 011 321 6899 | www.samsung.com/rs/support |
| SLOVAKIA | 0800 – SAMSUNG(0800-726 786) | www.samsung.com/sk/support |
| SPAIN | 0034902172678 | www.samsung.com/es/support |
| SWEDEN | 0771 726 7864 (SAMSUNG) | www.samsung.com/se/support |
|
SWITZERLAND |
0848 726 78 64 (0848-SAMSUNG) | www.samsung.com/ch/support (German) www.samsung.com/ch_fr/
support (French) |
| U.K | 0330 SAMSUNG (7267864) | www.samsung.com/uk/support |
| EIRE | 0818 717100 | www.samsung.com/ie/support |
| LITHUANIA | 8-800-77777 | www.samsung.com/lt/support |
| LATVIA | 8000-7267 | www.samsung.com/lv/support |
| ESTONIA | 800-7267 | www.samsung.com/ee/support |
(Applicable in countries with separate collection systems)
This marking on the battery, manual or packaging indicates that the batteries in this product should not be disposed of with other household waste at the end of their working life. Where marked, the chemical symbols Hg, Cd or Pb indicate that the battery contains mercury, cadmium or lead above the reference levels in EC Directive 2006/66. If batteries are not properly disposed of, these substances can cause harm to human health or the environment. To protect natural resources and to promote material reuse, please separate batteries from other types of waste and recycle them through your local, free battery return system.
FAQS.
The subwoofer plugs into the wall separate from the bar. The bar has an ac/dc converter that also plugs into the wall.
If you have a Samsung TV that supports this function. My Samsung Smart TV does not among other things I would like it to do. Some manufactured made 2012 and later may.
The # to the left of the . is the number of sound channels for regular speakers. The # to the right of the . is the number of subwoofers (low notes)
The optical cable that comes with the sound bar stays in place without issues once the clear plastic cap on the end is removed.
if you own a compatible Samsung TV that has the Radio.com app, you can stream FM music to the soundbar.
This sound bar can work with any TV. It uses an HDMI, or optical connection.
Mine worked with a dumb tv. Samsung 40 inch from 5 years ago. Used the hdmi signal to operate easil also work with opitcal cable. Now using it with a vizio smart tv via hdmi also.
If your TV has HDMI ARC, plug your cable box into your TV. Then connect HDMI directly from your TV to the HDMI OUT (counterintuitive i know) on the sound bar
It sits under the tv and does not interfere with our tv or remote at all. Make sure you turn the sound down on your regular tv before turning the sound up on the sound bar or you will have an echo.
It sits under the tv and does not interfere with our tv or remote at all. Make sure you turn the sound down on your regular tv before turning the sound up on the sound bar or you will have an echo.
It should work via Bluetooth…but if not you can hook it up with the hdmi or digital cord..
Yes everything is included with this but if you wish to install it with an HDMI cable that would need to be purchases separately so you can get even better audio quality.
Great product. Sounds great no matter what you’re watching.
My Bluetooth works just fine with it on my 6s. Should be good to go.
You can connect HDMI from your XBoxes to the TV and connect an optical audio cable from the TV to the soundbar.


