
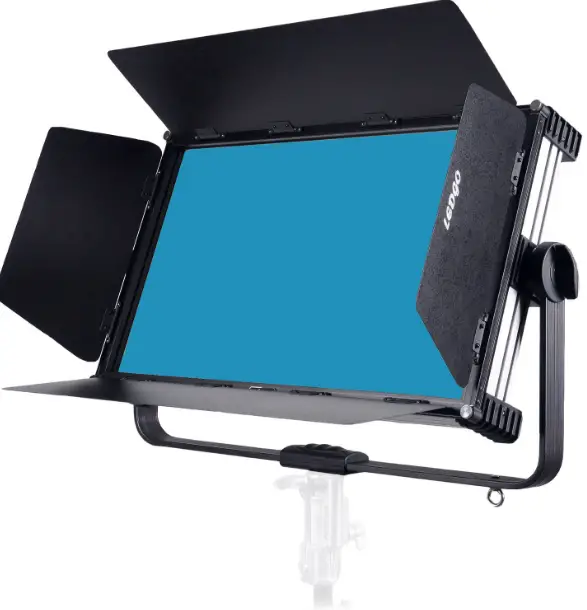
LEDGO LG-G260 260W LED RGB Studio Light
- This product is in good condition and the package is completed while in the factory. All users should strictly follow the warnings and operating instructions stated in this manual, and any damage caused by misuse or neglect of the operating manual is not within the warranty of the distributors and manufacturer.
- If any change in technology parameters shall take real product as criterion without notice.
Standard Configuration
| Items | Quantity | Unit | Remarks |
| Power cable | 1 | PC | |
| Power Adapter | 1 | PC | 48V |
| Flight Case(without wheels) | 1 | PC |
Security Warning Info
- While receiving the fixture, please check the lights if there is any external damage due to transportation. Do not use the fixture if there is any external damage caused by shipping, and please contact the dealer or manufacturer as soon as possible.
- Please do not place the fixture in the vicinity of solvents such as alcohol or gasoline, or other common combustible materials.
- Qualified professionals and technical personnel are required to install, operate and maintain the fixture and ensure that they are strictly in accordance with the procedures described in the operating instructions.
- The fixture should be installed in a well-ventilated area, and check if the fan and vents are unobstructed or not.
- Do not stare at the light source for a long time to avoid damaging the eyes!
- Please do not open the fixture to repair on your own.
- Operators who perform electric connections must have the appropriate qualifications.
- Before installation, make sure that the power supply voltage you are using matches the voltage marked on the fixture.
- Do not use power cords with damaged insulation layer, and do not overlap the power cord with other wires. When the fixture is not working or needs to clean, please unplug the power cord, and pay attention not to drag the power cord directly for pulling out the plug.
- The temperature of the outer surface can reach 50°C when the fixture is used for a long time. Please be careful not to be scalded.
- If you have any questions or suggestions, please contact the distributors or manufacturer in time.
Notice:Before making any electric installation, repair and cleaning of the fixture, make sure that the power has been cut off.
Structure & Installation
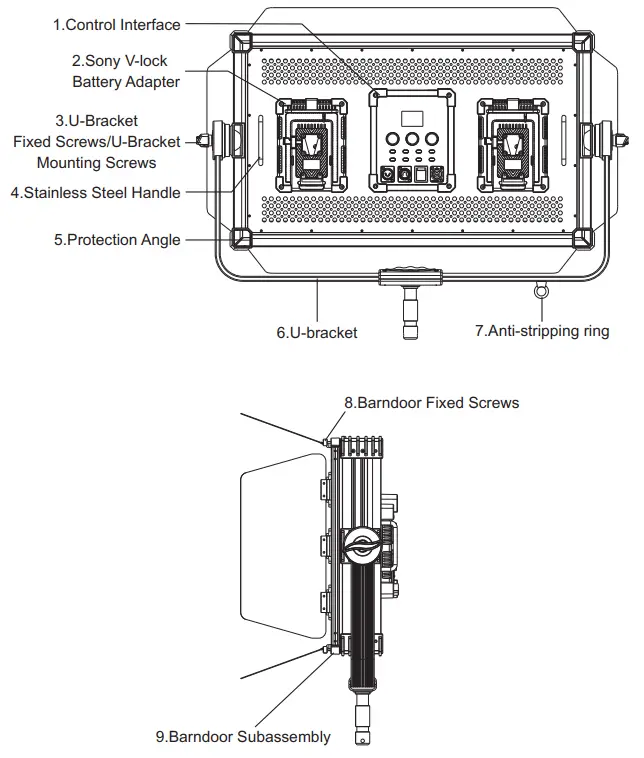
The fixture can be installed directly on the light stand, is also suitable for hanging installation. If you choose the hanging installation, please purchase the Quick installation components of safety rope and installed it in four protection-angle hole of the fixture, please confirm if the installation of light is reliable and stable on the required hanging position, please make sure that the position has sufficient strength to support the fixture. For safety, the safety rope must be used passing through the U-Bracket to assist the lifting and ensure the safety.
Notice:
- The safety rope is only used when lifting the fixture. Do not use them as a handle tool to carry the lights.
- For safety, please ensure each safety rope can bear 25KG weight.
Install & Disassemble of the Barn doors
- When installing the fixture, fasten the fixture with a vertically upwards, insert the barn doors component from the top to the bottom, then tighten the four fixing screws in a clockwise direction.
- When disassembling, fasten the fixture with a vertically upwards, turn it counterclockwise to release the four fixing screws, slide the barn doors component out.
Notice: When installing and removing the barn doors component, please do not touch the filter of the front panel to avoid getting surface scratches.
Power Connection
- When connecting the power supply,please note that the supply voltage and frequency should
match the one marked on the power adapter. - When connecting an external battery or using the V-lock battery,please turn off the light first
before plugging or unplugging the power cords or battery.
Notice:
- Use only the power cords and power adapter delivered with the fixture or suggested by the manufacturer as an option.
- The power plug on the adapter and the socket on the fixture should be connected as shown below.

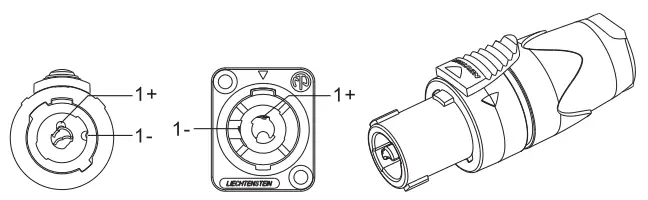
Pin1+: Connect the positive side of the power supply
Pin1- : Connect the negative side of the power supply
Power Connection
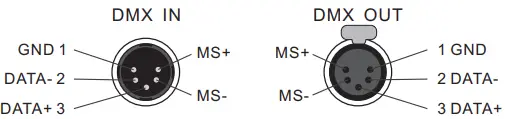
- The connection between the fixture and the console, and the fixtures between each one must use a 4-core shielded conducting wire with a diameter of not less than 0.5 mm.The connection between the XLR plug / socket and the conducting wire is shown above.
- Pin1, Pin2, Pin3 for connecting the DMX signal, Pin4, Pin5 for connecting the Master / Slave signal of the fixture.
Notice: When the socket is connected, the internal pin cannot touch the inner case, and the Pin and Pin can not touch each other. This fixture receives the international standard control signal: DMX512 (1990).
- 5-core and 3-core XLR plug/socket switch The fixture uses a 5-core XLR plug. If you are using a 3-core plug, please refer to the following illustration.

- Notice: When using a 3-pin XLR plug, the Master / Slave Mode Control cannot achieve.
DMX Loop Insert
In the “DMX control mode”, the DMX output port of the last fixture must be connected to the DMX circuit plug (optional accessories). There is a resistance of about 120Ω (OHM) between the 2-pin and 3-pin of this circuit plug (shown below). This circuit is inserted in the output of the last fixture, which can effectively avoid the noise and reflection of the DMX512 signal during transmission.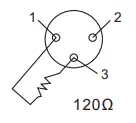
DMX Circuit connection Connect a 120 Ω(OHM) resistor between the 2-pin and 3-pin XLR plug and plug it into the DMX output socket of the last fixture.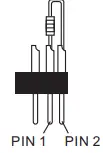
DMX Circuit connection
Connect a 120 Ω(OHM) resistor between the 2-pin and 3-pin XLR plug and plug it into the DMX output socket of the last fixture.
Control Panel Functional Buttons

- .CCT Button: Press it which can switch the CCT Dimming Mode according to your demands. Rotate the No.1 knob for adjusting the brightness; Rotate the No.2 knob for adjusting the color temperature; Rotate the No.3 knob for adjusting the RGB color compensation.
- Color Trimming Button: Press it which can switch directly into the RGB color trimming mode, the user can do color trimming based on the original mode according to your demands: The No.1 knob is for the Red color trimming mode; The No.2 knob is for the Green color trimming mode; The No.3 knob is for the Blue color trimming mode.
- RGBW Button: Press it which can switch the RGBW Dimming Mode,Rotate the Intensity Knob for adjusting the lighting brightness; Press the Selector Knob can select the R/G/B/W color mode then can rotate the No.2 knob for adjusting the color mix.
- Menu Button: Press it which can display the menu operating mode on the LCD screen.
- Filters Button: Press it which can switch the filters modes.Rotating the Intensity Knob can select the filter color; Rotate the No.3 Knob can select the color temperature 3200K OR 5600K and enter to get different filter effects.
- Special Effects Button: Press it which can switch the Special Effects Mode.Rotating the Intensity Knob can choose what special effect you need, then set the relevant parameters with the rapid simulation of a variety of special scene lighting effects.
- Scenes Button: Press it which can switch the Scenes Mode to extract or save the customized scenes.
- Back Button: Press it which can operate the LCD Screen menu displaying return to the previous level interface.
DMX Start Address Setting
- When using the console to control the fixture, each one must be set its DMX address, to receive the dimmer signal and response correctly. This product has a total of 10 channels, set the first fixture’s DMX start address is set to 001, 011 for the second one displays, 021 for the third one displays, 031 for the fourth one displays, and so on. Press the Menu Button, LCD screen displays menu options, rotate the Selector Knob to select “Address” and press the knob to confirm, enter the DMX address code settings page, rotate the Selector Knob to set the fixture address code, stop your choosing then the system will save the default Display automatically(the upper right corner of the format for the Ch: XXX). Press the Back Button for exiting the settings interface.
Note: This DMX address code is equivalent to a wireless or WiFi address code when LEDGO wireless remote control or LEDGO WiFi lighting control is enabled.
WiFi 2.4G Remote Control
- The LG-G260 can be remotely operated with a 2.4G remote control or Wi-Fi APP lighting control system.
Notice: The 2.4G remote control or Wi-Fi APP lighting control system should be bought additionally ( regarding the detailed operating instructions, please refer to the accessories manual).
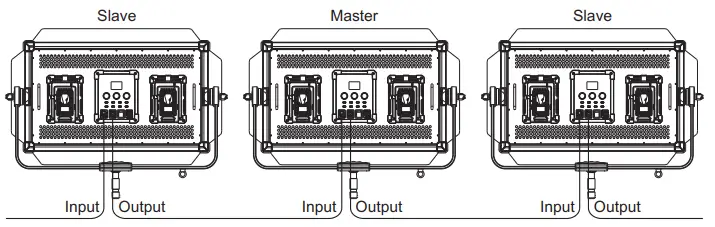
Master/Slave Sync Mode
- If you need to connect multiple fixtures to the master / slave sync mode, first connect the XLR control cable from the DMX output port of the first fixture to the DMX input port of the second fixture, and connect the DMX output port of the second fixture to the DMX input port of the third fixture, and so on, until all the fixture are connected.
- Operation control panel MENU button, press the Selector knob which can switch the Combined Control Mode option, rotate the Selector knob and press selecting the desired mode, select the Master mode in the random preset host lights, and set the Slaver mode in the slave machine, which achieves the Master / Slave Sync Mode control, at this point the slave operating mode is the same as the host one. That is, it can be controlled through the lighting of a host fixture to control the entire group of fixture’s lighting
- In Master / Slave Sync mode, if the slave does not want to be controlled by the host, you can set the combined control mode of the fixture in OFF mode.
Note:
- Fixture default DMX control priority, if the fixture is connected to the DMX dimming console, only can be controlled by the console and cannot be operated the Master / Slave Sync mode.
- When setting the master/slave mode, there is only one host fixture among all connected fixtures, cannot set two or more than two hosts at the same time.

| Power On displays LEDGO… | ||||
| 1st Menu Press the Selector knob to enter. | 2nd Menu Press the Selector knob to enter. | 3rd MENU | 4th Menu | Instructions |
|
1.Lighting Modes | CCT Displays the light brightness & color temperature.Rotate the Selector Knob for adjusting the R/G compensation. |
Mode:CCT Ch:001 DIM:100% CCT:5600K GN:+00 R:0% G:0% B:0% | In the CCT operation interface, if you want to add R.G.B color trimming function, you can press the Color Trimming button on the panel to operate and add the color according to the display contents, press the Scenes key can save the current scene, the fixture enters the Scene Save Mode, you can extract or save the user-defined scene according to the displayed contents. | |
| HSI Displays the light brightness.Rotate the Selector Knob for adjusting the intensity of the lighting color. | Mode:HSI Ch:001 DIM:100% HSI:360° SAT:100% | |||
| RGBW Displays the brightness percentage of the RGBW. | Mode:RGBW Ch:001 DIM:100% R:100% G:100% B:100% R:100% | |||
|
Tungsten |
Mode:Tungsten Ch:001 DIM:100%
R:0% G:0% B:0% | In the Tungsten operation interface, if you want to add R.G.B color trimming function, press the Color Trimming Button on the panel to operate and add the color according to the display contents, press the Scenes key can save the current scene, the fixture enters the Scene Save Mode, you can extract or save the user-defined scene according to the displayed content. | ||
| Sodium Vepour | Sodium Vepout Ch:001 DIM:100% | |||
| Metal Halide | Metal Halide Ch:001 DIM:100% | |||
| Fluorescent Rotate the Selector Knob for selecting 3 lighting effects on the menu. | Fluorescent Ch:001 DIM:100% Warmer Cooler Neutral | |||
| Street Rotate the Selector Knob for selecting 4 lighting effects on the menu. | Mode:Street Ch:001 DIM:100% YW WW NW CW | |||
|
2.Filters | OFF L3202 L3203 L3204 L3208 L3216 L3407 L3411 L3408 L3409 L3418 Rotate the Selector Knob for selecting 10 kinds of filters effect or turn off it. |
L3202 Ch:001 DIM:100% 3200K 5600K
Rotate the Selector Knob for selecting two lighting color temperature effects | ||
| OFF | ||||
|
3.Special Effect | Storm Enter the menu to set the brightness, frequency and amplitude,press the Selector Knob for adjusting the start or the pause. | Storm Ch:001 DIM:100% Freq:100% SPD:100% | ||
| Cop Car Enter the menu to set the brightness, rotate the Selector Knob for selecting the modes. | Cop Car Ch:001 DIM:100% Color:RBW Mode:Single | |||
| Candle light Enter the menu for adjusting the brightness, speed and mode. | Caneld Light Ch:001 DIM:100% SPD:100% Mode:Single | |||
| Soft Disco Enter the menu for adjusting the brightness, speed and color type. | Soft Disco Ch:001 DIM:100% SPD:100% SAT:100% | |||
| Hard Disco Enter the menu for adjusting the brightness, speed and saturation. | Hard Disco Ch:001 DIM:100% SPD:100% Colors:24 | |||
| Monitor Enter the menu for adjusting the brightness, speed and color type. | Monitor Ch:001 DIM:100% SPD:100% Mode:warmer | |||
| Multi Flash Enter the menu for adjusting the brightness, frequency and mode. | Multi Flash Ch:001 DIM:100% Freq:100% Mode:Modern |
|
4.Scenes | Save Used to extract the user-defined scenes or lighting effects, five kinds of scenes are available. | SAVE SCENE-1 SCENE-2 SCENE-3 SCENE-4 SCENE-5 | Do you save the scene?
NO YES | Scene-Save operation instructions: used to save the current settings scene, pressing the Scenes Button can enter the Scene Save Mode, save customized scene according to the display contents. |
| Extraction Used to extract the user-defined scenes or lighting effects, five kinds of scenes are available. | Extraction SCENE-1 SCENE-2 SCENE-3 SCENE-4 SCENE-5 | Do you extract the scene?
NO YES | Scene-Extraction operation instructions: used to extract five kinds of scenes, pressing the Scenes Button can enter the Scene Extraction Mode, extract customized scene according to the display contents. | |
|
5. Flashing | OFF 250mS 500mS 1000mS 2000mS SOS Rotate the selector knob to select the duration of the flashing or turn it off. | |||
| User-Defined For customizing the duration of flashing. | Flash-User Defined Ch:001 6.0S | |||
| Random Blink For customizing the frequency of the flashing. | Flash-Random Blink Ch:001 Freq:100% | |||
|
6. Cycle | OFF 4S 8S 12S 16S Rotate the Selector Knob or adjusting the color retention time or turn off the loop function. | |||
| User Defined For customizing the Cycle Time. | Cycle-User Defined Ch:001 16.0S |
|
7.Combined Control Moed | Combined Control Moed OFF Master Slaver Rotate the Selector Knob for selecting Combined Control Mode. | |||
| 8. Address | ADDRESS 512 Rotate the Selector Knob for selecting the Address. | |||
|
9. Fan | ON OFF Rotate the Selector Knob for selecting to turn ON/OFF the Fan. | Fan setting instructions: When you choose to the OFF mode, the fixture output brightness is 50%;When you choose to the ON mode, the fixture output brightness is 100%;When the battery holder is equipped with two batteries, the fan automatically enters the OFF mode | ||
| 10. Version | Version X.XX.XX Display the fixture version number |
DMX Control Channel
LG-G260 RGB studio light has a total of 10 control channels, can receive the DMX512 international standard signal, and its respective control channel content as follows
| Channel | Contents | DMX Value | Descriptions |
| 1 | DIM ( Dimmer) | 000- 255 | Gradually change from dark to bright |
|
2 |
Lighting Mode | 000- 028 | OFF |
| 029-056 | CCT | ||
| 057-084 | HSI | ||
| 085-112 | RGBW | ||
| 113-140 | Tungsten | ||
| 141-168 | Sodium Vepour | ||
| 169-196 | Metal Halide | ||
| 197-224 | Fluorescent | ||
| 225-255 | Street | ||
|
3 |
Special Effect | 000- 031 | OFF |
| 032-062 | Storm | ||
| 063-093 | Cop Car | ||
| 094-124 | Candle Light | ||
| 125-155 | Soft Disco | ||
| 156-186 | Hard Disco | ||
| 187-217 | Monitor | ||
| 218-255 | Multi Flash | ||
|
4 |
Filters | 000- 023 | OFF |
| 024-046 | L3202 | ||
| 047-069 | L3203 | ||
| 070-092 | L3204 | ||
| 093-115 | L3208 | ||
| 116-138 | L3216 | ||
| 139-161 | L3407 | ||
| 162-184 | L3411 | ||
| 185-207 | L3408 | ||
| 208-230 | L3409 | ||
| 231-255 | L3418 | ||
| 5 | |||
| Lighting mode | |||
| CCT | Lighting color temperature adjustment | 000-255 | 2700K- 7500K |
| HSI | Lighting color selection | 000-255 | 0- 360° |
| RGBW | Red mixed lighting | 000- 255 | Gradually change from dark to bright |
| Tungsten | R+: Red compensation | 000- 255 | Gradually change from dark to bright |
| Sodium Vepour | |||
| Metal Halide | |||
| Fluorescent | Warmer | 000- 085 | Select the light source effects |
| Coolerl | 086- 172 | ||
| Neutra | 173-255 | ||
| Street | YW | 000-063 |
Select the light source effects |
| WW | 064-127 | ||
| NW | 128-191 | ||
| CW | 192-255 | ||
| Special Effects | |||
| Storm | Freq | 000-255 | The frequency changes from slow to fast |
| Cop Car | B | 000-063 |
Switch B / RB / BW / RBW 4 modes |
| RB | 064-127 | ||
| BW | 128-191 | ||
| RBW | 192-255 | ||
| Candle Light | SPD | 000- 255 | Gradually change from fast to slow |
| Soft Disco | SPD | 000- 255 | Gradually change from fast to slow |
| Hard Disco | SPD | 000- 255 | Gradually change from fast to slow |
| Monitor | SPD | 000- 255 | Gradually change from fast to slow |
| Multi Flash | Freq | 000- 255 | The frequency changes from slow to fast |
| Filters | |||
| L3202 |
3200K |
000- 127 |
2 modes switch |
| L3203 | |||
| L3204 | |||
| L3208 | |||
| L3216 | |||
| L3407 |
5600K |
128- 255 | |
| L3411 | |||
| L3408 | |||
| L3409 | |||
| L3418 | |||
| 6 | |||
| Lighting modes | |||
| CCT | GN: Red and green compensation | (-50)-(+50) Color compensation adjustment | |
| HSI | SAT | Gradually change from shallow to deep | |
| RGBW | G: Green mixed lighting | Gradually change from dark to bright | |
| Tungsten | G+: Green compensation | Gradually change from dark to bright | |
| Sodium Vepour | |||
| Metal Halide | |||
| Fluorescent | |||
| Street |
| Special Effects | |||
| Storm | SPD | ||
|
Cop Car | Cop Single | 000-042 |
6 modes switch |
| Cop Double | 043- 084 | ||
| Cop Quint_ All | 085- 126 | ||
| Cop Quint | 127- 168 | ||
| Cop Quad | 169- 210 | ||
| Cop Cycle | 211- 255 | ||
| Candle Light | Warmer | 000-085 | 3 kinds of light source switch |
| Coolerl | 086- 172 | ||
| Neutra | 173- 255 | ||
| Soft Disco | SAT | 000-255 | Gradually change from shallow to deep |
|
Hard Disco | Colors3 | 000-032 |
8 kinds of light source modes switch |
| Colors6 | 033- 064 | ||
| Colors9 | 065- 096 | ||
| Colors12 | 097- 128 | ||
| Colors15 | 129- 160 | ||
| Colors18 | 161- 192 | ||
| Colors21 | 193- 224 | ||
| Colors24 | 225- 255 | ||
| Monitor | Warmer | 000-085 | 3 kinds of light source switch |
| Coolerl | 086- 172 | ||
| Neutra | 173- 255 | ||
| Multi Flash | Modern | 000-127 | Selecting modes |
| Blue | 128- 255 | ||
| 7 | |||
| Lighting modes | |||
| CCT | R: Green mixed lighting | 000-255 | |
| HSI | |||
| RGBW | B: Green mixed lighting | 000-255 | |
| Tungsten | B+: Green compensation | 000-255 | |
| Special Effects | |||
| Storm | Pause | 000-127 | Switch-flashing mode |
| Start | 128- 255 | ||
| Cop Car | |||
| Candle Light | |||
| Soft Disco | |||
| Hard Disco | |||
| Monitor | |||
| Multi Flash |
| 8 | |||
| Lighting modes | |||
| CCT | G: Green mixed lighting | 000-255 | Gradually change from dark to bright |
| HSI | |||
| RGBW | W: White mixed lighting | 000-255 | Gradually change from dark to bright |
| 9 | |||
| Lighting modes | |||
| CCT | B: Green mixed lighting | 000-255 | Gradually change from dark to bright |
| HSI | Cycle OFF | 000-004 | |
| Cycle Time: 4-16S | 005-255 | ||
| 10 | |||
| Lighting modes | Flashing | ||
| CCT | |||
| HSI | OFF | 000-010 | |
| RGBW | Flashing:0. 1– 16S | 011-110 | |
| Tungsten | Freq: 0-100 SOS | 111-210 211-255 | 3 modes switch |
| Sodium Vepour | |||
| Metal Halide | |||
| Fluorescent | |||
| Street | |||
| Filters | Flashing | ||
| L3202 | |||
| L3203 | |||
| L3204 | OFF | 000-010 | |
| L3208 | Flashing:0. 1– 16S | 011-110 | |
| L3216 | Freq: 0-100 SOS | 111-210 211-255 | 3 modes switch |
| L3407 | |||
| L3411 | |||
| L3408 | |||
| L3409 | |||
| L3418 |
General Breakdown Analysis
| Description of Breakdown | Measurements |
|
The fixture cannot light up normally | 1) Please check if there is any loose connection between the adapter and power cords or lighting socket. 2) Please check if the adapter voltage is within the specified range. 3) If an external battery is used, please check if the battery is in place.Please check if the battery voltage is the same as the specified voltage. |
| The fixture can light up normally, but cannot control with the controller | 1) Check whether the DMX original address setting of the fixture is correct or not. 2) Check that the XLR signal cable is connected correctly or damaged. |
| LCD screen display garbled | Please turn off the fixture for 5-10 seconds and turn it on again. |
| The fan inside the fixture does not work | 1) Please check if the fan is set to the off state manually; 2) Please check if the dust plugs the fan or the vent. |
| Lighting brightness decreases significantly | Please check if the fan is set to be manual off. |
| Barn doors cannot be removed | Please check if 4 screws on the corner of the protection angle are completely released. |
Please contact the local distributor or manufacturer for maintenance service if the faulty problems are still not solved after taking the breakdown analysis and exclusion as above.
Main Technical Parameters
Input power:48V DC 5.8A, 100-240V AC
Maximum power:260W
Control Mode:
- International standard signal:DMX512, 5-core DMX512 interface (external wiring) 10 control channels
- Master/Slave Sync Mode
- 2.4G Mode
- WiFi APP Lighting Control Mode
Optical Parameters:
- Color temperature: 2700K-7500K
- CRI (Ra): 95
- Weight: 11 KGS
- Power Adapter: 2.5Kg
- Barn door Components: 2.5Kg
- Size: shown blow
LEDGO TECHNOLOGY LIMITED
Add: Zhanglin Section, Highway324,Dongli, Chenghai,Shantou City, Guangdong Province, China
Tel:0086-754-85354187 Fax:0086-754-85300887
E-mail: [email protected] http://www.ledgo.hk
Notice: This manual contains important information on how to install and use safely. Please read carefully and install accordingly as required. Please keep this manual properly in case you need it.
LEDGO Technology Limited
http://www.ledgo.hk
Zhanglin Section, 324 Highway, Dongli, Chenghai, Shantou, Guangdong, China


