
RadioRA 3 RRST-PRO-N Sunnata LED+ RF Dimmer Instruction Manual
Turn power OFF at circuit breaker

 WARNING: ELECTRIC SHOCK HAZARD.
May result in Serious Injury or Death. Turn off power at circuit breaker or fuse before installing.
Load types and operation
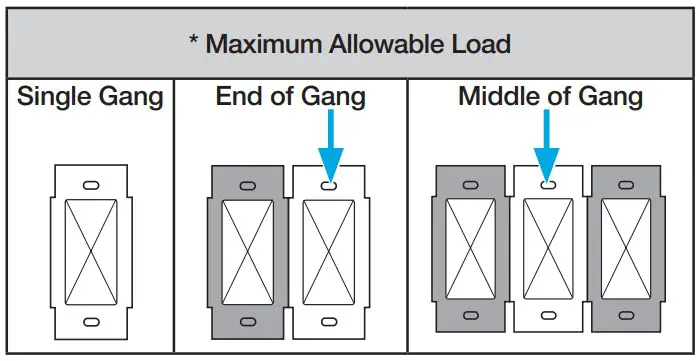
| Load Type | Minimum Load | Maximum Load | Neutral | Required Phase Mode 1 | ||
| Single Gang | End of Gang | Middle of Gang | ||||
| LED | 1 bulb | 250 W | 200 W | 150 W | Required | Either |
| MLV Transformer with LEDs | See Application Note #559 (P/N 048559) at www.lutron.com | Required | Forward | |||
| ELV Transformer with LEDs | Reverse | |||||
| MLV Transformer with Halogen | 10 W | 400 VA (300 W) | No Derating Required | Required | Forward | |
| ELV Transformer with Halogen | 10 W | 500 W | 400 W | 300 W | Required | Reverse |
| Incandescent /Halogen | 10 W | 500 W | 400 W | 300 W | Required | Either |
| Dimmable Fluorescent Ballast | 1 ballast | 3.3 A (400 VA) | No Derating Required | Required | Forward | |
| Hi-lume 1% 2-wire (LTE) LED Driver | 1 driver | 3.3 A (400 W) 20 drivers max. | No Derating Required | Required | Forward | |
| PHPM-PA / 3F and GRX-TVI | 1 interface | 3 interfaces | No Derating Required | Required | Forward | |
| CFL | 1 bulb | 250 W | 200 W | 150 W | Required | Forward |
See Section 7 on page 2 of this guide for phase-select instructions.
Note: For dimming MLV fixtures, the maximum lamp wattage is typically 70%- 85% of the transformer’s VA rating. For actual transformer efficiency, contact the manufacturer. The total VA rating of the transformer(s) shall not exceed the VA rating of the dimmer.
IMPORTANT
- CAUTION: Use only with permanently installed fixtures with dimmable screw-in LED, dimmable self-ballasted compact fluorescent, halogen, or incandescent lamps. Use only to control the primary side of permanently installed transformer supplied low-voltage lighting, or in combination with incandescent lamps. To reduce the risk of overheating and possible damage to other equipment DO NOT use to control receptacles, fluorescent lighting fixtures, non-ballasted or externally ballasted compact fluorescent lamps, motor operated appliances or transformer supplied appliances.
- Neutral is required for all load types.
- Install in accordance with all national and local electrical codes.
- When no “grounding means” exist within the wallbox, the NEC® 2011, Article 404.9 allows a dimmer without a grounding connection to be installed as a replacement, as long as a plastic, noncombustible wallplate is used. For this type of installation, twist a wire connector onto the green ground wire or remove the green ground wire on the dimmer and use an appropriate wallplate such as Claro or Satin Colors series wallplates by Lutron.
- Protect the dimmer from dust and dirt when painting or spackling the wall.
- This dimmer is not compatible with standard 3-way or 4-way switches. Use only with Lutron companion dimmers listed above.
- In any 3-way /4-way circuit use only one dimmer with up to
- companion dimmers.
- Maximum wire length between the dimmer and the farthest companion dimmer is 150 ft (45 m).
- Operate between 32 °F and 104 °F (0 °C and 40 °C).
- It is normal for the dimmers to feel warm to the touch during operation.
- Clean the dimmer with a soft damp cloth only. Do not use any chemical cleaners. For disinfecting, please refer to App Note #758 (048758), “Cleaning Recommendations for Lutron Products” at www.lutron.com.
- For indoor use only.
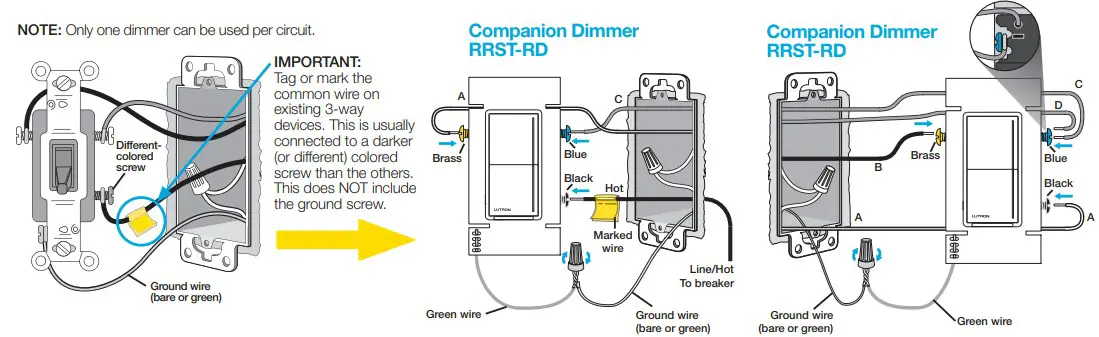
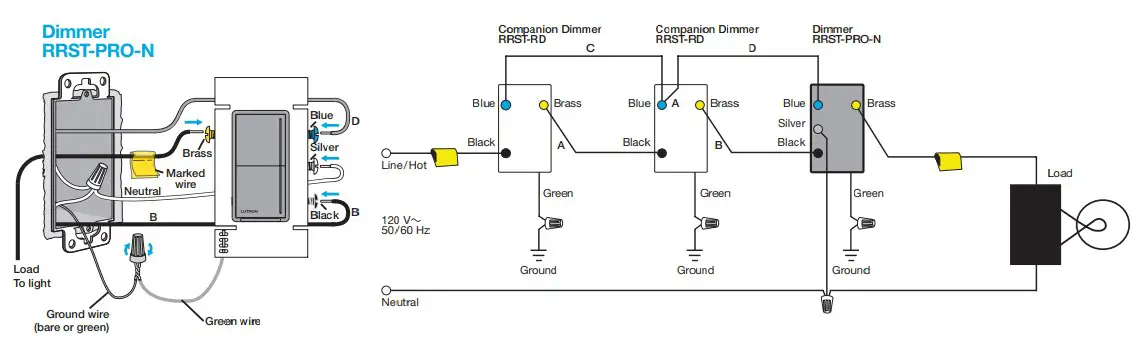
Determine wiring configuration

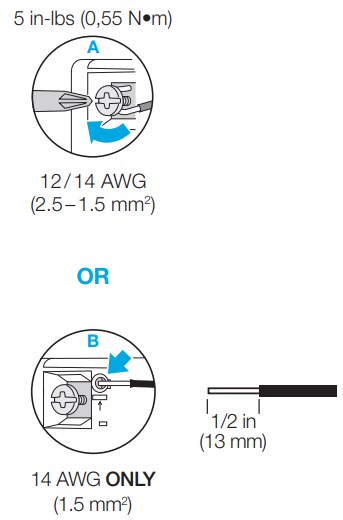
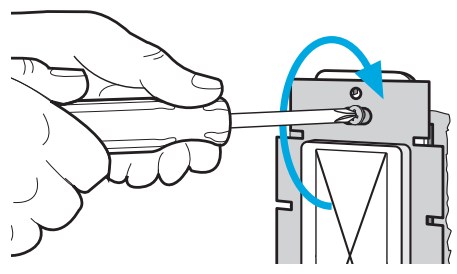
Fully wrap the wires around the screw and tighten (A), or strip insulated wires to 1/2 in (13 mm) and insert into the push-in terminals (B). Solid copper wire only.
For more information please go to www.lutron.com/wiringwizard
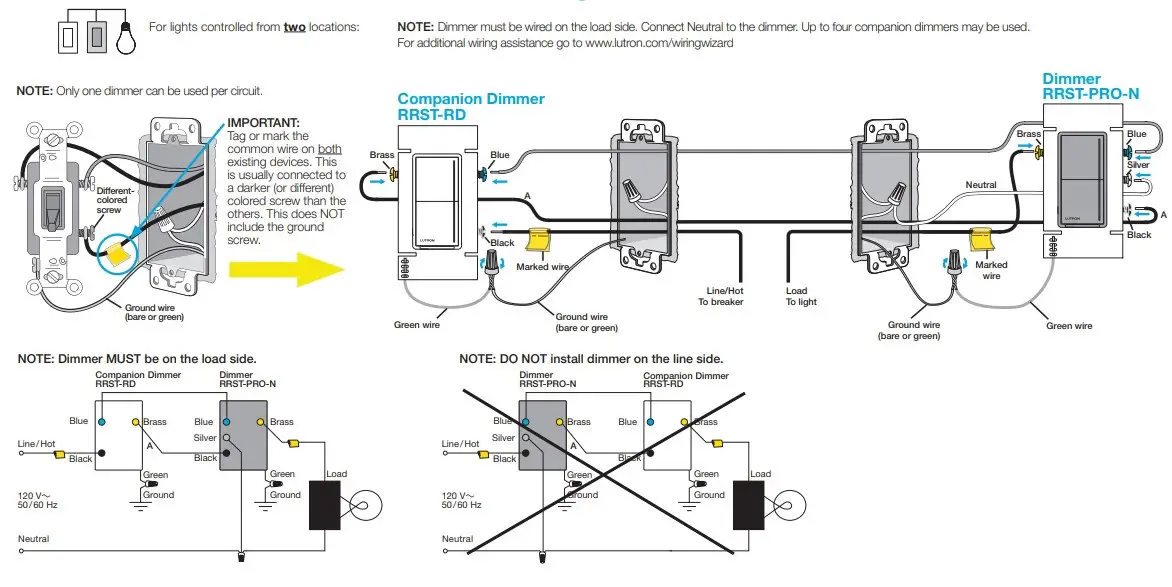
 For lights controlled from three or more locations:
NOTE: Dimmer must be wired on the load side. Connect Neutral to the dimmer. Up to four companion dimmers may be used.
For additional wiring assistance go to www.lutron.com/wiringwizard
Mount all devices using the provided screws and attach wallplate
Turn power ON at circuit breaker
Operation
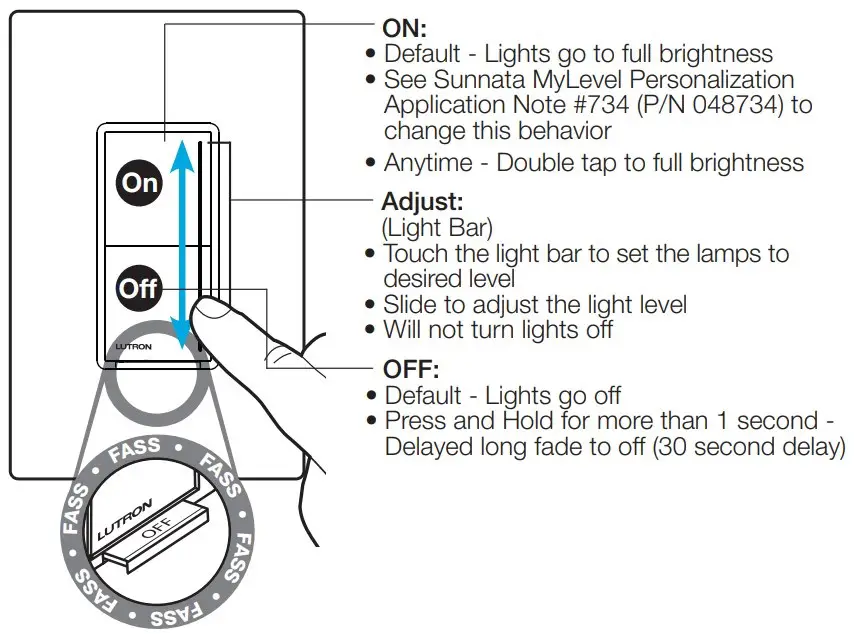
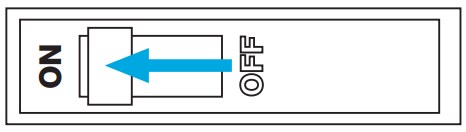
FASS
(Front Accessible Service Switch) Pull tab out to change the room’s light bulb.
Setup
Setup for use WITHOUT a system
NOTE: If setting up as part of system, phase settings and low-end trim levels made on the dimmer will be over-written by the system software.
Adjust Low-End Trim

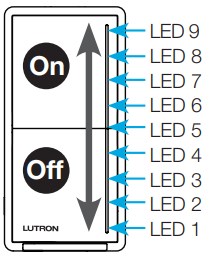
- Press and hold middle (LED 5) of light bar until dimmer goes to low-end and low-end setting starts to flash.
- Slide up or down on the light bar.
- Press and release Off to save and exit.
Phase-Select Mode
- Pull out the Front Accessible Service Switch (FASS).
- Press and hold On . Push in the Front Accessible Service Switch (FASS) and continue to hold On LED 1 and LED 9 start flashing.
LED 9 – Forward-Phase
LED 1 – Reverse-Phase (default) - Release the On . LED 1 or LED 9 will be flashing to indicate current phase mode.

- Press and hold On to save and exit
See the Sunnata MyLevel Personalization Application Note #734 (P/N 048734) at www.lutron.com/RA3support for details on how to change these settings.
Setup for use WITH a system
NOTE: If setting up as part of system, phase settings and low-end trim levels made on the dimmer will be over-written by the system software.
For use in a RadioRA 3 system, please refer to the Getting Started Guide: www.lutron.com/RA3support
For reliable performance in a system, this device should be placed within 25 ft (7.6 m) of two additional compatible RadioRA 3 Sunnata dimmer, switch, keypad or RadioRA 3 processor wireless devices. For more information please refer to the Wireless Setup guide: www.lutron.com/RA3support
Troubleshooting
| Symptom | Cause | Action |
| LED lights do not operate well or they flicker/buzz | The lamp is not compatible with your Lutron dimmer | Find a compatible lamp by visiting Lutron’s led compatibility tool at www.lutron.com/ledfinder |
| The phase is not set to the correct setting for your load type | 1. Confirm Phase Setting for your load type. See Table in Step 2 2. Change Phase Select Mode in Step 7 | |
| The low-end is not adjusted | Perform low-end trim adjustment in Step 7 | |
| LED lights do not dim low enough | The low-end is not adjusted | Perform low-end trim adjustment in Step 7 |
| LEDs 1, 7 and 9 are flashing (Hot-Dimmed Wire Miswire) | Wiring error. Product may be permanently damaged | Check wiring to be sure it matches installation instructions and wiring diagrams |
| LEDs 7, 8 and 9 are flashing (Blue Screw Miswire) | Wiring error. Product may be permanently damaged | Check wiring to be sure it matches installation instructions and wiring diagrams |
| LEDs 1 and 7 are flashing (Over Voltage Protection) | The phase is not set to the correct setting for your load type | 1. Confirm Phase Setting for your load type. See Table in Step 2 2. Change Phase Select Mode in Step 7 |
| Bottom three LEDs 1, 2, and 3 are flashing (Shorted FET Detection) | Wiring error. Product may be permanently damaged | Check wiring to be sure it matches installation instructions and wiring diagrams |
| Middle LED 5 is flashing (Over Temperature) | Load may exceed maximum load rating | Ensure load does not exceed the maximum allowable load. See Table in Step 2 |
| Ambient temperature may exceed maximum product rating | Turn unit off until the ambient temperature returns to the normal operating range | |
| Unit needs to be reset | Cycle power to the unit using the Front Accessible Service Switch (FASS) to reset | |
| All LEDs are flashing (Over Current Protection) | The phase is not set to the correct setting for your load type | 1. Confirm Phase Setting for your load type. See Table in Step 2 2. Change Phase Select Mode in Step 7 |
| Bulbs may have failed | Verify that no bulbs have failed | |
| Wiring error. Product may be permanently damaged | Check wiring to be sure it matches installation instructions and wiring diagrams | |
| The dimmer may need to be reset | Cycle power to the unit using the Front Accessible Service Switch (FASS) to reset | |
| The lamp is not compatible with your Lutron dimmer | Find a compatible lamp by visiting Lutron’s led compatibility tool at www.lutron.com/ledfinder | |
| Load is OFF and there is no LED lit on the dimmer | Power Not Present Circuit breaker OFF or tripped Load is not installed or connected Front Accessible Service Switch (FASS) is in the OFF position | Ensure breaker is On Dimmer must have a load to operate. Move Front Accessible Service Switch (FASS) to the ON position by pushing it in |
| Wiring Error Product is not wired correctly | Check wiring to be sure it matches installation instructions and wiring diagrams | |
| Light turns ON and OFF continuously | Improper load type or less than the required minimum load | Recommended minimum load is 10 W/ 10 VA or one compatible LED lamp listed at www.lutron.com/ledfinder |
| Dimmer LED is ON but load cannot be turned on or off | Wiring error | Check wiring to be sure it matches installation instructions and wiring diagrams |
| Lamps failed or not installed | Replace or install lamp | |
| Lights don’t turn ON/OFF from a keypad or from other remote device | Improper programming | Refer to the RadioRA3 software or Lutron App to ensure proper programming |
| Out of RF range | Reposition to be within 25 ft (7.6 m) of an RF signal repeater or another RF device |
For additional Troubleshooting, please visit www.lutron.com/RA3support
FCC/IC/IFT Information
- This device may not cause interference, and
- This device must accept any interference, including interference that may cause undesired operation. Modifications not expressly approved by Lutron Electronics Co., Inc. could void the user’s authority to operate this equipment.
NOTE: This equipment has been tested and found to comply with the limits for a Class B digital device, pursuant to part 15 of the FCC Rules.
These limits are designed to provide reasonable protection against harmful interference in a residential installation. This equipment generates, uses and can radiate radio frequency energy and, if not installed and used in accordance with the instructions, may cause harmful interference to radio communications. However, there is no guarantee that interference will not occur in a particular installation. If this equipment does cause harmful interference to radio or television reception, which can be determined by turning the equipment off and on, the user is encouraged to try to correct the interference by one or more of the following measures:
- Reorient or relocate the receiving antenna
- Increase the separation between the equipment and receiver
- Connect the equipment into an outlet on a circuit different from that to which the receiver is connected
- Consult the dealer or an experienced radio/TV technician for help.
This equipment complies with FCC/ISED radiation exposure limits set forth for an uncontrolled environment. The user should avoid prolonged exposure within 7.9 in (20 cm) of the antenna, which may exceed FCC/ISED radio frequency exposure limits.
This Class B digital apparatus complies with Canadian ICES-003
How-to videos


Help
Use our mobile friendly self-paced installation tool:
www.lutron.com/wiringwizard
Find more product information:
www.lutron.com/support
- Videos
- Frequently Asked Questions
- Online Chat (8 am–5 pm EST)
Call us:
U.S.A.|Canada|Caribbean
1.844.LUTRON1 (588.7661) (24/7)
Mexico
+1.888.235.2910
Others
+1.610.282.3800
Limited Warranty
www.lutron.com/TechnicalDocumentLibrary/Warranty.pdf
For FCC/IC information:
Please visit: www.lutron.com/fcc-ic)Lutron, Lutron, Sunnata, Claro, FASS, LED+, Pico, RadioRA, RadioRA 3, and Satin Colors are trademarks or registered trademarks of Lutron Electronics Co., Inc. in the US and/or other countries.
App Store is a service mark of Apple Inc., registered in the U.S. and other countries.
All product names, logos, and brands are property of their respective owners.
©2021 Lutron Electronics Co., Inc.
References
 LED Compatibility Tool | Lutron
-
Application Notes | RadioRA 3 | Lutron
-
Lutron: Beautiful light. Intelligent Shades. Powerful Controls
-
lutron.com/fcc-ic
-
LED Compatibility Tool | Lutron
-
Application Notes | RadioRA 3 | Lutron
-
Lutron Support Center | Lutron
-
How to Install a Dimmer Switch | Dimmer Switch Wiring | Lutron Web Tools


