![]()
![]() CLAIRITY™
CLAIRITY™
Link Portal
CLAIRITY™ Link
Overview
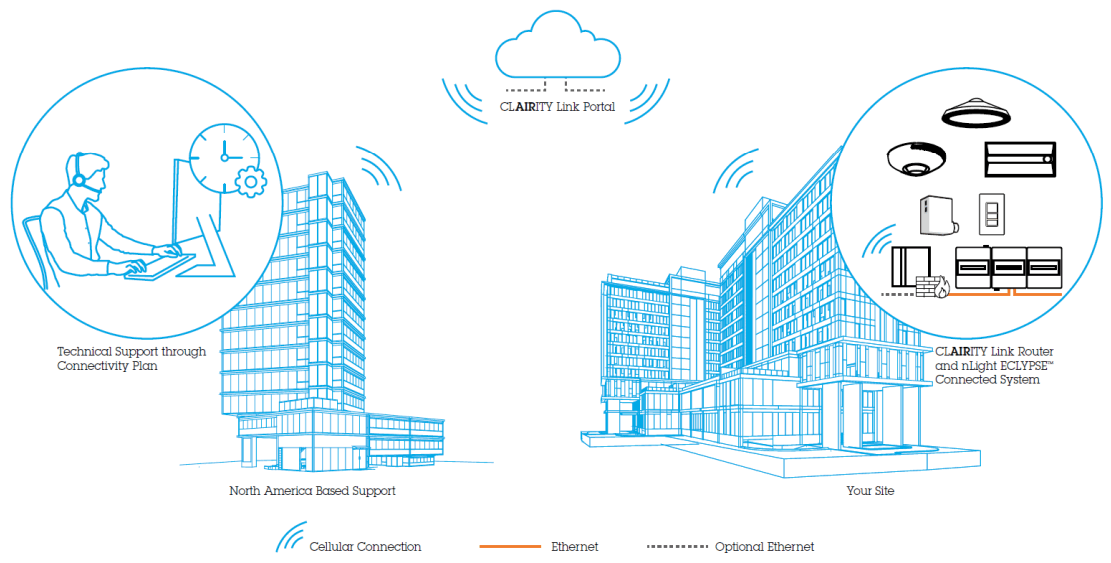
The CLAIRITY™ Link portal is the fleet management software used by factory representative experts to access one or more CLARITY Link routers and their connected devices. Through the portal, factory representative experts can configure items such as system device settings, system sequence of operations, and system lighting schedules.
This user guide will review the CLARITY Link portal, best practices, and its user interface. Through this guide, the word router will be used interchangeably with the word modem. The CLARITY Link router serves both device roles.
Login
The CLARITY Link solution makes use of several security features pertaining to the login experience for the CLARITY Link portal, which is reached at https://clairitylink.acuitynext.com/.
Multifactor Authentication
Multifactor authentication is used for both logging into the CLARITY Link transporter and logging into the CLARITY Link portal. Multifactor authentication for agent representatives is accomplished through a verification code sent to the email associated with their account. Acuity employee multifactor authentication is accomplished through single sign-on using the Microsoft Azure directory.
CLARITY Link Transporter
The CLARITY Link transporter encrypts information exchange between authenticated users and the CLARITY Link portal. This software is available for optional installation when installing SensorView versions 15.2 and later. The application’s symbol is shown below. See the SensorView User Guide for more information on this software.
Role Types
The CLARITY Link solution makes use of various user roles to protect access to routers. Below is a summary of the roles and their capabilities.

Organization Admin
This role type is intended for users that will maintain their CLARITY Link solution. Organization admins assemble the organization’s subgroups and the associated routers and users. They also create and manage sites routers can be associated with. Organization admins can see and connect to all routers associated with an organization. Organization admins may not modify accepted email domains found under the Accepted Emails Domain tab.
This role is recommended for individuals with higher levels of trust.
Organization Member
Users with this role type can see and connect to routers in subgroups assigned to them. They can create new sites and modify information inside of sites and routers. This role is recommended for general users who only need access to specific subgroups.
Operator
The operator role type is the least privileged user type. Users with this role may only see and connect to routers in their respective subgroup(s). They cannot modify router names, site information, and other similar privileges. This role type is recommended for users with temporary access to an organization in the portal.
Global Admin
Global admins are able to create organizations, add members, create subgroups, and connect to all routers. They may also modify all organizations’ accepted email domain lists (see the Allowed Email Domain Policy for more information). These capabilities are critical to the sustainment of the CLARITY Link portal. This role type was created to administrate across multiple organizations and is only assigned to Acuity Brands employees with the highest trust level.
Global Members
Users with this role type can connect to routers associated with all subgroups from all organizations. They have the ability to edit site and router information much like an organization admin, but they lack the ability to modify subgroups.
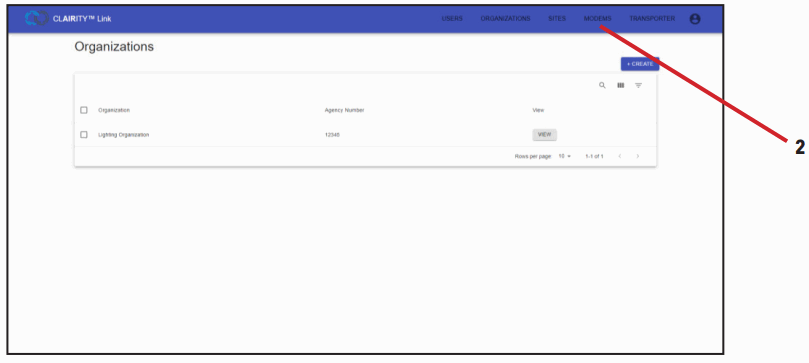
Organizations
When viewing the Organizations screen, all organizations that a user’s account is associated with will be displayed. Organization Admin and Global Admin users can add users to organizations.
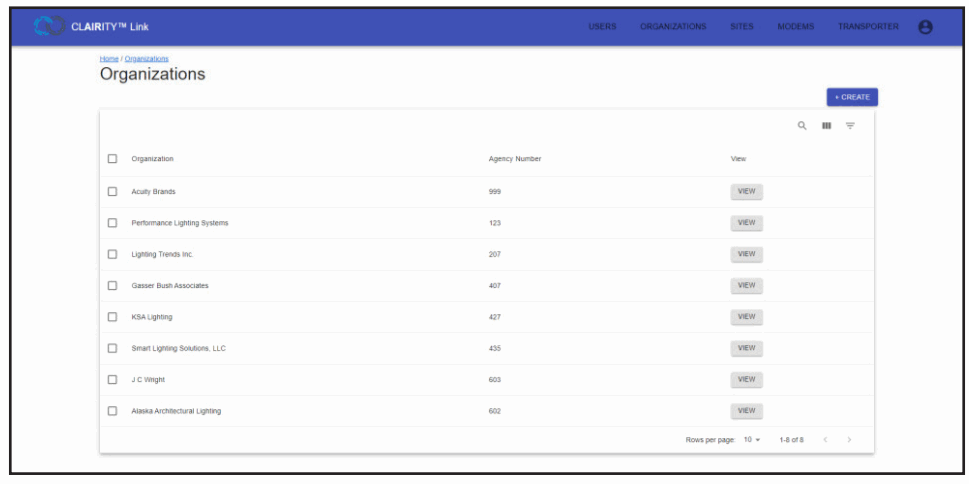
Organization Landing Screen
The Organizations screen presents a list of organizations to which a user has access. When a user clicks the VIEW button, they will be able to view information particular to that organization.
The organization screen also allows users to search for organizations in their list (if more than one organization is visible), hide or reveal unnecessary columns, and to filter results by organization and agency number.
Organizations – About
The about tab gives read-only information about the organization to general users. Global Admin users can adjust this information.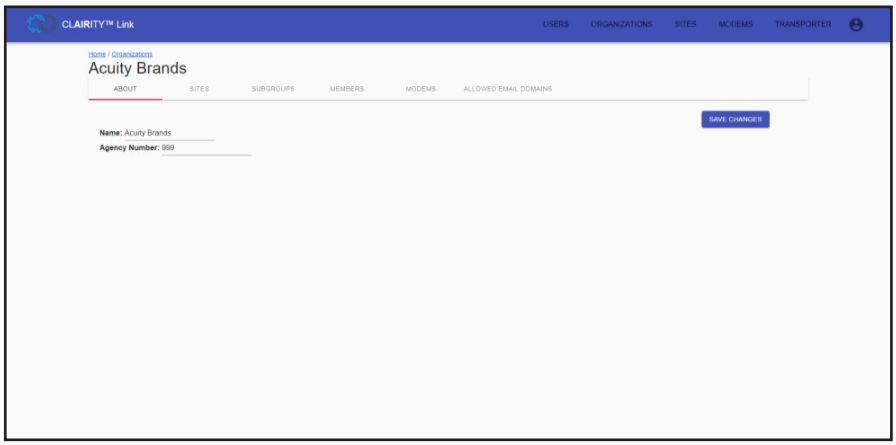
Organizations – Sites
The sites tab is used to find an existing site or to create a site. Using the search feature, users can search for a site by its name, site address, site contact name, or contact phone number. Columns may be revealed or hidden to allow for more space.
Organizations – Subgroups
Subgroups are used to limit the routers that a user can see. Users may be associated with multiple subgroups, and routers may also be associated with multiple subgroups. The user interface supports associating one or more users and one or more routers to a single subgroup. Subgroups allow organizations to share all routers with all users, to share a select few routers with only some users, or to share routers with users in a 1:1 ratio. For best practice, it is recommended to share routers only with users that need to regularly access those routers.
Subgroups can be created and deleted easily, and neither action will result in a router being removed from the organization’s pool of routers. This allows for subgroups to be temporarily created if a router is being shared with an atypical user.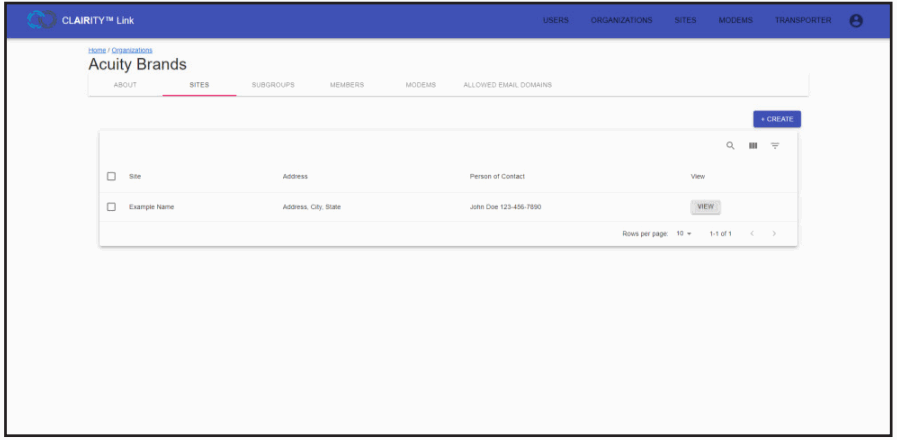
Organizations – Members
Members are added to an organization through the Members tab. Here, users can be added using a CLARITY Link only login (created by visiting CLARITY Link. AcuityNext.com) or an already-existing Acuity Brands application login (CLARITY Pro, CLARITY, Sensor Switch VLP, etc.) whose domain has been added to the Allowed Email Domains tab. See the Adding a User section for how to add members to an organization.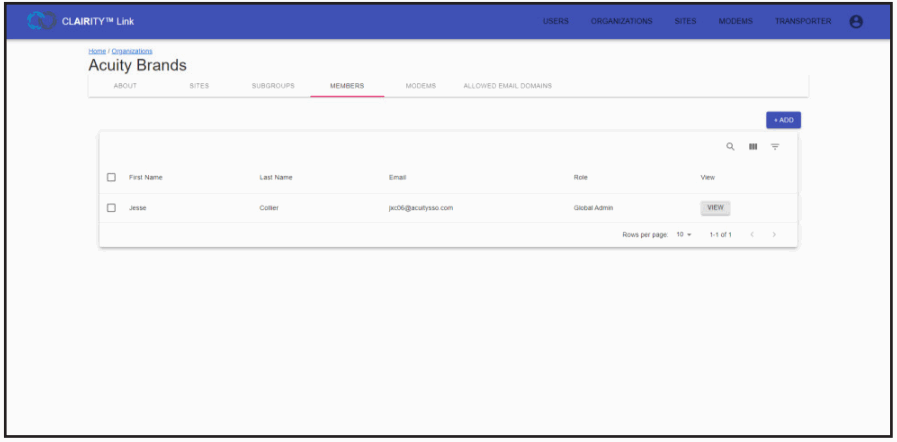
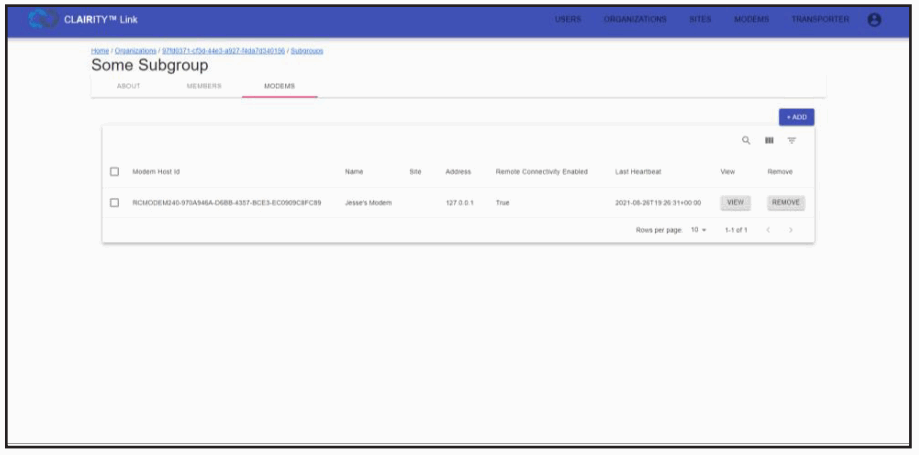
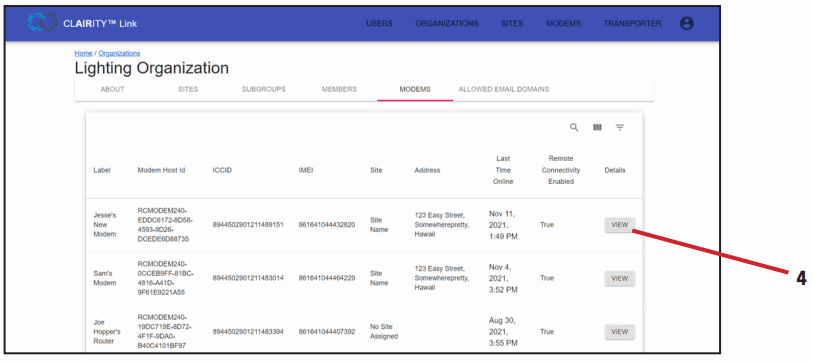
Organizations – Modems
The Modems tab of the Organizations screen shows routers associated with the organization. The screen presents features for searching for routers using their cellular ICCID, site information, hardware IMEI, Host ID, and user-assigned label.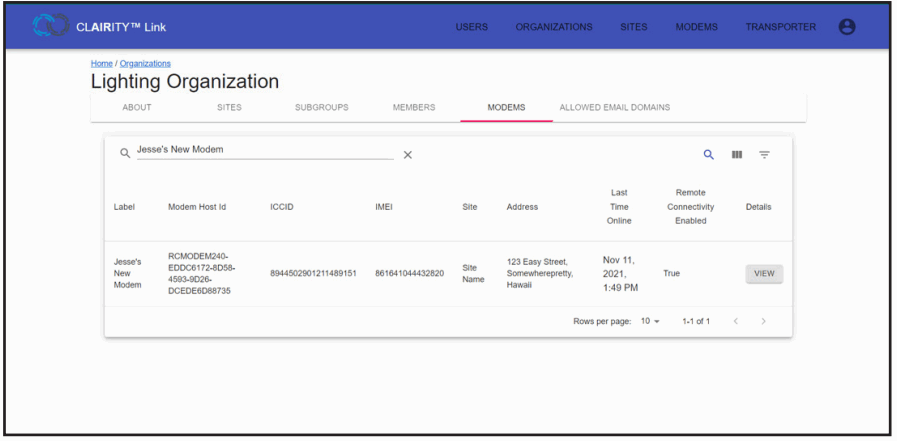 Organizations – Allowed Email Domains
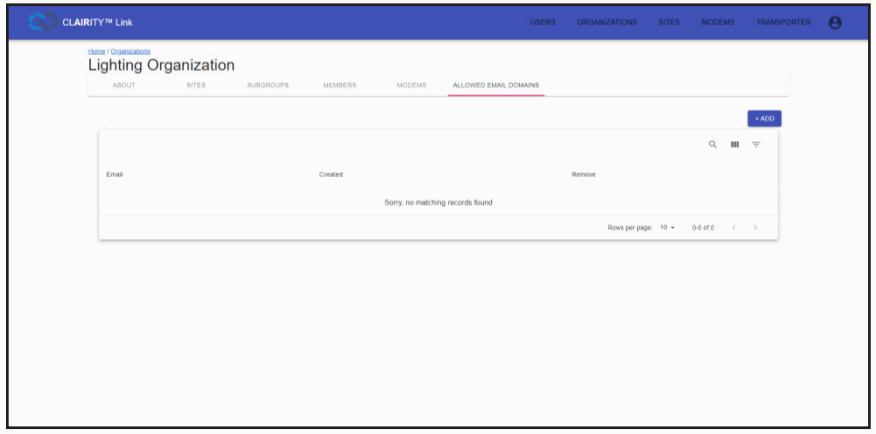
The Allowed Email Domains tab is used to control what user accounts can be added to an organization. Only user accounts that match a specific, approved email address or with an approved domain can be added to an organization. When adding an allowed email domain, do not include the @ symbol. It should only be included when adding an email address.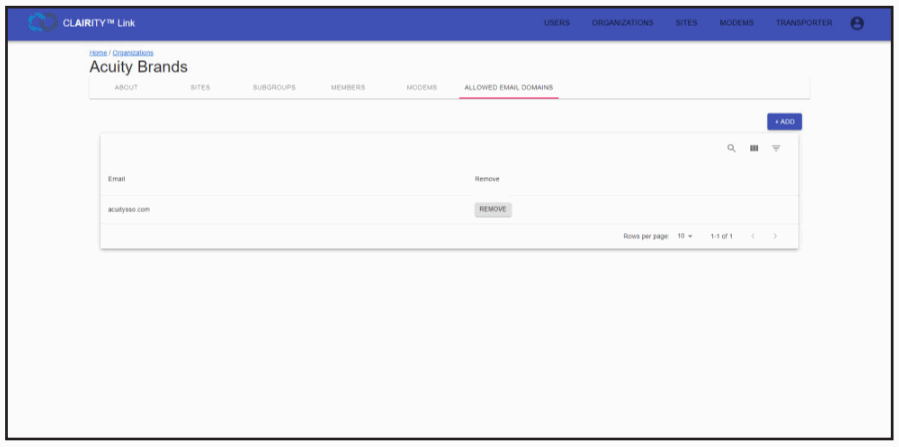
Organizations – Adding a User
To add a user to an organization, the below steps should be followed.
- A user’s account must be created. This can be done using the ClairityLink.AcuityNext.com portal or through an Acuity mobile application, such as CLARITY Pro, CLARITY, or SensorSwitch VLP.
- Add a user’s email domain or full email address to their organization.
Note: this can only be done by a global admin. See the Allowed Email Domain Policy for more information on requesting an email domain or full email address to be added to the Allowed Email Domains whitelist.
a. From the Organizations screen, select an organization by clicking View next to the organization.
b. Select the Allowed Email Domains tab. c. Click ADD.
d. Enter a user’s email domain (such as “lightingorganization.com”) or the user’s full email address. e. Click ADD to save.
 - Add a user under the Members screen.
a. From the Organizations screen, select an organization by clicking VIEW next to the organization.
b. Select the Members tab. Organizations – Adding a User – cont’d
c. Click ADD.
d. Search for and select the desired member’s email address. e. Click SAVE CHANGES to add the user to the organization.
 - Associate a user’s email with one or more subgroups.
a. From the Organizations screen, select an organization by clicking VIEW next to the organization.
b. Select the Subgroups tab. c. Click the CREATE button.
 d. Enter a subgroup name into the open field.
 e. Click SAVE CHANGES to create the subgroup.
 - Associate a user with a subgroup.
a. From the Organizations screen, select an organization by clicking VIEW next to the organization.
b. Select the Subgroups tab.
c. Select a subgroup by clicking VIEW. d. Select the Members tab.
e. Click ADD. g. Click ADD to associate the member with the subgroup.
- Associate a router with a subgroup so that members of the subgroup may connect with the routers.
a. From the Organizations screen, select an organization by clicking VIEW next to the organization.
b. Select the Modems tab.
c. Click ADD to add a router. d. Select a router from the drop-down.
e. Click ADD to associate the router with the subgroup.
 c. Click ADD.
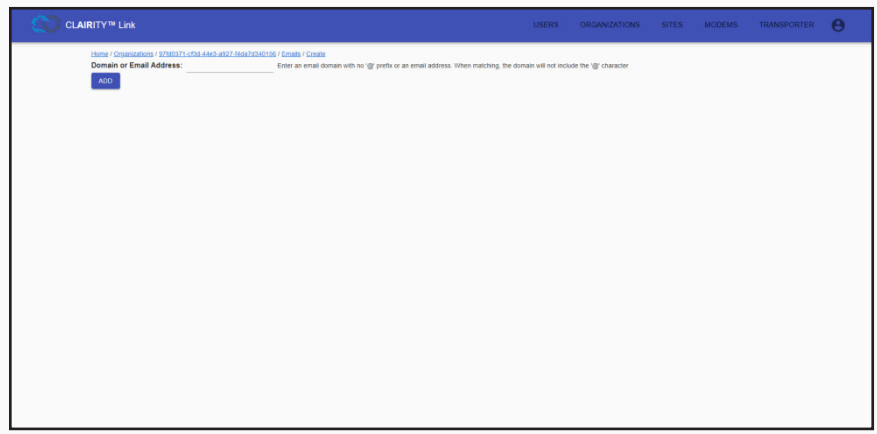 e. Click ADD to save.
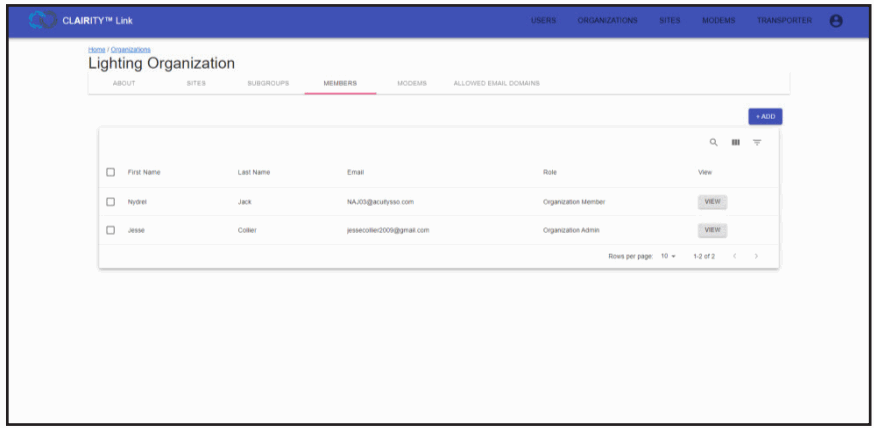 Organizations – Adding a User – cont’d
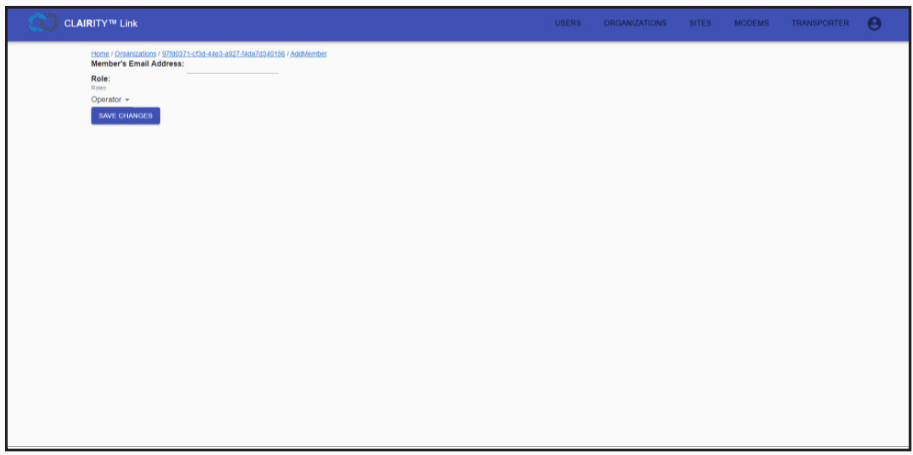 e. Click SAVE CHANGES to add the user to the organization.
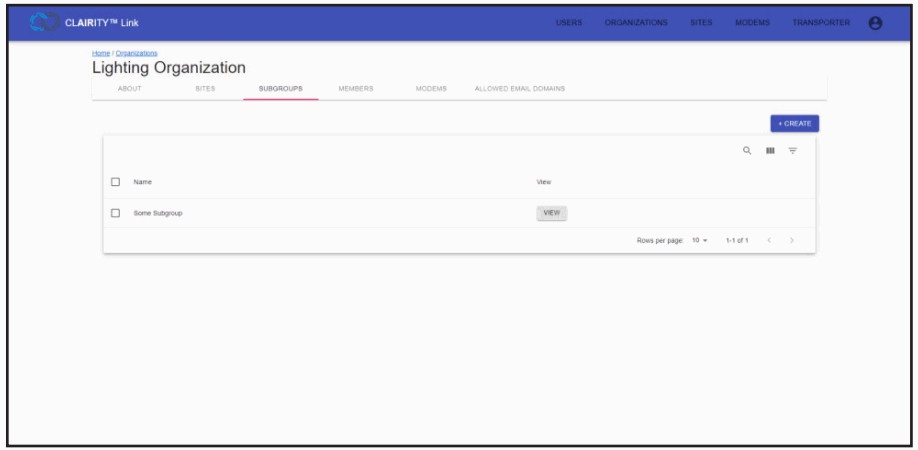 c. Click the CREATE button.
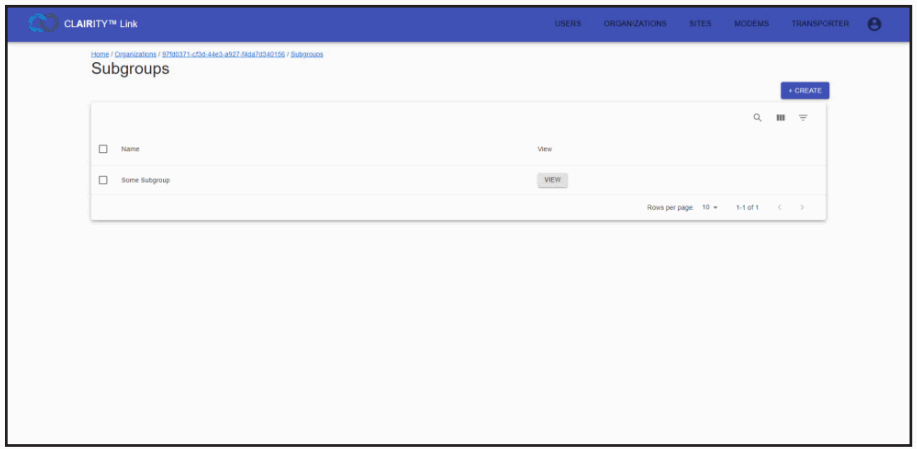 d. Enter a subgroup name into the open field.
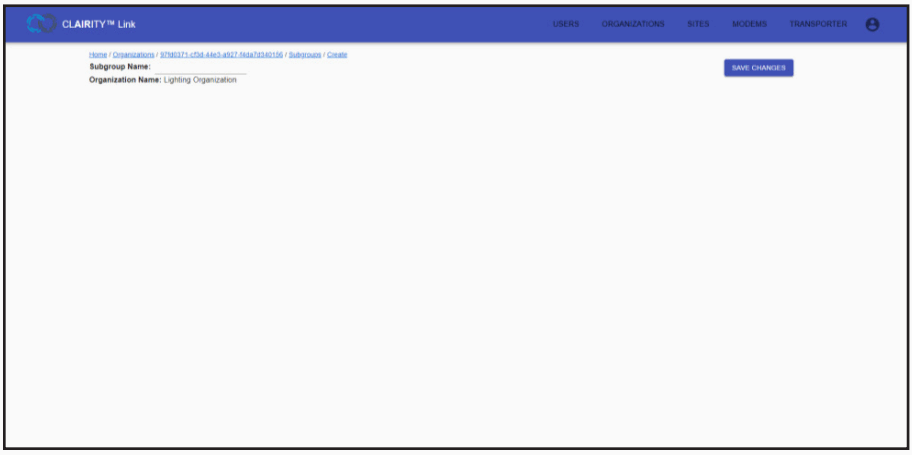 e. Click SAVE CHANGES to create the subgroup.
 d. Select the Members tab.
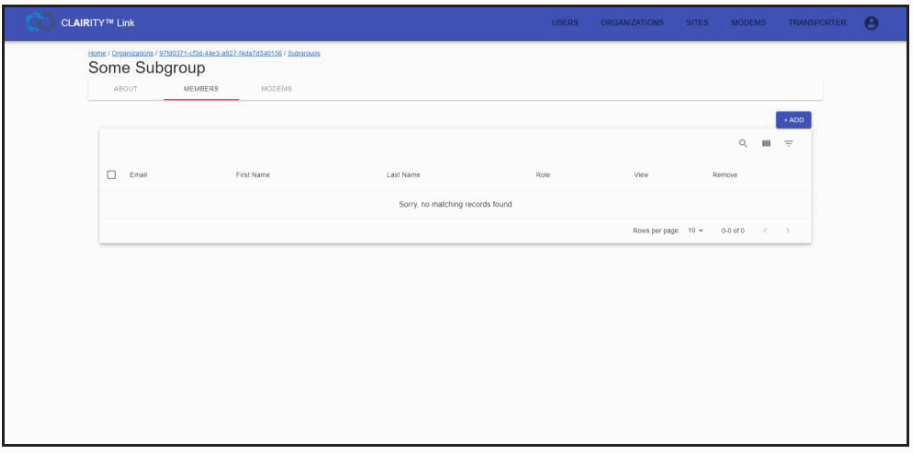 g. Click ADD to associate the member with the subgroup.
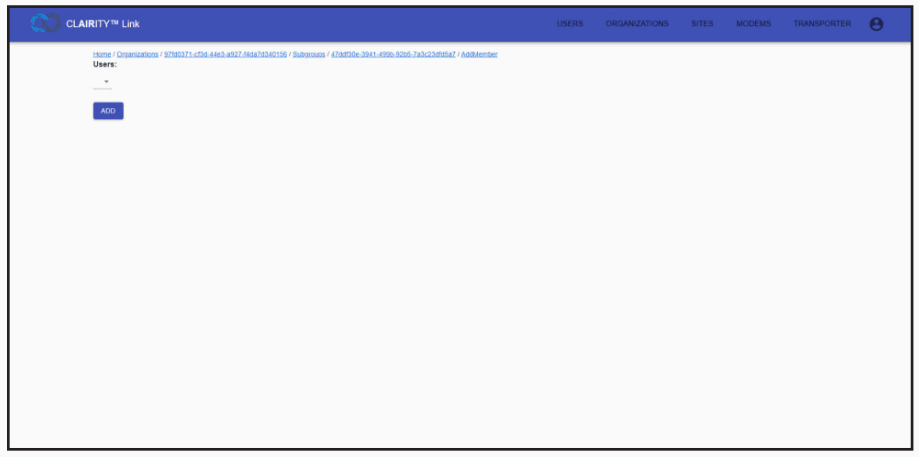
 d. Select a router from the drop-down.
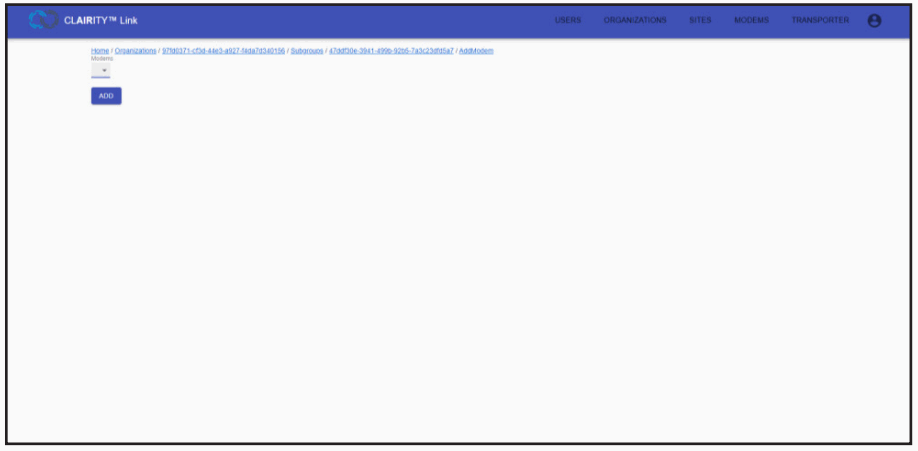
Sites
From the Sites screen, users can view, create, and modify site information. Sites are used to quickly associate project information with routers. Modified site contact information is passed to all related routers simultaneously.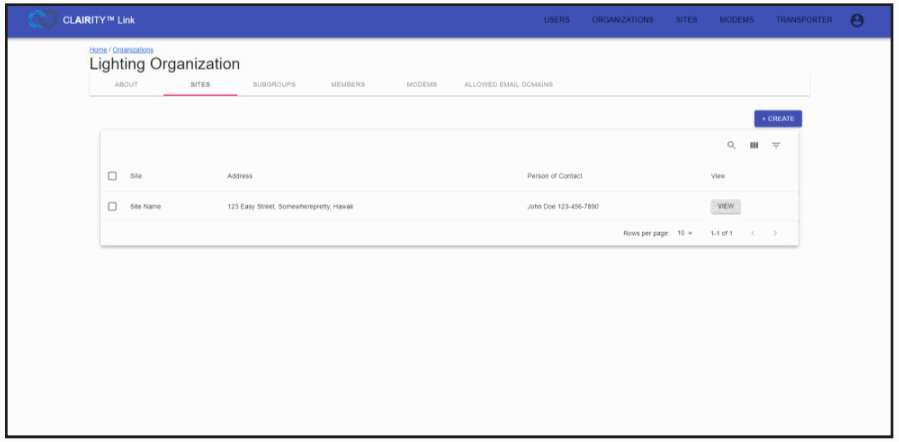
Sites – About
After pressing the ADD button from the Sites landing screen or by clicking VIEW on an already existing router users are presented with the About tab. Through this tab, users adjust information that is specific to the site, including the site name, site status, address, project container number, salesforce project key, and contact information. Saving changes creates a new site or updates an already existing site. 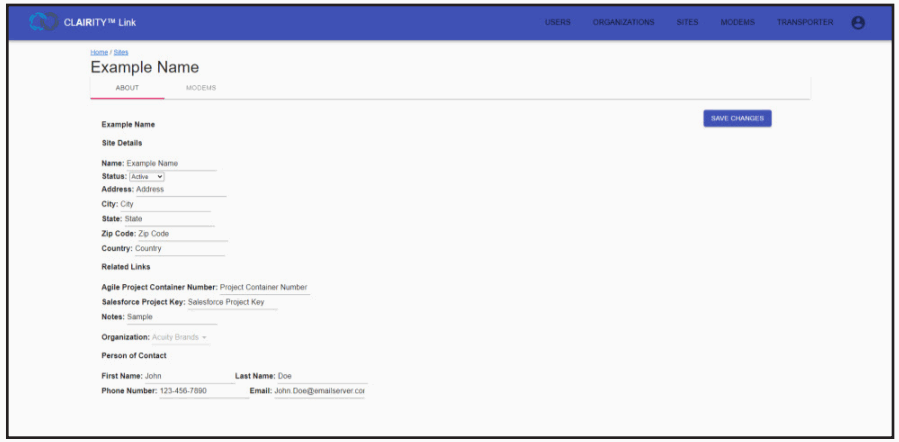
Sites – Modems
The Modems tab of the Site screen shows routers associated with the site. The screen presents features for searching for routers using their cellular ICCID, site information, hardware IMEI, Host ID, and user-assigned label.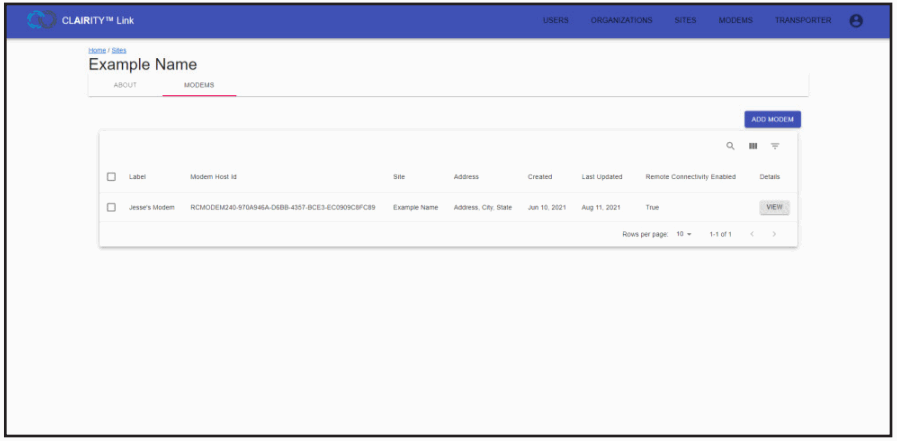
Modems
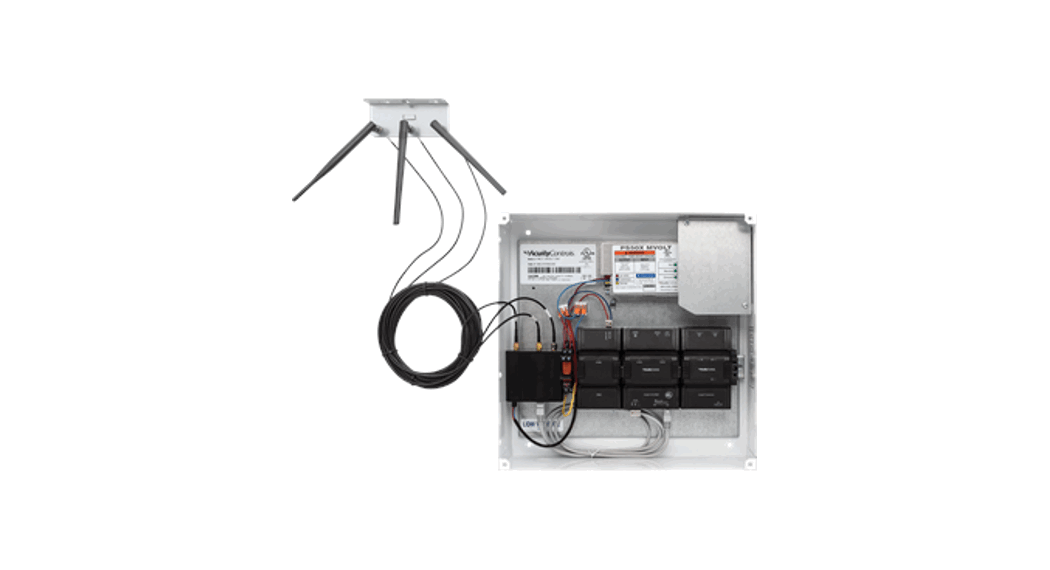
The Modems screen is the most common way that users access a router. This screen is convenient to access and presents numerous ways to search for routers, including by cellular ICCID, site information, hardware IMEI, Host ID, and the user-assigned label.
Modems – About
The About tab, which is accessed after clicking VIEW for any router, shows information pertaining to the specific router.
Such information includes the host ID, label, serial ID, date the device was created, last update date, last time the device was online, RSSI signal strength (a representation of the device’s current cellular strength), IP address, cellular ICCID, IMEI, and current firmware version. If new firmware versions are available to be added to a router, they will appear on this screen and may be downloaded to a user’s workstation.
While on this screen, if a user clicks the MANAGE MODEM button while the CLARITY Link transporter is running, the CLARITY Link portal will attempt to connect to the router.
If the CLARITY Link transport is not running, no session will start. The Transporter screen will show the IP address assigned to the router by the CLARITY Link portal when MANAGE MODEM is clicked.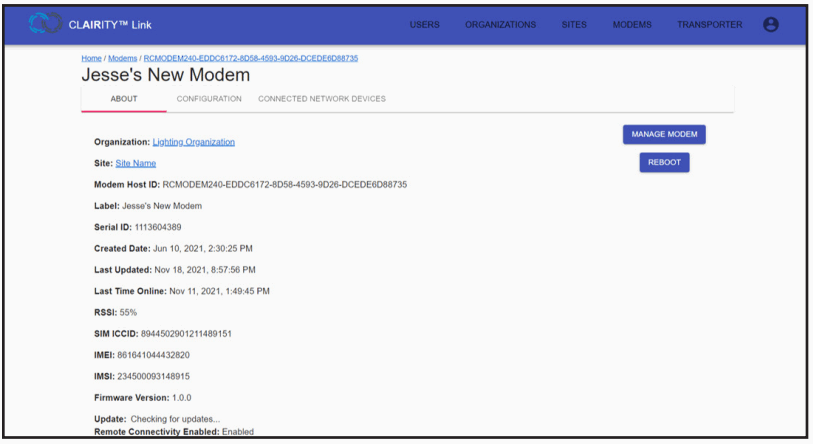
Modems – Configuration
From the configuration screen, users can update the router’s label and associate the router with a site.
The status of a connectivity plan is shown by the Remote Connectivity Enabled checkbox. Also, the router may be moved to another organization by a Global Admin user through this screen.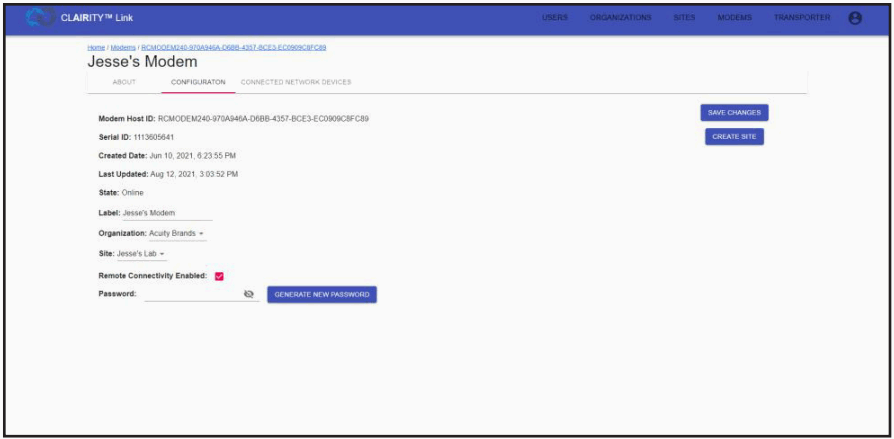
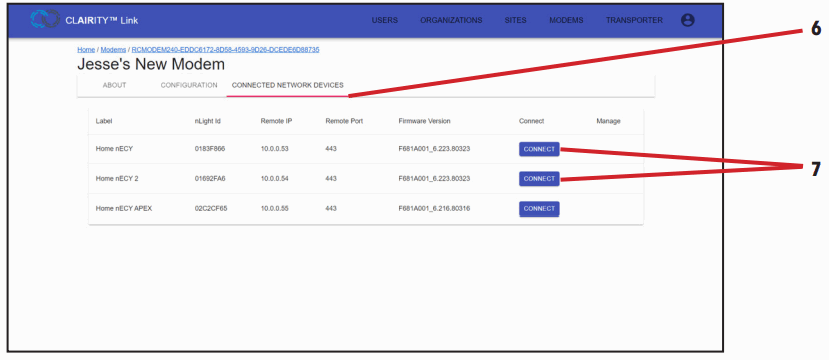
Modems – Configuration
The Connected Network Device screen will show the label, UID, IP address, and port over which a connected nLight ECLYPSE™ system controller was discovered by the router. After clicking the CONNECT button beside a night ECLYPSE while the CLARITY Link transporter is running in the background, a user will see the nLight ECLYPSE appear in the list of devices on the Transporter screen, and the nLight ECLYPSE will be assigned a new IP address unique to the CLARITY Link portal.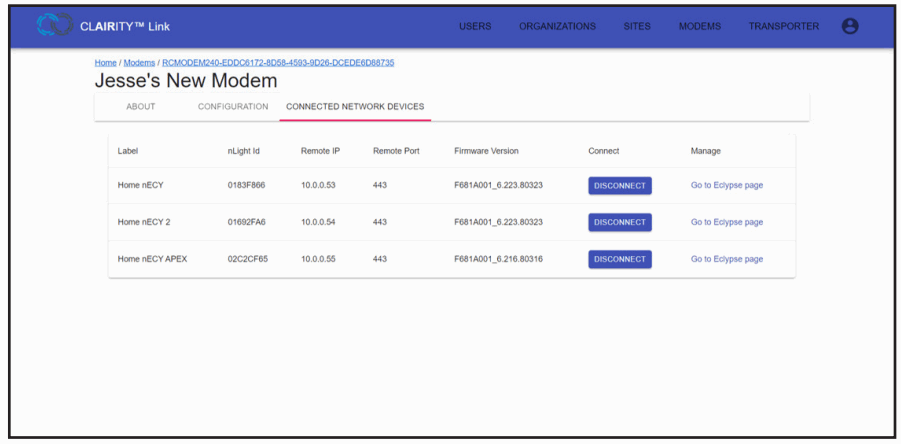
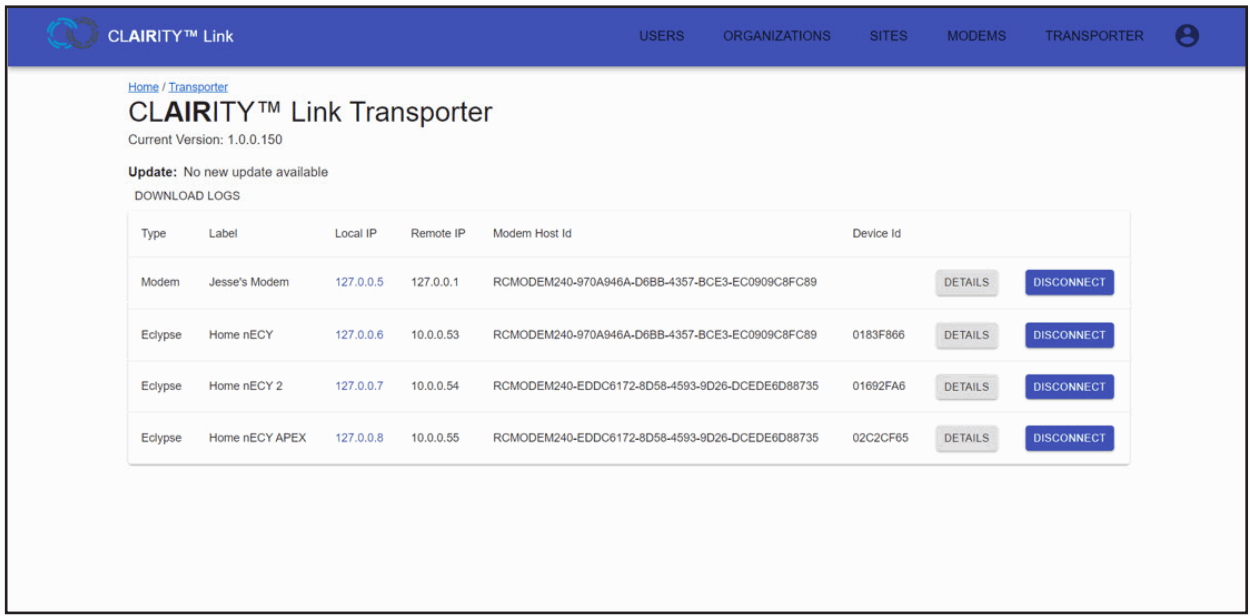
Transporter
The Transporter screen provides users visibility to all devices they have attempted to connect to via the CLARITY Link solution. This screen shows the current version of the CLARITY Link transporter that a user is using, provides a link to the router to which devices are associated through DETAILS buttons, and shows device IDs of the different devices.
Additionally, it shows the related IP address assigned by the portal to the connected devices. These IP addresses are represented under the “Local IP” column. The IP addresses that have been assigned to the devices by their respective network(s) will be represented under the “Remote IP” column. A maximum of 29 nLight ECLYPSE controllers or routers can be connected via the transporter in a single session, and simultaneous connectivity with nLight ECLYPSE controllers across one or more routers is possible.
Connect to a Router
The below are steps required to connect successfully with a router and downstream nLight ECLYPSE controllers.
- Run the CLARITY Link transporter.
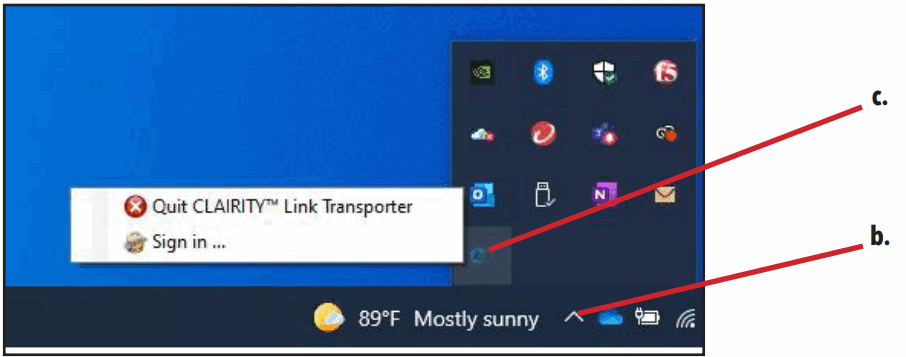
a. Click on the CLARITY Link transporter desktop shortcut or run the program from your start menu.
b. Locate the program in the Hidden Icons menu of the taskbar.
c. Right-click the program and select Sign in. d. Sign into the CLARITY Link transporter using your CLARITY Link email address and password. Multi-factor authentication may be required.
When logged into the transporter, you will be presented with a confirmation screen, such as the one below. Connect to a Router – cont’d
e. Log into the CLARITY Link portal by visiting https://clairitylink.acuitynext.com and entering your CLARITY Link email address and password.
Multi-factor authentication will be required.
- Select the Modems screen.

- Search for the router. Using the router’s ICCID or IMEI is recommended for a first-time connection. These can both be found using the quick-scan QR code that ships with the router hardware and with a night ECLYPSE™ that includes a router option.
- Click VIEW.
 Connect to a Router – cont’d
 - Click MANAGE MODEM from the router’s About tab. A user does not have to connect to the router before connecting to nLight ECLYPSE controllers.
This step can be skipped if users only want to connect to nLight ECLYPSE controllers.
- Select the Connected Network Devices tab.
- Click CONNECT on each system controller.

- Use the IP addresses shown under the Local IP column (do not use the Remote IP addresses) to discover and connect to nLight ECLYPSE™ controllers using SensorView. See the SensorView User Guide for more information on gateway discovery.

 d. Sign into the CLARITY Link transporter using your CLARITY Link email address and password. Multi-factor authentication may be required.
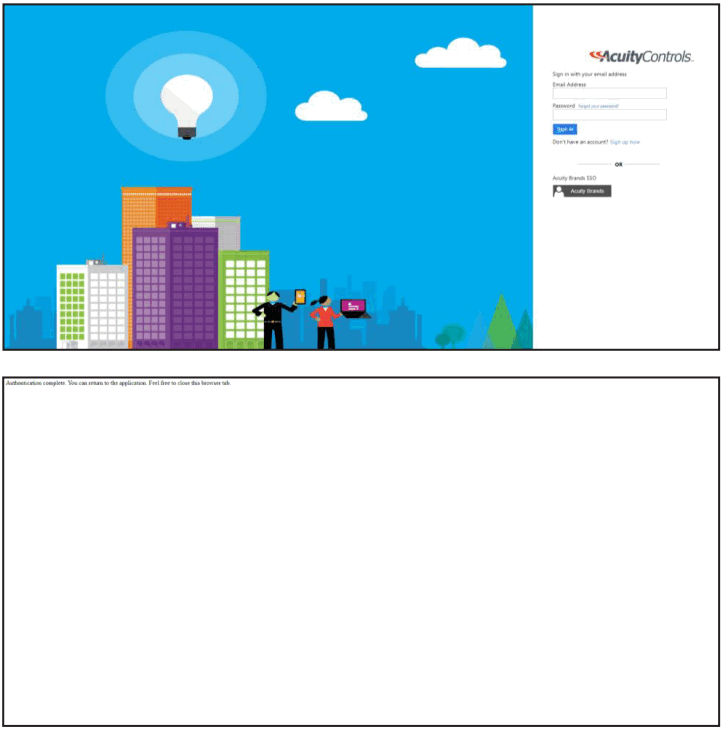 Connect to a Router – cont’d
 Connect to a Router – cont’d
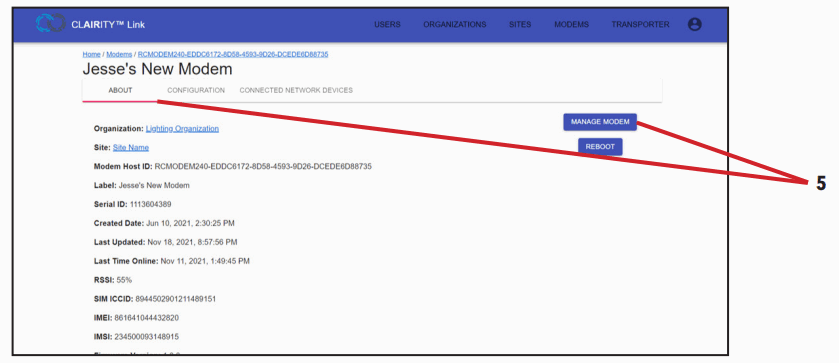

Acuity Brands | One Lithonia Way Conyers, GA 30012 Phone: 800.535.2465 www.acuitybrands.com © 2019 Acuity Brands Lighting, Inc. All rights reserved. Rev. 11/19/2021


