GLOBAL Gas Boiler and Water Underfloor Heating Thermostat HY09BW User Manual
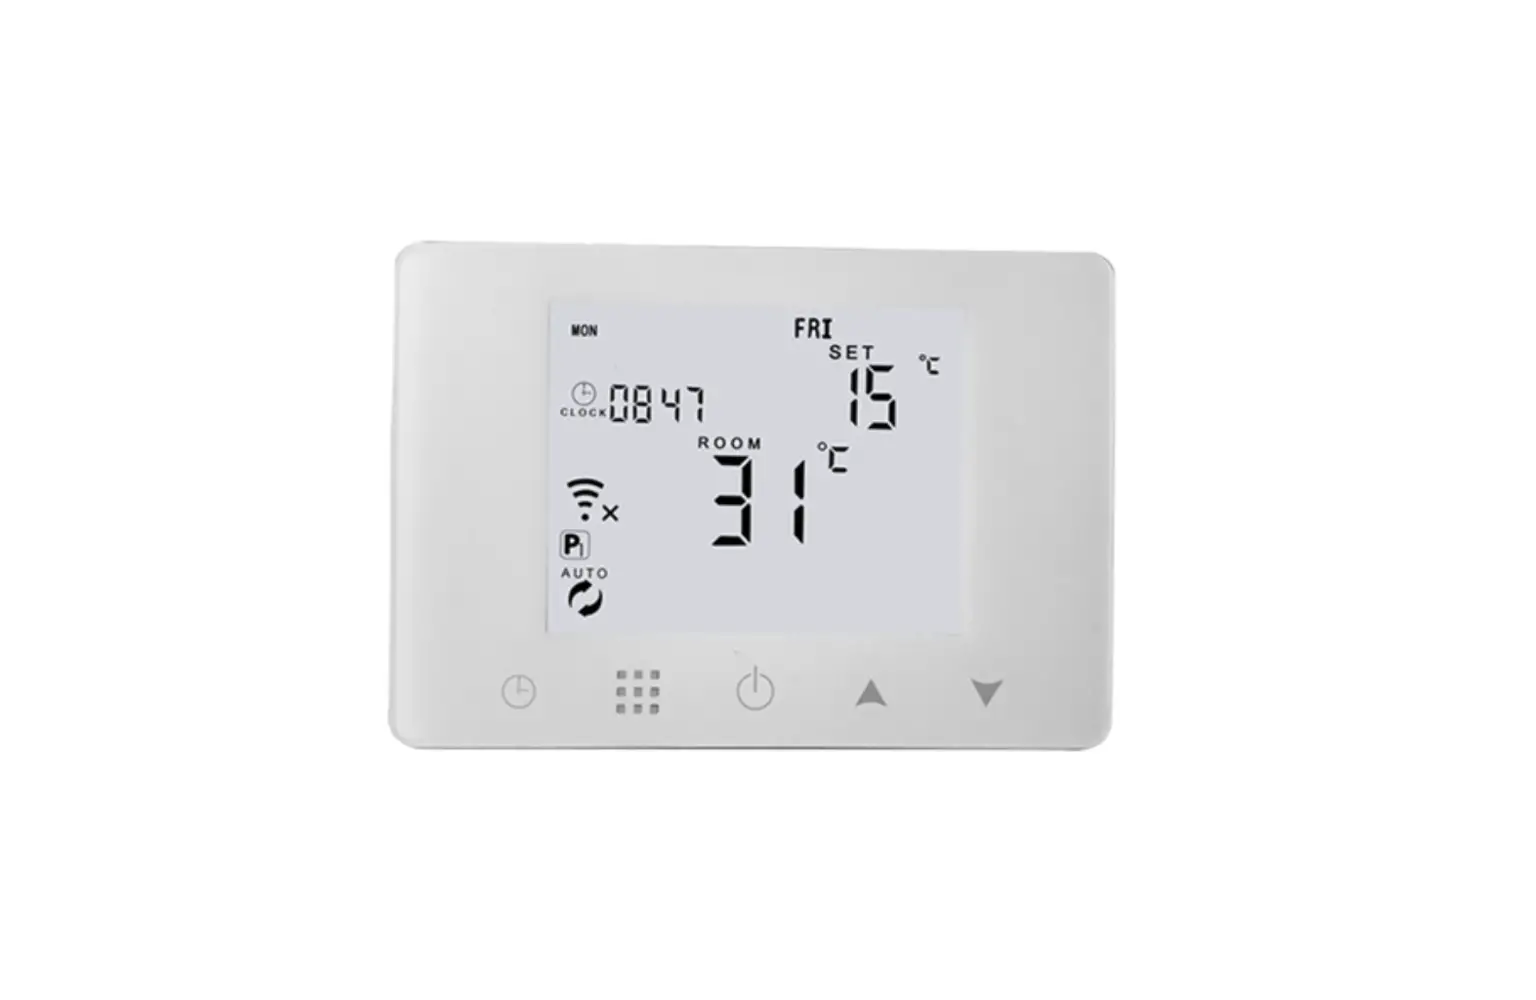
Icon Instruction
![]() Automatic Mode: run the pre-set programmable mode
Automatic Mode: run the pre-set programmable mode
![]() Manual mode
Manual mode
 Holiday mode: the days and temperature of holiday can be set to run in the countdown mode
 Heating: it disappears means stop heating
![]() Clock
Clock
![]() run the programmable mode
run the programmable mode
P1 run 5+2days 6 periods weekly programmable mode; P2 run 6+1days 6 periods weekly programmable mode; P3 run 7days 6 periods weekly programmable mode
P1、P2、P3 select in the advanced setting option A7,default is P1
![]() Low power icon
Low power icon
![]() Children lock, long press
Children lock, long press ![]() for 3-5s to lock/unlock key
for 3-5s to lock/unlock key
Quick Operation | ||
NO | Icon | Description |
A |  | Turn ON/OFF |
B |
|
|
C |
|
|
B |
|
|
D |
|
|

Programmable Mode Setting
6 times period setting and weekly programmable mode setting: 5+2 days(factory default),6+1 days, 7 days
Power on state, long press “  ” 3-5 seconds to enter into first time period then set hour, minutes, period temperature, press “
  ” and “
  ” to adjust value. After finish setting , stand for about 10 seconds ,it will save setting then exit. The most comfortable temperature is 18°C-22°C.
 |  |  | |||
| Wake up | Out door | Back home | |||
6:00 | 20℃ | 8:00 | 15℃ | 11:30 | 15℃ |
 |  |  | |||
Out door | Back home | Sleep | |||
| 13:30 | 15℃ | 17:00 | 15℃ | 22:00 | 15℃ |
Advanced options
Power off state, long press for 3-5 seconds to do advanced setting. Short press “ ” to
switch and confirm. Press “ ” and “ ![]() ” to adjust options.
” to adjust options.
After finish setting , stand for about 10 seconds ,it will save setting then exit .
| NO | Description | Range | Default |
A1 | Temperature Calibration | -9-+9℃ | 0.5℃ |
A2 | Switching Differential of Built in Sensor | 0.5-2.5℃ | 1℃ |
A3 | Children Lock | 0:half lock 1:full lock | 0 |
A4 | Min temp of External sensor (anti-freeze protection) | 1. 1-10℃ 2. When setting temp is higher than 10℃, screen display【–】, cancel anti freeze protection | 5℃ |
| A5 | Max Temp Setting | 1-10℃ | 5℃ |
| A6 | Min Temp Setting | 20-70℃ | 35℃ |
A7 | Weekly Programmable Function | P1: 5+2 days P2: 6+1 days P3: 7 days | 0 |
| A8 | Power off Memory | 0:Stay last state 1: Power on turn off | P1 |
A9 | Anti-freezing Function Options | 0:Anti-freezing Function close 1: Anti-freezing Function open | 0 |
| Temperature Unit Options | 0°C:degree centigrade 1°F:Fahrenheit degree | 0°C | |
A9 | Factory defaults | Display A o, long pressuntil show the whole screen |
Sensor failure notice:
The sensor is faulty (damaged), the LCD interface will display “E1”, and the thermostat will stop heating until the fault is eliminated.
BEFORE WIRING AND INSTALLING
- 1. Read these instructions carefully. Failure to follow them could damage the
product or cause a hazardous condition. - Check the ratings given in the instructions and on the product to make sure the
produce is suitable for your application. - Installer must be a trained experienced service technician.
- After installation is complete. check out produce operation as provided in these instructions.
![]() CAUTION
CAUTION
Please arrange professional technician to install the product according to drawings and instructions.
Disconnect power supply before making any connection. Contact with components carrying hazardous voltage can cause electrical shock.
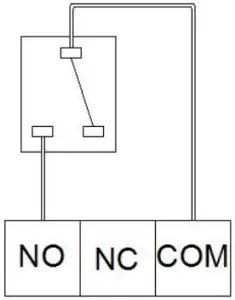
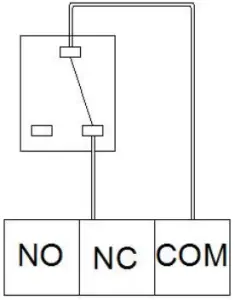
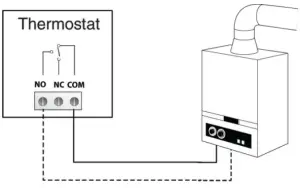
WIRING
- Connection For Heating Unit

- Connection For Cooling Unit

We offer the warranty of 18 months, from the sales day. The products of our company can have lifetime warranty ,if it is not the quality problems, or beyond the warranty period, we will charge for the after-sale service.
Product Specifications
- Power: Receiver: 4*AAA Batteries
- Temperature limit range: 0~70°C
- Display accuracy: ±0.5°C/1°F
- Sensor: NTC(10k)1%
- Temperature setting range: 5~35°C/41-95°F
- Contact capacity: 1A/5A(BW);
- Size(mm): 130*90*25


