Phoenix Elite Portable Solar Generator
USER GUIDE
CN ·ELITE
PHOENIX ELITE PORTABLE SOLAR GENERATOR
Model: R300PHXE
User Guide
IMPORTANT SAFETY INSTRUCTIONS
Please read the User Guide carefully before recharging or operating your PHOENIX Elite. IMPORTANT SYMBOLS![]() Indicates potentially dangerous conditions that could result in personal injury
Indicates potentially dangerous conditions that could result in personal injury![]() Indicates conditions or practices that could result in damages to the unit or other equipment
Indicates conditions or practices that could result in damages to the unit or other equipment![]() Indicates procedures or functions that are important for proper and safe operation of the unit and/or other equipment
Indicates procedures or functions that are important for proper and safe operation of the unit and/or other equipment
![]() DO NOT submerge the unit in water or operate the unit in the rain. Doing so may cause short circuits, electric shocks, and/or fire.
DO NOT submerge the unit in water or operate the unit in the rain. Doing so may cause short circuits, electric shocks, and/or fire.![]() DO NOT place the unit near fire and/or heat the unit. Doing so may cause irreversible damages to the unit and/or battery explosion.
DO NOT place the unit near fire and/or heat the unit. Doing so may cause irreversible damages to the unit and/or battery explosion.![]() DO NOT overload the unit. Please check the specifications of output ports and devices before operation.
DO NOT overload the unit. Please check the specifications of output ports and devices before operation.
![]() Please dispose of the product according to the local recycling and environmental regulations.
Please dispose of the product according to the local recycling and environmental regulations.
![]() Please turn off the output ports when no devices are connected to the unit to prevent electric shocks.
Please turn off the output ports when no devices are connected to the unit to prevent electric shocks.
![]() DO NOT dismantle or modify the unit. Doing so may cause irreversible damages to the unit and void warranty.
DO NOT dismantle or modify the unit. Doing so may cause irreversible damages to the unit and void warranty.
![]() DO NOT drop or strike the unit. Doing so may cause circuit failures and cracks in the casing.
DO NOT drop or strike the unit. Doing so may cause circuit failures and cracks in the casing.
![]() Keep the unit out of the reach of young children.
Keep the unit out of the reach of young children.
![]() DO NOT place the unit in high-temperature situations. Doing so may cause unit malfunction or component degradation.
DO NOT place the unit in high-temperature situations. Doing so may cause unit malfunction or component degradation.
![]() DO NOT expose the unit to strong electrostatic fields, strong magnetic fields, and/or radiation.
DO NOT expose the unit to strong electrostatic fields, strong magnetic fields, and/or radiation.
![]() Please check the unit before each use. Stop using the unit if you notice unusual smells, heating, distortion, or any other abnormalities.
Please check the unit before each use. Stop using the unit if you notice unusual smells, heating, distortion, or any other abnormalities.
FEATURES
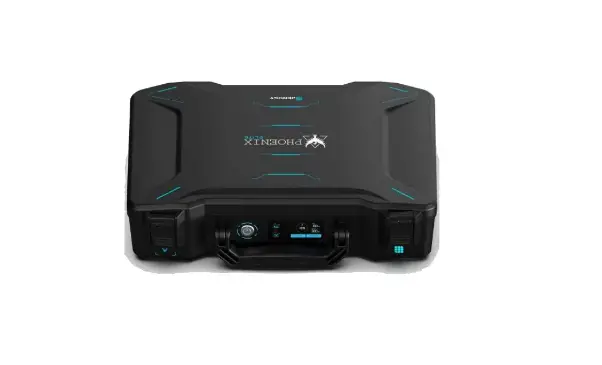
PORTABLE DESIGN
Featuring a portable briefcase design with a sturdy carrying handle, the PHOENIX Elite is the top choice for a weekend trip or an emergency.
RENEWABLE ENERGY
Designed for off-grid applications, the PHOENIX Elite combines two highly efficient 10W monocrystalline solar panels for effortless battery replenishment.
DIVERSE RECHARGING OPTIONS
Engineered with convenience and versatility in mind, the PHOENIX Elite supports recharging from car sockets, AC adapters, USB-C wall chargers, and external solar panels.
RELIABLE POWER SOURCE
Equipped with a 300Wh rechargeable lithium-ion battery pack and multiple output ports, the PHOENIX Elite is ready to provide long-lasting power for a wide range of mobile devices and small appliances.
PACKAGE CONTENTS
- 1 x Renogy PHOENIX Elite Portable Solar Generator
- 1 x AC/DC Adapter
- 1 x Cigarette Lighter Plug to 5.5mm DC Adapter Cable
- 1 x Solar Panel Connectors to 5.5mm DC Adapter Cable
- 1 x USB-C to USB-C Cable 1 x User Guide
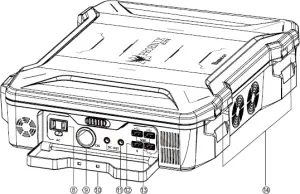
PRODUCT OVERVIEW
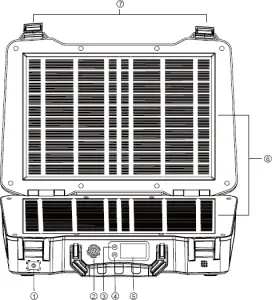
- Flashlight On/Off Button
- Main Power Button
- AC Output Mode On/Off Button
- DC Output Mode On/Off Button
- LCD Screen
- Built-in Solar Panels
- Latches
- AC Outlet
- CIG Port
- Output Side Door
- DC Output Ports
- QC USB-A Port
- USB-A Ports
- Hinges
- Input Side Door
- DC Input Port
- USB-C PD Port
- LED Flashlight
- Carrying Handle
SPECIFICATIONS
| General | |
| Dimension | 413 x 308 x 100 mm / 16.3 x 12.1 x 3.9 inch |
| Weight | 5.3 kg / 11.7 lb. |
| Material | ABS + PC |
| Flashlight | 3W LED |
| Normal Operating Temperature | 0-45 ℃ / 32-113 ℉ |
| Storage Temperature | -10-60 ℃ / 14-140℉ |
| Operating / Storage Humidity | 20-90% |
| Battery | |
| Battery Type | Lithium-ion |
| Battery Voltage | 14.4V |
| Battery Capacity | 20800mAh / 299.5Wh |
| Input | |
| Built-in Solar Panel | 9.8V / 2.04A, 20W Max |
| DC Input Port | 9-16.8V, 55W Max 16.8-30V, 100W Max |
| USB-C PD Port | 5V / 3A, 9V / 3A, 12V / 3A, 15V / 3A, 20V / 3A, 60W Max |
| Total | 180W Max |
| Output | |
| USB-A Port (2) | 5V / 2.4A Max |
| QC USB-A Port | 5V / 3A, 9V / 2A, 12V / 1.5A, 18W Max |
| USB-C PD Port | 5V / 3A, 9V / 3A, 12V / 3A, 15V / 3A, 20V / 3A, 60W Max |
| CIG Port | 13.6V / 9A Max |
| DC Output Port (2) | 13.6V / 4.5A Max |
| AC Outlet | 110V / 60Hz (US, JP, CA) 220V / 50Hz (AU, EU, CN) 200W Rated, 300W Surge Pure Sine Wave |
| Total | 300W Max |
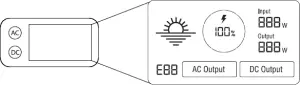
LCD SCREEN
- The LCD Screen will be lit when the PHOENIX Elite is being recharged or turned on to display the recharging and operating status of the PHOENIX Elite. Please refer to the following table to interpret the information displayed on the LCD Screen.
| Icon | Name | Description |
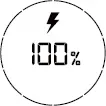 | Battery Level | The Battery Level is displayed as a ring composed of 10 segments with a percentage in the center. The ring and percentage appear when the PHOENIX Elite is being recharged or is turned on. When recharging the PHOENIX Elite, a lightning bolt will appear above the percentage. The ring will be lit segment by segment with the increasing percentage until the PHOENIX Elite has been fully recharged. As the PHOENIX Elite is used to power other devices, the ring segments will go out one by one with the decreasing percentage. When the battery level is lower than 10%, the last ring segment and the percentage will flash. |
| AC Output Mode | The AC Output Mode is displayed as a rectangle with the words ‘AC Output’ inside. The rectangle appears when the AC output mode is activated with the AC Outlet turned on. The rectangle disappears when the AC output mode is deactivated with the AC Outlet turned off. | |
| DC Output Mode | The DC Output Mode is displayed as a rectangle with the words ‘DC Output’ inside. The rectangle appears when the DC output mode is activated with the USB-A Ports, QC USB-A Port, USB-C PD Port, CIG Port, and DC Output Ports turned on. The rectangle disappears when the DC output mode is deactivated with the USB-A Ports, QC USB-A Port, USB-C PD Port, CIG Port, and DC Output Ports turned off. | |
 | Built-in Solar Panel Input | The Built-in Solar Panel Input is displayed as a sun with 5 bars below it. The sun and bars appear when the PHOENIX Elite detects input power from the Built-in Solar Panel. The number of bars demonstrates the strength of solar irradiance. |
 | Input Power | The Input Power is displayed as a wattage with the word ‘Input’ above it. The wattage appears when the PHOENIX Elite is being recharged. |
 | Output Power | The Output Power is displayed as a wattage with the word ‘Output’ above it. The wattage appears when the AC output mode or the DC output mode is activated. |
 | Error Code | The Error Code is displayed as a 3-digit code starting with the letter ‘E’. The code appears when the PHOENIX Elite encounters abnormal conditions. |
![]() If the [Error Code] icon appears, the PHOENIX Elite may need special attention. Please refer to CAUTION the TROUBLESHOOTING section for help.
If the [Error Code] icon appears, the PHOENIX Elite may need special attention. Please refer to CAUTION the TROUBLESHOOTING section for help.
RECHARGING PHOENIX ELITE
![]() To maximize the battery life, please ensure that the PHOENIX Elite is fully recharged before CAUTION operating or storing.
To maximize the battery life, please ensure that the PHOENIX Elite is fully recharged before CAUTION operating or storing.
![]() To shorten the recharge time, it is highly recommended to disconnect all loads while recharging the PHOENIX Elite.
To shorten the recharge time, it is highly recommended to disconnect all loads while recharging the PHOENIX Elite.
Recharge Time
- Recharge via Built-in Solar Panel: 20 Hours
- Recharge via External Solar Panel: 4 Hours
- Recharge via both Built-in Solar Panel and External Solar Panel: 3.5 Hours
- Recharge via AC/DC Adapter: 6 Hours
- Recharge via Car Socket: 6 Hours
- Recharge via USB-C PD Wall Charger: 6 Hours
- Recharge via both AC/DC Adapter and USB-C PD Wall Charger: 3 Hours
![]() The above recharge times are based on conditions when the PHOENIX Elite is recharged at full speed with no loads connected to it.
The above recharge times are based on conditions when the PHOENIX Elite is recharged at full speed with no loads connected to it.
Recharging via Built-in Solar Panel
- For optimal recharging performance, it is highly recommended to recharge the PHOENIX Elite using the Built-in Solar Panels on bright sunny days free of scattered clouds.
- Place the PHOENIX Elite in an open area. Open the Latches and adjust the angle of the Hinges to expose the Built-in Solar Panels to direct sunlight. Steer clear of trees or branches that can shade the Built-in Solar Panel and slow down the recharging process.
- The PHOENIX Elite will begin to recharge automatically. The LCD Screen will be lit with the [Battery Level] icon, [Built-in Solar Panel Input] icon, and [Input Power] icon appearing.
![]()
The LCD Screen will go out if the input power of the Built-in Solar Panels is lower than 5W and no operations are made within 60 seconds. Press the AC Output Mode On/Off Button or DC Output Mode On/Off Button to relight the LCD Screen.
![]() The recharge time via the Built-in Solar Panels is highly dependent on solar irradiance and ambient temperature.
The recharge time via the Built-in Solar Panels is highly dependent on solar irradiance and ambient temperature.
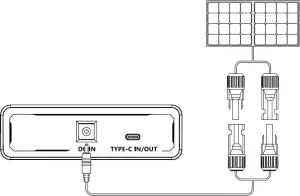
Recharging via External Solar Panel
- For optimal recharging performance, it is highly recommended to recharge the PHOENIX Elite using an external solar panel (not included) on bright sunny days free of scattered clouds.
- Place the external solar panel under direct sunlight. Steer clear of trees or branches that can shade the external solar panel and slow down the recharging process.
- Use the included Solar Panel Connectors to 5.5mm DC Adapter cable to connect the external solar panel to the DC Input Port of the PHOENIX Elite. Place the PHOENIX Elite in the shade to prevent it from overheating.
- The PHOENIX Elite will begin to recharge automatically. The LCD Screen will be lit with the [Battery Level] icon and [Input Power] icon appearing.
Compatible External Solar Panels:
- Renogy Monocrystalline Solar Panel: 50W, 80W, 100W, 160W
- Renogy Polycrystalline Solar Panel: 50W, 100W
- Renogy ECLIPSE Series Solar Panel: 100W
- Renogy Monocrystalline Foldable Solar Suitcase w/o Controller: 100W
- Renogy ECLIPSE Series Foldable Solar Panel w/o Controller: 100W, 200W
- Renogy Flexible Solar Panel: 50W, 100W, 160W, 175W
- Renogy E.FLEX Series Portable Solar Panel: 50W, 100W, 120W
![]() Electrical shock can occur if the Solar Panel Connectors to 5.5mm DC Adapter Cable is WARNING damaged or frayed. DO NOT use a damaged or frayed cable to recharge the PHOENIX Elite.
Electrical shock can occur if the Solar Panel Connectors to 5.5mm DC Adapter Cable is WARNING damaged or frayed. DO NOT use a damaged or frayed cable to recharge the PHOENIX Elite.
![]() Please ensure that the open circuit voltage of the external solar panel does not exceed 30V or fall short of 9V.
Please ensure that the open circuit voltage of the external solar panel does not exceed 30V or fall short of 9V.
![]() The recharge time via the external solar panel is highly dependent on solar irradiance and ambient temperature.
The recharge time via the external solar panel is highly dependent on solar irradiance and ambient temperature.
Recharging via AC/DC Adapter
- Plug the PHOENIX Elite into a wall outlet through the DC Input Port using the included AC/DC Adapter.
- The PHOENIX Elite will begin to recharge automatically. The LCD Screen will be lit with the [Battery Level] icon and [Input Power] icon appearing.
![]() Electrical shock can occur if the AC/DC Adapter is damaged. DO NOT use a damaged AC/DC WARNING Adapter to recharge the PHOENIX Elite.
Electrical shock can occur if the AC/DC Adapter is damaged. DO NOT use a damaged AC/DC WARNING Adapter to recharge the PHOENIX Elite.
![]() DO NOT use a third-party AC/DC adapter to charge the PHOENIX Elite. Doing so may cause WARNING the AC/DC adapter to overheat and/or fire.
DO NOT use a third-party AC/DC adapter to charge the PHOENIX Elite. Doing so may cause WARNING the AC/DC adapter to overheat and/or fire.
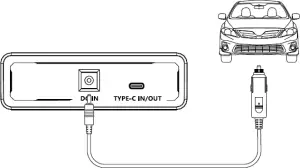
Recharging via Car Socket
- Plug the PHOENIX Elite into a car socket through the DC Input Port using the included Cigarette Lighter Plug to 5.5mm DC Adapter Cable.
- The PHOENIX Elite will begin to recharge automatically. The LCD Screen will be lit with the [Battery Level] icon and [Input Power] icon appearing.

![]() Electrical shock can occur if the Cigarette Lighter Plug to 5.5mm DC Adapter Cable is damaged or frayed. DO NOT use a damaged or frayed cable to recharge the PHOENIX Elite.
Electrical shock can occur if the Cigarette Lighter Plug to 5.5mm DC Adapter Cable is damaged or frayed. DO NOT use a damaged or frayed cable to recharge the PHOENIX Elite.![]() Please disconnect the PHOENIX Elite from the car socket when starting the engine. Electrical
Please disconnect the PHOENIX Elite from the car socket when starting the engine. Electrical
surges from the alternator when starting may damage the PHOENIX Elite
Recharging via USB-C PD Wall Charger
- For optimal recharging performance, it is highly recommended to recharge the PHOENIX Elite using a USB-C PD wall charger (not included) with a high power rating.
- Plug the PHOENIX Elite into a wall outlet through the USB-C PD Port using the USB-C PD wall charger and the included USB-C to USB-C Cable.
- The PHOENIX Elite will begin to recharge automatically. The LCD Screen will be lit with the [Battery Level] icon and [Input Power] icon appearing.


Recommended USB-C PD Wall Chargers:
- Apple USB-C Power Adapter: 30W, 61W, 87W, 96W
- Google USB-C Power Adapter: 45W
Electrical shock can occur if the USB-C PD wall charger is damaged. DO NOT use a damaged WARNING USB-C PD wall charger to recharge the PHOENIX Elite.
OPERATING PHOENIX ELITE
![]()
Operating the PHOENIX Elite at high temperature above 113 (45) or at low temperatures below 32 (0) can result in battery performance degradation and service life shortening. For optimal battery performance and maximum battery life, it is highly recommended to operate the PHOENIX Elite at room temperatures.
Operation Time
- Battery Powered Devices:
Number of Full Charges = 299.5Wh x 70% Device Battery Capacity (Wh) - DC Powered Devices:
Working Hours = 299.5Wh x 95% Device Power Rating (W) - AC Powered Devices:
Working Hours = 299.5Wh x 85% Device Power Rating (W)
![]() The above estimation formulas only apply when the PHOENIX Elite has been fully recharged and the device does not draw too much power.
The above estimation formulas only apply when the PHOENIX Elite has been fully recharged and the device does not draw too much power.![]() Actual number of full charges and working hours may vary due to different powering methods and device operation status.
Actual number of full charges and working hours may vary due to different powering methods and device operation status.
Powering Devices
- Press the Main Power Button to turn on the PHOENIX Elite. The LCD Screen will be lit with the [Battery Level] icon appearing.
- To use the USB-A Ports, QC USB-A Port, USB-C PD Port, CIG Port, or DC Output Ports, first press the DC Output Mode On/Off Button to activate the DC output mode. The [DC Output Mode] icon and [Output Power] icon will appear. Then, connect the device(s) to the port(s) for power. The [Output Power] icon will show the real-time output power. When not using the port(s), long press the DC Output Mode On/Off Button to deactivate the DC output mode. The [DC Output Mode] icon and [Output Power] icon will disappear.
- To use the AC Outlet, first press the AC Output Mode On/Off Button to activate the AC output mode. The [AC Output Mode] icon and [Output Power] icon will appear. Then, connect the device to the outlet for power. The [Output Power] icon will show the real-time output power. When not using the outlet, long press the AC Output Mode On/Off Button to deactivate the AC output mode. The [AC Output Mode] icon and [Output Power] icon will disappear.
- When no device is connected to the PHOENIX Elite, press the Main Power Button again to turn it off.
Compatible Devices
- USB-A Ports / QC USB-A Ports: Smart Watch, Electronic Book, Smart Phone, Tablet, Action Camera, Digital Camera, Bluetooth Speaker, Wireless Headphone, Drone, and other USB-A enabled devices
- USB-C PD Ports: Smart Phone, Tablet, Laptop, Handheld Game Console, DSLR Camera, and other USB-C enabled devices
- CIG Port: Portable Refrigerator, Car Vacuum, Car Air Fan, CPAP Machine, and other car powered devices
DC Output Ports: LED Strip Light, Modem, Router, Motor, and other DC powered devices - AC Outlet: Laptop, Monitor, TV, Game Console, Inkjet Printer, Portable Projector, Light Bulb, and other AC Powered Devices
![]() The PHOENIX Elite can provide up to 300W total output power. Allocate the total output power rationally and follow the specifications of each output port. DO NOT overload the PHOENIX Elite. If the total output power should exceed 300W, the AC Outlet will be shut off.
The PHOENIX Elite can provide up to 300W total output power. Allocate the total output power rationally and follow the specifications of each output port. DO NOT overload the PHOENIX Elite. If the total output power should exceed 300W, the AC Outlet will be shut off.![]() Battery high temperature protection may be triggered when the PHOENIX Elite is operating at CAUTION full load. Cool down the PHOENIX Elite before resuming operation.
Battery high temperature protection may be triggered when the PHOENIX Elite is operating at CAUTION full load. Cool down the PHOENIX Elite before resuming operation.![]() When using the AC Outlet, keep 4 inches of space on either side of the PHOENIX Elite to guarantee efficient heat dissipation.
When using the AC Outlet, keep 4 inches of space on either side of the PHOENIX Elite to guarantee efficient heat dissipation.![]() When the battery level drops below 10%, use of the AC Outlet will be disabled. If the total output power still exceeds 200W, use of the CIG Port and DC Output Ports will be subsequently disabled. DO NOT connect devices with high power ratings to the PHOENIX Elite when the battery level is low.
When the battery level drops below 10%, use of the AC Outlet will be disabled. If the total output power still exceeds 200W, use of the CIG Port and DC Output Ports will be subsequently disabled. DO NOT connect devices with high power ratings to the PHOENIX Elite when the battery level is low.![]() When the battery level drops to 0%, the PHOENIX Elite will turn off automatically. Please CAUTION recharge the PHOENIX Elite as soon as possible to avoid permanent damage to the battery.
When the battery level drops to 0%, the PHOENIX Elite will turn off automatically. Please CAUTION recharge the PHOENIX Elite as soon as possible to avoid permanent damage to the battery.![]() The PHOENIX Elite may not be compatible with the devices that require high current impulses despite their conformity with the output ports specifications.
The PHOENIX Elite may not be compatible with the devices that require high current impulses despite their conformity with the output ports specifications.![]() The PHOENIX Elite may not be able to deliver exactly 299.5Wh of energy when powering devices with high power ratings.
The PHOENIX Elite may not be able to deliver exactly 299.5Wh of energy when powering devices with high power ratings.
Using LED Flashlight
- Press the Main Power Button to turn on the PHOENIX Elite. The LCD Screen will be lit with the [Battery Level] icon appearing.
- The LED Flashlight has three lighting modes: bright (100% brightness), dim (50% brightness), and SOS. Press the Flashlight On/Off Button to turn on the LED Flashlight, switch lighting modes, and turn off the LED Flashlight. Long press the Flashlight On/Off Button to turn off the LED Flashlight no matter what lighting mode it is on.
- When not using the LED Flashlight, press the Main Power Button to turn off the PHOENIX Elite.
MAINTENANCE
- To prolong the service life of the PHOENIX Elite, keep it away from water, dust, and dirt. DO NOT leave the PHOENIX Elite in harsh environments.
- Keep the PHOENIX Elite recharged when not in use and avoid connecting devices with high power ratings when the battery level is low.
- If the PHOENIX Elite is not used frequently, keep its battery level at around 50%. Store the PHOENIX Elite in a clean, dry, and well-ventilated environment with a temperature around 77 (25) and a humidity no higher than 75%. Recharge the PHOENIX Elite at least once every two months.
- Keep the PHOENIX Elite away from corrosives, fire, and heat sources.
TROUBLESHOOTING
- If the PHOENIX Elite does not operate normally, please refer to the following table for possible causes and corrective steps.
- If the following corrective steps do not work, please contact the Renogy technical support team for help. Refer to the last page of the User Guide for contact information.
| Error Code | Possible Causes | Corrective Steps |
| E01 | Battery Over-voltage | Disconnect all the power source(s). Discharge the unit until the [Error Code] icon disappears. |
| E02 | Battery Under-voltage | Disconnect all the electrical load(s). Recharge the unit until the [Error Code] icon disappears. |
| E03 | Battery Cell Imbalance | Stop using the unit. Contact the Renogy technical support team for help. |
| E04 | BMS Communication Failure | Stop using the unit. Contact the Renogy technical support team for help. |
| E05 | Battery High Temperature (Charge) | Disconnect all the power source(s) and electrical load(s). Cool down the unit until the [Error Code] icon disappears. |
| E06 | Battery Low Temperature (Charge) | Disconnect all the power source(s) and electrical load(s). Warm up the unit until the [Error Code] icon disappears. |
| E07 | DC Input Port Overvoltage | Disconnect the power source. Check the voltage rating of the power source. Connect only the power source with compliant voltage rating to the unit. |
| E08 | DC Input Port Undervoltage | Disconnect the power source. Check the voltage rating of the power source. Connect only the power source with compliant voltage rating to the unit. |
| E09 | USB-C PD Port Input Over-voltage | Disconnect the power source. Check the voltage rating of the power source. Connect only the power source with compliant voltage rating to the unit. |
| E010 | USB-C PD Port Input Under-voltage | Disconnect the power source. Check the voltage rating of the power source. Connect only the power source with compliant voltage rating to the unit. |
| E011 | Charge Over-current | Reconnect all the power source(s). If the [Error Code] icon persists, stop using the unit. Contact the Renogy technical support team for help. |
| E012 | Battery High Temperature (Discharge) | Disconnect all power source(s) and electrical load(s). Cool down the unit until the [Error Code] icon disappears. |
| E013 | Battery Low Temperature (Discharge) | Disconnect all power source(s) and electrical load(s). Warm up the unit until the [Error Code] icon disappears. |
| E014 | USB-A Ports Output Over-voltage | Disconnect the electrical load(s). Reactivate the DC output mode. If the [Error Code] icon persists, stop using the unit. Contact the Renogy technical support team for help. |
| E15 | USB-A Ports Output Under-voltage | Disconnect the electrical load(s). Reactivate the DC output mode. If the [Error Code] icon persists, stop using the unit. Contact the Renogy technical support team for help. |
| E16 | USB-A Ports Output Over-current/Short-circuit | Disconnect the electrical load(s). Remove the short circuit(s). Press the DC Output Mode On/Off Button to clear the [Error Code] icon. Connect only the electrical load(s) with compliant current ratings to the unit. |
| E17 | DC Output Ports/CIG Port Output Over-voltage | Disconnect the electrical load(s). Reactivate the DC output mode. If the [Error Code] icon persists, stop using the unit. Contact the Renogy technical support team for help. |
| E18 | DC Output Ports/CIG Port Output Under-voltage | Disconnect the electrical load(s). Reactivate the DC output mode. If the [Error Code] icon persists, stop using the unit. Contact the Renogy technical support team for help. |
| E19 | DC Output Ports/CIG Port Output Over-current/ Short-circuit | Disconnect the electrical load(s). Remove the short circuit(s). Press the DC Output Mode On/Off Button to clear the [Error Code] icon. Connect only the electrical load(s) with compliant current ratings to the unit. |
| E20 | QC USB-A Port Output Over-voltage | Disconnect the electrical load. Reactivate the DC output mode. If the [Error Code] icon persists, stop using the unit. Contact the Renogy technical support team for help. |
| E21 | QC USB-A Port Output Under-voltage | Disconnect the electrical load. Reactivate the DC output mode. If the [Error Code] icon persists, stop using the unit. Contact the Renogy technical support team for help. |
| E22 | QC USB-A Port Output Over-current/Short-circuit | Disconnect the electrical load. Remove the short circuit. Press the DC Output Mode On/Off Button to clear the [Error Code] icon. Connect only the electrical load with compliant current ratings to the unit. |
| E23 | USB-C PD Port Output Over-voltage | Disconnect the electrical load. Reactivate the DC output mode. If the [Error Code] icon persists, stop using the unit. Contact the Renogy technical support team for help. |
| E24 | USB-C PD Port Output Under-voltage | Disconnect the electrical load. Reactivate the DC output mode. If the [Error Code] icon persists, stop using the unit. Contact the Renogy technical support team for help. |
| E25 | USB-C PD Port Output Over-current/Short-circuit | Disconnect the electrical load. Remove the short circuit. Press the DC Output Mode On/Off Button to clear the [Error Code] icon. Connect only the electrical load with compliant current ratings to the unit. |
| E26 | AC Outlet Output Overload/Short-circuit | Disconnect the electrical load. Remove the short circuit. Let the unit stand for 10 seconds. Press the AC Output Mode On/Off Button to clear the [Error Code] icon. Connect only the electrical load with compliant power ratings to the unit. |
| E27 | AC Outlet Output Over-voltage | Disconnect the electrical load. Reactivate the AC output mode. If the [Error Code] icon persists, stop using the unit. Contact the Renogy technical support team for help. |
| E28 | AC Outlet Output Under-voltage | Disconnect the electrical load. Reactivate the AC output mode. If the [Error Code] icon persists, stop using the unit. Contact the Renogy technical support team for help. |
| E29 | Inverter High Temperature | Disconnect all the power source(s) and electrical load(s). Cool down the unit to the room temperature. Press the AC Output Mode On/Off Button to clear the [Error Code] icon. |
| E31 | Total Output Overload | Disconnect all the electrical load(s). Press the AC Output Mode On/Off Button to clear the [Error Code] icon. Reallocate the total output power |
FREQUENTLY ASKED QUESTIONS
- Why doesn’t the PHOENIX Elite power external devices? First, make sure that the unit has been turned on by pressing the Main Power Button. If the LCD Screen does not light up after pressing the Main Power Button, please recharge the unit as soon as possible. Then, make sure that the output ports have been turned on by pressing the AC Output Mode On/Off Button and/or DC Output Mode On/Off Button. Finally, make sure that the connected devices conform to the specifications of the output ports. If the [Error Code] icon appears, please see the TROUBLESHOOTING section or contact the Renogy technical support team for help. Refer to the last page of the User Guide for contact information.
- Can I replace the battery in the PHOENIX Elite? No, the battery in PHOENIX Elite is not replaceable. Do not try to dismantle the PHOENIX Elite and replace the battery by yourself. Doing so may cause irreversible damages to the unit and/or battery explosion.
- Is the PHOENIX Elite chainable? No, the PHOENIX Elite cannot be chained together or with other rechargeable AC power supplies. If you are looking for a rechargeable AC power supply with a large capacity,, please visit our website or contact us for more options. Refer to the last page of the User Guide for contact information.
- Is the PHOENIX Elite waterproof? No, the PHOENIX Elite is not waterproof. Please keep the unit away from moisture. Do not submerge the unit into water or operate the unit in the rain. Doing so may cause short-circuit, electric shocks, and fire.
- Why doesn’t the PHOENIX Elite last as long as I expect? The battery capacity of the PHOENIX Elite is rated at 0.2C. When the PHOENIX Elite is powering devices with high power ratings, the internal resistance of the battery will turn more energy into heat and lower the energy conversion efficiency. As a result, you may not get exactly 299.5Wh of energy.
WARRANTY
- RENOGY products are covered by a 12-month limited warranty from the original purchase date. If any problems occur, please contact us for assistance. Refer to the last page of the User Guide for contact information.
- We only provide after-sales services for products that are sold by RENOGY or retailers and distributors authorized by RENOGY. If you have purchased your unit from other channels, please contact your seller for more information about return and warranty.
- Please register your purchase(s) directly at warranty.renogy.com/support/tickets/new or your region’s corresponding website so that we can stay in touch and contact you in the unlikely event that a safety recall is required.
References
 Renogy® Official- offer all off grid solar system products
-
Renogy® Official- offer all off grid solar system products
-
Solar Power Kits & Equipment for Sale | Renogy Australia
-
Renogy® Canada-Solar Off-grid Products
-
Renogy Weihnachten Sale Bis Zu 30% Sparen| Renogy DE
-
High Quality Solar Products | Renogy UK
 RENOGY如果新能源 | 让每个人拥有独立清洁的能源
-
独立型太陽光発電システム専門 | RENOGY JAPANオンラインショップ


