![]()
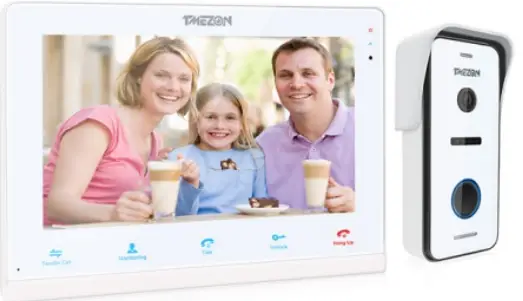
TMEZON MZ-IP-V103W 4-Wire IP Video Door Phone 10 Inch Touch Screen Series
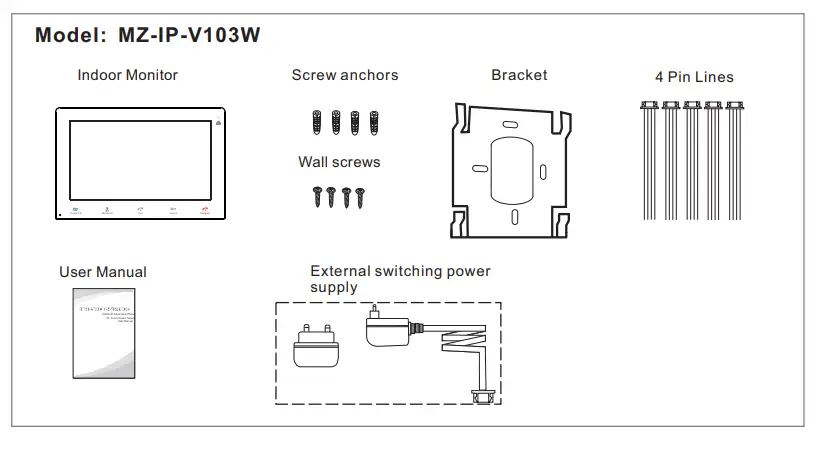
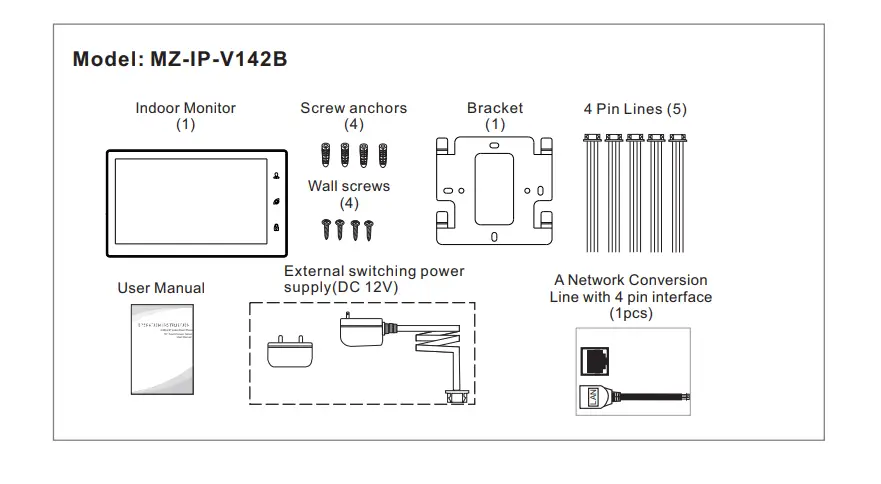
Accessories for the Indoor Monitor

Specifications of the Indoor Monitor
| Display | 10.1 inch TFT LCD(16:9) |
| Resolution | 1024*600 |
| Video system | PAL/NTSC compatible |
| Intercom mode | Semi-duplex communication |
| Conversation duration | 120 seconds |
| Standby status | 1A max. |
| working status | 1.5A max. |
| Power supply | External switching power supply DC 12V |
| Operation temp. | -10 C~+60 C |
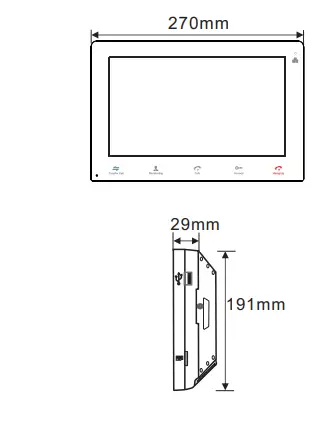
| Installation | Surface mount |
| Dimensions | 270*191*29mm |
| Display | 10.1 inch TFT LCD(16:9) |
| Resolution | 1024*600 |
| Video system | PAL/NTSC compatible |
| Intercom mode | Semi-duplex communication |
| Conversation duration | 120 seconds |
| Standby status | 1A max. |
| working status | 1.5A max. |
| Power supply | External switching power supply DC 12V |
| Operation temp. | -10 C~+60 C |
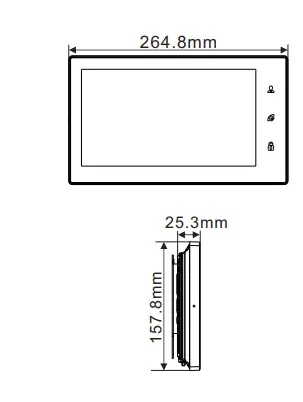
| Installation | Surface mount |
| Dimensions | 264.8*157.8*25.3mm |
Note On Wiring Connection
 The power supplies for electric lock, CCTV cameras, and extension cables are not included in the package, user can purchase according to actual requirements. The indoor monitor is with an external switching power supply DC 12V. If you don’t want to use the external power supply, please use 2 pin cable and DIN rail power supply to extend the power cable to your home power supply center and hide the wire in the wall. If over 3m, we suggest you to use the thicker power cable and higher ampere power supply, or the monitor and doorbell can not get enough power, which will affect the conversation and unlocking.
Wiring connection according to the following to avoid interference: 
Please note the silk printing marked on PCB in order to avoid incorrect connecting. The wiring connection requirement(The actual effect and the quality of wire rod has the very big relations):
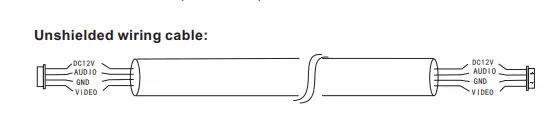
- 4-Core ordinary unshielded and shielded wiring cable;
- Effective distance from the outdoor camera to furthest indoor monitor: Transmission ≤30m (4×0.4mm2) Transmission ≤60m (4×0.65mm2) Unshielded wiring cable:

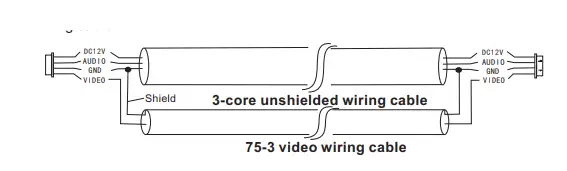
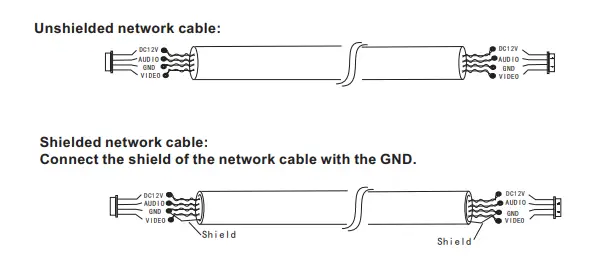
- If you want to extend the distance over 60m, you’d better to choose a thick copper core cable, or a shielded wiring cable, or a 3-core ordinary unshielded wire + a 75-3 video wire.When using a shielded wiring cable, please connect the shield terminal with the GND.

- 3-core unshielded wiring cable+75-3 video wiring cable: Connect the shield of the 75-3 video wiring cable with the GND of the 3-core unshielded wiring cable.

- .If the user wants to use CAT5 or CAT6 network cable, the effective distance from the outdoor camera to the furthest indoor monitor will be limited. For unshielded network cable, the distance will be up to 20m. For shielded network cable, the distance will be up to 40m. So CAT5 or CAT6 network cable is not recommended.CAT5 or CAT6 network cable consists of 4 pairs of twisted pairs(8 wires), here one pair of twisted pair will be used as one cable.
Green&White+Green, Brown&White+Brown, Orange&White+Orange, Blue&White+Blue.
Unshielded network cable:
- When the distance from the outdoor doorbell to the indoor monitor is too far, maybe over 50m or 60m, please make sure that the input voltage to the outdoor doorbell must reach 11.7V.

Installation process of indoor monitors
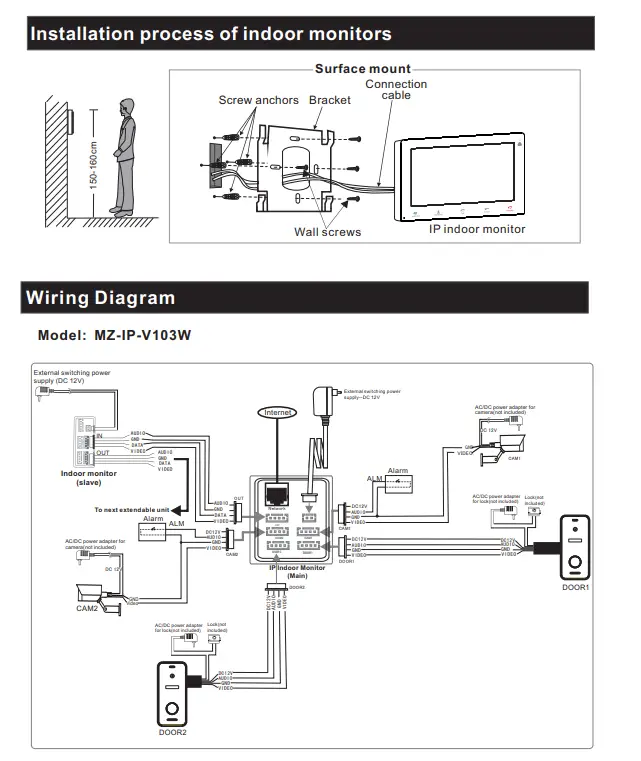
For IP 10’’ touch screen series, users can connect up to two doorbells, or two CCTV cameras, and three extendable traditional indoor monitors. The IP indoor monitor is with an external power supply.
Note:The CCTV cameras must use an external switching power supply The doorbell cameras and CCTV cameras connected to the indoor monitor support mixed input.
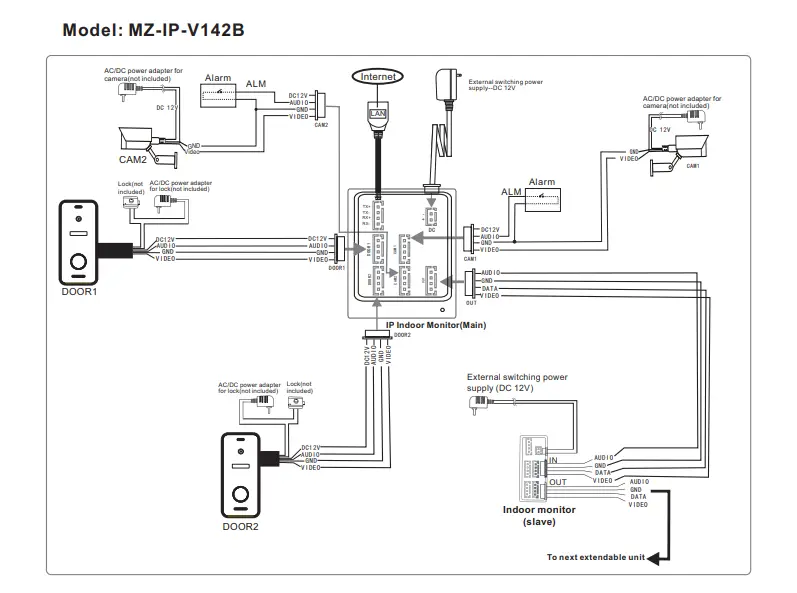
Multi-monitor connection
Multiple monitors connected, ensure that the wiring and settings are correct as follows.
- Connect from “Out” port of Master monitor to the “In” port of Slave monitor. Connect from “Out” port of the last monitor to the “In” port of the next monitor.
- Set as Slave mode for all the Slave monitors
Description On The Indoor Monitor

| Name | Descriptions | |
| TFT display & Touch screen | 1. View visitor’s image displayed on the TFT screen. 2. Touch screen function. | |
| Microphone | Transmit the voice to outdoor camera | |
| Transfer call | Transfer call, press the button transfer call to another indoor monitor. | |
| Monitoring | Monitoring, press the button to watch the outdoor doorbell and CCTV camera images. | |
| Talk | 1. Talk, press the button to activate conversation mode. 2. In standby mode, press this button to intercom call to another indoor monitor. | |
| Unlock | Unlock, release the door lock. | |
| Hang up | Hang up, press this button to end conversation mode. | |
| 8 | Power LED | |
| 9 | Network LED | |
| 10 | USB Port | To connect the USB mouse to the device. |
| 11 | Speaker | Sound from outdoor camera. |
| 12 | TF card slot | TF card interface, the SD card maximum supports 128GB. If the SD card is less than 64GB, the file system must be FAT32; and if the SD card is more than 64GB, its file system must be exFAT. The card should be formatted before using. And suggest that it’s better to use a TF card more than class 10 onto the device. |
| 13 | Power switch | To turn on/turn off the monitor. |
Note:
The back-light of each button will be on when user presses any button or some visitor calls on the outdoor doorbell. The back-light of each button will be off if user doesn’t do any operate on the device in 10 seconds.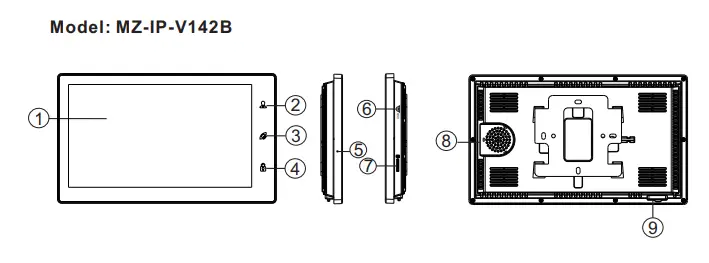
| Name | Descriptions | |
| TFT display & Touch screen | 1. View visitor’s image displayed on the TFT screen. 2. Touch screen function. | |
| Monitoring, press the button to watch the outdoor doorbell and CCTV camera images. | ||
|
|
| 1. Talk, press the button to activate conversation mode. 2. In standby mode, press this button to intercom call to another indoor monitor. 3. Transfer call, press and hold the button for about 3 seconds to transfer call to another indoor monitor. 4. Hang up, press this button to end conversation mode. |
| Unlock, release the door lock. | ||
| Microphone | Transmit the voice to outdoor camera | |
| USB Port | To connect the USB mouse to the device. | |
|
| TF card slot | TF card interface, the SD card maximum supports 128GB. If the SD card is less than 64GB, the file system must be FAT32; and if the SD card is more than 64GB, its file system must be exFAT. The card should be formatted before using. And suggest that it’s better to use a TF card more than class 10 onto the device. |
| 8 | Speaker | Sound from outdoor camera. |
| 9 | Power switch | To turn on/turn off the device. |
Outdoor Camera Instruction
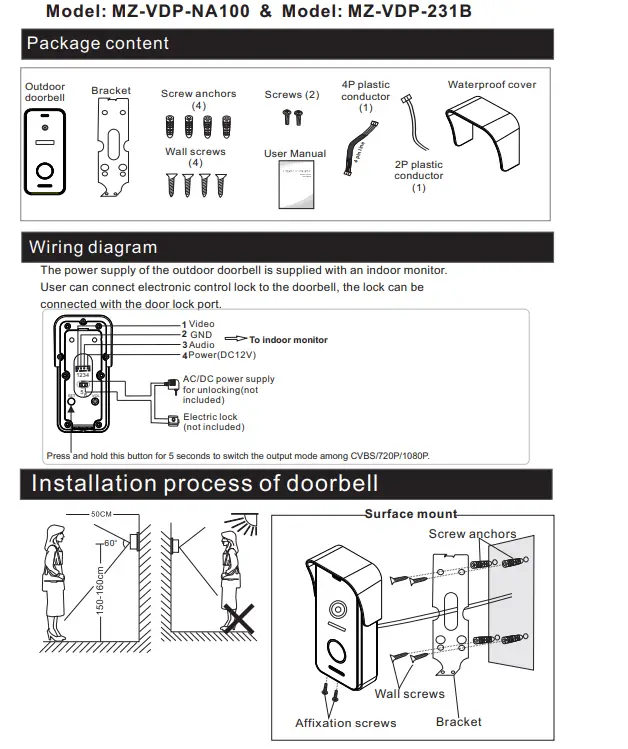
Model: MZ-VDP-NA100 & Model: MZ-VDP-231B 
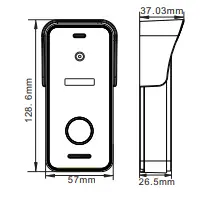
Specification
| 1/3 inch CMOS camera | |
| 115o(H.) | |
| Definition | 1080P(1920*1080)/720P(1280*720)/CVBS |
| IR LEDs(120o ) | |
| Day/Night | IR-CUT |
| 300mA max. | |
| Supplied from indoor monitor | |
|
-20C~+60C | |
| Surface mount |
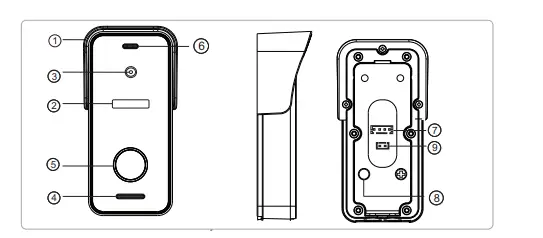
| No. | |
| 1. Weather shield | Affix and protect outdoor doorbell from rain/snow |
| 2. IR LEDS | Provides illumination with IR LEDs for better visibility |
| 3. Camera | Capture image to transmit to the monitor |
| 4. Speaker | Sound from indoor monitor |
| 5. Call button | Call indoor monitor for intercommunication |
| 6. Microphone | Transmit voice to the indoor monitor |
| 7. System port | Connect the indoor monitor |
| 8. Switch output mode | Press and hold this button for 5 seconds to switch the output mode among CVBS/720P/1080P |
| 9. Door lock port | Connect to the door lock. |
Note on lock connection
The electric locks are usually divided into NC lock and NO lock, their wiring is different, the NC lock need to work with the additional power supply control.
- The doorbell or the monitor will not provide the power to door lock.
- The doorbell can support door locks within 30V.
- Door lock’s power supply depends on its door lock, if the door lock is 12V, the corresponding power supply is 12V, etc.
- Make sure the input voltage from the monitor to the doorbell must reach 11.7V when unlocking.
NO Lock: Always closed when power or power off, only open when press unlock.
NC Lock: Always open when power off. Closed when power and open after press unlock.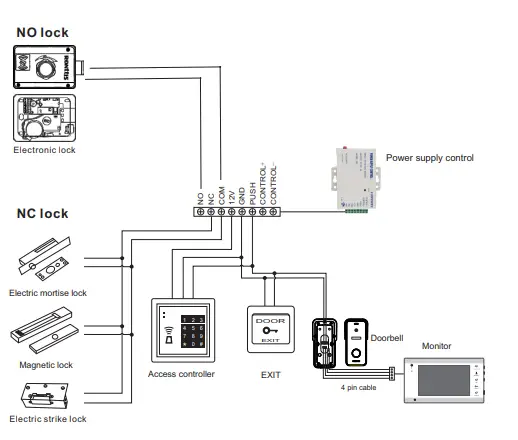
How to connect Network
Note:
Router Band–This IP indoor monitor will only connect to the 2.4GHZ band. . Router b/g/n –This IP indoor monitor works on 802(b/g/n) network.
Pl ease download an app “TuyaSmart” via “Google Play Store” or via “APP Store”, then register an account.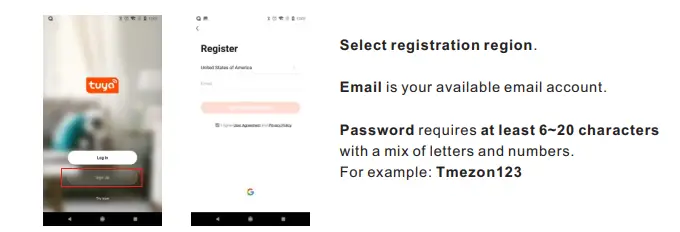
APP CONNECTION
Step 1. Connect the IP indoor monitor to a WiFi router through an Ethernet cable or WIFI. If through wireless/WiFi connection, please refer to the following method.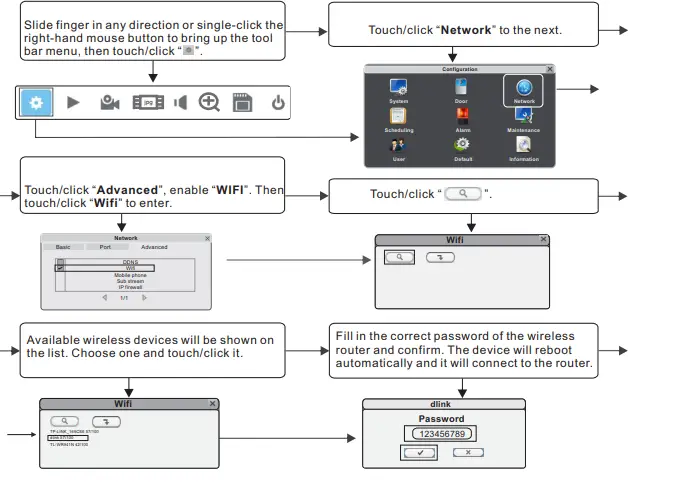
Step 2. Connect your smart-phone to the same WiFi router.
Note: Please make sure the IP indoor monitor and your smart-phone are both connected to the Internet.
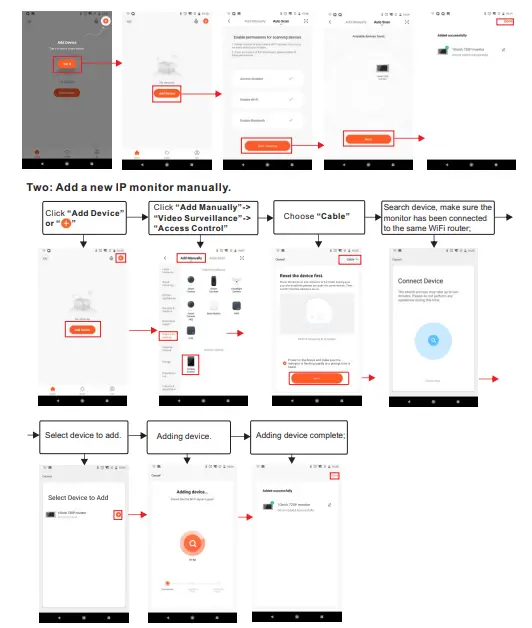
Step 3. Login the TuyaSmart app, add a new IP monitor refer to the following two methods. One: Click “Add Device”->“Auto Scan”->choose available device found to add.
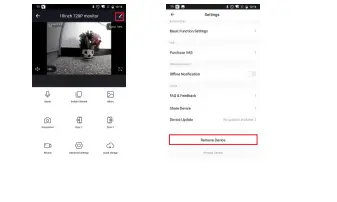
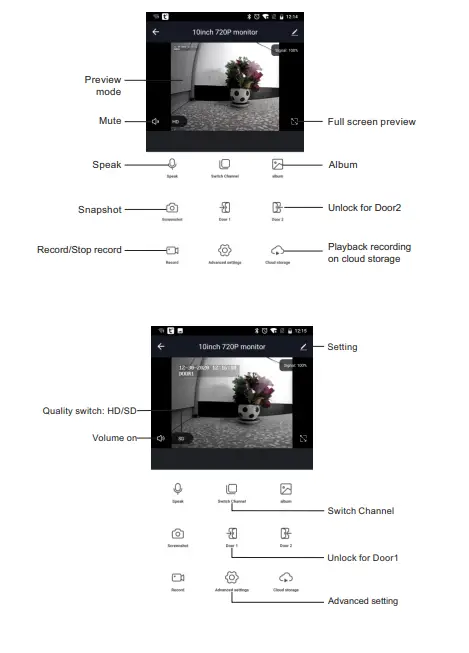
The icons on live view
Remove your device
Steps: Settings>>Remove Device>>Confirm.
Note: When remove the device on the app, the current monitor will auto-reboot.