
reolink 58.03.005.0009 E1 Outdoor Security Camera
Product Information
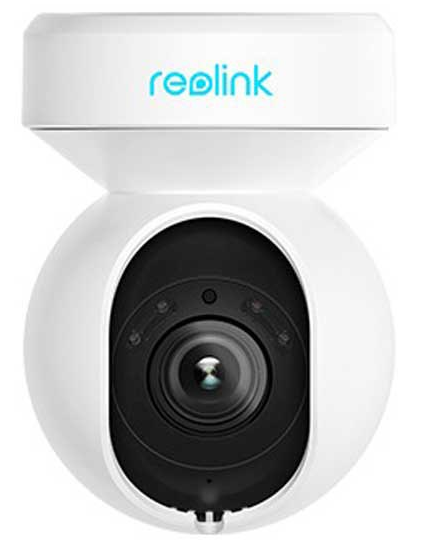
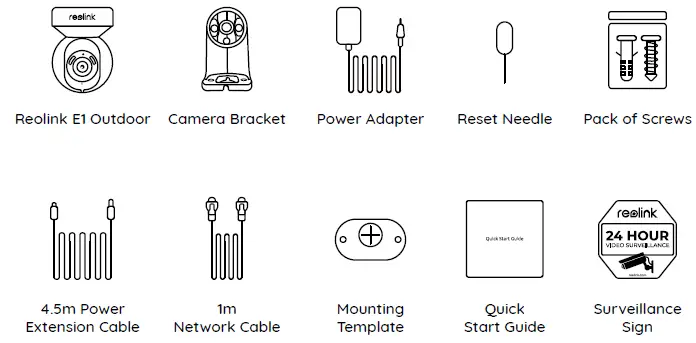
The Reolink E1 Outdoor Camera is a surveillance camera designed for outdoor use. It features a daylight sensor spotlight, infrared lights, a built-in mic, and speaker. The camera comes with a bracket, power adapter, reset needle, pack of screws, 4.5m power extension cable, 1m network cable, mounting template, quick start guide, and surveillance sign. The camera can be set up either wirelessly or with an ethernet cable. It can be accessed via the Reolink App or Reolink Client, and the UID is located on the camera body below the QR code. The camera also has a reset button and micro SD card slot for restoring to default settings and storage.
Product Usage Instructions
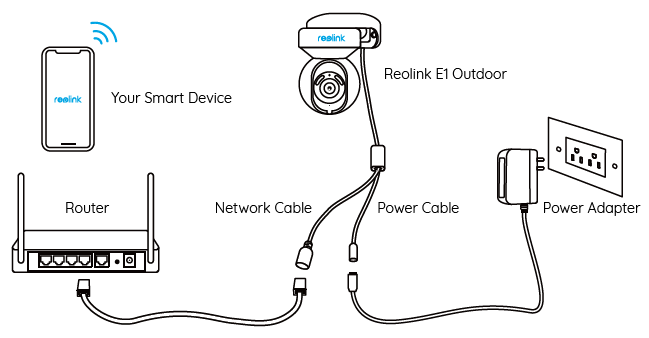
Wired Setup
For the initial setup, it is recommended to use the ethernet cable. Follow these steps:
- Connect the camera to a LAN port on your router with an Ethernet cable.
- Use the power adapter provided to power on the camera.
- Download and launch the Reolink App or Client software, and follow the onscreen instructions to finish initial setup.
Wireless Setup
If you prefer to set up the camera wirelessly, follow these steps:
- Use the power adapter provided to power on the camera.
- Launch the Reolink App and click the “
 ” button in the top right corner to add the camera.
 - Scan the QR code on the device and follow the onscreen instructions to finish initial setup.
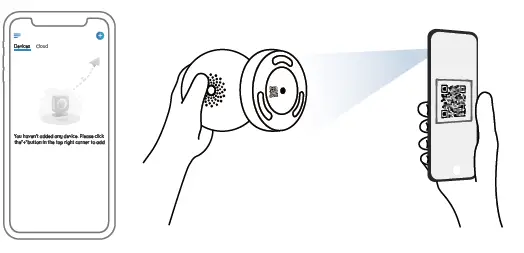
NOTE: If you access the camera via the Reolink Client, you may click the Add Device icon and choose the UID option to enter the UID of your camera. The UID is on the camera body (right below the QR code).
Installing the E1 Outdoor Camera
Follow these steps to mount the camera to a wall:
- Pull the button of the security mount and unscrew the bracket to separate the two parts.
- Screw the bracket to the bottom of the camera.

- Drill holes in accordance with the mounting template and screw the security mount to the wall.
- Choose a proper direction of the camera and then align the bracket to the security mount and lock the camera in place by turning anti-clockwise.

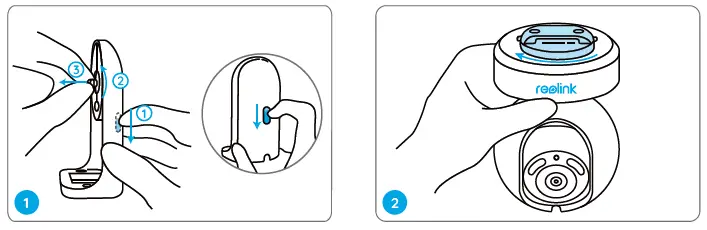
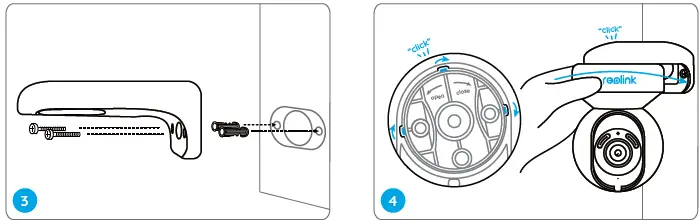
The camera must be installed upside down for better waterproof performance. Use the drywall anchors included in the package if needed.
NOTE: Use the drywall anchors included in the package if needed
What’s in the Box
Camera Introduction
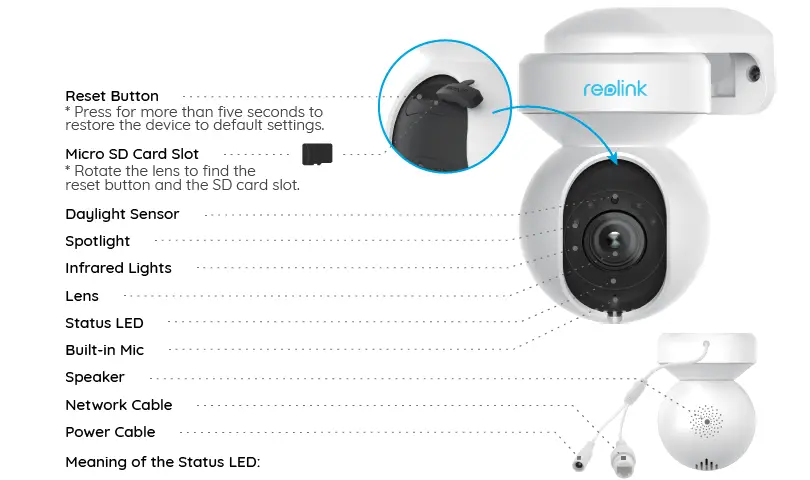
| Status/LED | Blinking | Solid |
| LED in Blue | WiFi connection failed | Camera is starting up |
| WiFi is not configured | WiFi connection succeeded |
On Smartphone
Scan to download the Reolink App

On PC
Download path of the Reolink Client: Go to https://reolink.com > Support > App & Client.
Mount the Camera to the Ceiling
Pull the button of the security mount and unscrew the ceiling bracket from the mount.
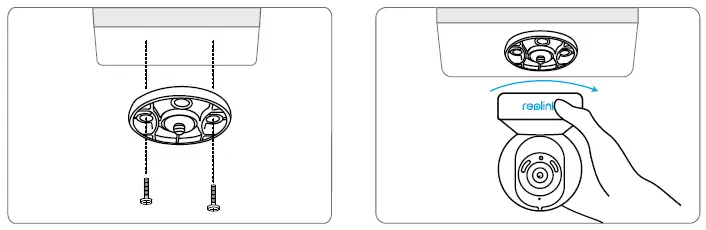
Install the bracket to the ceiling. Align the camera with the bracket and turn the camera unit clockwise to lock it in position
Troubleshooting
Camera is not Powering on
If your camera is not powering on, please try the following solutions:
- Plug the camera into another outlet.
- Use another 12V power adapter to power on the camera.
If these won’t work, please contact Reolink Support https://support.reolink.com
WiFi Connection Failed During Initial Setup Process
If the camera failed to connect to WiFi, please try the following solutions:
- Please ensure you have entered the correct WiFi password.
- Put your camera close to your router to ensure a strong WiFi signal.
- Change the encryption method of the WiFi network to WPA2-PSK/WPA-PSK (safer encryption) on your router interface.
- Change your WiFi SSID or password and make sure that SSID is within 31 characters and password is within 64 characters.
- Set your password using only the characters on the keyboard
If these won’t work, please contact Reolink Support https://support.reolink.com
Specifications
Hardware
- Display Resolution: 5MP
- IR Distance: 12 meters (40 ft)
- Pan/Tilt Angle: Horizontal: 355° / Vertical: 50°
- Power Input: DC 12V/1A
Software Features
- Frame Rate: 20fps (default)
- Audio: Two-way audio
- IR Cut Filter: Yes
General Operating Frequency: 2.4/5GHz Dual-band
- Operating Temperature: -10°C to 55°C (14°F to 131°F)
- Size: 84.7×117.8 mm
- Weight: 380g
Notification of Compliance
FCC Compliance Statement
This device complies with Part 15 of FCC Rules. Operation is subject to the following two conditions: (1) this device may not cause harmful interference, and (2) this device must accept any interference received, including interference that may cause undesired operation. For more information, visit: https://reolink.com/fcc-compliance-notice/.
- Reorient or relocate the receiving antenna.
- Increase the separation between the equipment and receiver.
- Connect the equipment into an outlet on a circuit different from that to which the receiver is connected.
- Consult the dealer or an experienced radio/TV technician for help.
FCC RF warning statement:
The device has been evaluated to meet general RF exposure requirement. The device can be used in portable exposure condition without restriction
Simplified EU Declaration of Conformity
Reolink declares that this device is in compliance with the essential requirements and other relevant provisions of Directive 2014/53/EU.
Correct Disposal of This Product
This marking indicates that this product should not be disposed with other household wastes throughout the EU. To prevent possible harm to the environment or human health from uncontrolled waste disposal, recycle it responsibly to promote the sustainable reuse of material resources. To return your used device, please use the return and collection systems or contact the retailer where the product was purchased. They can take this product for environment safe recycling
Limited Warranty
This product comes with a 2-year limited warranty that is valid only if purchased from Reolink Official Store or a Reolink authorized reseller. Learn more: https://reolink.com/warranty-and-return/.
NOTE: We hope that you enjoy the new purchase. But if you are not satisfied with the product and plan to return it, we strongly suggest that you reset the camera to factory default settings and take out the inserted SD card before returning.
Terms and Privacy
Use of the product is subject to your agreement to the Terms of Service and Privacy Policy at reolink.com. Keep out of reach of children.
End User License Agreement
By using the Product Software that is embedded on the Reolink product, you agree to the terms of this End User License Agreement (“EULA”) between you and Reolink. Learn more: https://reolink.com/eula/.
ISED Radiation Exposure Statement
This equipment complies with RSS-102 radiation exposure limits set forth for an uncontrolled environment. This equipment should be installed and operated with minimum distance 20cm between the radiator & your body.
OPERATING FREQUENCY
(the maximum transmitted power)
- 2412MHz—2472MHz (19dBm)
- 5150MHz—5350MHz (18dBm)
- 5470MHz—5725MHz (18dBm)
Technical Support
If you need any technical help, please visit our official support site and contact our support team before returning the products, https://support.reolink.com.


