
![]() S4210
S4210
2.1 Channel Sound Bar with Dolby Audio™,
DTS® Virtual:X™, and Wireless Subwoofer
Quick Start Guide
Register Your Product
Register your TCL Sound Bar to receive the latest news on product releases, promotional offers, and more!* ![]() Text to Register
Text to Register
Text a photo of the camera icon to 71403
Or register online at register.tcl.com
Need help? Visit photoregister.com/help or text HELP to 71403
Enjoy exclusive benefits with registration:![]() Expedited support and service
Expedited support and service![]() Exclusive offers and promotions
Exclusive offers and promotions![]() Insider tips on your sound bar
Insider tips on your sound bar![]() Verification of ownership
Verification of ownership
*Only Available to U.S. Customers
What’s in the box
Make sure you read all the safety information before you use this product.
User Manual can be found at www.tcl.com/us on the specific product page in the “Download” section.![]() Warning:
Warning:
To avoid the danger of suffocation, keep plastic packaging away from pets, babies, and children. Do not use packaging bags in cribs, beds, carriages, or playpens.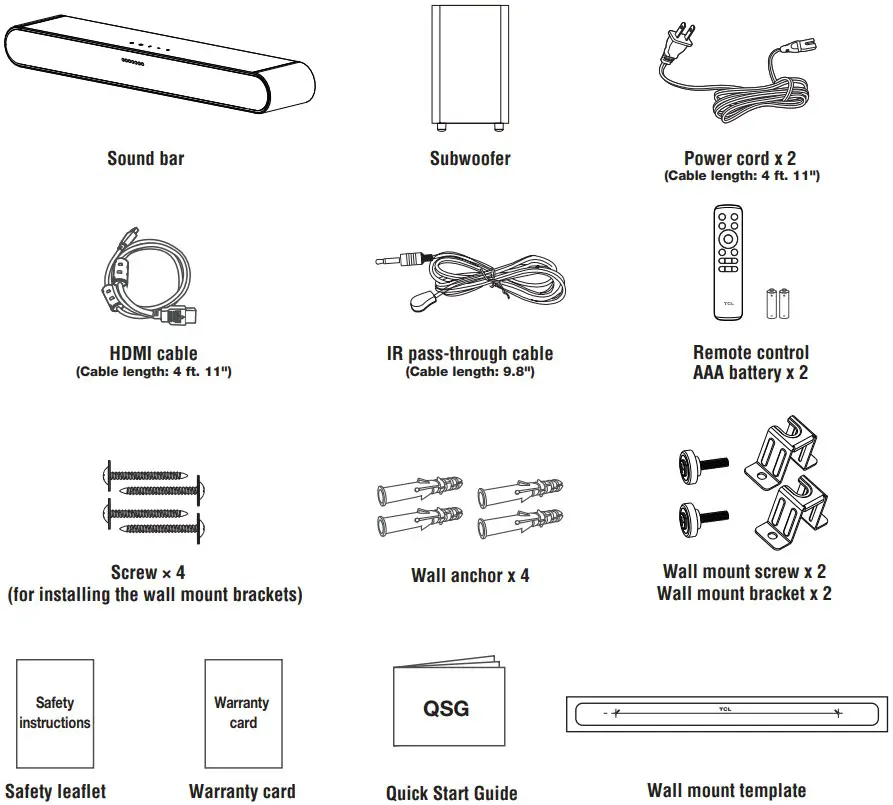
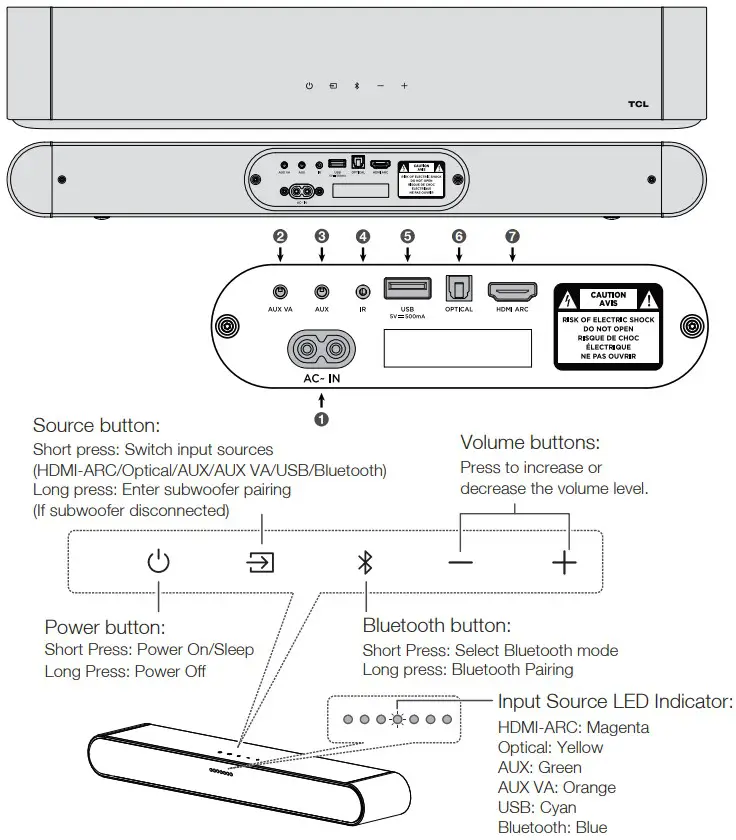
Overview
- AC input power connector
- AUX VA input connector
- AUX input connector
- IR input connector
- USB Type A connector
- Optical input connector
- HDMI ARC connector
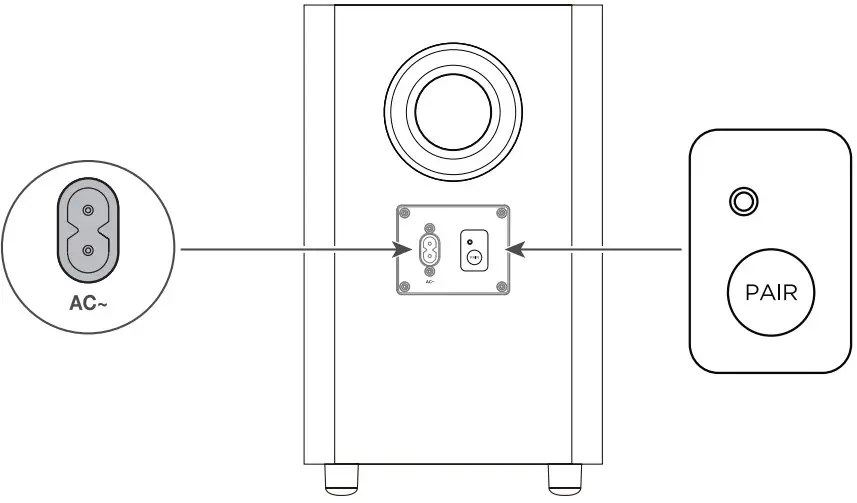
 Wireless subwoofer
The subwoofer will pair automatically with sound bar upon first use. In case of a problem, take the following steps to manually pair:
Press and hold the button on the subwoofer for 3 seconds until an amber light begins flashing above the pair button.
- Press and hold the
 button on the subwoofer for 3 seconds until an amber light begins flashing above the pair button.
 - Press and hold the
 button on the sound bar until a yellow LED indicator flashes on the sound bar. After a short while, the sound bar LED will turn green and the subwoofer LED will turn solid.
 - The subwoofer is now connected to the sound bar.
Install or replace the remote batteries
Battery type: 1.5V AAA battery x 2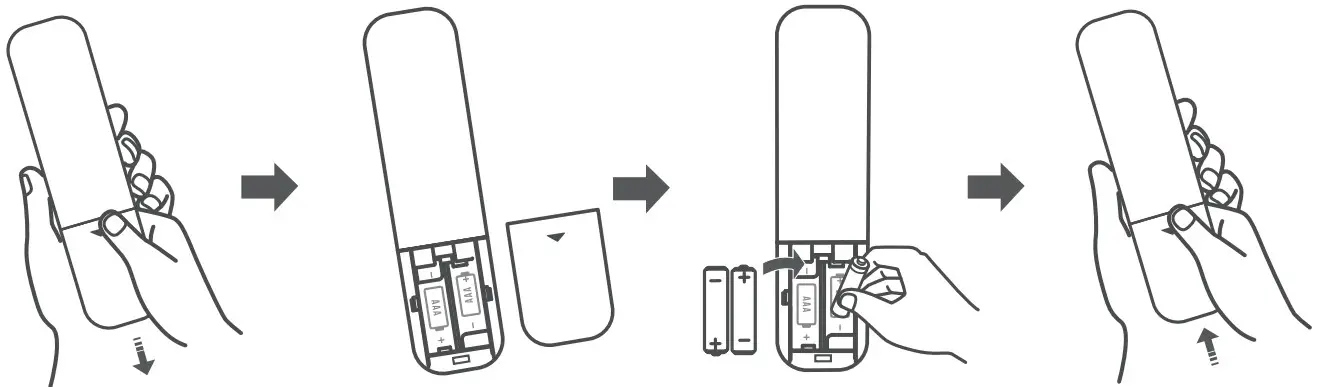 Use the Remote
![]() Warning: Do not expose batteries to excessive heat such as sunshine, fire, or the like. Keep new and used batteries away from children.
Warning: Do not expose batteries to excessive heat such as sunshine, fire, or the like. Keep new and used batteries away from children.
For disposal or recycling information, please contact your local authorities.![]() CAUTION: Danger of explosion if the battery is incorrectly replaced. Replace only with the same or equivalent type.
CAUTION: Danger of explosion if the battery is incorrectly replaced. Replace only with the same or equivalent type.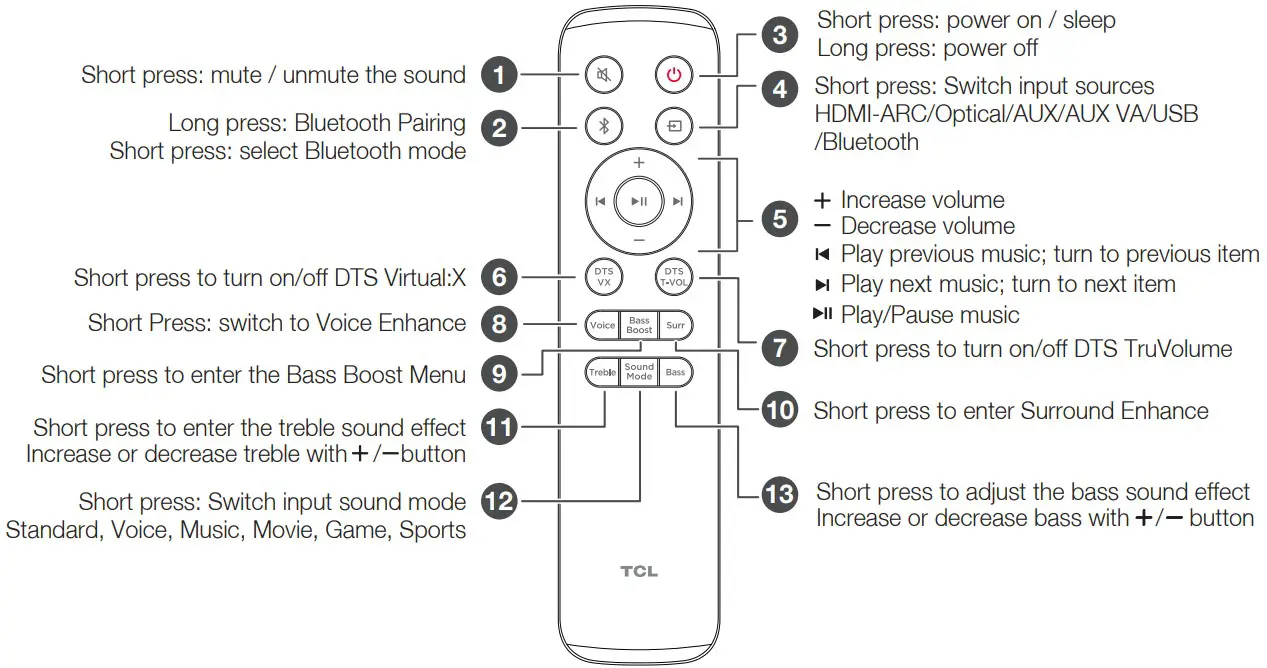
Sound Bar LED Display
| Remote Control | Sound bar Action | LED Behavior on Sound bar |
 | Power off/Sleep Power On | Power Off: All LEDs light turn on and turn off from the sides to the center. Power On: LEDs will turn on from the center to the sides. |
 | Mute sound | Mute On: Center LED will flash several times. Mute Off: Current Volume Level will be shown. |
 | Source | Input Source LED Indicator: HDMI ARC: Magenta Optical: Yellow Aux: Green Aux VA: Orange USB: Cyan Bluetooth: Blue |
 | Bluetooth Pairing | Blue LED will flash rapidly |
 | Volume up/down Skip/Previous | Volume Up: LEDs will gradually turn on from the center to the sides Volume Down: LEDs will gradually turn off from the sides to the center Skip: LEDs move from the left to the right Previous: LEDs move from the right to the left |
 | DTS Virtual:X/TruVolume | Enabled: LEDs will turn on from the center to the sides. Disabled: All LEDs light turn on and turn off from the sides to the center. |
 | Voice Enhance | Long Press: Enter Voice Enhance adjustment Use UP/DOWN keys to adjust between four different levels. Short Press: Show current Voice Enhance level Use UP/DOWN keys to adjust between four different levels. |
 | Bass Boost / Night | Long Press: Enable/Disable Night mode with voice broadcast Short Press: Show current Bass Boost level Use UP/DOWN keys to adjust between four different levels. |
 | Surround Enhance | Short Press: Show current Surround Enhance level Use UP/DOWN keys to adjust between four different levels. Long Press: Turn on or turn off AUX voice assistant. |
 | Treble Adjustment | Short Press: Show current Treble level. Increase/Decrease using UP/DOWN keys to adjust thirteen different levels. |
 | Sound Mode | Press to switch sound mode in following order: Standard / Voice / Music / Movie / Game / Sports |
 | Bass Adjustment | Short Press: Show current Bass level. Increase/Decrease using UP/DOWN keys to adjust thirteen different levels. |
Place your Sound Bar and Subwoofer
The ideal place to position the Sound Bar is centered underneath your TV.![]() Note: Do not place your sound bar in a location exposed to direct sunlight, heat, fire, or moisture.
Note: Do not place your sound bar in a location exposed to direct sunlight, heat, fire, or moisture.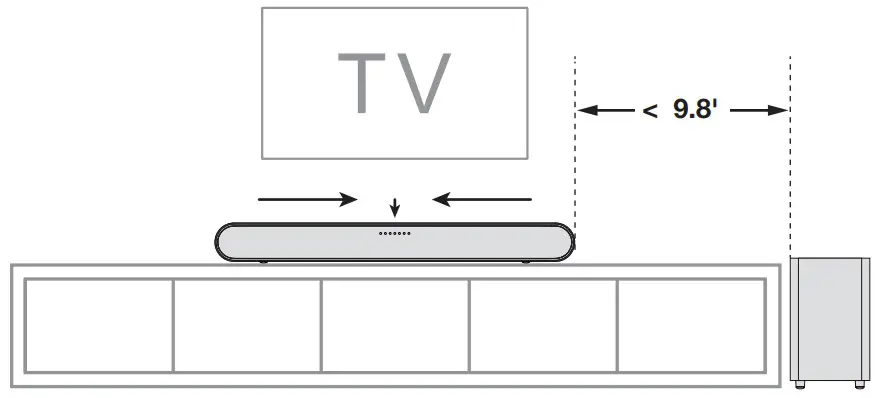
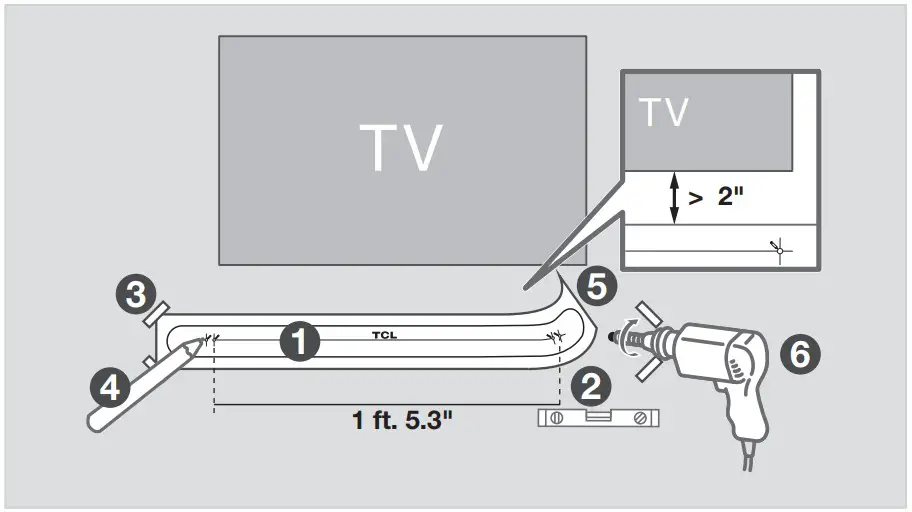
Wall mount your Sound Bar
Required tools:
- Place the included wall mount template on the wall. Make sure the wall mount template is at least 2 inches below the center of the TV.
- Use a level to make sure the wall mount template is positioned accurately
- Use the tape to stick the wall mount template firmly on the wall.
- Mark on the wall using each marking on the template through the mounting holes.
- Take away the wall mount template.
- Drill screw holes at each marking on the wall.
 Required tools:
- Insert the wall anchors in the holes on the wall.
- Insert the included screws with the brackets into the hole of the wall anchors.
- Fix and tighten the wall brackets and screws on the sound bar.
- Replace the screws with the included long wall mount screws.
- Pick up the sound bar and attach it to the brackets, similar to how you would hang a picture. Make sure everything is tight.
 Required tools:
![]() Note:
Note:
Do not place your sound bar in a location exposed to direct sunlight, heat, fire, or moisture.
Only suitable for mounting at heights: < 6 ft. 6.7″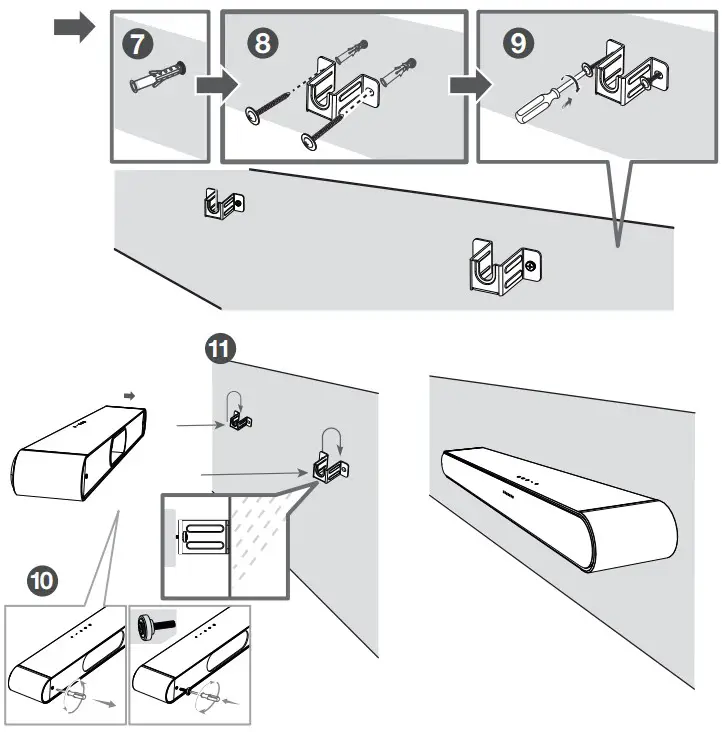
Connect to your TV
There are 2 ways to connect your sound bar to the TV (listed in order that we recommend): HDMI ARC (refer to 7a), and Optical (refer to 7b).
If you have a Roku TV™, simply plug in the HDMI cable to the ARC ports and follow the Roku TV Ready™ on-screen instructions.

![]() Simple setup
Simple setup![]() One remote
One remote![]() Quick Settings
Quick Settings
HDMI-ARC
Connect the Sound Bar to your TV with the included HDMI cable.
Connect the Sound Bar to the power outlet with the included power cord.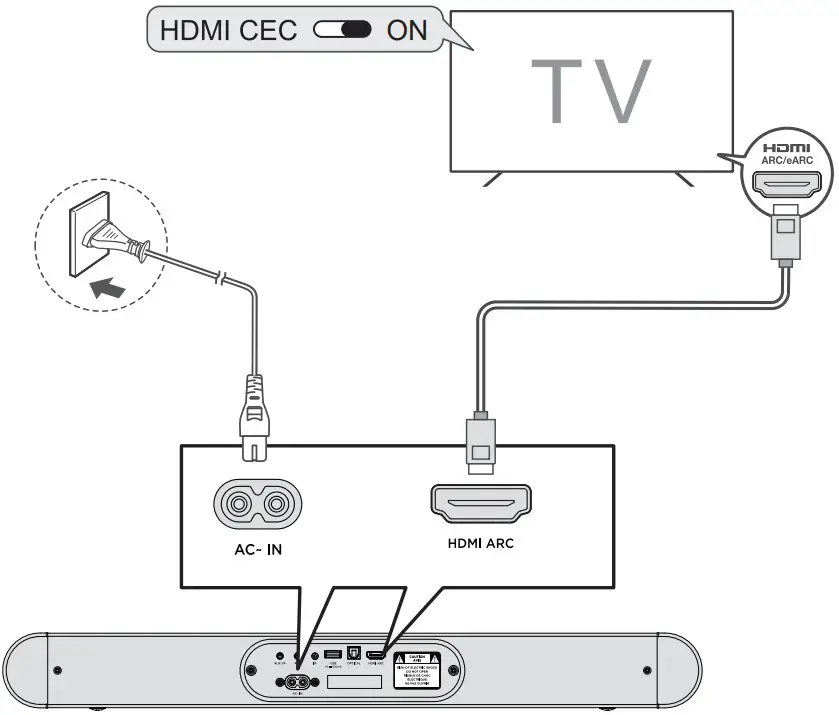
Enable CEC function on TCL TV.
- Connect HDMI cable from the HDMI (ARC) interface on the sound bar to the HDMI (ARC/eARC) interface on the TV.
- Enable the CEC function in the settings of the TCL TV. (See TV User Manual for instructions)
 Enable CEC function on other brand TV.
- Connect HDMI cable from the HDMI (ARC) interface on the sound bar to the HDMI (ARC/eARC) interface on the TV.
- Enable the CEC function in the settings of the TV.
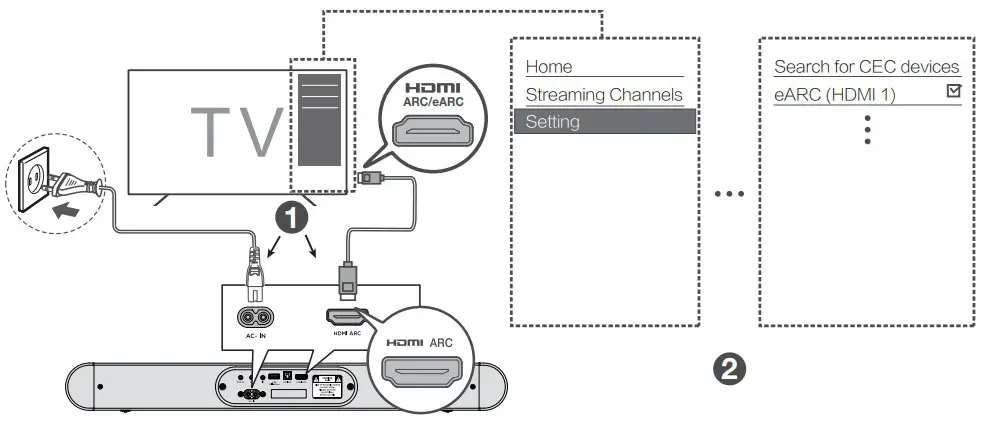
![]() Note:
Note:
CEC (Consumer Electronic Control) function naming may differ by TV manuafacturer. This feature may be called CEC, Anynet+, SimpLink, BRAVIA Link, EasyLink or VIERA Link. Please see your TV’s user manual for more information.
Optical
Connect the Sound Bar to the TV with an Optical cable.
Connect the Sound Bar to the power outlet with the included power cord.![]() Warning:
Warning:
Do not bend or kink the optical cable (SPDIF) as it is fragile and can easily get damaged and broken.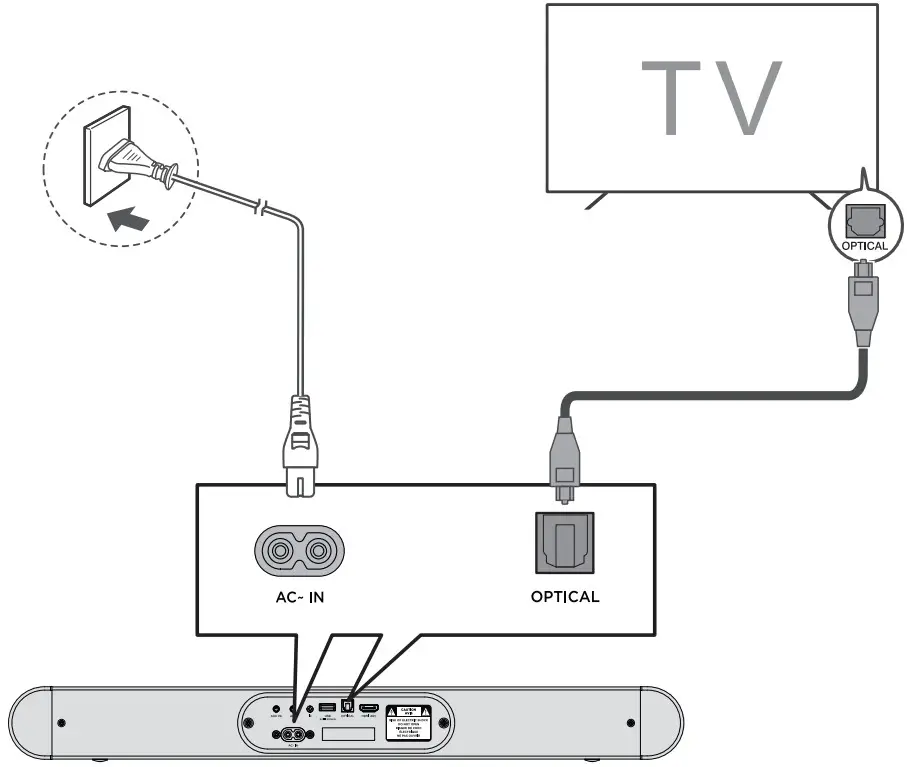
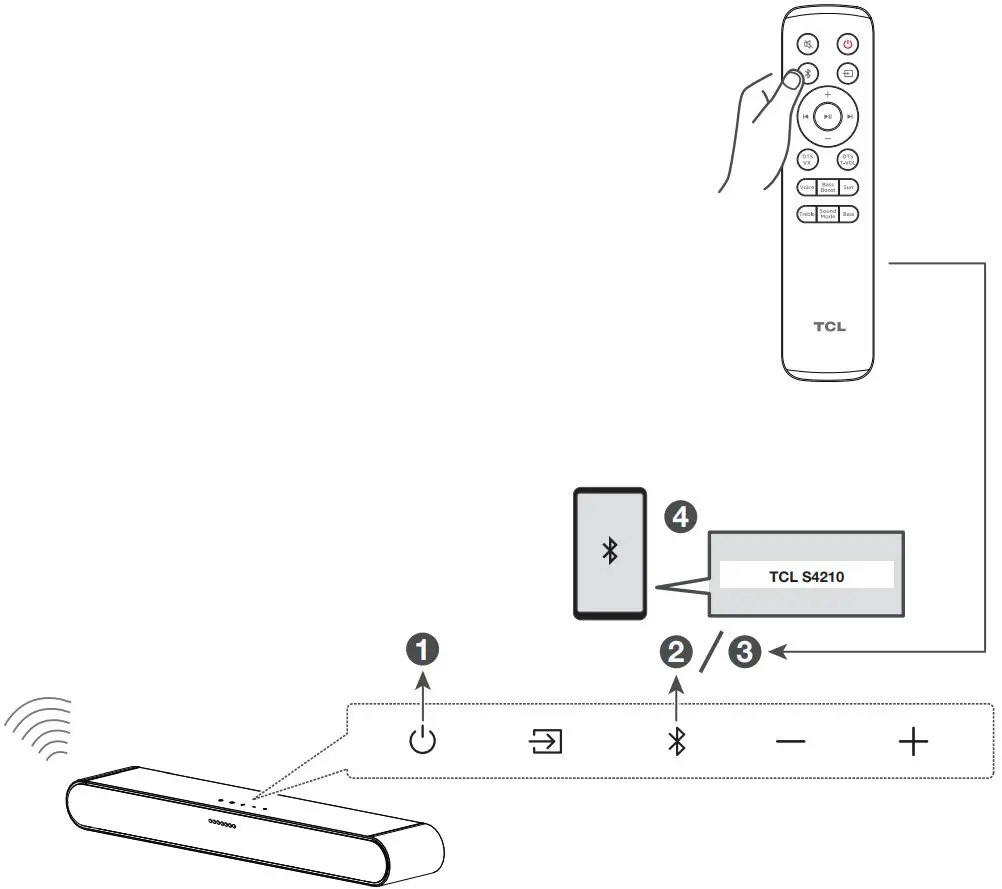
Pair with your Bluetooth device
You can stream music from your mobile device via Bluetooth.
- Press
 .
. - Press
 .
. - Press and hold on the remote control or press and hold on your sound bar.
> You will see blue LEDs flashing rapidly.
> The Sound Bar is ready to pair. - Power on your Bluetooth device and activate its Bluetooth function.
- Select TCL S4210.
> You will see the blue light on for 3 seconds.
> Pairing is successful. - If you want to pair another device, please repeat step 3.
 Other connections- USB
Supported audio files: MP3, WMA, FLAC, WAV.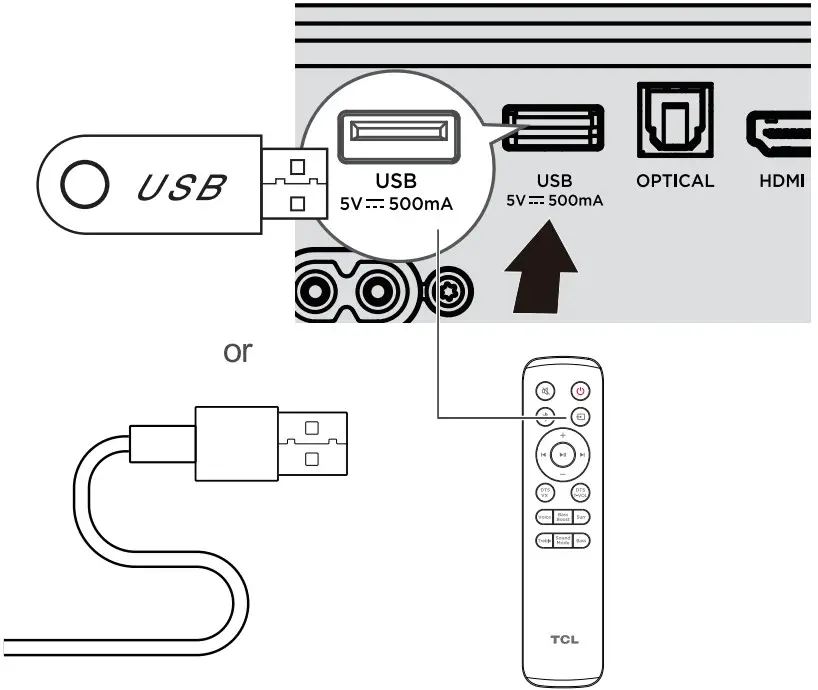 Other connections- AUX
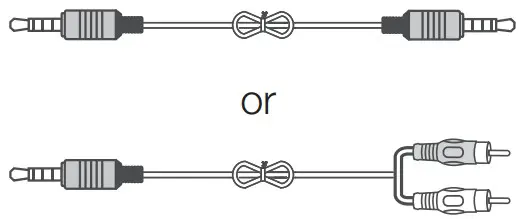 Cables are not included.
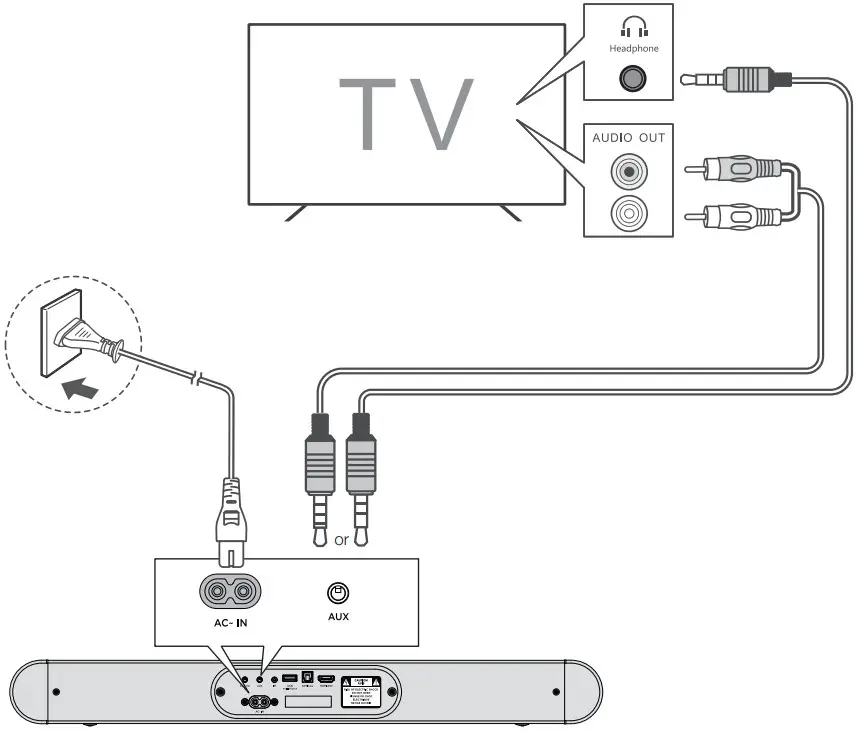
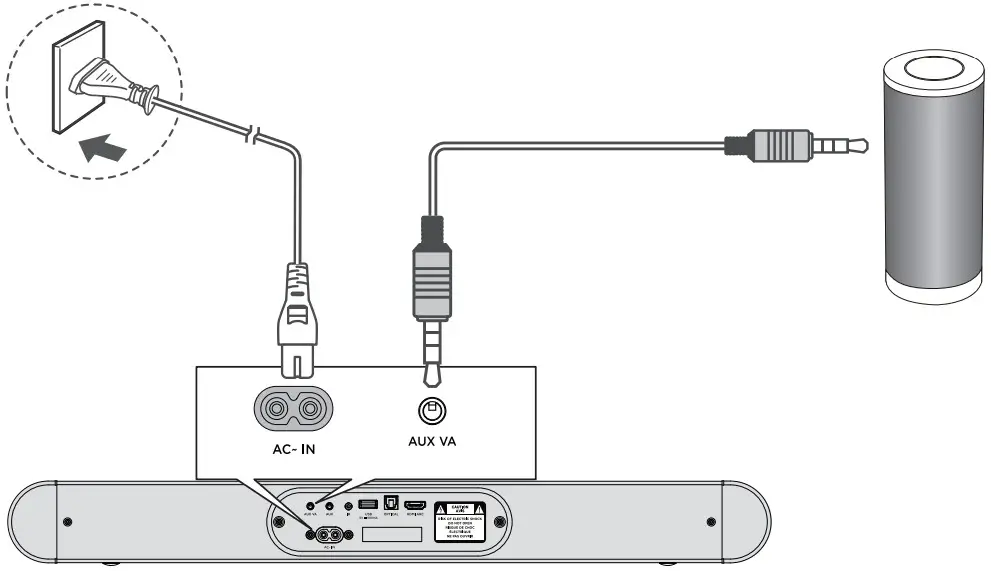
Other connections – AUX VA Your sound bar can connect to a Voice Assistant (VA) device through an AUX VA connection. Once connected, your sound bar will now act as the VA speaker.
Features and Benefits:
- Voice Assistant Dedicated Input: VA is active on the sound bar even if the sound bar is set to a different input with audio playing.
- Auto Muting: If playing audio from the sound bar, the VA will play over the original source audio for 10 seconds. If continued after the 10 seconds, the VA audio will mute the original source audio. Once the VA audio is stopped the original source audio will resume.
- If you wish to disable Aux VA features, you can long press
 button. Now you can use the Aux VA port as a standard Aux port for additional connections.
IR Pass-through
 If the sound bar blocks the IR receiver of the TV when placed directly in front of it. You can use the included IR pass-through cable to send IR commands to your TV using the sound bar. First connect one end of the IR pass-through cable to the IR connector on your sound bar. Next, place the other end with the IR blaster close to the TV’s IR receiver.
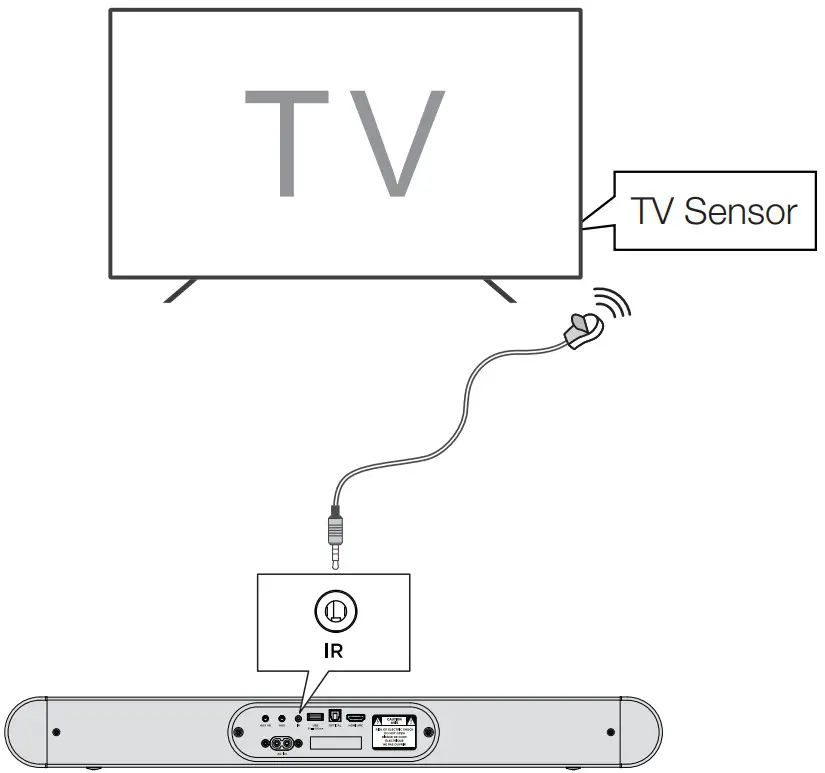
TrademarksRoku, the Roku logo, Roku TV, Roku TV Ready, and the Roku TV Ready logo are trademarks and/or registered trademarks of Roku, Inc. This product is Roku TV Ready-supported in the United States.
Countries are subject to change. For the most current list of countries in which this product is Roku TV Ready-supported, please email [email protected].![]()
Manufactured under license from Dolby Laboratories. Dolby, Dolby Audio, and the double-D symbol are trademarks of Dolby Laboratories Licensing Corporation.
The Bluetooth® word mark and logos are registered trademarks owned by Bluetooth SIG, Inc. and any use of such marks by TTE Corporation is under license. Other trademarks and trade names are those of their respective owners.
For DTS patents, see http://patents.dts.com. Manufactured under license from DTS, Inc. DTS, Digital Surround, Virtual:X, and the DTS logo are registered trademarks or trademarks of DTS, Inc. in the United States and other countries.
© 2022 DTS, Inc. ALL RIGHTS RESERVED.
“The terms HDMI, HDMI High-Definition Multimedia Interface, HDMI trade dress and the HDMI Logos are trademarks or registered trademarks of HDMI Licensing Administrator, Inc.”
DO NOT RETURN TO STORE
WE ARE READY TO HELP contact us first with any qustions
 TCL SUPPORT: support.tcl.com
1-877-300-9223
![]() TAKE CARE WHEN REMOVING THE SOUND BAR
TAKE CARE WHEN REMOVING THE SOUND BAR
Copyright © 2023 TCL.
All rights reserved.
S4210_NA_QSG_V0.11


