
![]() User Manual
User Manual
What is AML Setup?
AML Setup consists of an Android application, AML Setup, and a desktop application, AML Setup Console. AML Setup is a device configuration software that allows the user to configure their AML device by scanning configuration barcodes through the AML Barcode Service. AML Setup Console is a desktop application that works in tandem with AML Setup to set up the configuration and barcodes for the AML device that the user wants to configure.
What does AML Setup do?
AML Setup uses a scanned barcode with structured configuration data in it to configure settings on an AML device. The Barcode Scanner Service recognizes if the barcode scanner is a device configuration by looking for the AML Setup tags in the barcode. When a configuration barcode is scanned, the AML Setup application opens and begins completing the configuration tasks from start to finish. All of the tasks in the configuration barcode will be listed in the AML Setup app in a queue list. If the task finishes successfully the task text will turn green, if the task fails the text will turn red. There is a wide range of tasks that the user can complete with AML Setup.
Features
- Setup and connect to WIFI networks
- Install applications, files, and images from a website or AML Setup Console
- Set a downloaded image as the system wallpaper after downloading
- Set the default home application for the device
- Set the default browser application for the device
- Audio settings (alarm, media, and system volume)
- Display settings (screen brightness, font size, and screen sleep timer)
- Connectivity settings
o Airplane mode on/off
o NFC on/off
o Bluetooth on/off
o Wifi on/off - Security settings
o Set device screen lock password/pin
o Set an installed device admin application to enabled or disabled
o Turn location mode on/off - Configure AML Lockdown password, wallpaper, allowed apps, and Lockdown mode
- Configure AML Clone
o Download a clone file from AML Setup Console to clone the device - Configure AML Barcode Scanner settings
o scanner on/off o Set keyboard wedge mode o barcode actions on/off (disable/enable AML Setup) o Set prefix o keyboard wedge on/off o Set suffix o screen flash on scan on/off o Set barcode scan sound o AIM ID on/off o Enable disable symbologies o Picklist mode on/off
AML Setup Console
AML Setup Console is a desktop tool for AML Setup application that helps create barcodes to be scanned with AML Setup. AML Setup Console allows the user to select settings that they want to configure on their AML device. AML Setup Console is very user-friendly. The various device settings and features are separated into separate tabs and sections depending on the type of setting. AML Setup Console will generate 1-D and 2-D barcodes, as well as a printable PDF, for the device configuration. AML Setup Console also has a server that can be used to stage and download applications, files, images, and device configuration data for an AML device.
Who would use AML Setup?
AML Setup can be used by IT workers and managers to quickly set up their new or existing AML devices. AML Setup Console can be used to create multiple different configurations for each location or just one for all locations depending on the company’s setup. Just one barcode scan and the AML device will be set up and configured for use.
How to use AML Setup?
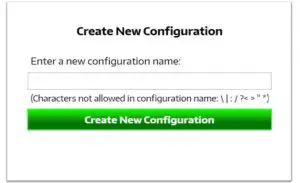
The first step to use AML Setup is to create a configuration barcode that can be scanned and recognized by the Barcode Scanner Service. There are two ways that this can be done. First, the user can manually create their own configuration barcode using the correct AML Setup task tags provided. Second, the user can use AML Setup Console to do the heavy lifting for them. In AML Setup Console, first, create a new configuration by clicking the Create New+ button in the left menu. A box should pop up where the user can type in their configuration name. (Pictured below) If the user already has a created configuration, they can right-click on the configuration in the left menu if they want to duplicate it, delete it, make it the default, or rename it.
Once the user has created a configuration, they can navigate the various setting tabs and sections at the top of the main screen to select their settings. (Pictured below) When the user is done with selecting their settings, all they have to do is click the Save Configuration button at the top and navigate to the Config Barcodes tab. Barcodes are automatically generated in this tab every time Save Configuration is clicked. 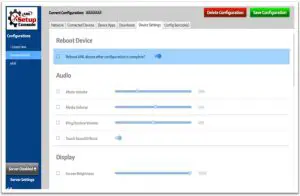
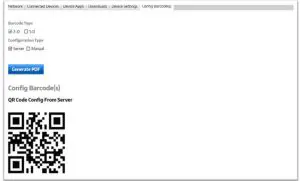
The user can select which barcodes they want to see on the screen by clicking the corresponding checkboxes. (Pictured below) If the user wishes to have a printable PDF for their configuration barcodes, they just need to click the Generate PDF button in the Config Barcodes tab. This will store the PDF files in the folder Users/PublicDocuments/ on the desktop. NOTE: The user can set up their own barcode with their own barcode generator instead of using AML Setup Console. The AML Setup task tags/structure is pictured below. (Pictured End) However, using AML Setup Console is better suited to structure the configuration data in the barcode correctly so that the configuration will work with AML Setup.
Different barcodes:
- 1-D Server barcode
o Contains AML Setup Console server Ip Address, Port, Config Name
o Used to get the configuration from the server onto the device
o When this barcode is scanned onto the device, AML Setup queries the AML Setup Console Server for the configuration info - 1-D Manual barcodes
o Contains the task info for the various settings for the device
o Each setting/task will have its own barcode to save barcode length
o No server is needed - 2-D Server barcode
o Contains AML Setup Console server Ip Address, Port, Config Name
o Used to get the configuration from the server onto the device
o When this barcode is scanned on the device, AML Setup queries the AML Setup Console Server for the configuration info - 2-D Manual barcode
o Contains the task info for the various settings for the device
o All the tasks will be in a single qr barcode because there is no space limitation will a 2-D barcode
o No server is needed
{“192.168.100.135“}
The last step is to scan the configuration barcode. If the user is going to use a 1-D Server or 2-D Server barcode, the Server button in the left menu (Pictured above) must be clicked to turn on the server. The server button will turn from grey to orange with a green dot to indicate that the server was turned on and is working. If this user is going to use the 1-D manual barcodes, they simply have to scan each 1-D barcode, one at a time, to complete the various tasks. Once the barcode is scanned by the AML device, AML Setup will open and start the queued tasks. The user does not have to do anything else after scanning the barcode. The queued list of tasks in AML Setup on the device will look like the picture below. (Pictured below) 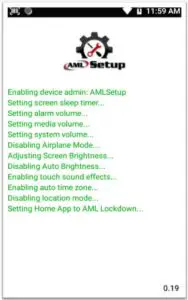
The task text color will turn from black to green if the task was successful or red if the task was unsuccessful. Tasks are most often successful, but if this one is unsuccessful, check the data that the user put for that setting in AML Setup Console or in the barcode. Oftentimes, there was a typo in the data. For example, the wrong SSID was typed in for a Wifi network. AML Setup can be disabled from the Barcode Scanner settings by un-checking the Barcode Actions enabled switch. (Pictured below) 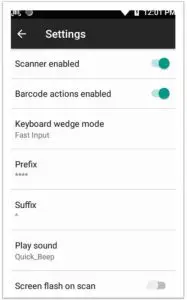
AML Setup Task Tags and Structure:
Example:
/%@%/{“WIFI”:”T:WPA;S:wifiaccess;P:accesspsk”,”GSO”:”192.168.100.140:19830::TestConfig4″}
| Command/Task Description (/%@%/) | Tag | Argument(s) | Comments |
| WiFi Setup | WIFI | “T:WPA;S:my ssid; P:my password; C :1” | Include to connect or save only: Connect C:1 SaveOnly C:0 Include to forget all other networks: F:1 Static Ip Settings must include : IP:192.168.1.128, GW:192.168.1.1, PLN:24, D1:8.8.8.8, D2:8.8.4.4 Manual Proxy Setting must include: HN:proxy.example.com, PP:8080, BP:example.co m,mycomp.test.com,loo kout.com or Proxy Auto Config must include: PU: www.example.com/proxy.pac |
| WiFi Setup w/Certificate
| W3
| “U: http://192.18.100.140 ;N:cer tificate.p12;S:eap;EM:PEAP;P2: MSCHAPV2;D:eidid;ID: [email protected]om;AID:dkdd;P:m password; C:1″ Or “I:193.11.33:88 88;N:certificate e.p12;S:eap ;EM: PEAP;P2:MSCHAPV 2;D:eidid;ID:[email protected];AID: dkdd;P:fref ;C:1″ | Include to connect or save only: Connect C:1 SaveOnly C:0 Include to forget all other networks: F:1 See table EAP-WIFI on separate page for details and options If the separate user and ca certificate files for TLS just add another N: certificate.ce r tag to download both files for TLS wifi configuration Static Ip Settings must include : IP:192.168.1.128, GW:192.168.1.1, PLN:24, D1:8.8.8.8, D2:8.8.4.4 Manual Proxy Setting must include PX: manual, HN: proxy.ex ample.com, PP:8080, BP:example.co m,mycomp.test.com, loo kout.com or Proxy Auto-Config must include PU:www.example.com/proxy.pa |
| Screen Lock Password/Pin | SL | “melted” | Set the device screen lock pin/password Screen Lock has to be set to None or Swipe for this command to work Password/Pin has to be between 4 and 16 characters |
| Set System Wallpaper | SWP | “wallpaper.jpg” | The argument is the filename that is in the Internal Storage directory under the Pictures/Wallpapers/ folder |
| Wifi enable/disable | W0 | “1” or “0” | 1 for enable 0 for disable |
| Bluetooth | B0 | “1” or “0” | 1 for enable 0 for disable |
| enable/disable | |||
| Forget Single Network | FC | “myssid” | The ssid of the network |
| Restart Device | RDA | “1” | Restarts/Reboots Device |
| Bluetooth Setup | BT | “M:001122334455; N: device name; P | |
| : my password” | |||
| Sleep Timer | ST0 | “15000” | Argument is in milliseconds, never sleep is -1 |
| USB Debugging | UD0 | “1” or “0” | |
| Alarm Volume | AV0 | “0” to “7” | Int from 0 to 7, 0 being mute 7 being loudest |
| Media Volume | MV0 | “0” to “15” | Int from 0 to 15, 0 being mute 15 being loudest |
| Ring/System Volume | SV0 | “1” to “7” | Int from 1 to 7, 1 being the lowest 7 being loudest |
| Airplane Mode | AP0 | “1” or “0” | |
| Developer Options | DO0 | “1” or “0” | |
| Screen Brightness | SB0 | “1” to “255” | integer from 1 to 255, 1 being dimmest and 255 brightest |
| Auto Screen Brightness | AB0 | “1” or “0” | |
| Font Size | FS0 | “0.85” to “1.3” | Float from 0.85 to 1.3, 0.85 being small text and 1.3 biggest text |
| Touch Sound Effects | SE0 | “1” or “0” | |
| Auto Time Zone | TZ0 | “1” or “0” | |
| Location Mode | LM0 | “1” or “0” | |
| Auto Rotate Screen | AR0 | “1” or “0” | |
| NFC | NFC0 | “1” or “0” | |
| Install APK from URL | APK0 | “http://192.168.100.140/ANF20S | |
| ample_v2.apk” | |||
| Install APK from AML | APK1 | “192.168.100.140:19830::ANF20S | |
| Setup Console | ample_v2.apk” | ||
| Default Launcher | HA0 | “AML Lockdown” | Name of app |
| Default Browser | BA0 | “apply” | Name of app |
| Device Admin App set | DA0 | “N:AMLSetup;A:1” | Name of app and enable/disable flag |
| Download File from URL | DF0 | “http://192.168.100.1/diiesdll .txt” | |
| Download File from AML Setup Console | DF1 | “192.168.100.140:19830::diiesd ll.txt” | |
| Get Config from | GS0 | “250.250.250.1:8451::MyConfi | |
| Server | g” | ||
| AML Clone from URL | AC0 | “http://192.168.100.140/202106 | |
| 14-152756.strikerClone” | |||
| AML Clone from AML | AC1 | “250.250.250.1:8451::MyClone | Download and install clone file/reboot |
| Setup Console | .stryker” | ||
| AML | LCK0 | “1” | To enable the lockdown feature in AML Lockdown makes AML Lockdown the device home launcher |
| Lockdown Launcher | |||
| AML Lockdown | LCK1 | “melted” | Set password for AML Lockdown |
| Password | |||
| AML Lockdown Add | LCK2 | “L: Chrome;U: https://www.google | L is the label name, U is the URL |
| Website | .com” | ||
| AML Lockdown Add | LCK3 | “N: AppLync; L: true” | N is the friendly name of the app/url, L is true/false depending on if the app needs to be set to auto-launch on device boot |
| Apps/set app to auto- | |||
| launch on device boot | |||
| AML Lockdown Use | LCK4 | “1” or “0” | 1 to use system wallpaper 0 to use default lockdown wallpaper |
| System Wallpaper | |||
| AML Barcode Scanner | BS0 | Subtags: | Symbology tags 1 thru 54 are in a separate tables on a separate page |
| Settings
| “SE:0” enable/disable scanner “BA:0” enable/disable Barcode Actions “SF:0:” enable/disable screen flash on scan “KWM:truekey” set wedge mode to true key “KWM:fastinput” set wedge mode to fast input “BP:0” set prefix to none “BP:8989dsdj” set custom prefix “BS:0” set suffix to none “BS:1” set suffix to enter “BS:2” set suffix to tab “BS:darthvader” set custom suffix “PS:Radon” set barcode play sound “KW:0” enable/disable keyboard wedge “AI:0” enable/disable aim id “PL:0” enable/disable picklist mode “SY1:0.2.5.25.34. etc…” Enable symbologies “SY0:0.2.5.25.34. etc…” Disable symbologies |
| |
Symbology Table for enabling/disabling barcode symbologies thru AML Setup
| Code | Symbology | Code | Symbology |
| 0 | Australian Post | 27 | Planet |
| 1 | Bookland EAN | 28 | Plessey |
| 2 | BPO | 29 | Postnet |
| 3 | Canada Post | 30 | Standard 2 of 5 |
| 4 | Chinese 2 of 5 | 31 | Sweden Post |
| 5 | Codabar | 32 | Telepen |
| 6 | Code 11 | 33 | UPC-A |
| 7 | Code 128 | 34 | UPC-E |
| 8 | Code 39 | 35 | UPC-E1 |
| 9 | Code 93 | 36 | Aztec |
| 10 | Discrete 2 of 5 | 37 | Code block A |
| 11 | Dutch Post | 38 | Code block F |
| 12 | EAN-13 JAN-13 | 39 | GS1 Composite CC-AB |
| 13 | EAN-8 JAN-8 | 40 | GS1 Composite CC-C |
| 14 | GS1 128 | 41 | GS1 Composite TLC-39 |
| 15 | GS1 Databar (RSS) – Expanded | 42 | Data Matrix |
| 16 | GS1 Databar (RSS) – Limited | 43 | GS1 Data Matrix |
| 17 | GS1 Databar (RSS) – Omni | 44 | GS1 QR Code |
| 18 | Informal | 45 | Han Xin |
| 19 | Intelligent mail | 46 | Maxi Code |
| 20 | Interleaved 2 of 5 | 47 | Micro PDF417 |
| 21 | ISBT 128 | 48 | Micro QR Code |
| 22 | ISSN EAN | 49 | PDF417 |
| 23 | Japan Post | 50 | QR Code |
| 24 | Korean 3 of 5 | 51 | GS1 UPC/EAN |
| 25 | Matrix 2 of 5 | 52 | Macro PDF417 |
| 26 | MSI | 53 | Dot Code |
www.amltd.com
©AML
10112021


