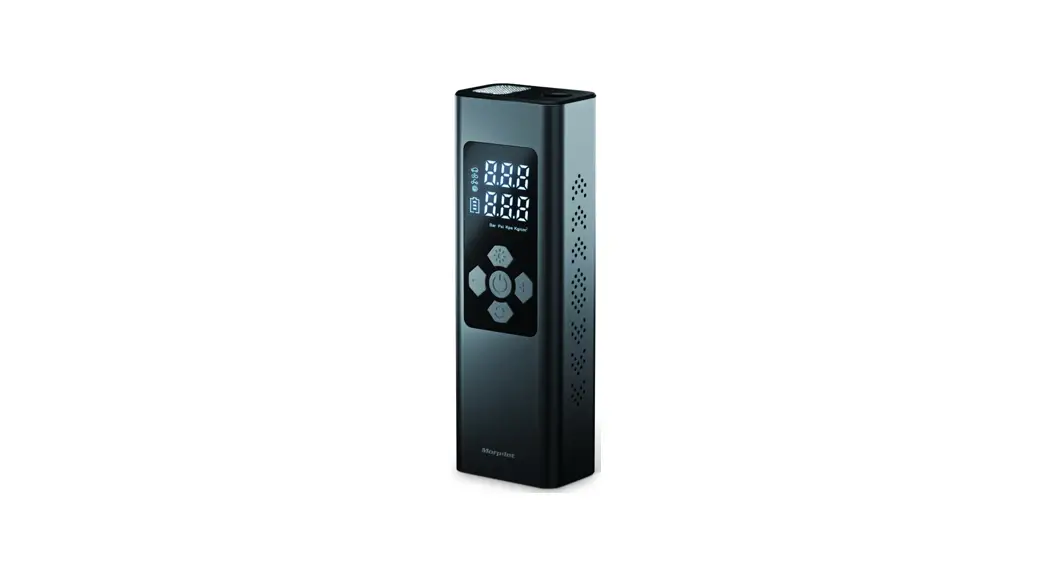
![]() MS22C-003 Tire Inflator Portable Air Compressor
MS22C-003 Tire Inflator Portable Air Compressor
User Manual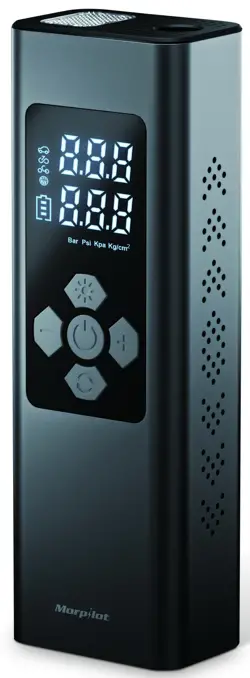
Before using the product, please read this instruction manual carefully and keep it for future reference.
SAFETY NOTICE
![]() Warn
Warn
Noise: the machine will produce more than 75dB noise when working. Please take all safety precautions seriously.
Hot: when working continuously for a long time, the body and air tube will produce high temperatures; please cool it before use.
Attention: the silicone end of the air tube connected with the pump is quite hot after work. For your safety, don’t touch it within 2 minutes!
PRODUCT DIAGRAM
The infiltrator can inflate some motorcycles, bicycles, cars and balls. The detailed list can be found on the product sales page or you can consult customer service for assistance.
Component description
 *Bottom of the product*
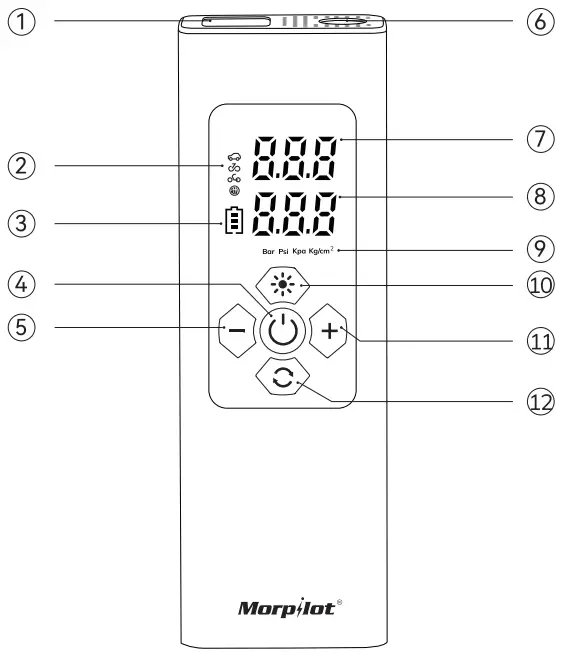 *Product front*
- Lighting window
- Mode selection
- Battery display
- Switch ( start and stop ) button
- Tire pressure reduction key
- Air hose interface
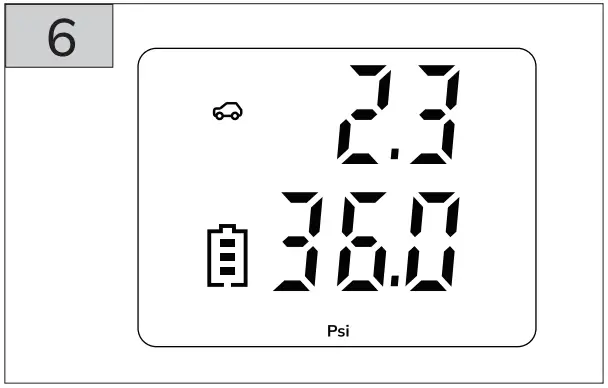
- Real-time tire/AN pressure display
- Preset tire pressure display
- Tire pressure unit display
- SOS rescue lamp lighting button
- Tire pressure increase button
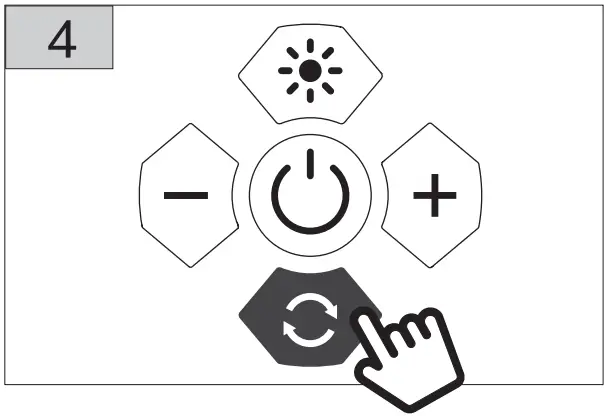
- Mode/unit key
Short press to switch the inflatable mode.
Long press to switch the unit
PACKAGE CONTENTS
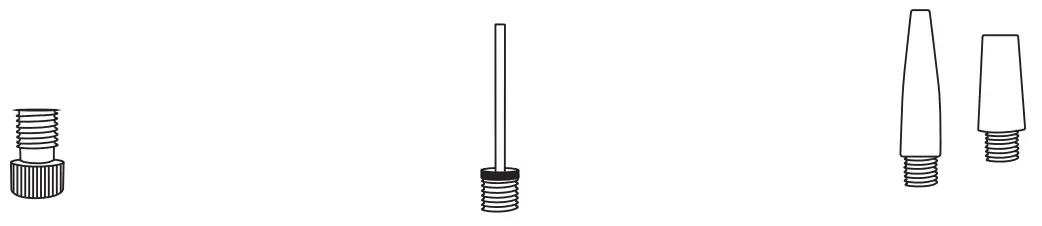 | ||
| Nozzle x 1 | Air needle x l | Air nozzle x 7 |
 | ||
| Charging cable x 1 | Storage case x l | Safety hammer x 1 |
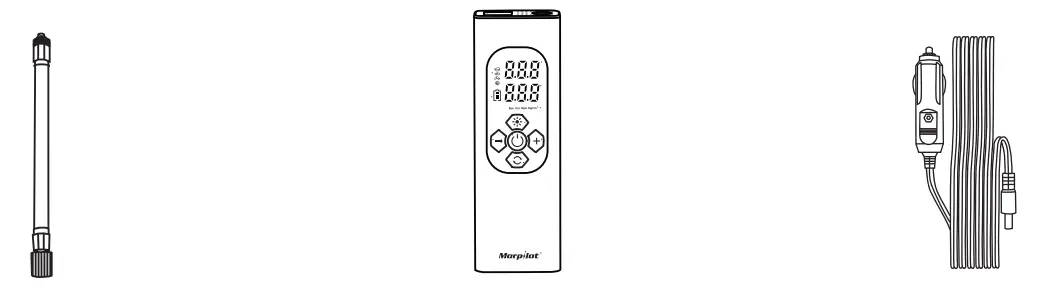 | ||
| High-pressure air inflation tube x 1 | Portable air infiltrator | 3 meters cigarette lighter x l |
HOW TO USE
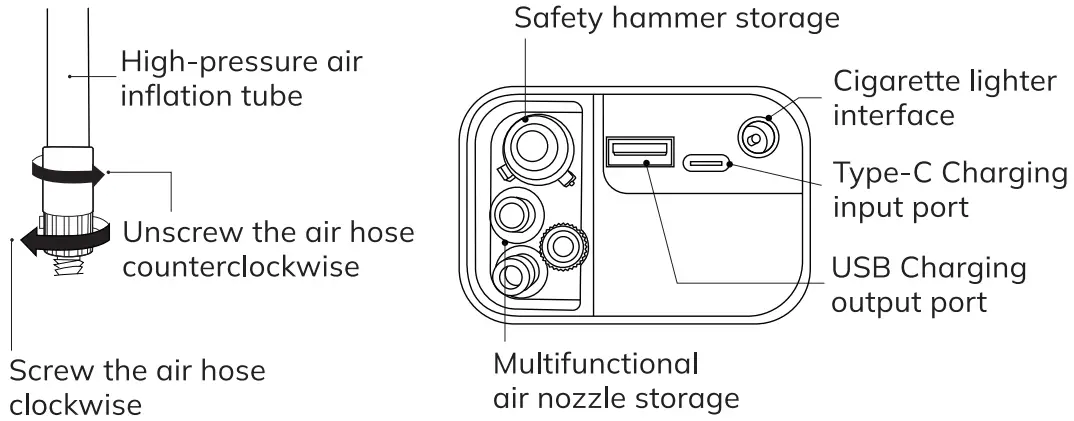
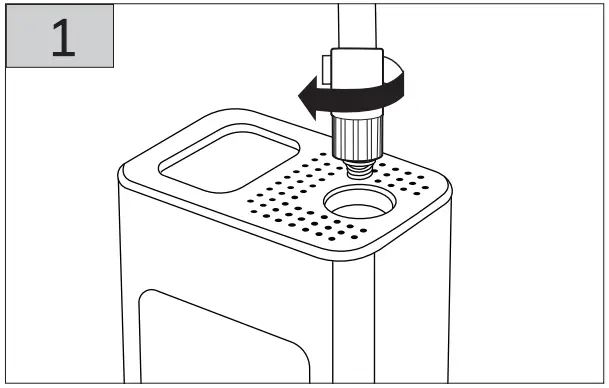
- Screw the air hose clockwise

- Connect the air hose clockwise to the car’s inflation port

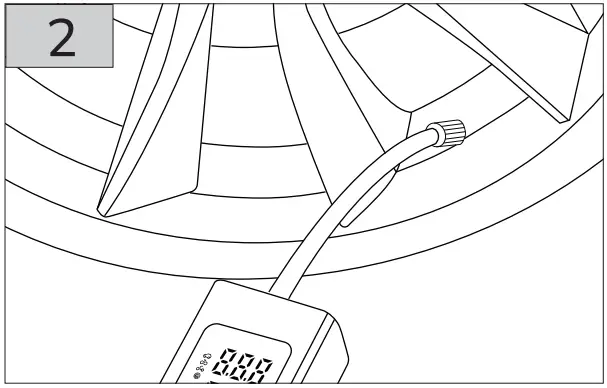
- Long press for 3 seconds to turn on the machine.

- Short press the button ”
 ” to switch modes. Long press 2 seconds ” ” to switch units.
- Click ” + / -” button to increase or decrease the preset tire pressure value.

- Short press ”
 ” to start inflating, when it reaches the preset tire pressure, it will automatically stop.

Note: idle ploy for 2 minutes or standby for 90 seconds, the machine automatically shut down.
INSTRUCTION MANUAL
- Lighting
 Short press light button: turn on white light
Short press again: red flash ( flash interval 0.8s )
Short press again: rapid red flashing ( flash interval 0.4 s )
Press the button again to turn off the light - USB charging
 Please fully charge before using it for the first time. Use the charging cable to connect the 5V USB adapter to charge the infiltrator.
One grid on: 0% – 30%
Two grids on: 30% – 65%
Three grids on: 65% – 100%
Tips:
• To extend battery life, please charge every 1 month. - The use of cigarette lighter
 If the infiltrator is low in battery . you can use a cigarette lighter to inflate.
The steps are os follows:
1. Start the car
2. Insert car cigarette lighter hole
3. Connect the car cigarette lighter port at the bottom of the machine - The use of safety hammer
 Take out the safety hammer from the bottom and screw the air hose clockwise at the air hose interface for emergency escape.
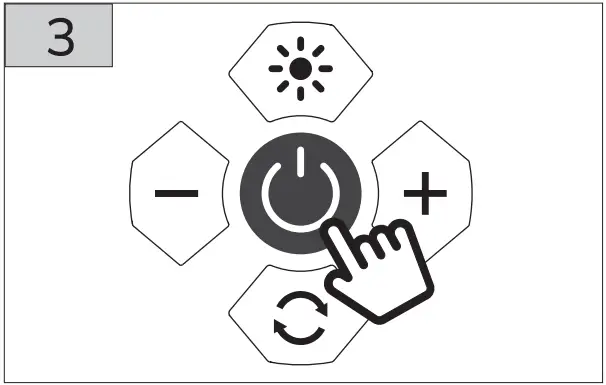
 - Turn on and turn off
 Turn on
Press the switch button for 3 seconds until the machine start to work. In the power-on state, if there is no operation within 3 minutes, it will shut down automatically.
Turn off
In the working state, long press the button to shut down the machine. - Connect the high-pressure tube with the nozzle American air nozzle
 Mountain bikes, e-bikes, motorcycles and cars are equipped with American-style air nozzles.
Inflation: Connect the American nozzle to the American nozzle on the high-pressure tube to inflate.
Deflation: Deflate by pressing the air needle inside the nozzle with a suitable tool (e.g. a 4mm aliens wrench).
French nozzle adapters French nozzle adapters will be used when inflating road bicycles and several mountain bicycles
Inflation:
1. Connect the French nozzle adapters with the American nozzle interface on the high-pressure air inflation tube.
2. Unscrew the French nozzle screws of the tires.
3. Connect the French nozzle to the adaptor to inflate.
Deflation: Unscrew the screw at the mouth of the French nozzle and press the nozzle to deflate.
Air needles Air needles are required when inflating balls such as basketballs and soccer balls.
Inflation: Screw the needle and American nozzle interface and insert the needle into the ball inflation hole to inflate.
Deflation: Plug the air needle directly into the ball inflation hole to deflate.
Safety hammer Can be used for escape from broken windows.
Other nozzles Swimming rings or inflatable boats will be equipped with nozzles as shown here.
Inflation: Screw the nozzle connector and insert it into the swim ring or rubber boat to inflate it.
Deflation: Deflate by inserting the nozzle directly into the swim ring or rubber boat - Detect air pressure
In the infiltrator on state, connect the high-pressure air inflation tube with the object; the number displayed on the inflatable pump display is the current pressure.
Tire Tires for cars, bicycles and motorcycles can withstand air pressure ranges marked on the side walls of the tires. The car tire guidance air pressure is marked near the inner wall of the driver’s side door. The level of inflation pressure is related to the weight of the load. For more detailed air pressure recommendations, please refer to the car manual.
Ball The inflatable pressure of balls such as football, basketball and volleyball is marked around the inflatable port.
 - Recommended inflatable pressure gauge for common products
Product type Recommendpressure range Bicycle Electrically assisted folding bicycle tires 45-50 psi 12, 14, 16 inch bike tire 30-50 psi 20, 22, 24inch bike tire 40-50 psi 26, 27.5, 29 inch mountain bike tire 45-65 psi Electric scooter tire 45-50 psi Balance car 40-60 psi 700c Road bike opening tire 100-140 psi Motorcycle Motorcycle, electric motorcycle tire 1.8-3.0 bar Vehicle Small car tire 2.2-2.8 bar Ball Basketball 7-9 psi Football 8-16 psi Volleyball 4-5 psi rugby 2-14 psi Tip: The recommended pressure range value of the inflatable is for reference only. Please refer to the requirements of the instruction manual of the inflated product
- Preset Inflatable Tire
1. Mode switching Short press the mode button to switch the following five inflatable modes on the display. Long press the mode button before inflating to switch bar, psi, Kpa, kg/cm²
Free mode: preset pressure can be adjusted freely, and values and units can be remembered.
Adjustable range: 3-150 psi / 0.2-10.3 bar
Car mode: default 36 Psi
Adjustable range: 26-50 Psi
Bicycle mode: default 45 psi
Adjustable range: 30-65 psi
Motorcycle mode: default 32 Psi
Adjustable range: 26-45 PsiBall mode: default 9 psi
Adjustable range: 4-16 psi2. Preset values are fine-tuned
 “+” “-” Any button represents a manual increase and decrease of the preset tire pressure value. Each press increases 0.05 Bar or 0.5 Psi or 0.05 Kg/cm2 or 5 Kpa to the maximum and minimum value alternatively. Current working states do not change when setting the preset pressure.
 - Inflation
Start to inflate Short press the switch button to start inflating. During the inflation process, there will be a noise of 75-80 decibels. Please be careful while doing this. If its in use for a long time, the temperature of the high-pressure air tube and the host rises; avoid long-term contact with the high-pressure air tube by hand
Stop inflating When the air pressure reaches the preset pressure value, the infiltrator automatically stops inflating. The inflation can also be stopped by pressing the switch button shortly during the inflation process. - Unscrew the nozzle
The temperature of the high press air inflation tube is high after inflation. Please take the necessary precaution to protect yourself when disassembling the nozzle. There will be a slight air leakage during disassembly, please disassemble quickly to reduce the amount of air outlet. - Can be used as a power bank
In the state of full power, the inflator can be used as a 5V/1A power bank, and it needs to be turned on.
 Short press light button: turn on white light
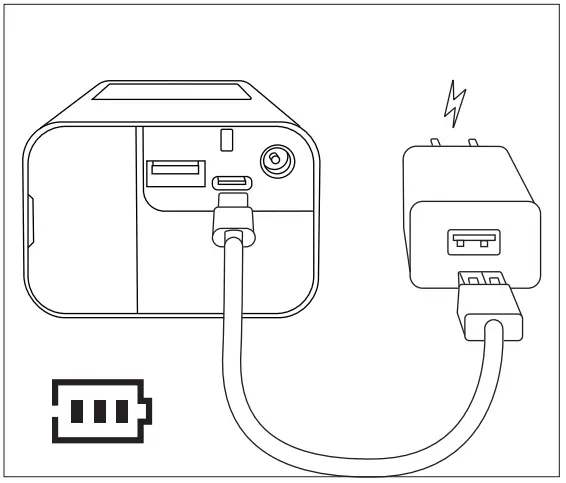 Please fully charge before using it for the first time. Use the charging cable to connect the 5V USB adapter to charge the infiltrator.
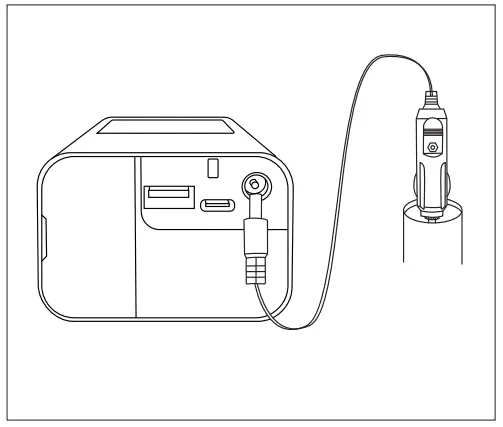 If the infiltrator is low in battery . you can use a cigarette lighter to inflate.
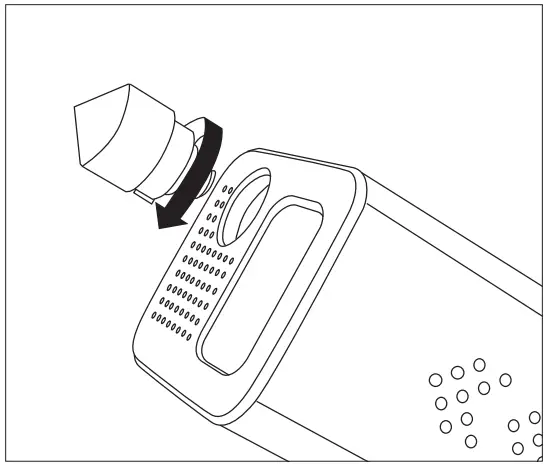 Take out the safety hammer from the bottom and screw the air hose clockwise at the air hose interface for emergency escape.
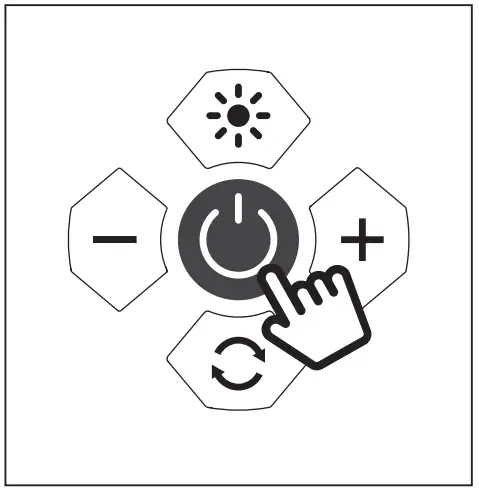 Turn on
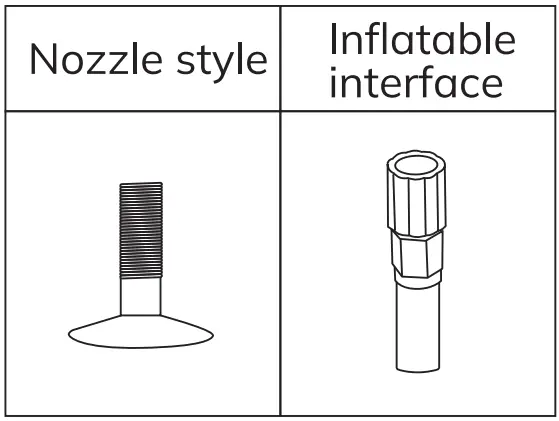 Mountain bikes, e-bikes, motorcycles and cars are equipped with American-style air nozzles.
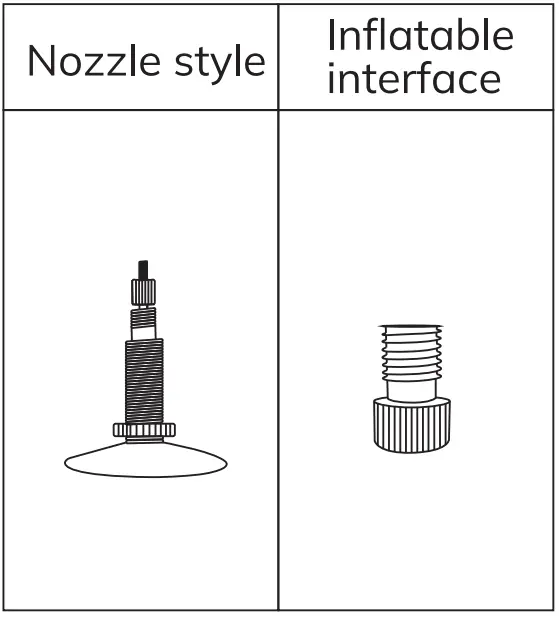 French nozzle adapters will be used when inflating road bicycles and several mountain bicycles
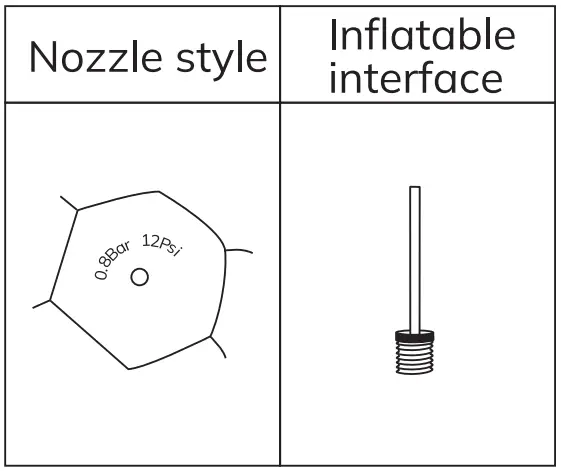 Air needles are required when inflating balls such as basketballs and soccer balls.
 Can be used for escape from broken windows.
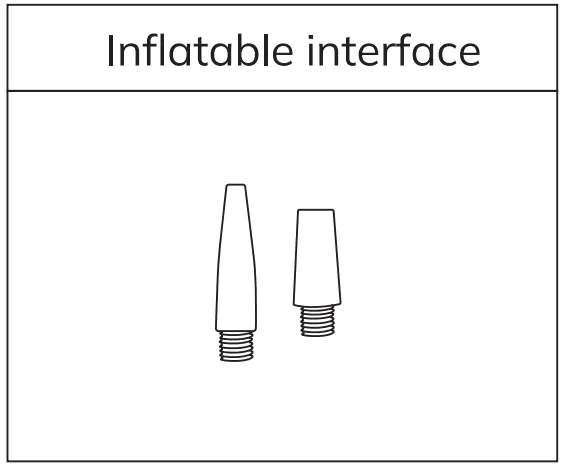 Swimming rings or inflatable boats will be equipped with nozzles as shown here.
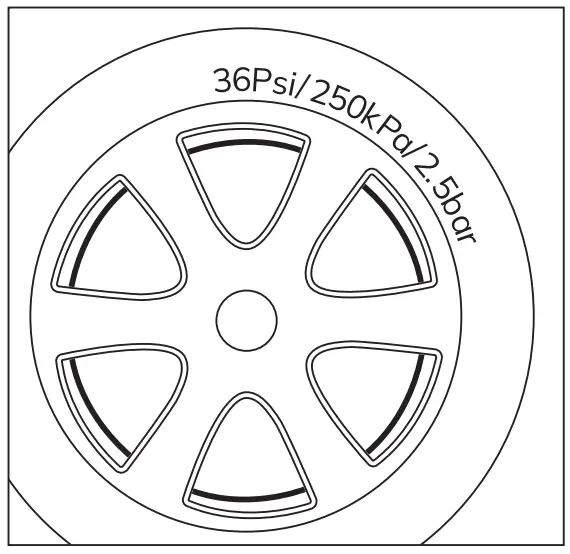 Tires for cars, bicycles and motorcycles can withstand air pressure ranges marked on the side walls of the tires. The car tire guidance air pressure is marked near the inner wall of the driver’s side door. The level of inflation pressure is related to the weight of the load. For more detailed air pressure recommendations, please refer to the car manual.
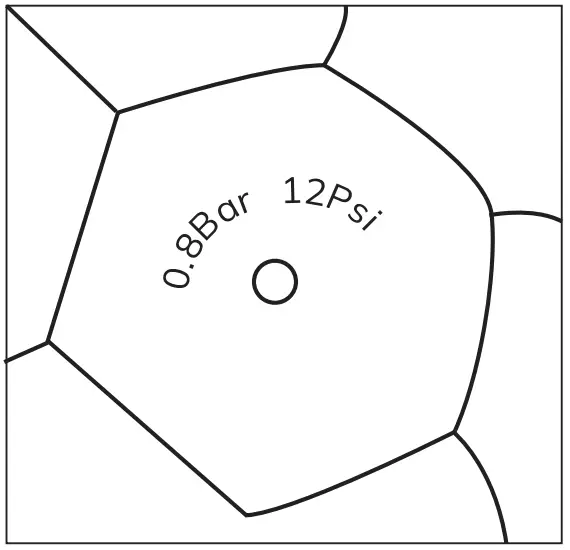 The inflatable pressure of balls such as football, basketball and volleyball is marked around the inflatable port.
 “+” “-” Any button represents a manual increase and decrease of the preset tire pressure value. Each press increases 0.05 Bar or 0.5 Psi or 0.05 Kg/cm2 or 5 Kpa to the maximum and minimum value alternatively. Current working states do not change when setting the preset pressure.
 Short press the switch button to start inflating. During the inflation process, there will be a noise of 75-80 decibels. Please be careful while doing this. If its in use for a long time, the temperature of the high-pressure air tube and the host rises; avoid long-term contact with the high-pressure air tube by hand
OPERATION NOTE:
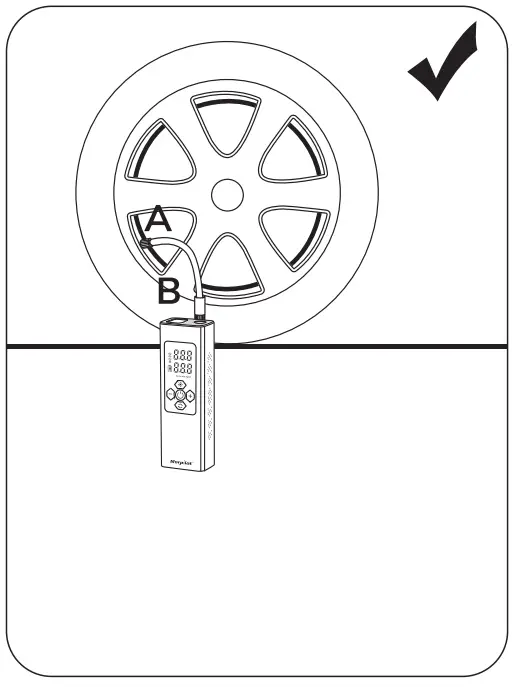 Note: Please tighten points A and B before inflating.
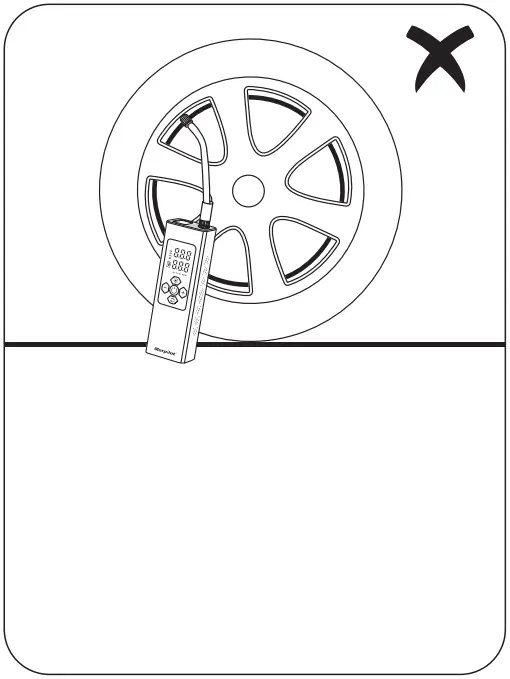 Note: Please do not hoist the product when using it. This will shorten the service life of the tube.
NOTE:
- This product is not a toy; children are prohibited from use. Users are advised to be over 16 years of age. During the inflation process, please keep a safe distance between the children and the infiltrator.
- The product has built-in non-removable lithium battery, and it is forbidden to throw the product into the fire or abandon it at will. There might be a risk of fire, spontaneous combustion, explosion if the Lithium battery is overheating, impact or water ingress. Please avoid exposure to high temperature such as in the car.
- The storage temperature of the product should not be lower than-10 degrees or higher than 45 degrees, too cold or overheating will shorten the life of the product, or damage the built-in battery.
- The battery may get damaged if not used for a long time. It is recommended to charge at least once every three months.
- The product’s built-in DC motor may get experience electric sparks while in use. Please shut down immediately.
- If there is an abnormal noise or the temperature is too high when working, please shut down immediately.
- Do not leave when inflating, and observe the inflation process to prevent the inflating pressure from being too high if the preset air pressure is not set.
- Please use in a dry and clean environment. Sediment and sand intrusion may lead to product damage; the product is not waterproof, so it is forbidden to rinse with water.
- Before setting the inflation pressure value, please confirm the correct measurement unit is selected, otherwise it may lead to a tire blowout accident.
Common unit conversion: 1 bar = 14.5 psi= 100 kpa = 1.02 kg/cm²
TROUBLESHOOTING
| Problem | Solution |
| Slow inflation | 1. Check whether the power is sufficient. 2. Check whether the air inflation tube is leaking. 3. Check whether the connection parts at both ends of the tube are tightened. 4.Check whether the inflated objects are leaking. |
| Can not be inflated when power-on | 1. Check whether the power is sufficient. 2. Check whether the current tire pressure is higher than the preset value. |
| Can not turn the preset pressure up or down | Check if you are in an incorrect inflatable mode, select Pro mode to adjust from 3-150 psi. |
| Normally inflated but pressure shown as zero | Low-pressure inflatable products such as balloons are not within the measurable range of the equipment. |
| Leakage in connecting air tube | Tighten the air tube. |
| Tire pressure decreased | There will be a drop space of 1-2 psi when the air is pumped to a preset value, and there is a pressure difference between the outlet and inlet holes. |
| The power level icon in the charging state is inconsistent with the standby state | The power lithium battery has a significant voltage drop during the discharge process, so that the inconsistency between the battery level icon and the standby state is not a fault. |
| The power level icon does not light up after charging | Replace the safety compliant adapter and original charging cable to recharge. |
| Other devices cannot be charged | 1. Check whether the power is sufficient. 2. The output parameter is 5V/1A, please confirm whether the charged device is suitable. 3. In the inflated state, it cannot be used as a power bank. 4. Please use the original charging cable supporting the charged device to charge. |
| Other situation, the operation of the infiltrator is unresponsive | Restart the machine. |
BASIC PARAMETERS
| Product Model | MS22C-003 |
| Product Size | 69.5 * 46.5 * 208 mm |
| Rated Voltage | DC11.1V |
| Inflation Pressure Range | 3-150psi / 0.2-10.3bar |
| Rated Input | 5V 2A |
| Input Port | USB Type-C |
| Rated Output | 5V 1A |
| Output Port | USB-A |
| Rated Power | 60W |
| Product Net Weight | 615g |
| Unit Display | Bar. Psi. Kpa. kg/cm² |
| Charging Time | 4-6 hours |
| Charging Methods | Built-in Battery/ Cigarette lighter |
| Storage Temperature | ‘-10 °C -45 °C |
• The above data are from our laboratory. The actual use varies according to the change of use environment. Please take the real object as the standard.
• Due to the need of continuous improvement of products, the information products are subject to the actual products, and our company reserves the right to update the products.
AFTER-SALES SERVICE
- The machine is guaranteed for one year free of charge under normal conditions within one year from the date of purchase.
- During the validity period of the free guarantee, the consumer can handle the maintenance and replacement with the invoice and the free guarantee vouchers.
- Within 7 days from the date of sale of the product, if a performance failure occurs, the consumer can choose to return, exchange or repair.
- Within 15 days from the date of sale of the product, if a performance failure occurs, the consumer can choose to replace or repair.
- Within the validity period of the free guarantee, the products that are repaired three times and still cannot be used normally can be exchanged for free with the same model and specifications with the repair records and certificates provided by the repairer.
- If it is necessary to repair or replace spare parts beyond the time limit set by the appeal, a maintenance fee will be charged.
- During the warranty period, if there are the following situations, it is not free to repair:
a. the consumer did the damage due to improper use and maintenance;
b. damage caused by unauthorized disassembly, assembly and repair;
c. damage caused by force majeure;
d. Failure or damage caused by non-general household use (such as use in places with harsh environments);
e. Failure caused by falling, being placed in water or directly flushing, improper operation or illegal use;
f. Repair beyond the scope of the warranty.
![]() Warning
Warning
- In thunderstorm weather, please disconnect the external charger to avoid being damaged by lightning.
- Stay away from heat sources and maintain ventilation.
- It is forbidden to put the equipment in high temperature or throw it into the fire to avoid explosion.
- In the storage, transportation and operation environment, please pay attention to waterproofing.
NON-WARRANTY REGULATIONS
- Unauthorized maintenance, misuse, collision, negligence, abuse, liquid intake, accident, modification, improper use of accessories other than this product or tearing or altering the label;
- The validity period of the warranty has exceeded;
- Damage caused by force majeure;
- Failure to meet the performance failure listed in the “Product Performance Failure Table” ;
- Due to human reasons, the performance failure of this product and its accessories is caused.
![]() Email: [email protected]
Email: [email protected]![]() MADE IN CHINA
MADE IN CHINA


