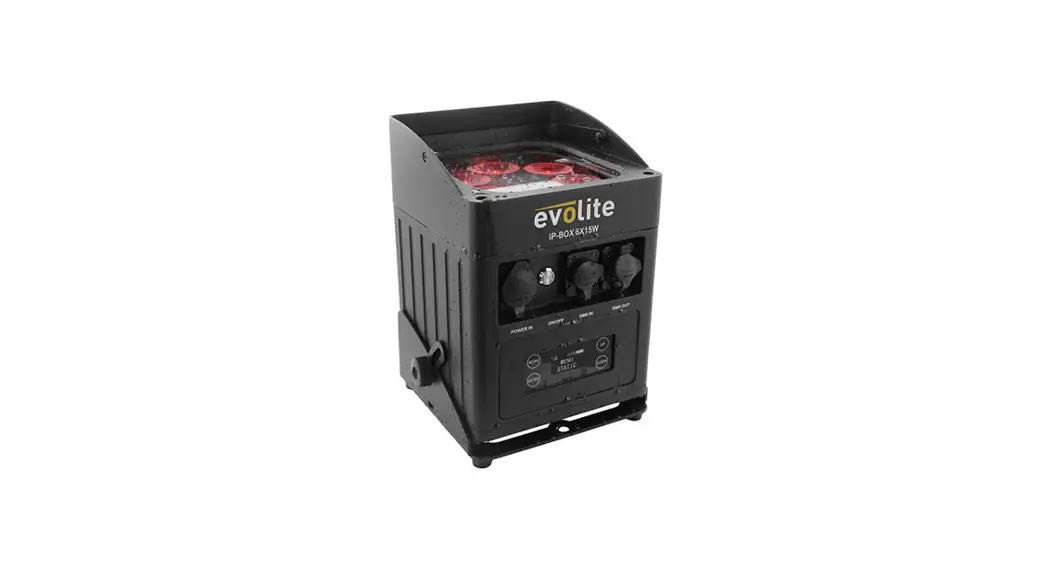
![]() IP-BOX 6X15W
IP-BOX 6X15W
RGBWA 5in1 ip65 battery projector
IP-BOX 6X15W Manual Ver. 1.00
User Manual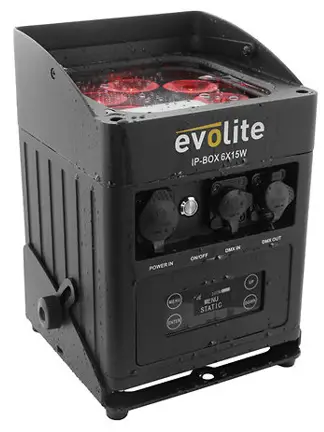
![]()
IP-BOX 6X15W RGBWA 5in1 ip65 Battery Projector
![]() WARNING
WARNING
Before use, and before installing this fixture, read carefully user manual, and follow the safety precautions listed on this page.
 WARNING
Very high level light output. DO NOT LOOK INTO THE BEAM.
![]() DANGER
DANGER
Hazardous voltage. Risk of electric shock!
ALWAYS disconnect the fixture from power for servicing, for cleaning or installing.
Do not connect this unit on a dimmer power pack.
Protect the unit from rain or moisture.
![]() WARNING !
WARNING !
Burn Hazard. Do not touch. Very hot surface The fixture becomes hot during use and remains hot 10 min after use . Do not touch the unit.
 WARNING !
Fire Hazard!
Keep flammable materials away from the fixture. Do not operate the fixture with ambient temperature over 40°C.
![]() DANGER !
DANGER !
Safety Hazard. Risk of injury.
This evolite unit must be installed by professional people. If suspended, make sure the structure and the hardware used for this suspension is secured. This Hardware must support at least 10 times the weight of the device suspended.
Ensure public is not looking at the beam. Do not try to repair the fixture by yourself. Contact a professional repair service.
In the event of a malfunction, stop the appliance immediately. Do not attempt to repair it yourself. Contact your retailer or call a specialized and authorized repairer. There are no user replaceable parts.
The battery is guaranteed for 6 months
![]() Disposal of old equipment
Disposal of old equipment
When it is to be permanently decommissioned, take the product to a local recycling plant for disposal that is not harmful to the environment. Devices marked with this symbol must not be disposed of with household waste. Contact your dealer or local authorities for more information. Remove all inserted batteries and dispose of them separately from the product.
As an end user, you are obliged by law (Battery Ordinance) to return all used batteries/rechargeable batteries. It is forbidden to throw them in the household waste. You
can drop off your used batteries free of charge at collection points in your municipality and wherever batteries/rechargeable batteries are sold. By disposing of used devices and batteries correctly, you help protect the environment.
Introduction
Thank you for selecting this professional fixture from evolite This new intelligent Moving Wash will provide you reliability, latest features, and professional lighting effects for a long period of time.
This evolite fixture is complying with European standards: EN60598-1:2008+A11:2009 EN60598-217:1989+A2:1991 et RoHs.
Device Description
![]() LED: 6 LED 15W RGBWA 5in1
LED: 6 LED 15W RGBWA 5in1![]() Power consumption: 80W
Power consumption: 80W![]() DMX channels: 10 / 5 / 3 DMX channels
DMX channels: 10 / 5 / 3 DMX channels![]() Control protocol: DMX512, WDMX
Control protocol: DMX512, WDMX![]() Color of the case: black
Color of the case: black![]() Fanless
Fanless![]() Color temperature: 3000K~7600K
Color temperature: 3000K~7600K![]() Rugged, water-resistant housing
Rugged, water-resistant housing![]() XLR connectors: 3-pin Seetronic connectors
XLR connectors: 3-pin Seetronic connectors![]() Powercon True1 current input
Powercon True1 current input![]() Protection index: IP65
Protection index: IP65![]() Operating modes: Auto, DMX, Master/Slave, WDMX, IR remote control
Operating modes: Auto, DMX, Master/Slave, WDMX, IR remote control![]() Power Input: 100~240V, 50/60Hz
Power Input: 100~240V, 50/60Hz![]() Battery: Lithium-Ion 11.1V / 8800 mAH
Battery: Lithium-Ion 11.1V / 8800 mAH![]() Autonomy: from 4 to 20h (mono-color)
Autonomy: from 4 to 20h (mono-color)![]() Charging time: 3 to 4 hours
Charging time: 3 to 4 hours![]() Dimensions: 200 x 160 x 235mm
Dimensions: 200 x 160 x 235mm![]() Net weight: 4.2 kg
Net weight: 4.2 kg
Installation
o Rigging
The installation of the projector has to be built and constructed in a way that it can hold 10 times the weight for 1 hour without any harming deformation.
IMPORTANT! OVERHEAD RIGGING REQUIRES EXTENSIVE EXPERIENCE, including calculating working load limits, installation material being used, and periodic safety inspection of all installation material and the projector. If you lack these qualifications, do not attempt the installation yourself, but instead use a professional structural rigger. Improper installation can result in bodily injury and or damage to property. The projector had to be installed out of the reach of people
![]() Always secure your fixture with a safety cable!’
Always secure your fixture with a safety cable!’
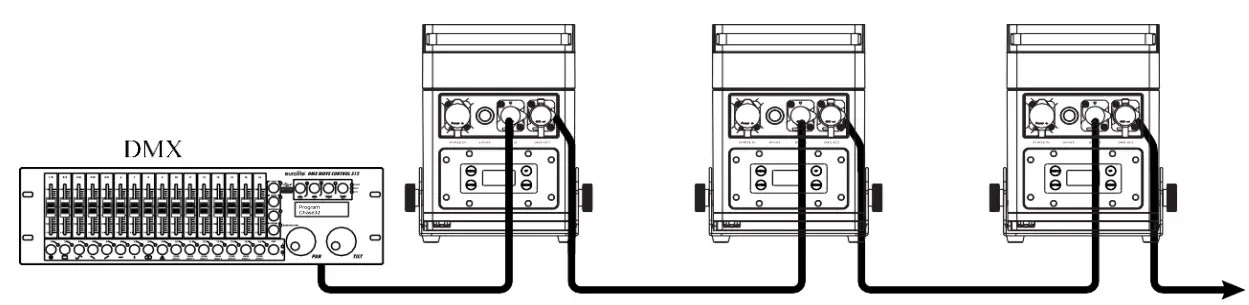
DMX 512 Connection
The wires must not come into contact with each other, otherwise the fixture will not work at all or properly. Please note the starting address depends upon which controller is being used. Only use a DMX cable and 3-pin XLR-plugs and connectors in order to connect the controller with the fixture or one fixture to another Connection with the mains.
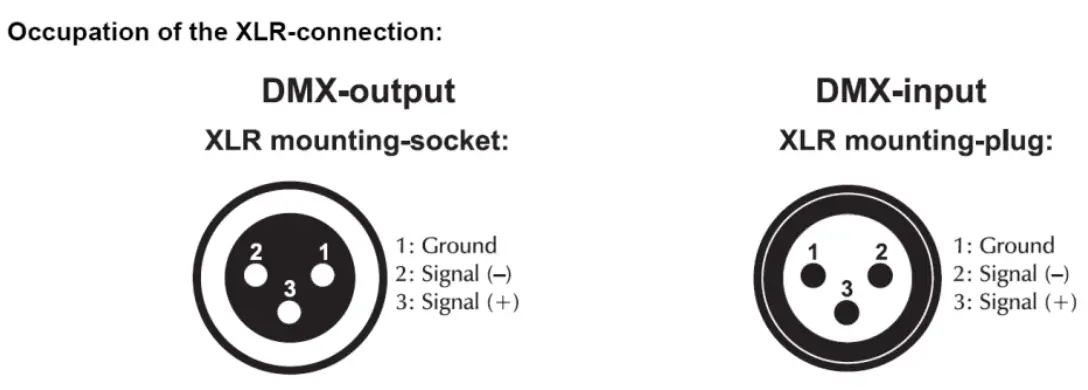
The occupation of the connection-cables is as follows:
| Cable | Pin | International |
| Brown | Live | L |
| Blue | Neutral | N |
| Yellow/Green | Earth |
The earth has to be connected. The device must only be connected with an electric installation carried out in compliance with IEC standards.
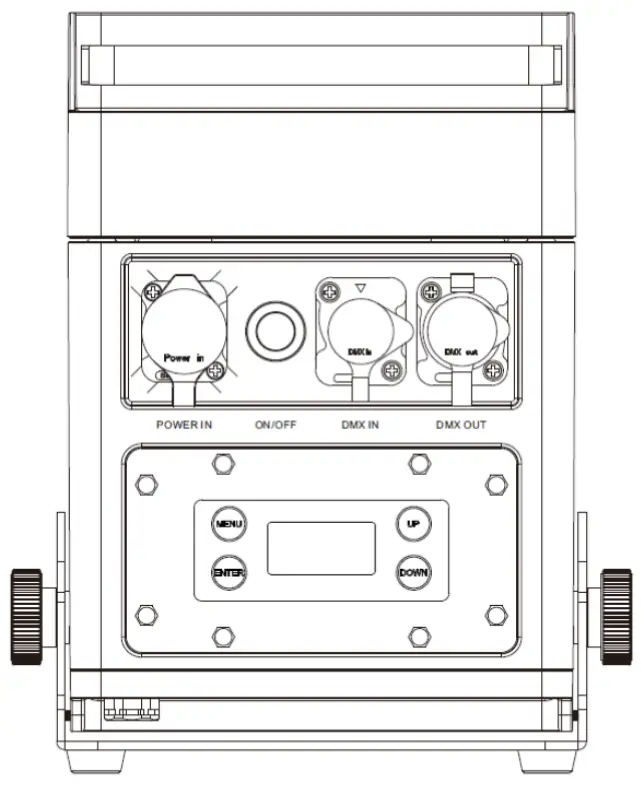
Set up
o Control panel
The control board offer several features: you can simple set the starting address, run the preprogrammed program or make a reset.
The main menu is accessed by pressing the Menu button, Browse through the submenu by pressing Up or Down. Press the Enter-button in order to select the desired menu. You can change the selection by pressing Up or Down, confirm every selection by pressing the Enter-button. The functions provided are described in the following setting.
| Button | Function |
| <MENU> | Scrolls through the first level of options, or exits from the current menu or function |
| <UP> | Navigates upward through the menu list or increases the numeric value when in a function |
| <DOWN> | Navigates downward through the menu list or decreases the numeric value when in a function |
| <ENTER> | Enables the currently displayed menu or sets the currently selected value in to the current function |
| Menu | Setting | Description | |
| DMX mode | DMX | 10CH | ADDR:001-512 |
| 5-1CH | |||
| 5-2CH | |||
| 3CH | |||
| Static colors | STATIC | 01-20 | Static colors |
| Auto | AUTO | 01-09 | Auto program |
| Speed | SPEED | 01-09 | Speed |
| Edit color | COLOR | R:000-255 | Red (0-100%) |
| G:000-255 | Green (0-100%) | ||
| B:000-255 | Blue (0-100%) | ||
| W:000-255 | White (0-100%) | ||
| A:000-255 | Amber (0-100%) | ||
| Dimming | DIMMING | 01-99 | Master dimming |
| Fading | FADING | 00-99 | Fading Program |
| Flash | FLASH | 00-99 | Flash Program |
| Slave | SLAVE | SLAVE MODE | Enable slave mode |
| ECO | ECO | OFF | Regular mode |
| ON | Energy saving mode | ||
| Passcode | PASSCODE | ON/OFF | Enable or Disenable the lock passcode on the display screen |
| Wireless 2.4G | SET 2.4G | CONNECT | Connect the DMX Wireless |
| DISCONNECT | Disconnect the DMX Wireless | ||
| Infrared | INFRARED | ON/OFF | Enable or Disenable IR remote |
DMX Mode
Each fixture can be individually controlled with a standard DMX-512 controller.
Each device must be “addressed” using the “A001” menu. The address entered is then the base address, the address from which the device will respond.
If two fixtures are addressed to the same DMX address; they will then behave identically, responding to the same DMX channels.
This product also embeds wireless DMX technology. It is compatible with the Evolite DWT-512 as well as Wireless Solution up to G4 protocol. Attention, not compatible with the G5 protocol.
The IP-BOX 6X15W also supports wireless master / slave transmission because the product is equipped with a wireless transmitter / receiver.
To make a wireless connection.
- Turn on the transmitter (not supplied). If ever you do not have a transmitter, you can use an IP-BOX 6X15W as a transmitter. Then connect the dmx output of your controller to the 1st IP-BOX 6X15W wired to use it as a transmitter.
- Turn on the IP-BOX 6X16W(s)
- Navigate in the menu and activate 2.4G > CONNECT. Do it on every product.
- The receiver will then connect to the transmitter
10 DMX channel
| CH1 | 0-255 | Master dimming (0-100%) |
| CH2 | 0-255 | Stroboscope (Rate 0-100%) |
| CH3 | 0-255 | Rouge(0-100%) |
| CH4 | 0-255 | Vert (0-100%) |
| CH5 | 0-255 | Bleu (0-100%) |
| CH6 | 0-255 | Blanc (0-100%) |
| CH7 | 0-255 | Ambre (0-100%) |
| CH8 | 0-9 | Pas de function |
| 10-19 | Rouge | |
| 20-29 | Vert | |
| 30-39 | Bleu | |
| 40-49 | Blanc | |
| 50-59 | Ambre | |
| 60-69 | Jaune | |
| 70-79 | Magenta | |
| 80-89 | Cyan | |
| 90-99 | Orange foncé |
| 100-109 | Vert jaune | |
| 110-119 | Saumon | |
| 120-129 | Turquoise | |
| 130-139 | Vert léger | |
| 140-149 | Orange | |
| 150-159 | Straw | |
| 160-169 | Lavande | |
| 170-179 | Bleu clair | |
| 180-189 | Bleu foncé | |
| 190-199 | Rose | |
| 200-255 | All on | |
| CH9 | 0-9 | Pas de fonction |
| 10-19 | Program Auto 1 | |
| 20-29 | Program Auto 2 | |
| 30-39 | Program Auto 3 | |
| 40-49 | Program Auto 4 | |
| 50-59 | Program Auto 5 | |
| 60-69 | Program Auto 6 | |
| 70-79 | Program Auto 7 | |
| 80-89 | Program Auto 8 | |
| 90-255 | Program Auto 9 | |
| CH10 | 0-255 | Vitesse program Auto (lent-rapide) |
5-1 DMX channel
| CH1 | 0-255 | Rouge (0-100%) |
| CH2 | 0-255 | vert (0-100%) |
| CH3 | 0-255 | Bleu (0-100%) |
| CH4 | 0-255 | Blanc (0-100%) |
| CH5 | 0-255 | Ambre (0-100%) |
5-2 DMX channel
| CH1 | 0-255 | Master dimming (0-100%) |
| CH2 | 0-255 | Stroboscope (Rate 0-100%) |
| CH3 | 0-9 | Pas de function |
| 10-19 | Rouge | |
| 20-29 | Vert | |
| 30-39 | Bleu | |
| 40-49 | Blanc | |
| 50-59 | Ambre | |
| 60-69 | Jaune | |
| 70-79 | Magenta | |
| 80-89 | Cyan | |
| 90-99 | Orange foncé | |
| 100-109 | Vert jaune | |
| 110-119 | Saumon | |
| 120-129 | Turquoise | |
| 130-139 | Vert léger | |
| 140-149 | Orange | |
| 150-159 | Straw | |
| 160-169 | Lavande | |
| 170-179 | Bleu clair | |
| 180-189 | Bleu foncé | |
| 190-199 | Rose | |
| 200-255 | All on | |
| CH4 | 0-9 | Pas de fonction |
| 10-19 | Program Auto 1 |
| 20-29 | Program Auto 2 | |
| 30-39 | Program Auto 3 | |
| 40-49 | Program Auto 4 | |
| 50-59 | Program Auto 5 | |
| 60-69 | Program Auto 6 | |
| 70-79 | Program Auto 7 | |
| 80-89 | Program Auto 8 | |
| 90-255 | Program Auto 9 | |
| CH5 | 0-255 | Vitesse program Auto (lent-rapide) |
3 DMX channel
| CH1 | 0-255 | Rouge (0-100%) |
| CH2 | 0-255 | Vert (0-100%) |
| CH3 | 0-255 | Bleu (0-100%) |
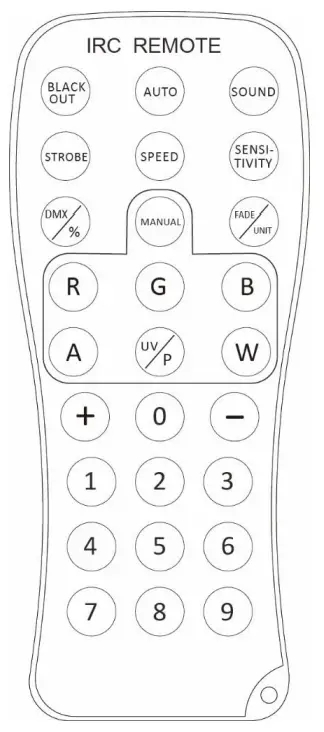
IR REMOTE CONTROLLER
BLACK OUT Mode
- Press BLACK OUT to off existing modes, Press BLACK OUT to return the last modes.
AUTO Mode
- Press <AUTO> on the IRC.
- Press <+> or <–> to choose between the different AUTO programs.
STROBE Mode
- Press <STROBE> on the IRC.
- Press <+> or <–> to adjust the strobe rate.
- Press <STROBE> again to turn off the strobe.
SPEED Mode
- Press <SPEED> on the IRC.
- Press <+> or <–> to adjust the auto program speed.
DMX/% Mode
To enable DMX or disallow DMX on the product
Manual Mode
- Press <MANUAL> on the IRC.
- Press <R>, <G>, <B>, <W> and <A> to choose your color.
- Press <+> or <–> to choose static colors.
FADE Mode
- Press <FADE> on the IRC.
- Press < FADE > again to turn off the FADE.
- Press <+> or <–> to adjust the Fading program speed.
Number 1-9
- Press digit <1> to <9> to change different brightness on the light.

Maintenance & service
o Cleaning
The cleaning of internal must be carried out periodically to optimize light output. Cleaning frequency depends on the environment in which the fixture operates: damp, smoky or particularly dirty surrounding can cause greater accumulation of dirt on the fixture’s optics.
- Clean with soft cloth using normal glass cleaning fluid.
- Always dry the parts carefully.
- Clean the external optics at least every 20 days.
Troubleshooting
Following are a few common problems that may occur during operation. Here are some suggestions for easy troubleshooting:
- The fixture does not work, no light
o Check the connection of power and main fuse.
o Measure the mains voltage on the main connector. - Not responding to DMX controller
o DMX LED should be on. If not, check DMX connectors, cables to see if link properly.
o If the DMX LED is on and no response to the channel, check the address settings and DMX polarity.
o If you have intermittent DMX signal problems, check the pins on connectors or on PCB of the fixture or the previous one.
o Try to use another DMX controller.
o Check if the DMX cables run near or run alongside to high voltage cables that may cause damage or interference to DMX interface circuit. - Some fixtures don’t respond to the easy controller
o You may have a break in the DMX cabling.
o Check the LED for the response of the master/ slave mode signal. - No response to the sound
o Make sure the fixture does not receive DMX signal.
o Check microphone to see if it is good by tapping the microphone.
www.evolite-pro.com
Importé par / Imported by
EVOLITE – MSC
7 avenue du 1er Mai
91120 Palaiseau / FRANCE
[email protected]
Tel : +33 1 69 34 80 62


