![]()
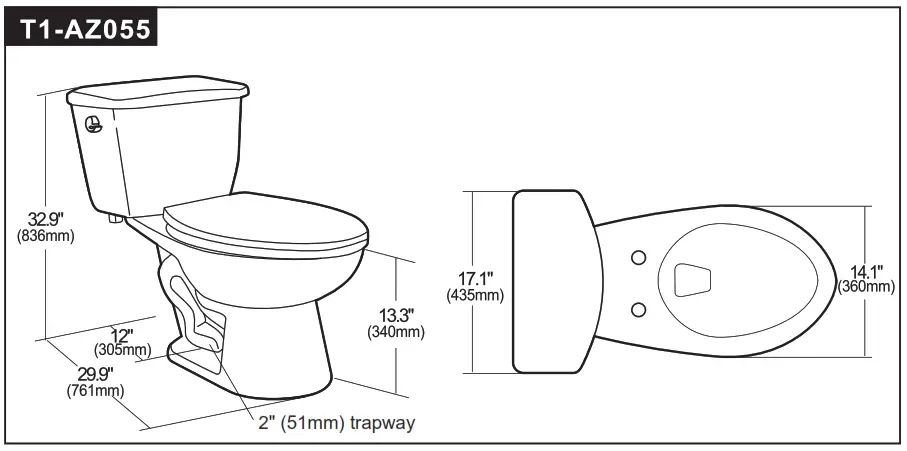
ITEM: T1-AZ055
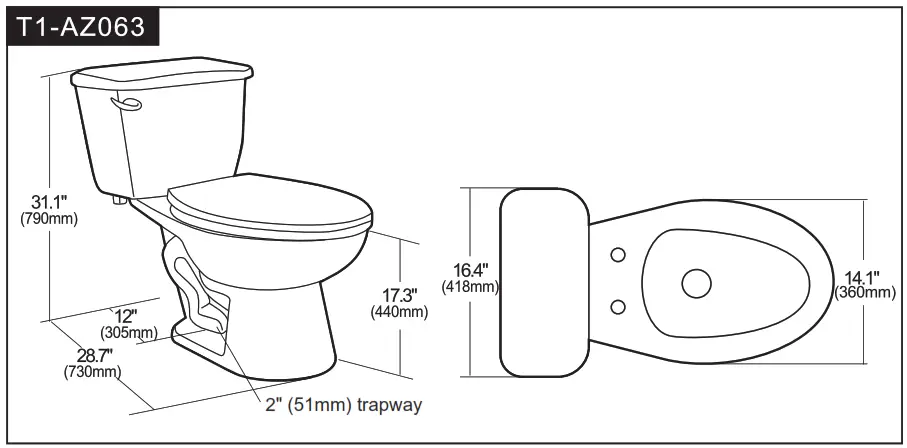
T1-AZ063
T1-AZ065
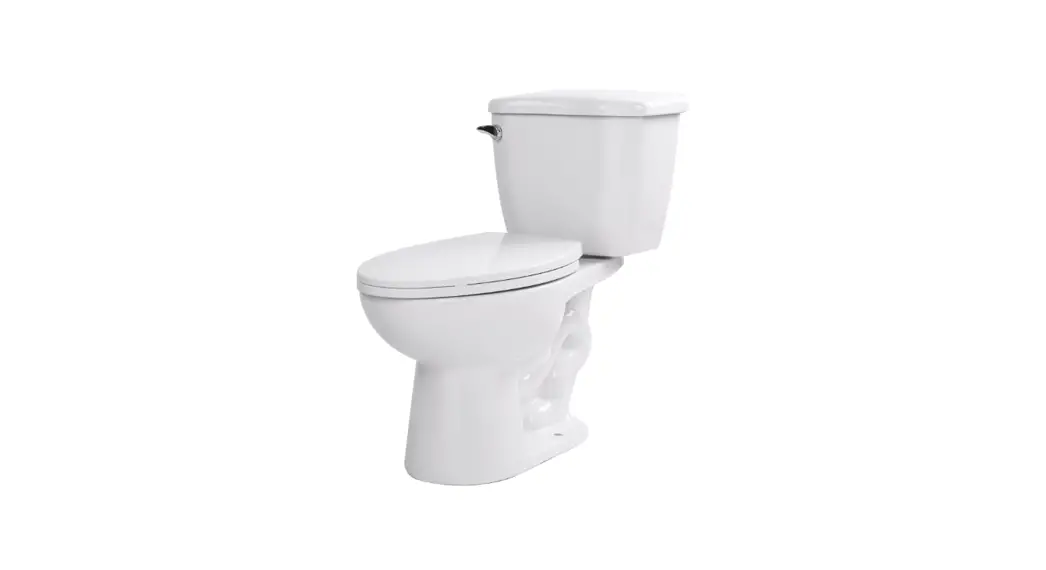
TWO PIECE TOILET
INSTALLATION & OPERATION MANUAL
V2.1
T1-AZ Series Two Piece Toilet
DON’T WAIT!
REGISTER NOW!
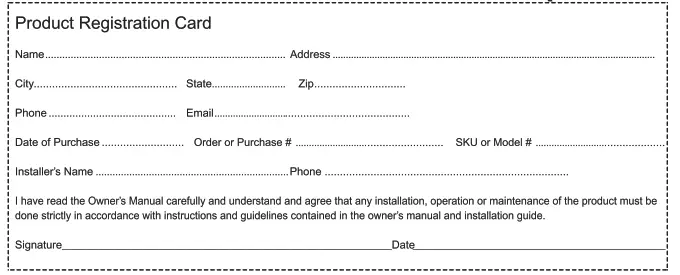
Register your product within 90 days to ensure your product is recognized as an official purchase and is eligible for warranty coverage.
Mail in the completed registry card (Pg. 2) or register online at www.swcorp.com/register .
PRODUCT REGISTRATION «
IMPORTANT: YOUR WARRANTY WILL NOT BE RECOGNIZED UNLESS THIS CARD IS FULLY COMPLETED AND RETURNED OR ONLINE REGISTRATION IS COMPLETED.
T o ensure that your warranty is registered and confirmed please do one of the following:
1 . Register online at_www.swcorp.com/register. You will be asked to fill out the same information you would in the registration card. Registering online is fast , secure and ensures we receive your information.
2. Complete, cut out and mail the registration card below. By returning this registration card we confirm the date of purchase for your new product. This confirmation will allow us to process any warranty claims.
Mail the card to 5701 NW 35 Avenue, Miami, FL 33142
Need help? For technical support call 305-614-4070 or visit us at www.ANZZI.com
INSTALLATION GUIDE BEFORE YOU BEGIN
- Please check the product for damage and missing parts immediately upon delivery. Damage reported later will not be covered by our warranty. Please handle the product with care. Avoid any impact to the sides and edges of the toilet.
- Consult your local plumbing & building codes prior to installation.
![]() WARNING
WARNING
- Handle with care. Vitreous chinaware i s glasslike with sharp edges if broken.
Do not drop, handle roughly, or overtighten bolts.
TOOLS AND MATERIALS

Thank you for purchasing ANZZI TOILET. Please read and follow the installation and operation instructions carefully, to ensure the long life and reliable operation of this appliance. FAILURE TO DO SO COULD CAUSE PROPERTY DAMAGE OR SERIOUS INJURY. Please keep this manual for future reference.
PRODUCT SIZE CHART

TOILET COMPONENTS
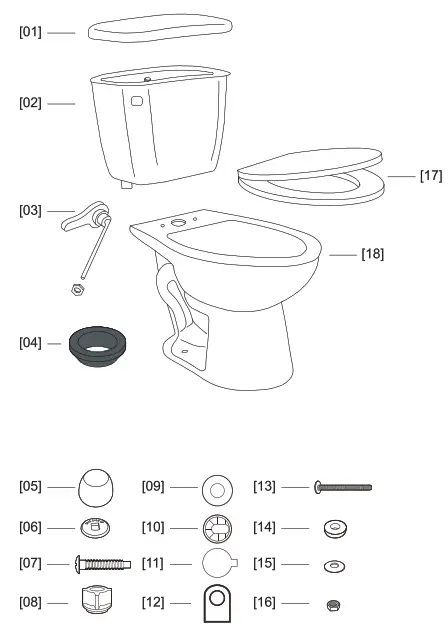
| Part | Description | Qty |
| [01] | Cover | 1 |
| [02] | Tank | 1 |
| [03] | Handle Assembly | 1 |
| [04] | Sealing Gasket | 1 |
| [05] | Bolt Cap | 1 |
| [ 06] | Gasket | 1 |
| [07] | Lock Bolt | 1 |
| [08] | Lock Nut | 1 |
| [09] | Washer | 1 |
| [10] | Gasket | 1 |
| [11] | Cover | 1 |
| [12] | Seat Gasket | 1 |
| [13] | Bolt | 1 |
| [14] | Rubber Gasket | 1 |
| [15] | Washer | 1 |
| [16] | Nut | 1 |
| [17] | Seat with Lid | 1 |
| [18] | Toilet | 1 |
TOILET INSTALLATION
AX ATTENTION
- To avoid personal injury or property damage, identify components and read all instructions before installing.
- Follow the instructions below to remove your old toilet and install ANZZI TOILET. Toilet Flange, Toilet Wax Ring and Toilet Bolts are not provided. You may need to buy them for new installation.
- Turn off the water supply and flush the tank completely. Remove remaining water from tank and bowel with towel or sponge.
- Disconnect and remove the old water supply line.
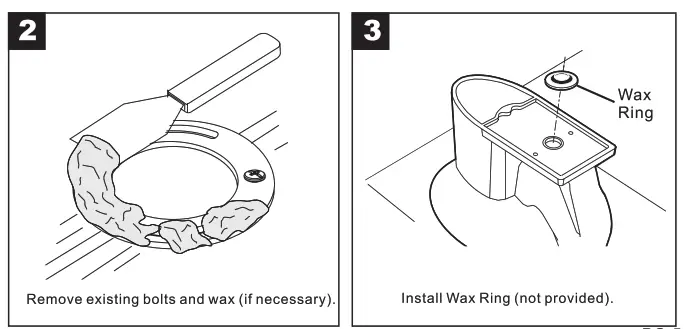
- Remove the bowl from the floor by removing the bolt caps and the floor bolt nuts.
- Temporarily plug the floor flange with a towel or cover to block sewer gases from escaping.
- NOTE: The mounting surface should be clean and level before the new toilet is installed.
INSTALLATION
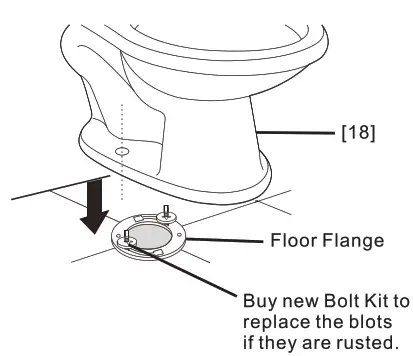
Position Toilet [18] on Floor Flange. Make sure the bolts go through the holes of the Toilet [18].
Attention: Do not shake the toilet back and forth as this may damage the seal. 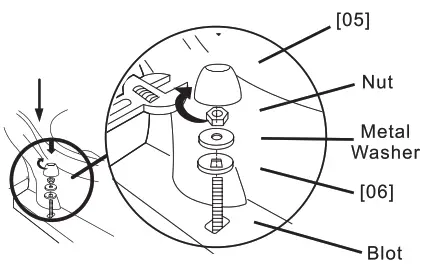
Slide Gasket [06] and Metal Washer (not provided) onto the Bolt. Tighten the NUT (not provided) to secure. DO NOT OVER TIGHTEN! Cover the Bolt with Bolt Cap [05]. Attention: Pour water into bowl to prevent the escape of sewer gas. Make sure the Gasket [06] with mark “This side up” faces up ward. 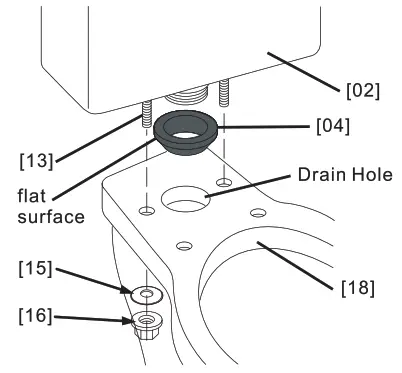
a. Attach the Sealing Gasket [04] to the Drain Hole with flat surface on the top.
b. Gently place the Tank [02] on the Toilet [18].
c. Remove the Nut [16] and Washer [15] from the Bolt [13].
d. Slide the Rubber Gaskets [14] onto the Bolts [13]. Slide the Bolts [13] through the holes inside the Tank [02] and through the holes on each side of the Toilet [18] drain hole.
e. Slide the Washers [15] onto the Bolts [13] and secure the Tank [02] by tightening the Nut [16].
DO NOT OVER TIGHTEN.
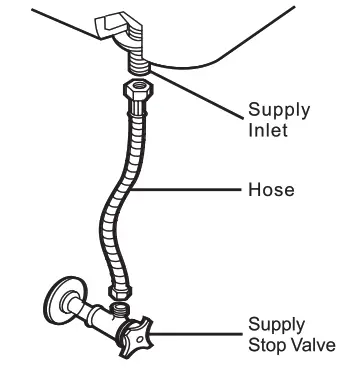
a. Connect the Hose (not provided) to the Supply Inlet of the toilet and the Supply Stop Valve.
b. Tighten the tank connection coupling nut 1/4 turn beyond hand tight.
c . Turn on the Supply Stop Valve and allow the toilet tank to fill.
d. Check for leakage at all connections. Tighten if necessary.
DO NOT OVER TIGHTEN. 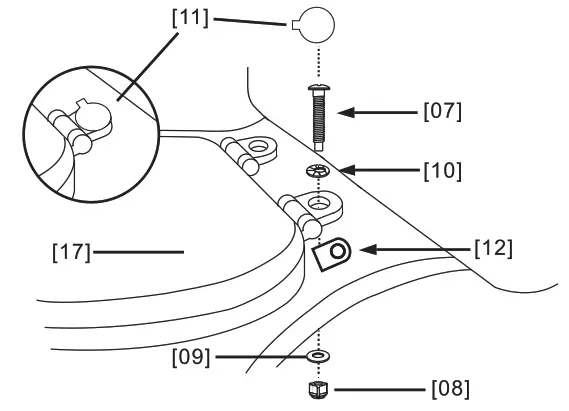
Position the Seat with Lid [17] onto the Toilet [18] with Seat Gaskets [12] under the Anchors.
Install the Lock Bolts [07] through the Gaskets [10] and the Anchors. Slide the Washers [09] onto the Lock Bolts [07] under the Toilet [ 1 8 ] and secure by tightening Lock Nuts [08] onto the Lock Bolts [07]. DO NOT OVER TIGHTENED. 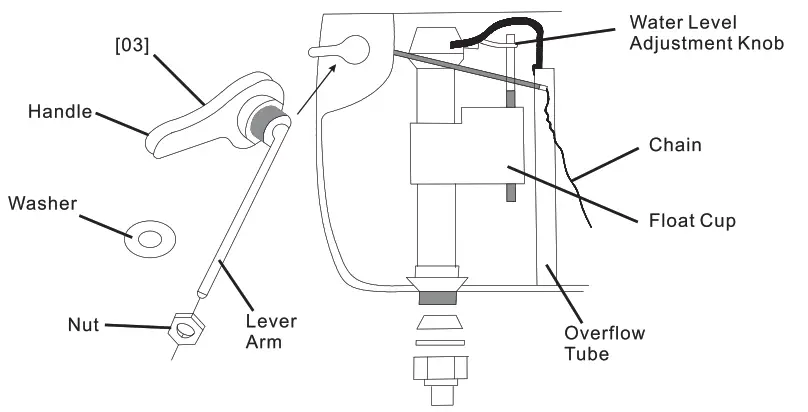
a. Remove the Nut and Washer from the Handle Assembly [03]. Install the Handle Assembly [03] to the outside of Tank [ 0 2 ] as the figure shows. Connect the Chain to the end of the Lever Arm. Adjust the length of the Chain so that it can pull up the flapper when pushing down the Handle Assembly [03] and can be closed when releasing the Handle Assembly [03].
b . Adjust water level in tank by turning Water Level Adjustment Knob to move Float Cup up or down.
Notice: Water level should be lower than the top of Overflow Tube.
c. Gently place the Cover [ 0 1 ] onto the top of the Tank [02] t o finish the installation.
CLEANING and MAINTENANCE
When cleaning your toilet, wash it with mild, soapy water, rinse thoroughly with clear water and dry with a soft cloth. Avoid detergents, disinfectants, or cleaning products in aerosol cans. NEVER use abrasive scouring powders or abrasive pads on your toilet seat. Some bathroom chemicals and cosmetics may damage the seat’s finish.
ATTENTION: Do not use in-tank cleaners. Products containing chlorine (calcium hypochlorite) can seriously damage fittings in the tank. This damage can cause leakage and property damage. ANZZI shall not be responsible or liable for any tank fitting damage caused by the use of cleaners containing chlorine (calcium hypochlorite).
TROUBLE SHOOTING
| Symptoms | Probable Causes | Trouble Shooting |
| Poor flush. | Supply Stop Valve is not fully open. | Open the Supply Stop Valve |
| Toilet discharges water continuously | The Chain connecting to the Lever Arm istoo short | Adjust the length of Chain |
| Excessive noise when tank is filling. | Flush Valve is blocked | Remove dirt or obstruction from the valve head. Flush the lines. |
![]()


