![]() Above Floor Raceway 4-Channel Standard Product
Above Floor Raceway 4-Channel Standard Product
Part Number(s): AFR4BC**%, AFR4RA**, AFR4TRT70**, AFR4JB2S**, AFR4EC**, AFR4CC**,
AFR4TBLG**, AFR4WTR**
PN616C
INSTALLATION INSTRUCTIONS
PN616C Floor Raceway Coupler
| Raceway Channel | See Fig. | Electrical Cables | Data Grade Cables | |||||||
| 14 | 12 | I 10 | 24AWG | 24AWG | 24 AWG | |||||
| THN/THWN/T90 | Cat 6 | Cat 6A | Cat 6A (SD) | |||||||
| 0.111 | 0.13 | I 0.164 | 0.24 | 0.3 | 0.24 | |||||
| Fill | Fill | Fill | Fill | |||||||
| Max | Max | I Max | Spec | Max | Spec | Max | Spec | Max | ||
| UL Temp Rise Test | 40% | 60% | 40% | 60% | 40% | 60% | ||||
| Outer Channels (with screws installed) | A | 21 | 15 | 10 | 3 | 4 | 2 | 3 | 3 | 4 |
| Inner Channels | _ B | 24 | 17 | 11 | 3 | 5 | 2 | 3 | 3 | 5 |

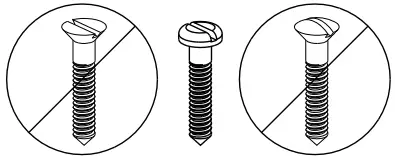
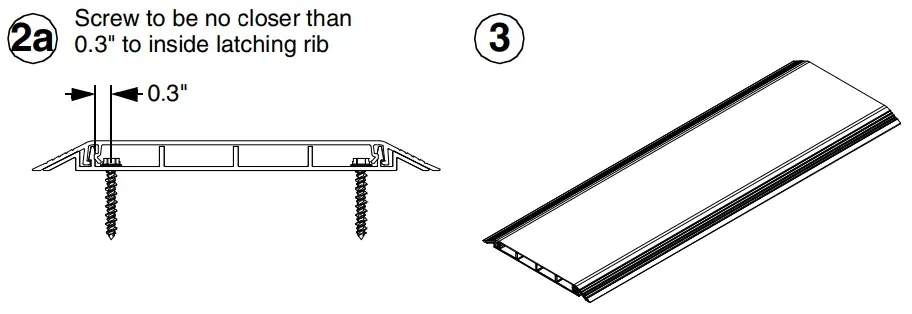
| The mounting hardware used to secure the raceway shall be appropriate for the mounting surface. | Screws provided with raceway are intended for installation on a concrete surface. |
 | 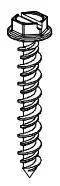 |
NOTES:
- An adhesive strip may serve only as a positioning aid during the installation process. The raceway shall be secured by mechanical fastening means.
- Holes for mounting raceway and associated fittings should be predrilled into infrastructure prior to the installation of the mounting hardware.
- A 5/32″ concrete drill bit is needed for the provided concrete screws.
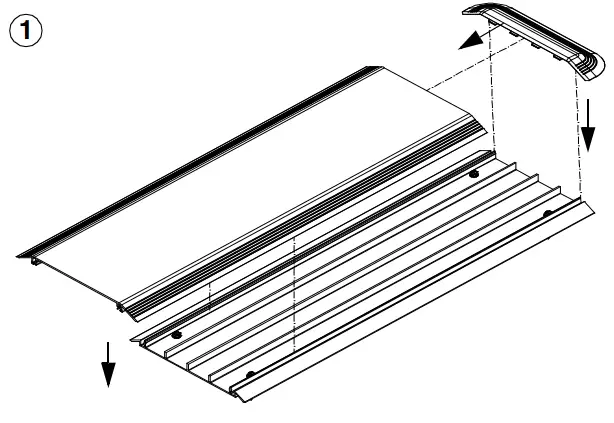
BASE & COVER
COUPLER
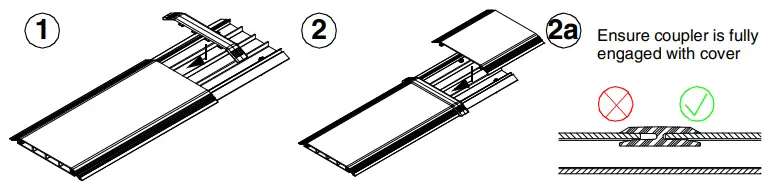
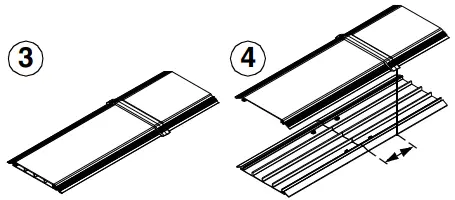
Stagger base joint and cover coupling joint to strengthen assembly.
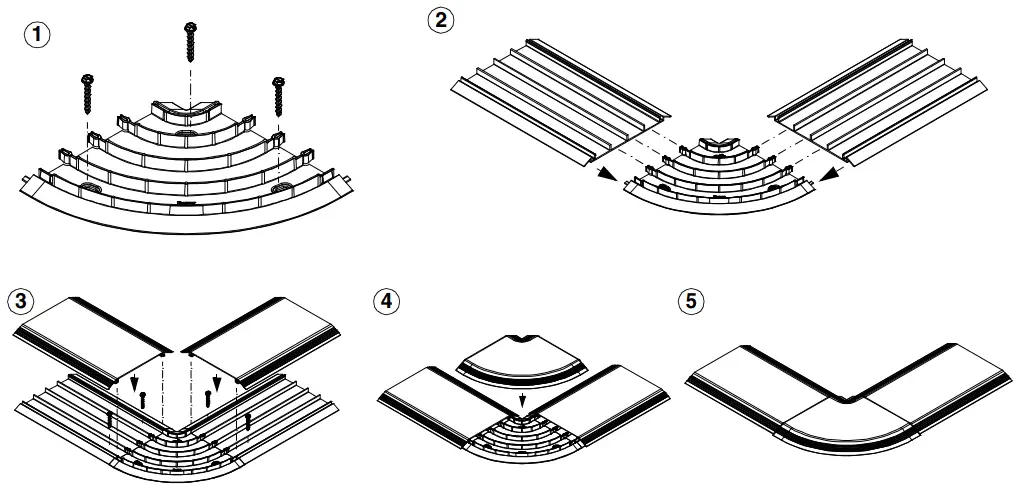
RIGHT ANGLE
TRANSITION TO T70
END CAP
Ensure end cap and cover are fully engaged as shown. 0.3″ is maximum allowable distance base can extend beyond cover when installingcap.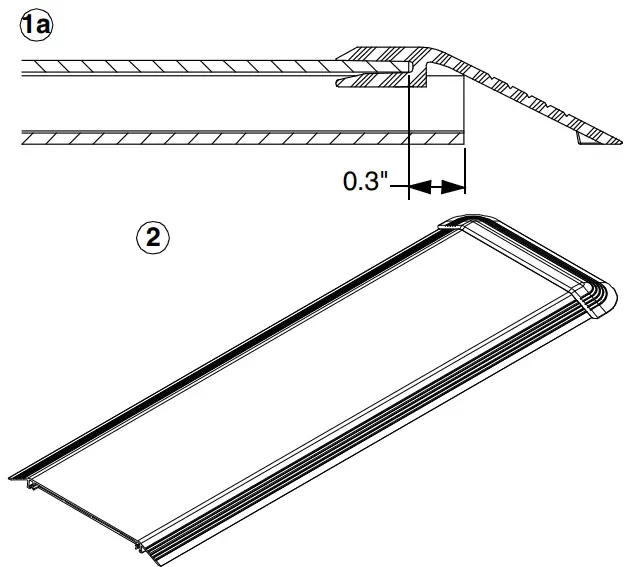
JUNCTION BOX
Ensure end cap and coupler(s) connect to junction box cover as shown [8 places]
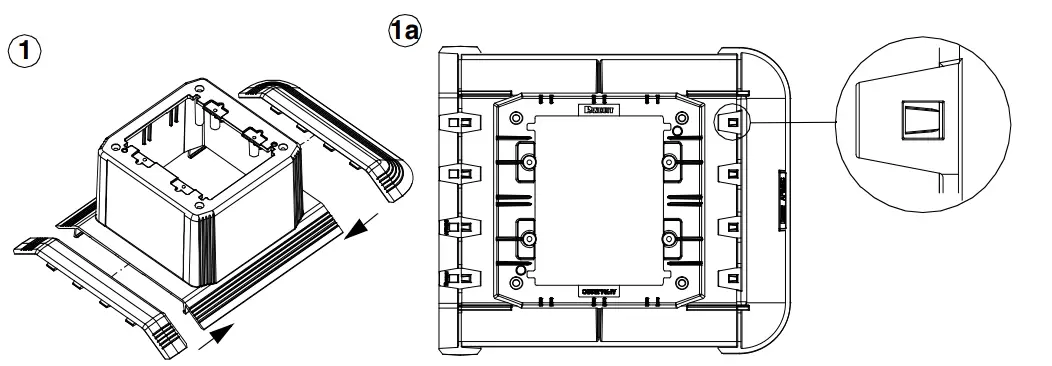
Note: Junction Box can be assembled between two raceway paths with the use of two coupler fittings.
End cap installation shown as reference.
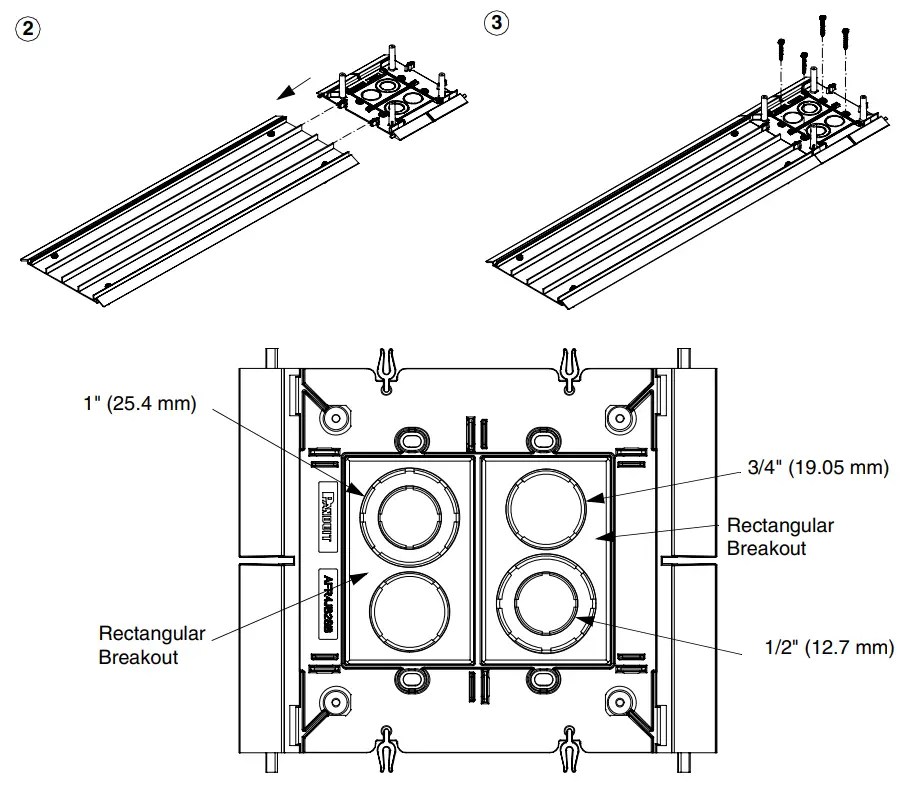
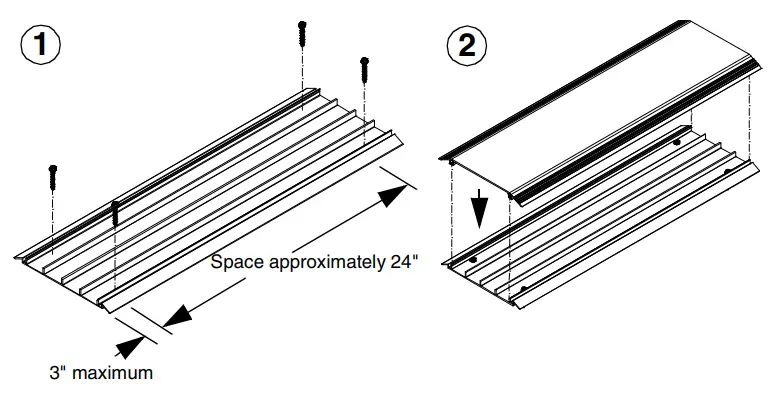
BREAKOUTS FOR CONDUIT APPLICATIONS
| POWER/DATA APPLICATION | DATA APPLICATION | POWER APPLICATION |
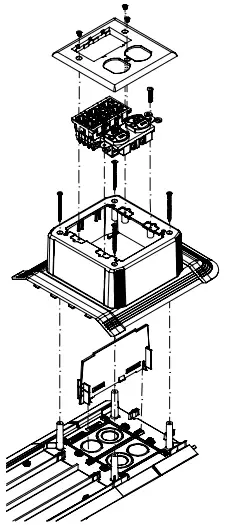 | 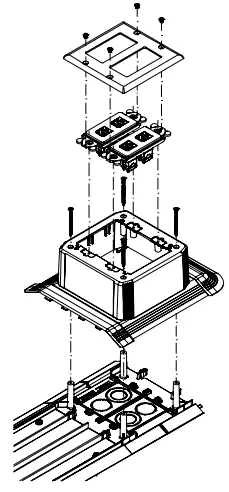 | 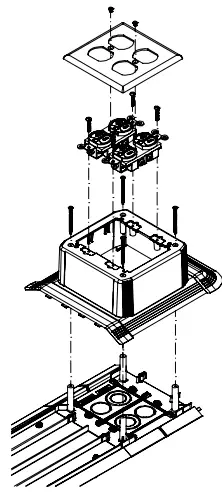 |

WALL TRANSITION
GREENFIELD APPLICATIONS – NEW CONSTRUCTION
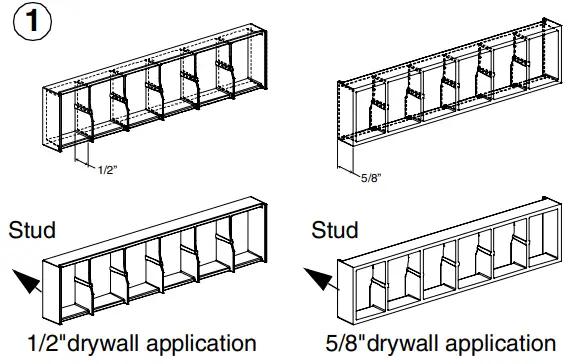
Determine if you will use 1/2″ or 5/8″ drywall. Orient standoff as shown for desired application.
**Only use standoff for Greenfield applications**
If installing into existing infrastructure, con-tinue to Brownfield application instructions.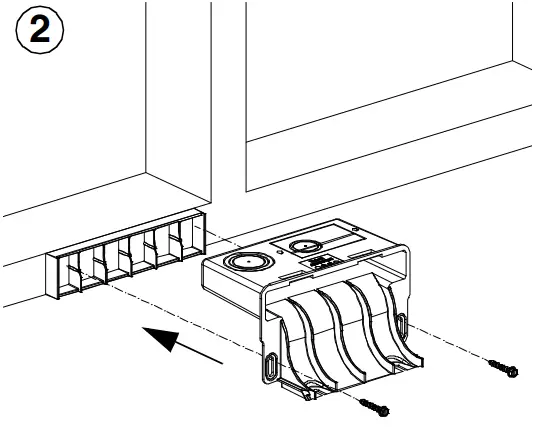 Secure base to sole board and route cables and wiring as desired. Do not overtighten screws as flooring installation may require adjustments.
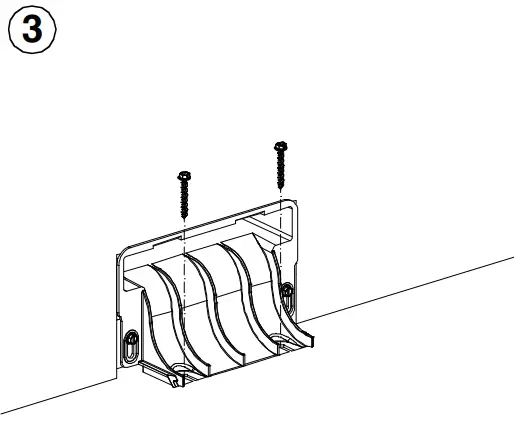
Adjust wall transition fitting base height during flooring installation. After drywall and flooring have been installed, secure transition fitting base to the floor using appropriate hardware.
Continue with Step 4 of Brownfield application instructions.
BROWNFIELD APPLICATIONS – EXISTING INFRASTRUCTURE
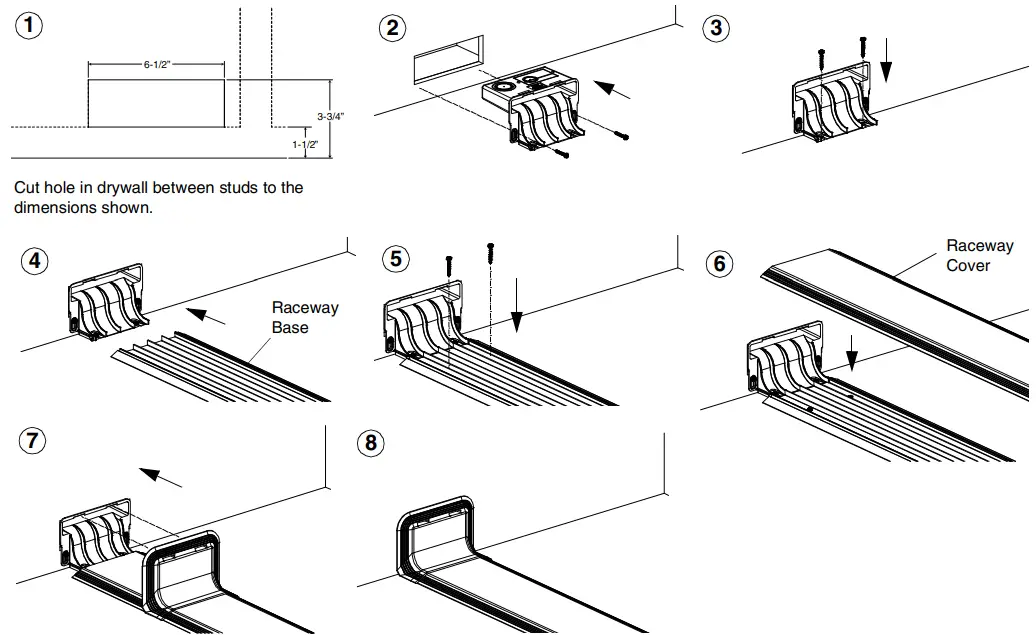
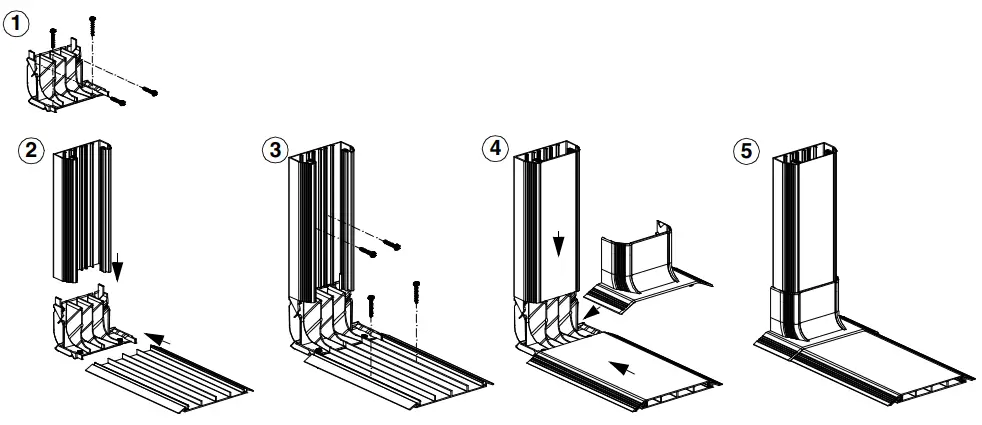
TABLE LEG
INSTALLATION BETWEEN 2 RACEWAY CHANNELS
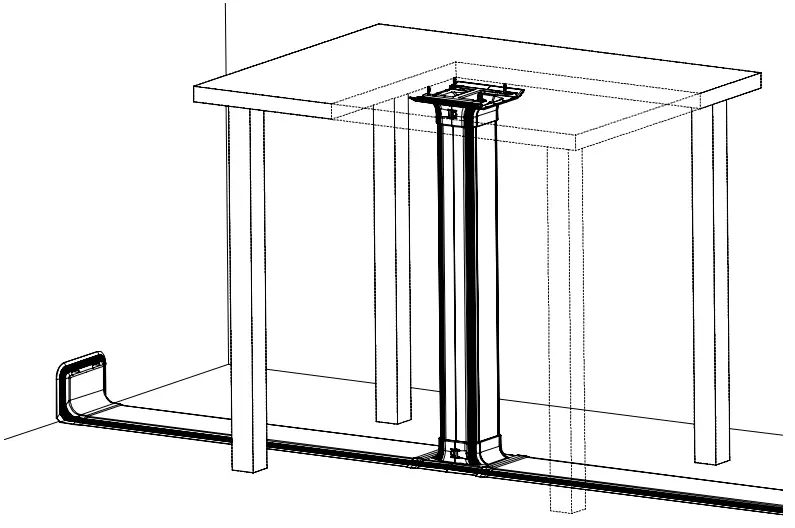
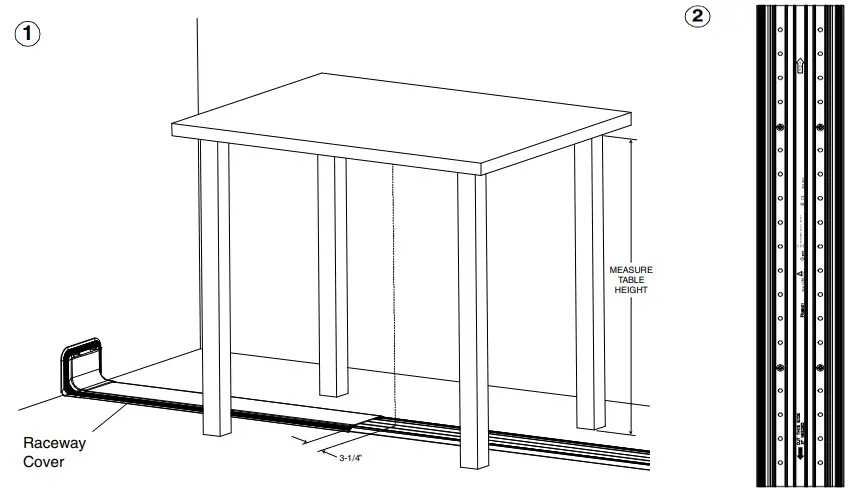
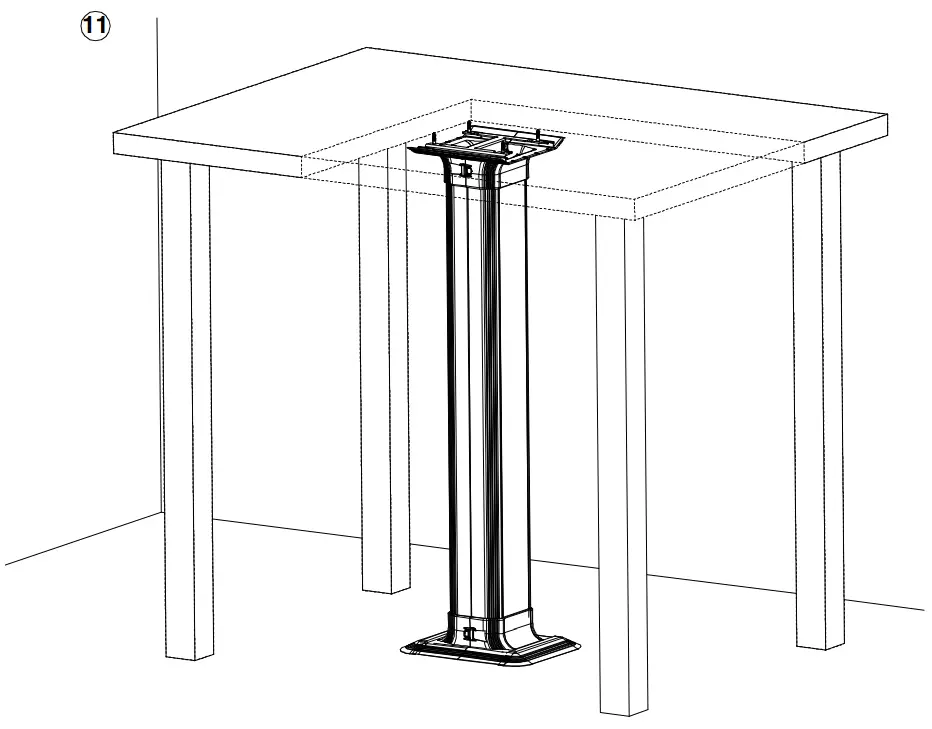
Measure the height from the floor to the underside of the table.
Channel should be between 3-1/2″ to 4″ shorter than the measured height.
If necessary, cut channel from bottom edge to accom-modate.
Center of table leg transition fitting will sit approximately 3-1/4″ from the edge of the raceway cover.Route cables prior to installing the raceway cover.
NOTE: Desired hole in table should be offset from table leg center to accommodate proper mounting of table leg.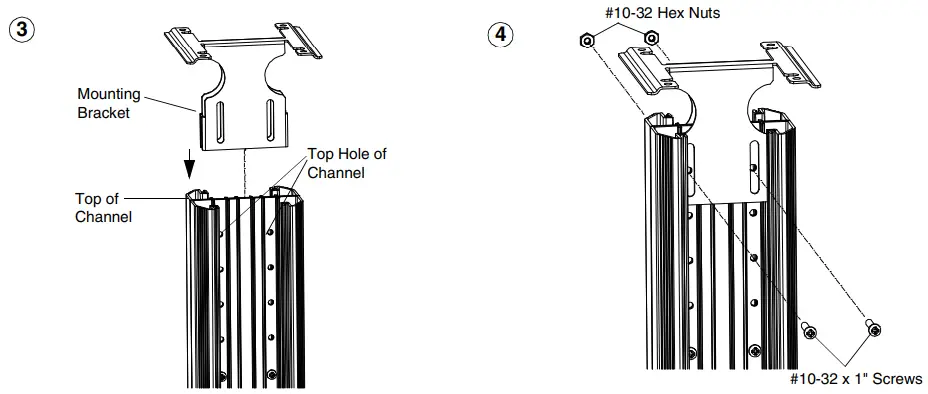
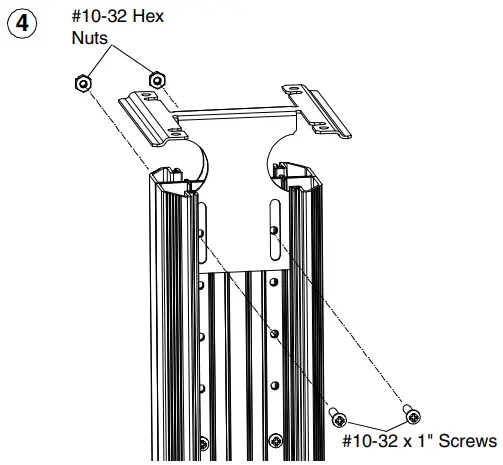
Secure mounting bracket to top of channel using provided hardware.
Use the top hole of the channel for assembly. Do not fully tighten the mounting bracket at this time.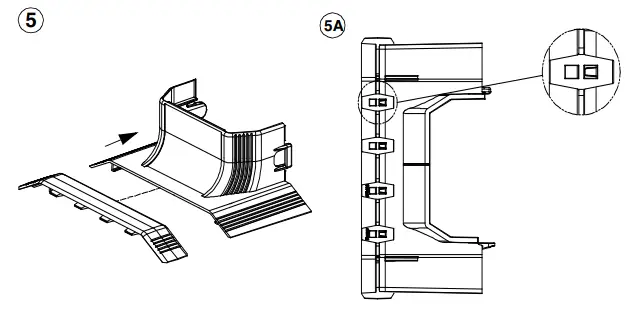
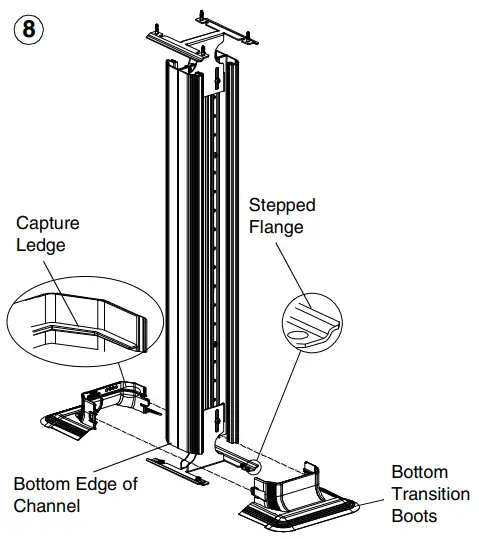
Ensure couplers connect to bottom transition boots as shown.
[4 Places]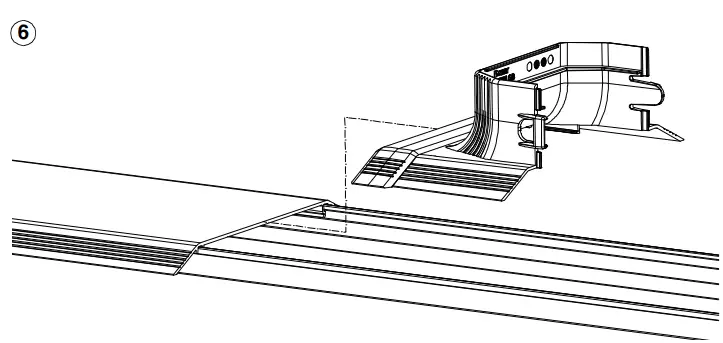
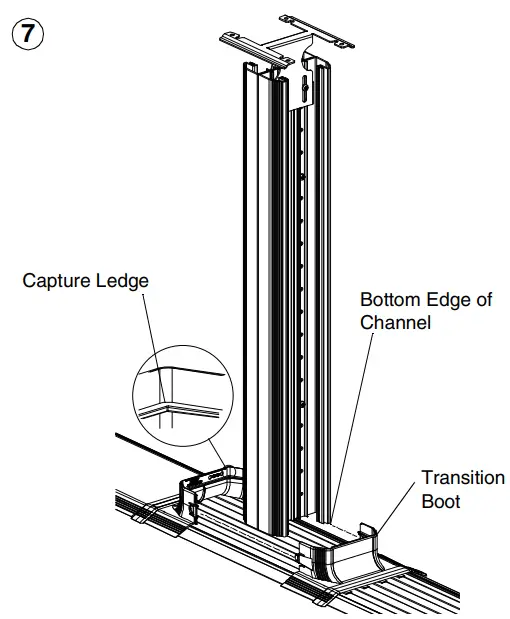 Set bottom edge of channel on capture ledge of installed transition boot. Connect second transition boot to the first.
 Ensure channel is level.Secure mounting bracket to underside of table using provided hardware. Fully tighten mounting bracket screws to secure channel in place.
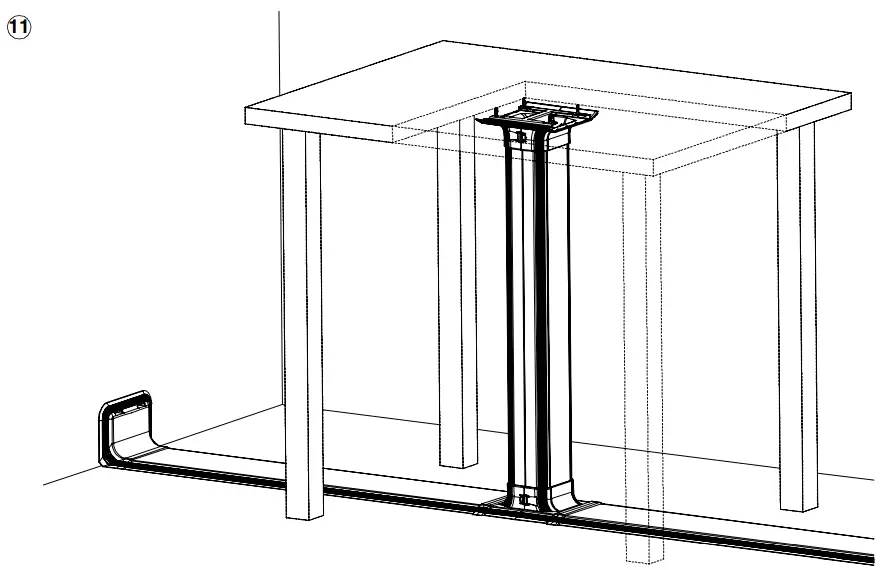
Route cables prior to installing covers. Covers are tamper-proof and are not intended for easy removal.
If added stiffness is desired, secure bottom of channel using pro-vided hardware in the lowermost holes of the channel.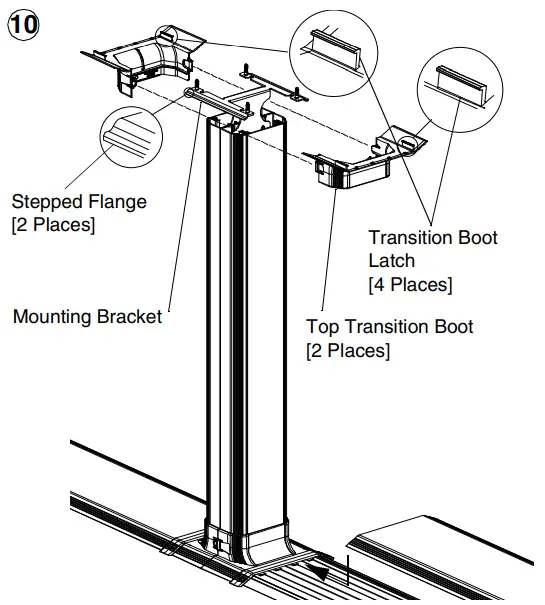
Assemble top transition boots to each other. Transition boot latches will mount to the stepped flanges of the mounting bracket.
INSTALLATION AS STAND ALONE OR WITH SINGLE SIDE RACEWAY CHANNEL
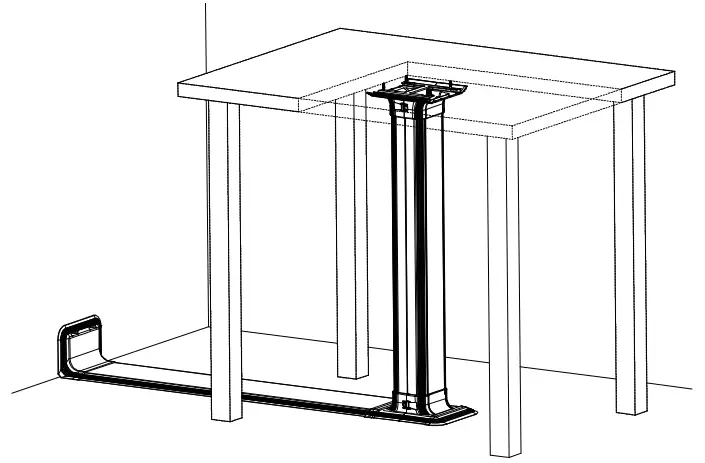
NOTE: For single side raceway application; above floor raceway should be mounted prior to table leg installation.
Center of table leg will sit approximately 3-1/4″ from the edge of the raceway cover. Route cables prior to installing the raceway cover.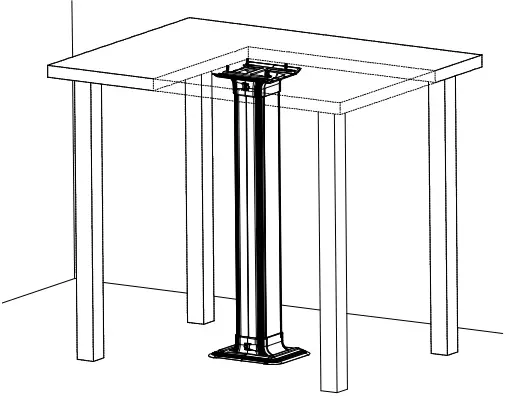
NOTE: Desired hole in table should be offset from table leg center to accommodate proper mounting of table leg.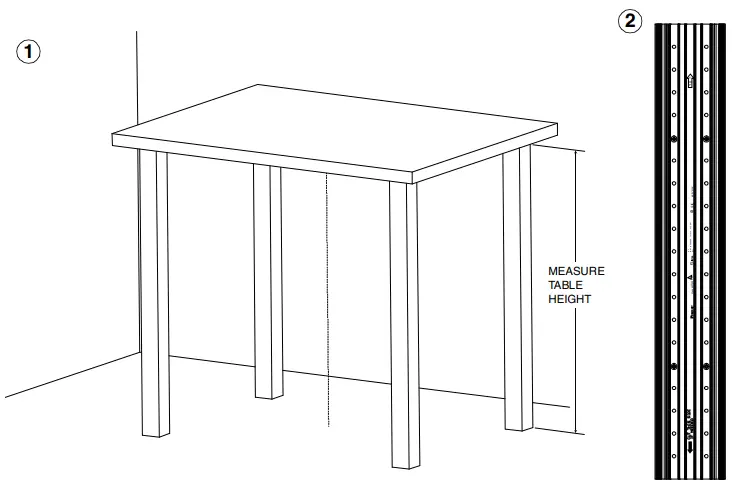
Measure the height from the floor to the underside of the table. Channel should be between 3-1/2″ and 4″ shorter than measured height.
If necessary, cut channel from bottom edge to accommodate.
NOTE: Desired hole in table should be offset from table leg center to accommodate proper mounting of table leg.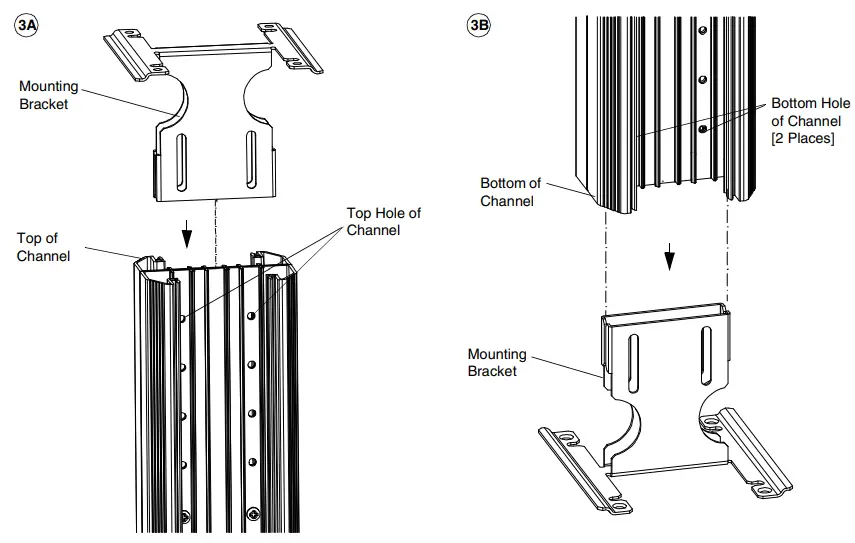
Secure mounting brackets to top and bottom of channel using provided hardware. Use the holes closest to the ends of the channel for assembly.
Do not fully tighten the mounting bracket at this time.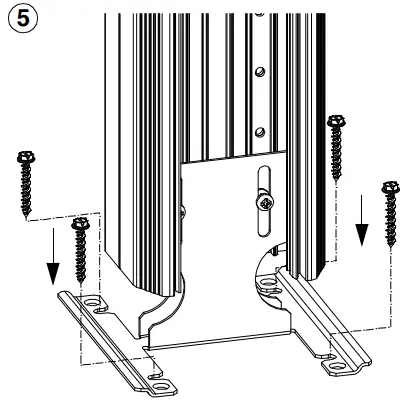
Pre-drill holes in infrastructure if necessary. Secure bottom mounting bracket to floor with proper hardware.
(Concrete screws provided)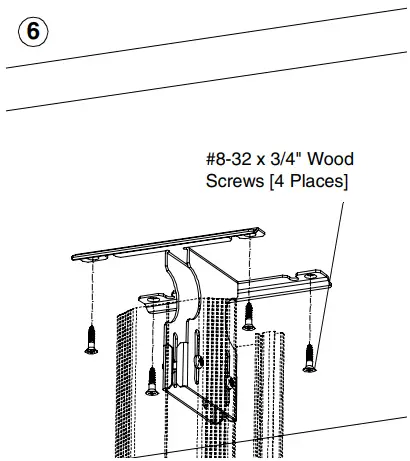
Ensure channel is level. Secure top mounting bracket to underside of table using provided hardware.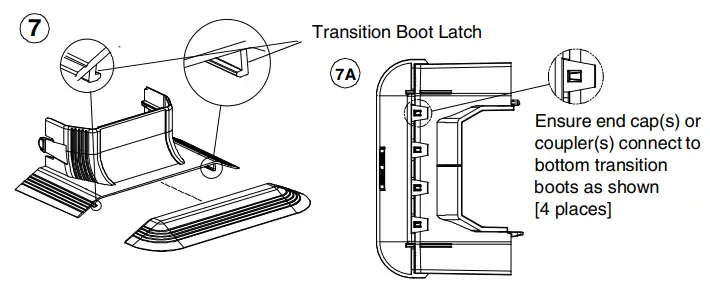
Assemble bottom transition boots together. Transition boot latches (shown in step 7) will mount to stepped flanges of the mounting brackets. Place bottom of channel on top of capture ledge of transition boots.
Tighten all mounting bracket screws to the channel at this time.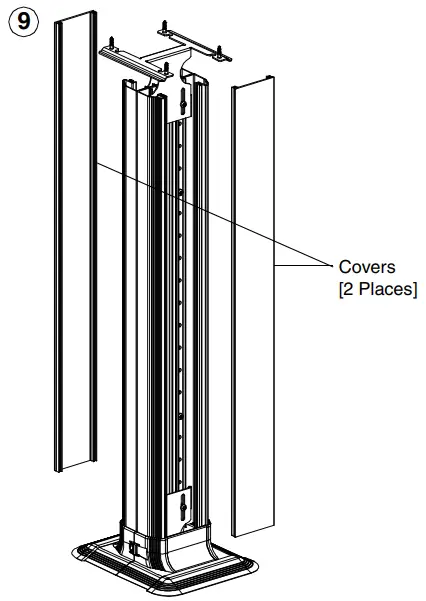
Route cables prior to installing covers. Covers are tamper proof and are not intended for easy removal.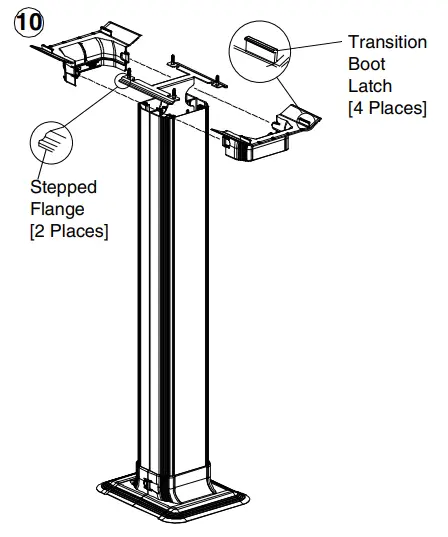
![]() For Instructions in Local Languages and Technical Support: www.panduit.com
For Instructions in Local Languages and Technical Support: www.panduit.com
E-mail: [email protected]
Phone: 866-405-6654


