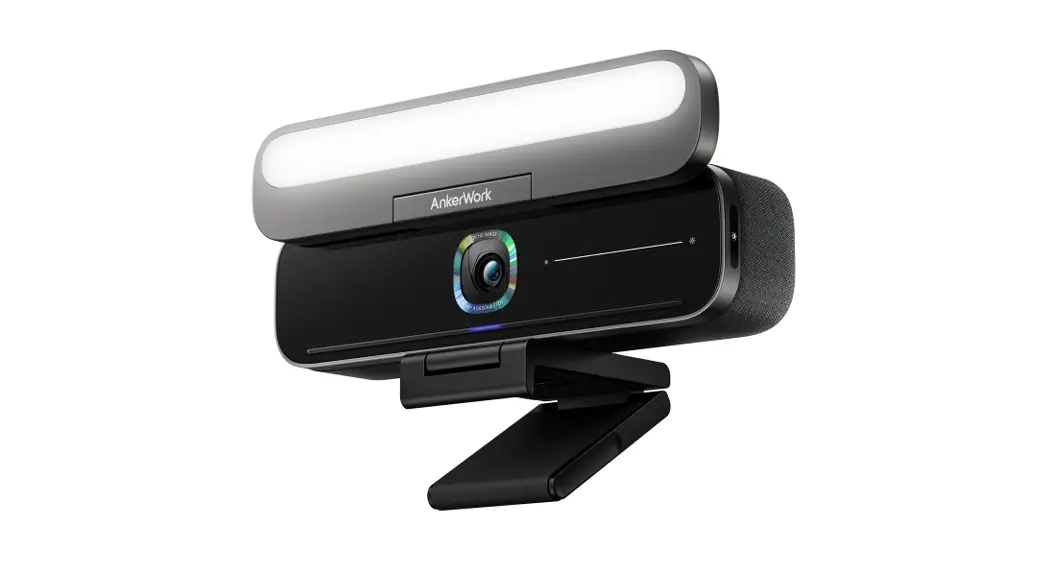
![]() Work B600 Video Bar
Work B600 Video Bar
User Manual
What’s Included
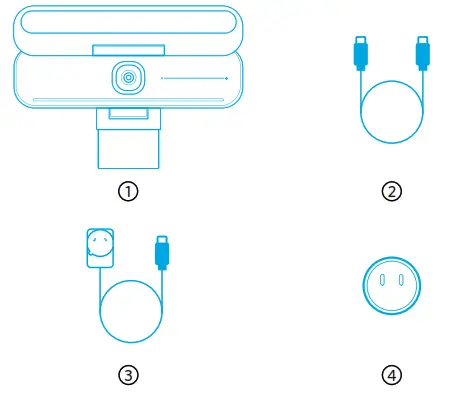
- AnkerWork B600 Video Bar
- USB-C to USB-C cable
- Power adapter
- Power plug*
*Power plug may vary in different regions.
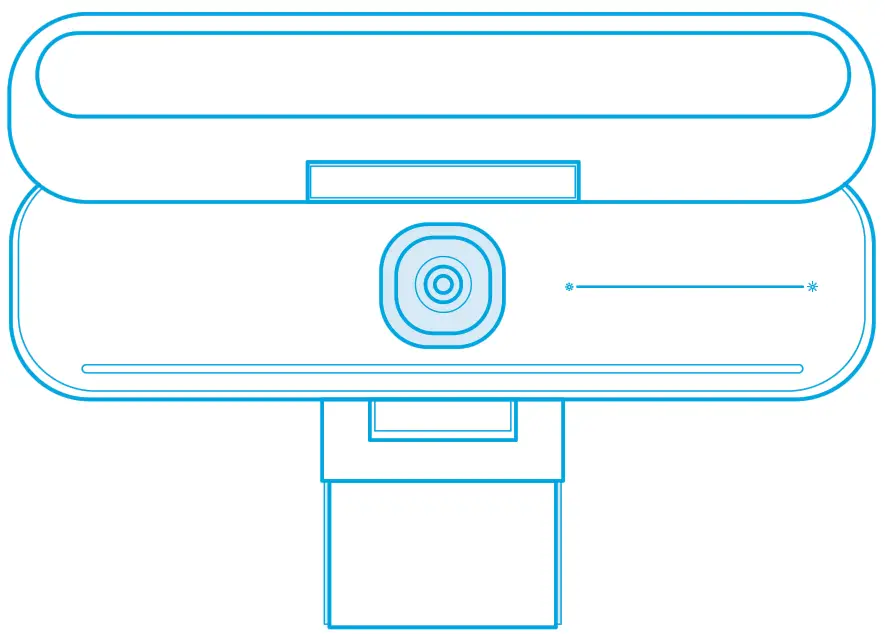
At a Glance

| 1. Camera | 8. Edge Light Touch Button |
| 2. Edge Light | 9. Speaker |
| 3. Privacy Cover | 10. USB-A Port |
| 4. Brightness Adjusting Touch Bar | 11. Data Port (USB 2.0) |
| 5. Microphone | 12. Power Port |
| 6. LED Indicator | 13. Adjustable Base |
| 7. Mute Touch Button | 14. tripod Thread |
Assembling the Power Adapter
- Align the groove of the plug with the pins on the power adapter.
- Press and turn the plug clockwise to lock.
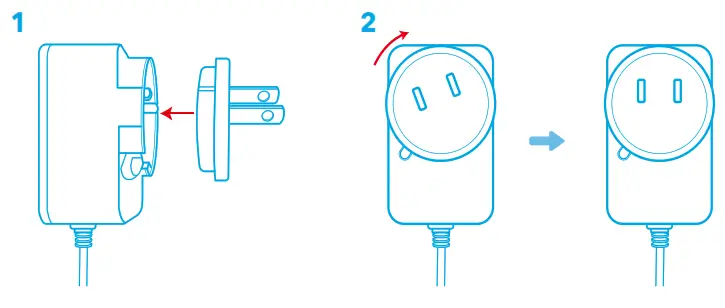
![]() To remove the plug, turn it counterclockwise while pressing the push button.
To remove the plug, turn it counterclockwise while pressing the push button.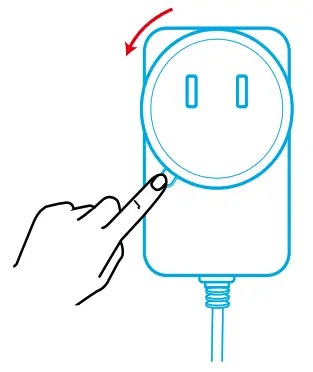
Setting Up the Video Bar
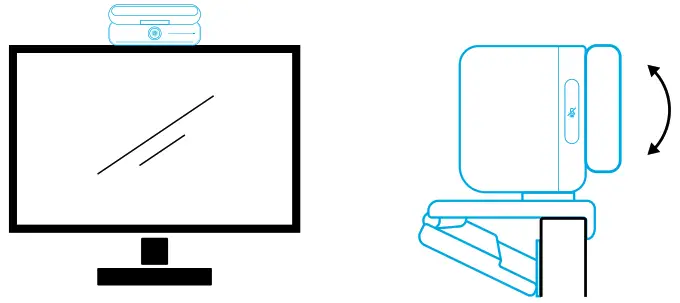
Option A: On Top of Your Monitor
- Unfold the clip so it fits over the top of your monitor. For a secure fit, adjust the clip by pressing it against the back of your device.
- Adjust the video bar up or down, or rotate it to the optimal position to frame.
• If the joint between the video bar and the clip is not tight enough, tighten the screw with the built-in handle at the base or a flat-blade screwdriver (not provided)
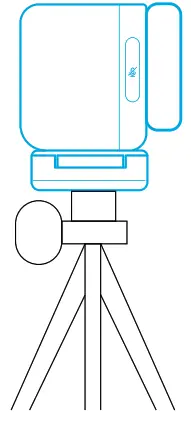
Option B: On a Tripod on Your Desk
With the clip folded in, mount the video bar onto a tripod (not provided) with the ¼-inch thread.
Connecting to a Computer
- Connect the video bar to a computer using the provided USB-C to USB-C cable (or other Anker’s USB-C to USB-C cable with a transfer speed of 480 Mbps and that is less than 2 m long).
- Connect the video bar to a power supply using the provided power adapter.
- Open the software you want to use with the video bar.
- The LED indicator will turn blue when the video bar is in use at any instant communication software, such as Zoom.
 Plug-and-play support will allow your computer to instantly recognize the video bar.
- If your computer does not instantly recognize the video bar, ensure the correct connection, try re-plugging the power adapter into the power port, or use a different USB port on your PC.
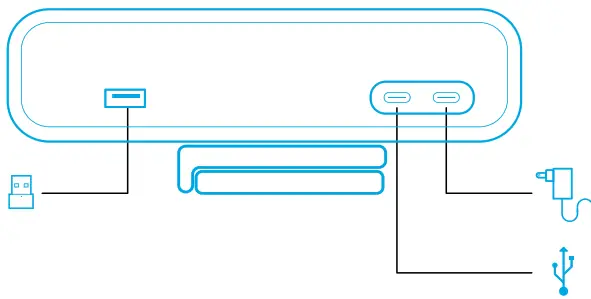
- The USB-A port can only support Anker’s wireless headphones with a USB receiver. You can pair your headphones with the video bar for the best experience.
- Do not connect the power adapter to the data port by mistake, otherwise, the led indicator will flash red.
 Plug-and-play support will allow your computer to instantly recognize the video bar.
![]() You may need to manually select AnkerWork B600 Video Bar for your PC system or software.
You may need to manually select AnkerWork B600 Video Bar for your PC system or software.
A) Windows
Audio:
Right-click on the sound icon > Open Sound settings > Choose your output device / Choose your input device
Microphone:
- Go to Settings > Privacy > Microphone and turn on “Allow apps to access your microphone”.
- Turn on each of the listed apps where you want to use the microphone.
Camera:
- Go to Settings > Privacy > Camera and turn on “Allow apps to access your camera”.
- Turn on each of the listed apps where you want to use the camera.
B) macOS
Audio:
Go to System Preferences > Sound > Sound Effects / Output / Input
Microphone:
- Go to System Preferences > Security & Privacy, then choose Microphone from the left side list.
- Locate the app(s) you want to enable microphone access for and check the box alongside that app name to enable microphone access for that application.
Camera:
- Go to System Preferences > Security & Privacy, then choose Camera from the left side list.
- Locate the app(s) you want to enable camera access for and check the box alongside that app name to enable camera access for that application.
Controls
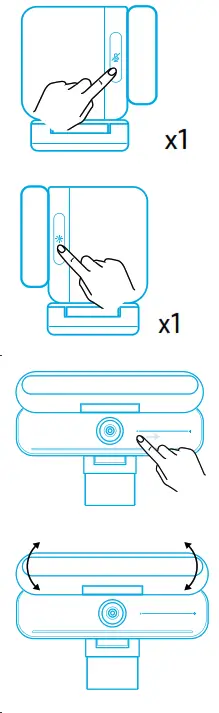 | Mute / unmute microphone | Touch once |
| Turn edge light on / off | Touch once | |
| Adjust brightness | Slide | |
| Open / close privacy cover | Rotate |
LED Light Guide
| Steady blue | Camera on | |
| Steady red | Microphone muted | |
| Flashing red | Incorrect operation: Power adapter plugged into data port and SB-C cable plugged into the power port |
Edge Light
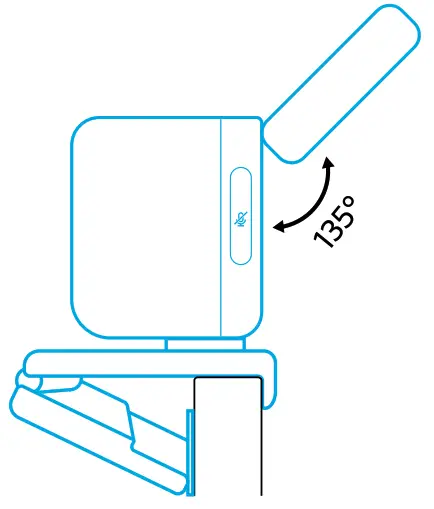
- By default, the edge light is turned off and it will automatically turn on if positioned at an angle of 135° or larger. Do not direct the edge light at the camera for a long time to void camera damage.
- The automatic light adjustment can be enabled via AnkerWork software. This feature allows the edge light to recognize the human face’s brightness level and automatically adjust its brightness.
- You can manually adjust brightness and color temperature via AnkerWork software.
Using AnkerWork Software
Download the AnkerWork Software from
software.ankerwork.com
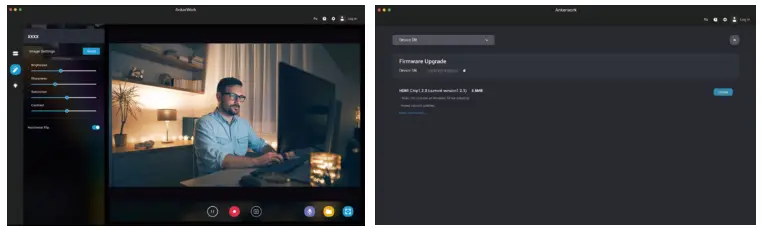
Download the AnkerWork software to check product information, change the light, image, audio, and video settings, adjust brightness and color temperature, update firmware, and more.
Firmware upgrade: You will be informed when you connect the video bar with the software if a new version of firmware is available. Ensure the video bar remains connected o your computer until the firmware upgrade is completed. During the upgrade, avoid any operation and ensure access to the internet.
Specifications
Specifications are subject to change without notice.
| Input | 5V |
| Resolution | 2K@30fps; 1080P@30fps; 720P@30fps; 320×240@30fps |
| Field of View (FOV) | 65° – 95° |
| Focus Type | Automatic focus |
| Sensor | 5 MP CMOS (1 / 2.7 in.) |
| Focus Distance | 15 cm to 3 m |
| Maximum Video Frame Rate | Up to 30fps in 2 K |
| Video Codec | H.264, MJPEG, YUV |
| Microphone | 4-mic array |
| Speaker | 2 x 2W |
| Voice Pickup Distance | 3 m |
| Voice Algorithm | AGC (Auto Gain Control), AEC (Acoustic Echo Cancellation), ANC (Auto Noise Cancellation) |
| Color Temperature Range | 2,900 K – 6,200 K |
| Supported Operating Systems or Software | Windows® 7 or later *; macOS® 10.11 or later; Skype for Business; Zoom; Google Meet; blue jeans; Cisco Webex; WeChat; Microsoft Teams; OBS *For best results, Windows® 10 or later s recommended. |


