![]()
25M Gas Controls
25M Type Appliance, Manifold, Quiet-Type and Second Stage
INSTALLATION INSTRUCTIONS
Operator: Save these instructions for future use!
FAILURE TO READ AND FOLLOW ALL INSTRUCTIONS CAREFULLY BEFORE INSTALLING OR OPERATING THIS CONTROL COULD CAUSE PERSONAL INJURY AND/OR PROPERTY DAMAGE.
DESCRIPTION
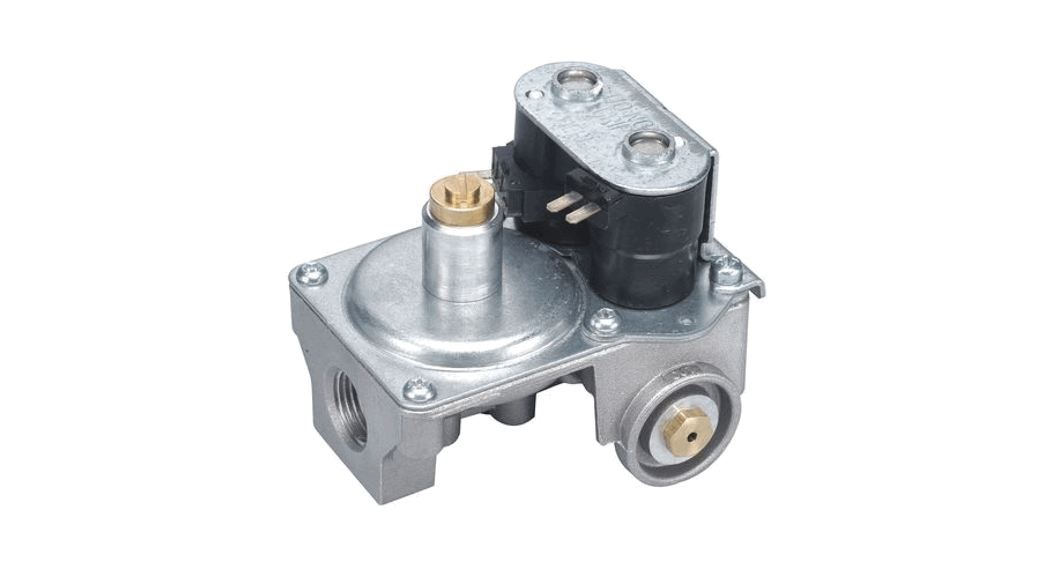
The 25M series gas control is a compact, multifunctional valve, with a direct-acting regulator ideal for use in pilot valve applications, thru-the-wall heaters, RV heaters, gas clothes dryers, hearth products, radiant heat systems, water heaters, cooking applications, agricultural heaters/ dryers, or other high-efficiency equipment. The 25M valve, provided with a straight inlet, has various outlet configurations that, when coupled with the various pipe sizes available, make for easy adaptation to a given application. Optional features, such as the inlet pressure tap, increase the flexibility in adapting this valve. Available configurations include:
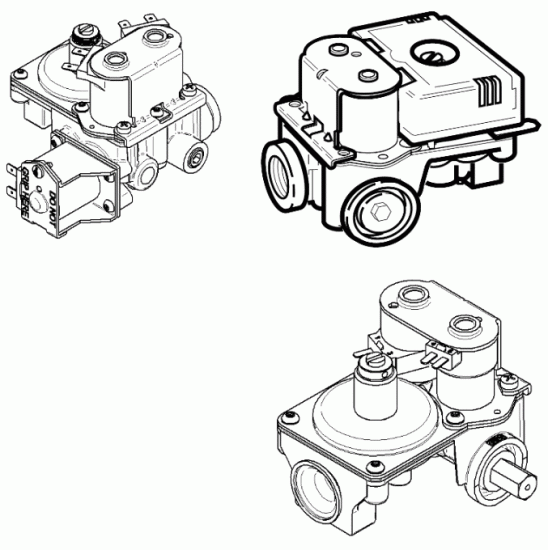
- Appliance (Series valve is a combination gas pressure regulator and dual automatic gas valve. These valves are designed for use on gas clothes dryers.)
- Manifold (The manifold type 25M series valve is a combination gas pressure regulator and redundant automatic gas valve. Two-Stage version (for applications requiring both high-fire and low-fire settings)
- Quiet-Type (series manifold gas valve is typically a combination of the gas pressure regulator and dual automatic gas valve suitable for applications requiring EN approval.)
SPECIFICATIONS
| Specifications | |
| Type of Gas | Natural Gas or LP Gas |
| Pressure Regulator Setting | Nat. Gas – 2.5″ to 5.4″ W.C. |
| LP Gas – 8.5″to 12″ W.C. | |
| Range of Regulations | Nat. Gas – 5,000 to 65,000 BTU/hr |
| LP Gas – 8,000 to 104,000 BTU/hr | |
| General Ratings | |
| Functions incorporated into the control | Two shut-off valves and a regulator |
| Gas families | 2nd and 3rd Family (conversion kit required) |
| Permissible mounting attitude(s) | Horizontal ± 90° or vertical. Not upside down. |
| Operating temperature range | 0°C to 80°C |
| Maximum working pressure | 50 mbar |
| Inlet connection type & size | Female NPT or Rp in 3/8″ or 1/8″ sizes |
| Outlet connection type & size | Female NPT or Rp 3/8″ or 1/8″ sizes |
| Governor Ratings | |
| Class of governor | Class C |
| Inlet pressure range | 6 to 50 mbar |
| Outlet pressure range | 6 to 11 mbar |
| Rated flow range | 0.76 m3/h (DP = 2.5mbar) |
| Automatic Shut-off Valve Ratings | |
| Class of valve | Class B + Class B |
| Rated voltage of valve | 12V DC, 24V DC, 24V A |
| Opening time | < 1sec |
| Closing time | < 1sec |
MODEL DESCRIPTION
| Family | Description | Voltage | Current | Ambient Temperature Application | Inlet Connection | Outlet Connection |
| 25M05V | Two-Stage Manifold | 12 DC | 0.73 mA | (-40°F to 175°F) | 3/8” NPT female | 3/8” BSP female |
| 25M01A | Appliance | 120 60Hz | 0.07 mA | (32°F to 175°F) | 3/8” NPT female | 1/8” NPT female |
| 25M11B | Appliance except 50 mbar rating | 120 50Hz | 0.07 mA | (32°F to 175°F) | 3/8” NPT female | 1/8” NPT female |
| 25M51A | Appliance except converted for LP use | 120 60Hz | 0.07 mA | (32°F to 175°F) | 3/8” NPT female | 1/8” NPT female |
| 25M42S | Manifold Quiet-Type | 220/240 50/60 Hz | 0.06/.05 mA | (32°F to 175°F) | 3/8” BSP female | 3/8” BSP female |
| 25M02V | Manifold | 12 DC | 0.48 mA | (32°F to 175°F) | 3/8” BSP female or 3/8” NPT female | 3/8” BSP female |
| 25M12 | Manifold | 24 50/60 Hz | 0.070/.060 mA | (-40°F to 175°F) | 3/8” BSP female or 3/8” NPT female | 3/8” BSP female |
| 25M42M | Manifold Quiet-Type | 220/240 DC | 0.06/.05 mA | (32°F to 175°F) | 3/8” BSP female or 3/8” NPT female | 3/8” BSP female |
| 25M51B | Appliance except converted for LP use | 120 50Hz | 0.07 mA | (32°F to 175 °F) | 3/8” NPT female | 1/8” NPT female |
PRECAUTIONS
DO NOT BEGIN INSTALLATION UNTIL YOU READ THE
FOLLOWING PRECAUTIONS.
  | If you do not follow these instructions exactly, a fire or explosion may the result, causing property damage, personal injury, or loss of life. |
| 1. Failure to turn off the electric or main gas supply to the clothes dryer could cause personal injury and/or property damage by shock, gas suffocation, fire, and/or explosion. 2. Do not use this control on circuits exceeding specified voltage. Higher voltage will damage the control and may cause shock or fire hazards. | 3. NEVER USE FLAME OR ANY KIND OF SPARK TO CHECK FOR GAS LEAKS–COULD CAUSE FIRE AND/OR EXPLOSION. 4. Do not use a control set for natural gas with LP gas, or control set for LP gas with natural gas. Personal injury and/or property damage, gas suffocation, fire, and/or explosion may result. |
| 1. Do not short out terminals on gas valve or primary control to test. Short or incorrect wiring can cause equipment damage, property damage, and/or personal injury. | 2. This control is not intended for use in locations where it may come in direct contact with water. Suitable protection must be provided to shield the control from exposure to water (dripping, spraying, rain, etc.). |
INSTALLATION
- Before attempting to service the device, unplug the power cord, turn off the main gas supply, and consult the device manufacturer’s instructions for accessing the gas valve.
- Disconnect the gas line from the device.
- Remove the access panel if is need as the manufacturer’s instructions indicate.
- The gas valve/burner assembly should now be visible.
- Disconnect the wiring harness from the gas valve. If the gas valve is not using fitting and orifice
- Remove screw(s) fastening the mounting bracket.
- Remove the gas inlet pipe as the Manufacturer’s instructions indicate.
- The gas valve should now be free to slide out of the burner and off of the mounting bracket. Take care not to disturb the air shutter.
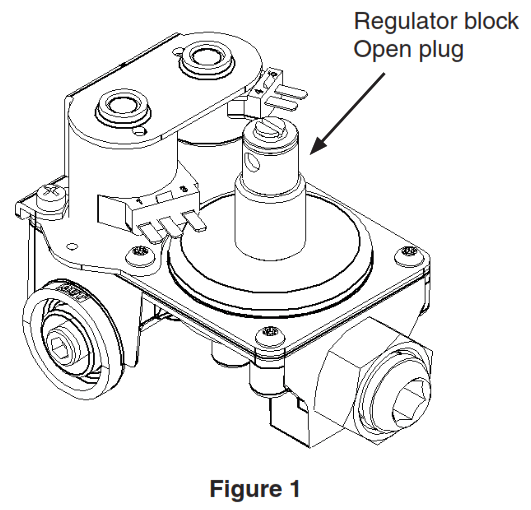
 If the gas valve is not using fitting and orifice screw go to step 15. (see figure 1)
- Remove inlet fitting from old gas valve and set it aside.
Take care not to damage the sealing surfaces. This part could be reused (if is need it). - Clean the threads of the inlet fitting. Apply pipe sealant (approved for all gases) to the threads. Install the fitting into the inlet of the new valve and tighten to 200 lbs-in (16.6 left) using a 3/8 inch hex head wrench (if it is needed).
- Remove orifice screw from old gas valve and set it aside. Take care not to damage the sealing surfaces. This part will be reused.
- Inspect the threads of the orifice screw and clean if necessary.
- Inspect the orifice hole and remove any foreign material. Install orifice screw into the new valve and tighten to 40 lbs-in. Do not use any pipe sealant.
- Slide the outlet boss of the new valve into the burner. Take care not to disturb the air shutter.
- Fasten the gas valve to the mounting bracket using the screw(s) removed earlier.
- Connect the gas inlet pipe to the inlet fitting by threading
the union together and tightening to 150 lbs-in (12.5 lbf-ft). - Reconnect the wiring harness to the gas valve.
- Apply pipe sealant to the threads of the inlet gas pipe and reconnect the gas line to the device.
- Turn on the gas supply and check for leaks.
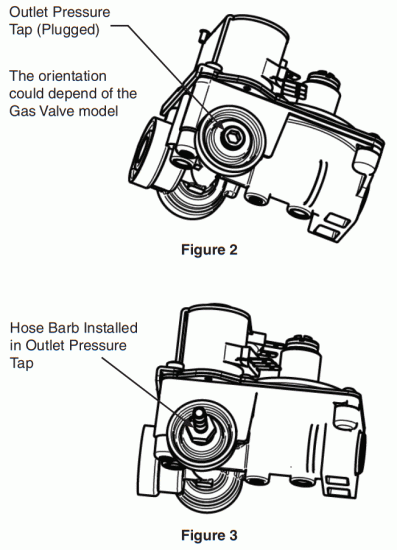
- Remove the outlet pressure tap from the gas valve (see figure 2). Apply pipe sealant to the 1/8-inch NPT threads of a hose barb. Install the hose barb into the outlet pressure tap and tighten it to 40 lbs in (see figure 3).
- Connect a manometer to the hose barb. The manometer should be capable of measuring pressure from 2.5″ WC up to 14.0″ WC.
- Plug the dryer power cord into an electrical socket.
- Energize device and verify ignition. Also, observe the reading on the manometer. It should read the same outlet pressure as stated on the rating plate on the old gas valve. If it does not, see the section on Pressure Regulator Adjustment.
- De-energize the dryer.
- Remove the hose barb.
- Apply pipe sealant to the 1/8 inch NPT used hex pipe plug. Install the 1/8 inch NPT hex pipe plug into the outlet pressure tap and tighten 40 lbf-in. (Could find BSP thread depending on the model)
- Check for leaks.
- Reinstall the cover of the device if it is needed.
ADJUSTMENT
PRESSURE REGULATOR ADJUSTMENT
This control was shipped from the factory with the regulator set as specified on the control label. Consult the appliance rating plate to ensure burner manifold pressure is as specified. If outlet pressure adjustment is required, follow these steps.
NOTE
If a valve has been factory-adjusted for the 2.5 to 5 inches W.C. range, it cannot be field-adjusted outside that range. This is also true for valves adjusted to the 7.0 to 12 inches W.C. range for LP gas.
![]() If your valve has a regulator blocked open (see figure 1) it is a non-regulable valve.
If your valve has a regulator blocked open (see figure 1) it is a non-regulable valve.
- Unplug the dryer power cord.
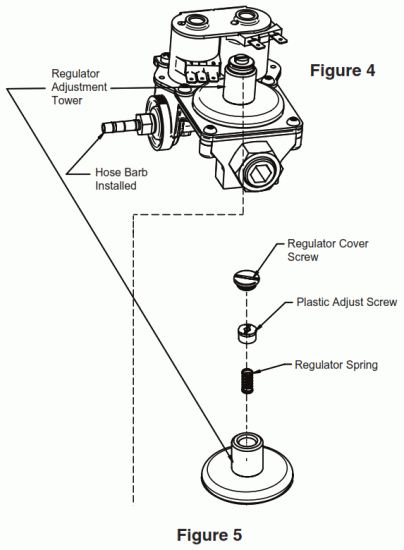
- Attach a hose and manometer to the hose barb in the tap of the valve (see figure 4).
- Turn on system power and energize the valve.
- Remove the regulator cover screw and turn the regulator to adjust the screw clockwise (
 ) to increase pressure, or counterclockwise (
 ) to decrease the pressure (see figure 5). Always adjust the regulator to provide the correct pressure according to the original equipment manufacturer’s specifications listed on the appliance rating plate.
 - Replace the regulator cover screw and tighten it securely.
- Turn off all electrical power to the system.
- Remove manometer hose from outlet pressure hose barb.
- Remove hose barb and replace the plug. Use pipe sealant.

- Plug-in power cord.
- Using a leak detection solution, check for leaks at the pressure boss screw. Bubbles forming indicate a leak. SHUT OFF GAS AND FIX ALL LEAKS IMMEDIATELY.
LIGHTING INSTRUCTIONS
FOR YOUR SAFETY READ BEFORE OPERATING
| If you do not follow these instructions exactly, a fire or explosion may result in causing property damage, personal injury, or loss of life. |
A. This appliance does not have a pilot. It is equipped with an ignition device that automatically lights the burner. Do not try to light the burner by hand. B. BEFORE OPERATING smell all around the appliance area for gas. Be sure to smell next to the floor because some gas is heavier than air and will settle on the floor.
FOR YOUR SAFETY “WHAT TO DO IF YOU SMELL GAS”
- Do not try to light any appliance.
- Do not touch any electrical switch; do not use any phone in your building.
- Immediately call your gas supplier from a neighbor’s phone. Follow the gas supplier’s instructions.
- If you cannot reach your gas supplier, call the fire department.
C. Do not use this appliance if any part has been underwater. Immediately call a qualified service technician to inspect the appliance and to replace any part of the control system and any gas control which has been underwater.
TO TURN OFF GAS TO APPLIANCE
- Unplug the power cord to the appliance.
- Slide devise away from the wall.
- Close the manual shut-off valve for the device, if none is present, shut off gas supply line where it enters the building.
Supplier Declaration of Conformity (DoC)
8100 West Florissant Ave.
![]()
PO Box 36922
St. Louis, Missouri, 63136, USA
Declared under our sole responsibility for the equipment:
Multi-Functional Control (Fitting)
 2797
2797
Model Designation | ||||||
| 25M42S-020 | 25M51B-101 | 25M01A146 | 25M11B149 | 25M11B146 | 25M01A149 | 25M01A157 |
| 25M51A102 | 25M42M-006 | 25M42S-013 | 25M05V-501 | 25M02V-1 | 25M02V-2 | 25M02V-3 |
| 25M05V-706 | 25M12-712 | 25M12-713 | 25M12-714 | 25M12-715 | 25M12-751 | 25M42M-002 |
Certificate Numbers:
CE 686924 (type examination), valid until 2028-06-20
CE 594168 (production surveillance)
Is conformal to the following directives and standards:
BS EN126: 2012 Multifunctional controls for gas burning appliances
BS EN13611:2007 +A2: 2011 Group 1 or Group 2 device
Essential requirements of the Gas Appliances Regulation 2016/426 and are manufactured in accordance with the harmonized European standards.
Notifying Body:
BSI Group, The Netherlands B.V., number 2797
I hereby declare that the equipment named above has been designed to comply with the relevant sections of the above
referenced standards and meets all essential requirements of the specified directives:
Signed:![]()
Steve DeRousse, Labs and Agency Coordinator
Manufacturing Location: Termotec de Chihuahua, Calle Pelicano No. 5500, Colonia Arboledas,
Chihuahua, Chihuahua, 31110, Mexico
NOTES
TECHNICAL SUPPORT: 1-888-725-9797
Emerson and White-Rodgers are
trademarks of Emerson Electric Co.
©2021 Emerson Electric Co.
All rights reserved.
![]()
![]()


![Amana Gas Dryer [w11361424a, W11361425a-sp] User Manual](https://static-data1.manualsee.com/1/img/460/16337/2020/12/Amana-Gas-Dryer.png "Amana Gas Dryer [w11361424a, W11361425a-sp] User Manual")
