
 ProofVision RS232 Aire Plus 43-Inch Outdoor TV
  Safety Information
 Safety Information
IMPORTANT SAFETY INSTRUCTIONS
- Read these instructions.
- Keep these instructions.
- Heed all warnings.
- Follow all instructions.
- Do not use this apparatus near water.
- Clean only with dry cloth.
- Do not block any ventilation openings. Install in accordance with the manufacturer’s instructions.
- Do not install near any heat sources such as radiators, heat registers, stoves, or other apparatus (including amplifiers) that produce heat.
- Do not defeat the safety purpose of the polarized or grounding plug. A polarized plug has two blades one wider than the other. A grounding plug has two blades and a third grounding prong. The wide blade or the third prong is provided for your safety. If the provided plug does
- not fit into your outlet, consult an electrician for the replacement of the obsolete outlet.
- Protect the power cord from being walked on or pinched particularly at the plugs, convenience receptacles, and at the point where they exit from the apparatus. Only use attachments/accessories specified by the manufacturer.
- Use only with the cart, stand, tripod, bracket, or table specified by the manufacturer, or sold with the apparatus. When a cart or rack is used, use caution when moving the cart/apparatus combination to avoid injury from tip-over.
- Unplug the apparatus during lightning storms or when unused for long periods of time.

- Refer all servicing to qualified personnel. Servicing is required when the apparatus has been damaged in any way, such as a power supply cord or plug is damaged, liquid has been spilled or objects have fallen into the apparatus has been exposed to rain or moisture, do not operate normally, or has been dropped.
 CAUTION: These servicing instructions are for use by qualified service personnel only. To reduce the risk of electric shock, do not perform any servicing other than that contained in the operating instructions unless you are qualified to do so.
WARNING: To reduce the risk of fire or electric shock, do not expose this apparatus to rain or moisture. The apparatus shall not be exposed to dripping or splashing and objects filled with liquids, such as vases, shall not be placed on the apparatus.
WARNING: The mains plug is used as a disconnect device, the disconnect device shall remain readily operable.- This lightning flash with an arrowhead symbol within an equilateral triangle is intended to alert the user to the presence of non-insulated “dangerous voltage” within the product’s enclosure that may be of sufficient magnitude to constitute a risk of electric shock.
- Warning: To reduce the risk of electric shock, do not remove cover (or back) as there are no user-serviceable parts inside. Refer servicing to qualified personnel.
- The exclamation point within an equilateral triangle is intended to alert the user to the presence of important operating and maintenance instructions in the literature accompanying the appliance.

 CAUTION: These servicing instructions are for use by qualified service personnel only. To reduce the risk of electric shock, do not perform any servicing other than that contained in the operating instructions unless you are qualified to do so.
Apparatus with class I construction shall be connected to a mains socket outlet with a protective earthing connection.
TV Specification
1500cd/m2 PV43AP-232
| Screen size | 43″ |
| Display Type | TFT LED |
| Resolution | 3840 X 2160 |
| Aspect Ratio | 16:9 |
| Alimentation | AC 100-240V 50/60Hz |
| Audio Output | L/R40WX2 |
| Dimensions(With stand) | 996.8 x 584.4 x 93.5MM
|
PVSSAP-232
| Screen size | 55″ |
| Display Type | TFTLED |
| Resolution | 3840 X 2160 |
| Aspect Ratio | 16:9 |
| Alimentation | AC 100-240V 50/60Hz |
| Audio Output | L/R40WX2 |
| Dimensions(With stand) | 1264.6 x 735.4 x 93.5MM |
PV65AP-232
| Screen size | 65″ |
| Display Type | TFT LED |
| Resolution | 3840 X 2160 |
| Aspect Ratio | 16:9 |
| Alimentation | AC 100-240V 50/60Hz |
| Audio Output | L/R40WX2 |
| Dimensions(With stand) | 1502.9 x 879.9 x 131.6MM |
1500cd/m2 PV75AP-232
| Screen size | 75″ |
| Display Type | TFT LED |
| Resolution | 3840 X 2160 |
| Aspect Ratio | 16:9 |
| Alimentation | AC 100-240V 50/60Hz |
| Audio Output | L/ R 40W X 2 |
| Dimensions(With stand) | 1726.1 x 1004.3x 131.6MM |
700cd/m2 PV43LP-232
| Screen size | 43″ |
| Display Type | TFT LED |
| Resolution | 3840 X 2160 |
| Aspect Ratio | 16:9 |
| Alimentation | AC 100-240V 50/60Hz |
| Audio Output | L/ R 40W X 2 |
| Dimensions(With stand) | 996.8 x 584.4 x 93.5MM |
Note:
Design and specification modifications maybe made at any time without prior notice, all data and dimensions are approximations.
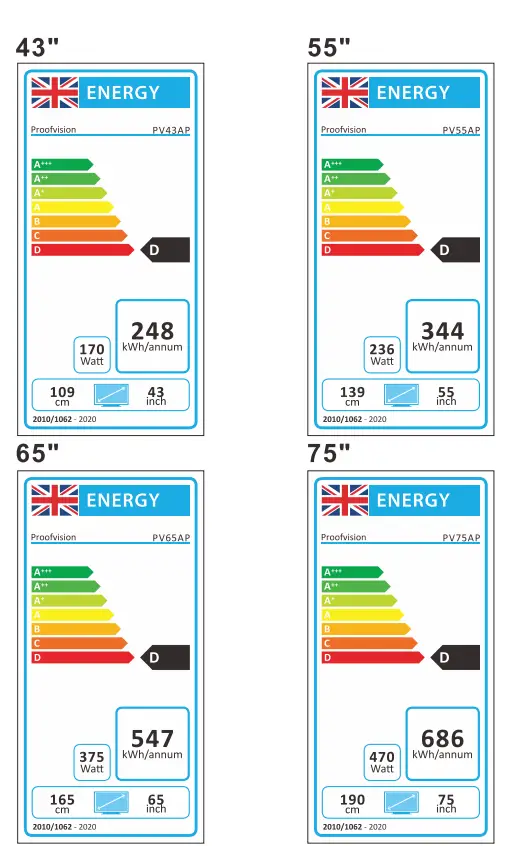
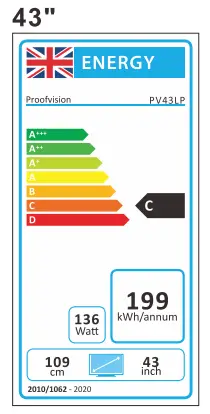
Products Fiche
| Model No | Energy label | Screen mm/inch | On-Mode power consumption (Max) | Annual energy consumption | Standby power consumption |
| PV43AP-232 | D | 109/43 | 170W | 248KWH | 0.5W |
| PV55AP-232 | D | 139/55 | 236W | 344KWH | 0.5W |
| PV65AP-232 | D | 165/65 | 375W | 547KWH | 0.5W |
| PV75AP-232 | D | 190/75 | 470W | 686KWH | 0.5W |
| PV43LP-232 | C | 109/43 | 136W | 199KWH | 0.5W |
Installation 
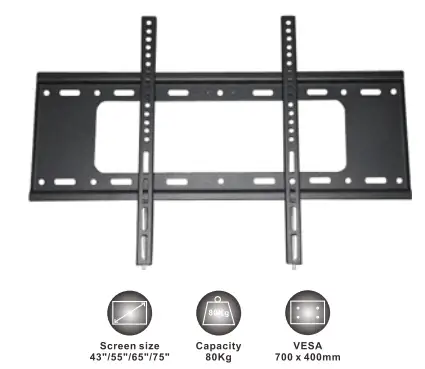
Warning – Please read before installation Your LED TV is able to accommodate wall mounting with the use of a wall mount bracket (Not supplied with LED TV, please contact your local hardware store) and the mounting holes on the back of the unit. Please thoroughly read instructions before attempting installation The only suitable for the 43″-75″0utdoorTVs. We advise that 2 people install the screen due to the heavy load of the screens.
Please be sure the mounting surface is strong enough to hold the weight of the screen.
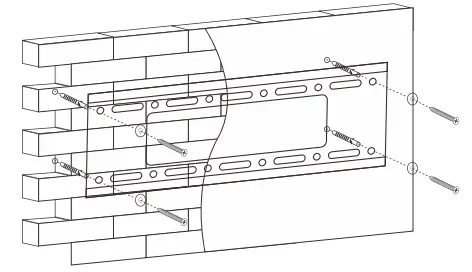
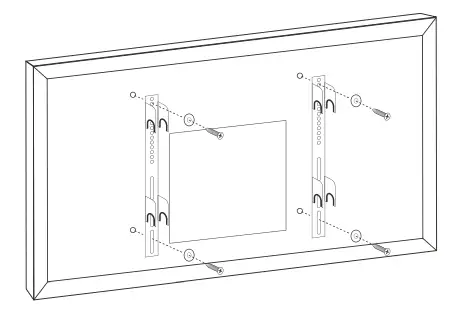
- Step1-Mounting Bracket to Wall
Attach back plate to wall using supplied screws.
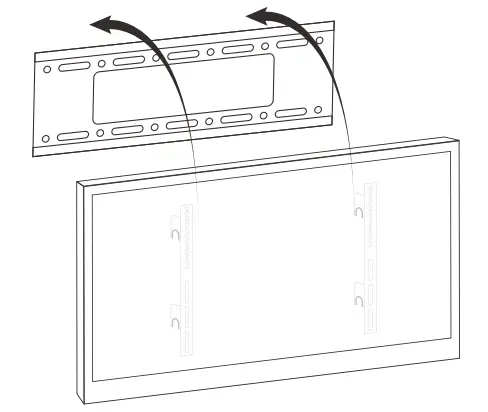
- Step2-Mounting Hooksto TV
Remove 4 x screws from back of the TV, line hooks up with the holes and attach hooks to back of TV using theses crews.
- Step3-Mounting TV to Bracket
Mount TV to wall bracket by lining up hooks with the poles and then lock in to place.
Overview of back panel
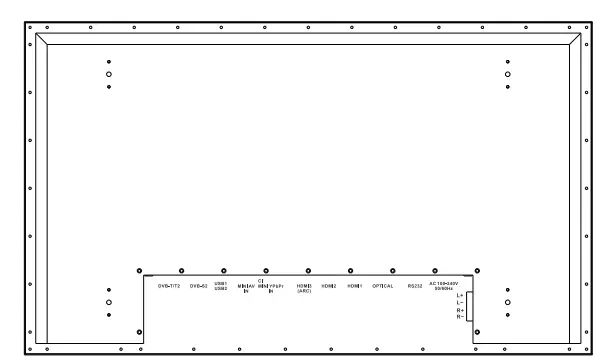
- DVB- T2
Connected to external antenna to receive the ATV/DTV program in ATV/DTV mode. - DVB-S2
Connected to external SATELLITE to receive. - USB 1/2
Connect media stick for content. - Cl SLOT
Use to insert the Cl card. - MINIAVIN
Connecting for VIDEO signal input in Composite mode. - MINI YPbPr IN
Connecting for the Y/Pb/Pr Input in Component mode. - HDMl3
Connect for HDMI. - HDMl2
Connect for HDMI. - HDMl1
Connect for HDMI. - OPTICAL
Connect for OPTICAL. - RS232
Connect for RS232. - AC 100-240V 50/60Hz
- AUDIO OUT
Speaker terminals then connect to pair of passive speakers.
Accessories
Please make sure the following items are included with your LED TV. If any items are missing, contact your dealer.
- Remote Control

- Owner’s Instructions

- Battery (CR2032)

- Mains lead

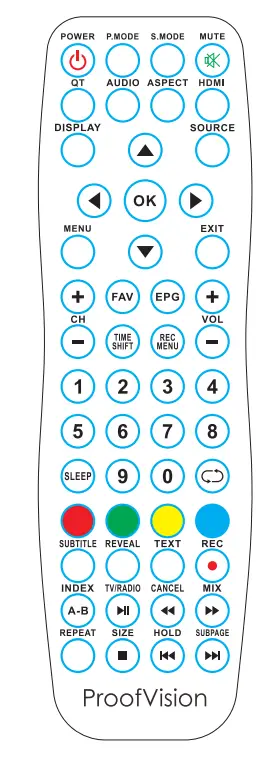


Remote Control Unit
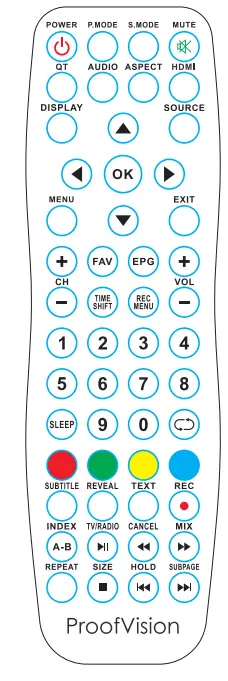
| No. | Button | Description |
| 1 | POWER | Set your TV to power on or standby mode. |
| 2 | P. M ODE | Select the picture mode. |
| 3 | S.MODE | Select the sound mode. |
| 4 | MUTE | Pre ss to mute the sound. Press again to regain sound. |
| 5 | QT | Quick Tune. Quick TV Channel Autotune Button. |
| 6 | AUDIO | Press to display the language of the audio in DTV. |
| 7 | ASPECT | Press this button to select the aspect of screen. |
| 8 | HDMI | Press this button to select the HDMI. |
| 9 | DISPLAY | Press this button to display the information on current input. |
| 10 | SOURCE | Press this button to display the input source. |
| 11 | MENU | Allows you to navigate on the screen menus (OSD). |
| 12 | EXIT | Exit from the current menu or sub-menu. Press twice to enter HOME. |
| 13 | ◄ ► …… | Allows you to navigate the on-screen menus and adjust the system settings to your preference. |
| 14 | FAV | Selects favorite channels. |
| 15 | EPG | Press to display EPG (Electronic Program information). |
| 16 | TIME SHIFT | Press to switch to TIME SHIFT mode. |
| 17 | REC.MENU | Press to switch to REC.MENU immediately (DTV only). |
| 18 | CH+/- | Press these two buttons to change channels up/ down. |
| 19 | VOL+/- | Press these two buttons to increase/decrease the volume. |
| 20 | 0-9 | Press 0-9 to select a TV channel directly. Thechannel will change after 2 second s. Applicable for enter page number in TELETEXT mode. |
| 21 | SLEEP | Set the time for the TVto turn off automatically. |
| 22 | C:) | Return to the previously viewed program. |
| 23 | R (DELETE) | Delete function butt on. |
| 24 | G (RENAME) | Rename function button. |
| 25 | Y (MOVE) | Move function butt on. |
| 26 | B (SKIP) | Skip function button. Open and close the mouse. |
| 27 | SUBTITLE | Press to select the subtitle language. |
| 28 | REVEAL | Shows hidden words or pages by Teletext. |
| 29 | TEXT | Switch on/off of Teletext window. |
| 30 | REC/ e | Press to record the program immediately. |
| 31 | INDEX | Returns to Index page by Teletext. |
| 32 | CANCEL | Switches the Teletext window to the background; only the current page is not visible. |
| 33 | MIX | Sets the transparency of Teletext win dow. |
| 34 | REPEAT | DVD : Repeat mode selection. |
| 35 | SIZE | Zoom In or Out of the Teletext window. |
| 36 | HOLD | Holds on the current Teletext page. |
| 37 | SUBPAGE | Displays a subpage of upper Teletext options. |
Installation Guide
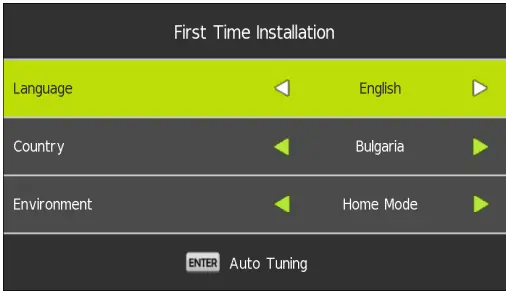
- Step 1: “Language” Press the [LEFT]/[RIGHT] key to change the language.
- Step 2: “Country” Press [LEFT]/[RIGHT] key to change the country.
- Step 3: “Environment” Press [LEFT]/[RIGHT] key to change the environment.
- Step 4: Press the [OK]/[ENTER] key to go to the Tuning Setup menu.

Main Menu 
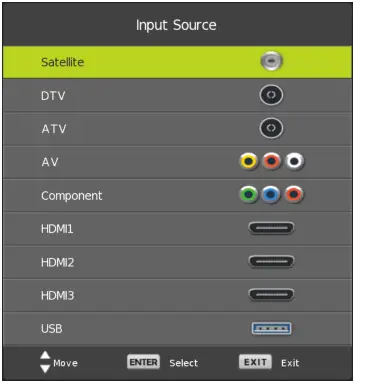
Press [SOURCE]to display the input source list.
Press [UP]/[DOWN] to highlight the input source and press [OK]/[ENTER] to confirm.
Press[EXIT]to hide the On-Screen menu. (The way to set the disappeared time: MENU – TIME Menu – OSD Timer)
CHANNEL
Press the [MENU] key to show main menu, Press [LEFT]/[RIGHT] to choose these functions.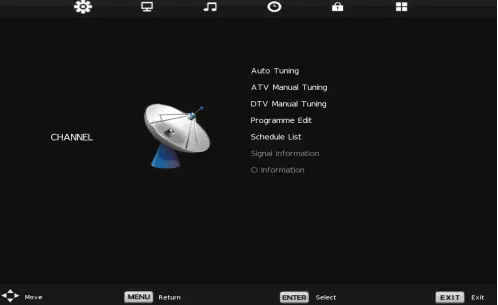 Auto Tuning
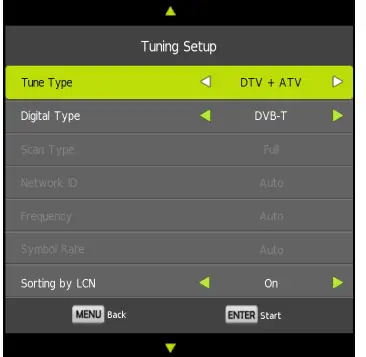
Under the Auto Tuning of CHANNEL menu, Press [RIGHT]/[OK]/[ENTER] key to enter Auto Tuning, the following prompt box will appear: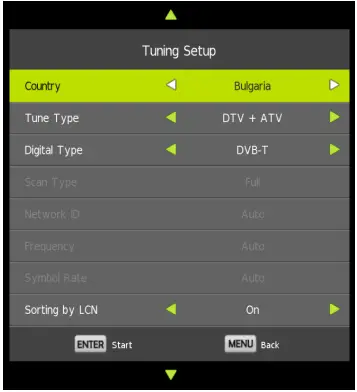 Press [OK]/[ENTER] key to enter TV auto searching.
 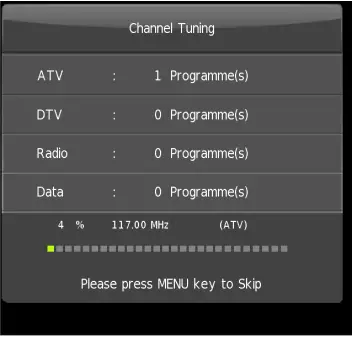 When search ATV+DTV, if you want to skip ATV and directly enter DTV, press [MENU] to enter the menu as follows:
 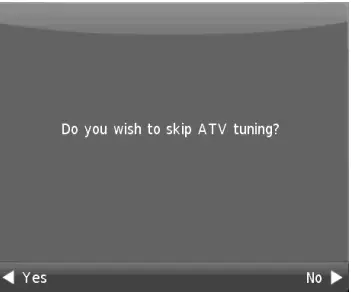 Press [LEFT]/[RIGHT] key to select Yes/No, “Yes” is to skip the ATV searching and enter DTV searching. When searching, if you want to directly exit from searching, press [EXIT]to exit tuning.
Auto Tuning of Satellite
Under the Auto Tuning of CHANNEL menu, Press [RIGHT]/[OK]/[ENTER] key to enter Auto Tuning, the following prompt box will appear :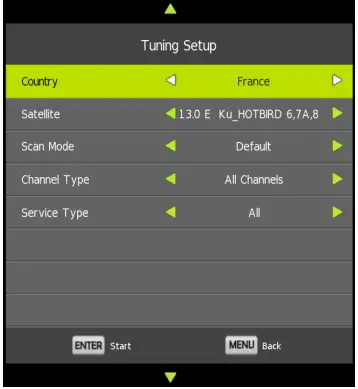 Press [OK]/[ENTER] key to enter Satellite auto searching.
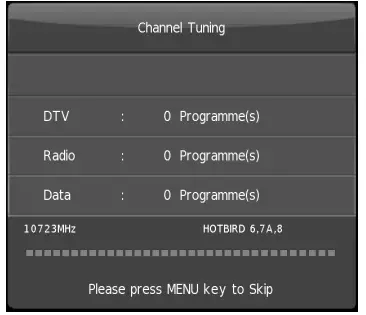 DTV Manual Tuning
Press [LEFT]/[RIGHT] to adjust channels, when there is signal, press [OK]/[ENTER] then begin DTV searching. 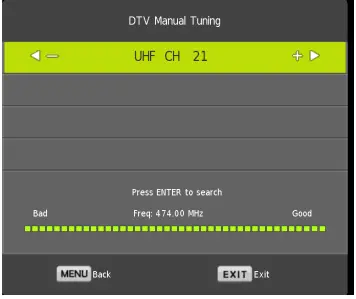
ATV Manual Tuning 
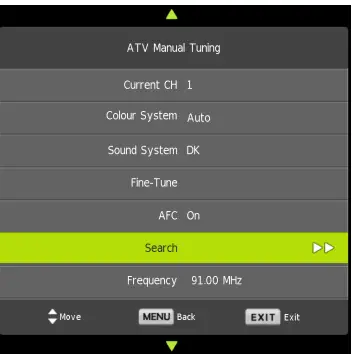
- Current CH
1 -99. - Color System
It will be dealt with according to the country you select. - Sound System
It will be dealt with according to the country you select. - Search
Press the [LEFT]/[RIGHT] key to search, it can have cycle searching in full frequency range. - Fine-Tune
Fine-tuning. - Frequency
Show current frequency point, the value will change according to Search or FineTune.
Program Edit 
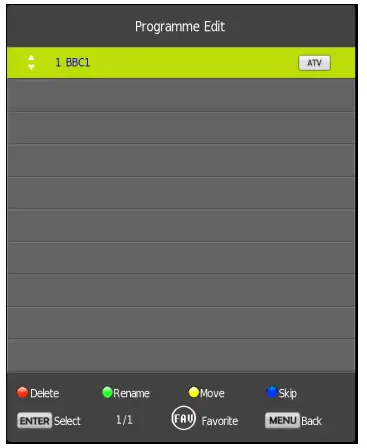
Channel edit function includes -Delete/Move/Rename/Skip/Fav. “Fav/Skip” mark will appear only after the users have some setting on the channel(Fav and Ship can’t be set together).
Delete: Press [RED] key to cancel the program that the cursor is in.
Move: Move function can be used under a non-LCN program. Press the [YELLOW] key, according to the prompt, execute MOVE function, move the program order.
Skip: Press the [BLUE] key, the program the cursor is will be marked with SKIP. When execute CH+/CH-, skip this program, and this program can’t be selected even press the number key.
Rename: Rename function only appear and can be used under ATV program. Press [GREEN] key under ATV, the program can be renamed.
Favorite: Press [FAV] key, mark the program the cursor is in as favorite program.
Dish Setup(Only show in Satellite source)
Select the “Dish Setup” item to enter the satellite system setting menu and the user operation interface as follows.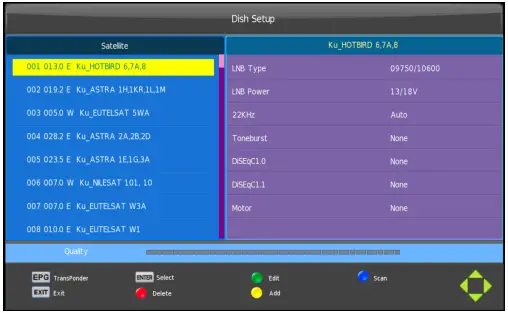 Satellite edit menu
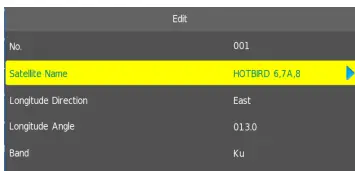
- Satellite Name
Enter Satellite Rename edit menu. - Longitude Direction
East, West. - Longitude Angle
Press the number key to set the Angle. - Band
C, Ku band choose.
Satellite Search menu 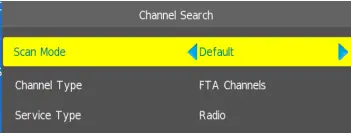
- Option
Value. - Scan Mode
Default,Network Search,Blind Search. - Channel Type
All channels,FTA channels. - Service Type
All ,DTV,Radio.
Transponder Add menu
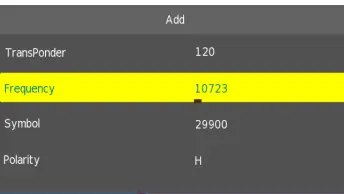
- Transponder
Can’t edit. Auto addition. - Frequency
Press number key to edit. - Symbol(ks/s)
Press number key to edit. - Polarity
H,V.
Transponder Edit menu 
- Transponder
Current Edit Item. Auto select. - Frequency
Press number key to edit. - Symbol(ks/s)
Press number key to edit. - Polarity
H,V.
Setting
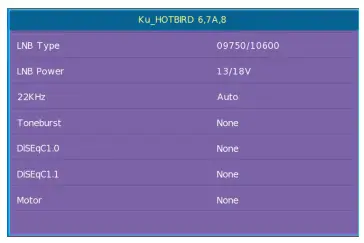
- LNB Type
9750/10600,9750/10750,05150,05750,5150/5750,09750, 10600, 10750, 11300, 1147 5,User Single,User Dual,Unicable. - LNB Power
13/1 BV, 13V, 18V,Off. - 22KHz
Auto,off,on. - Toneburst
None,BurstA,Burst B. - DISEqC 1.0
None,LNB1 ,LNB2,LNB3,LNB4,BurstA,Burst B. - DISEqC 1.1
None,LNB1,LNB2,LNB3,LNB4, … LNB16. - Motor
None,DisEqC1 .2,DisEqC1 .3.
Choose DISEqC 1,2&1.3 Set Limit menu 
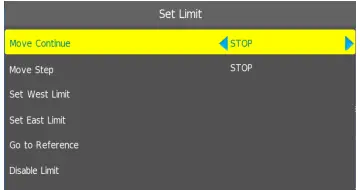
- Move Continue
Control polar axis continually moves east or west until it arrives where you want. - Move Step
Control polar axis moves east or west at a fixed-step. - Set East Limit
Set the current position as the maximum angle eastward. - Set West Limit
Set the current position as the maximum angle westward. - Goto Reference
Back to default values. - Disable Limit
Repeal the current set of limit values.
Choose DISEqC 1.3 Set Location menu
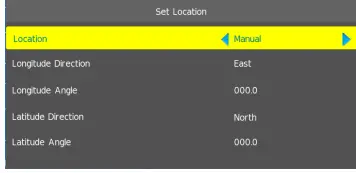
- Location
Select where the user is or is close to it, if a user is not where system default sets, choose to Manual custom setting. - Longitude Direction
Select user’s region is east or west longitude. - Longitude Angle
Select the longitude where user is, move the cursor and input corresponding data. - Latitude Direction
Select user’s region is south or north longitude. - Latitude Angle
Select latitude where the user is, move the cursor, and input corresponding data.
PICTURE 
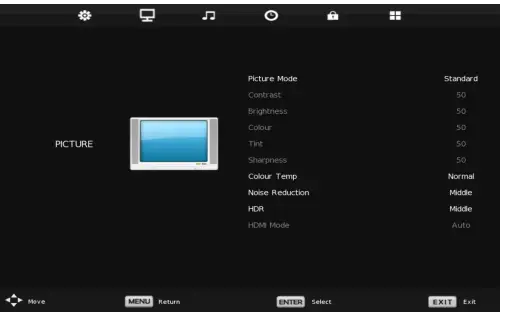
Press [MENU] to display the main menu, and press [LEFT]/[RIGHT]to select the Picture Menu.
- Picture Mode
Choose the item and Press[OK]/[ENTER]/[LEFT]/[RIGHT] to enter the sub-menu, that shows the picture mode you can choose: Dynamic/Standard/Mild/Personal. Press [P.MODE] on the remote control to select picture mode directly. - Contrast/Brightness/Color/Tint/Sharpness
These settings can be adjusted only when the Picture Mode is Personal mode. Select these function ,press [LEFT]/[RIGHT]/[OK]/[ENTER], and a process bar appears, then press [LEFT]/[RIGHT] to adjust the value.Press [MENU]to back to the picture page,press[EXIT] to exit - Contrast: Adjust the white level of the picture.
- Brightness: Adjust darkness of black sections in the picture.
- Color: Adjust the color intensity of the picture.
- Tint: Adjust the hue(Red,Green,Blue) of the picture(NTSC only).
- Sharpness: Object edges are enhanced for picture detail.
- Color Temperature
- Cool: Gives white colors a blue tint.
- Normal: Gives white colors a neutral tint .
- Warm: Gives white colors a red tint.
- Noise Reduction: (Off/Low/Middle/High).
- HDR: (Low/Middle/High).
- HDMI Mode: (Auto/Video/PC) Only work in HDMI source.
SOUND 
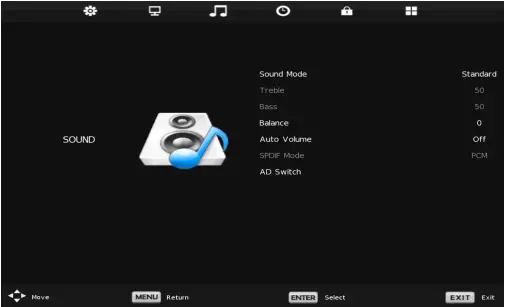
- Sound Mode: Standard/Music/Movie/Sports/Personal(Only in this mode, Treble and Bass can be adjusted.)
- Bass: Adjust the low-frequency sounds.
- Treble: Adjust the high-frequency sounds.
- Balance: Adjust the level of sound coming from the left and right speakers.
- Auto Volume: Press [LEFT]/[RIGHT] to set or cancel. When set on, it will level out the sound being heard when sudden changes in volume occur during commercial breaks or channel changes.
- SPDIF Mode: Coaxial setting.
- AD Switch: The function is for the ones who has bad eyesight. Some scenes in some code program only has action, no sound, so it adds voiceover to help the poor eyesight more convenient to watch program.
- Adjusting the Bass/Treble/Balance
2 Choose the item and press[LEFT]/[RIGHT]/[OK]/[ENTER] to display the sub-menu, then press [LEFT]/[RIGHT]to adjust the value.
TIME 
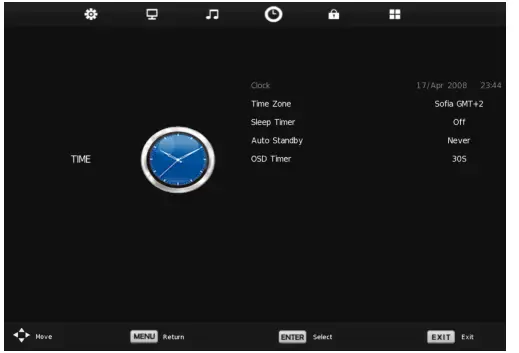
- Clock: It shows current time information. It is under hide status and can’t be selected. When there is no searching, after power on, it shows time beginning from 00: 00; after DTV searching, it shows the current code’s time information under DTV.
- Timer Zone: It is set to default according to the shipping area.
- Sleep Timer: Select the time in different minutes that you want the TV to automatically after you set the time. Cancel by setting it to Off.
- Auto Sleep: Select the time in hours(off,4H,6H,8H) that you want the TV to remain on after your last operation. Cancel by setting it to Off.
- OSD Timer: Select the time in different seconds, that you want the On-Screen Menu remains displayed after your last operation.
LOCK 
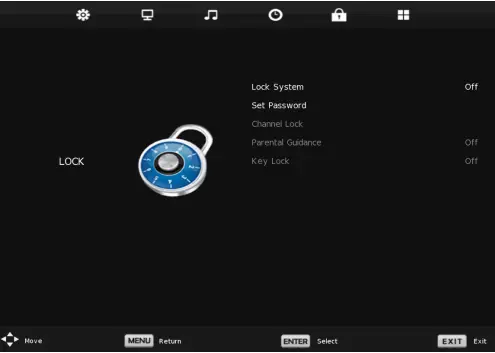
- lock system: You need to input a password to enter submenu, the password default is 0000. Set Password: Set system password.
- Channel Lock: Press [GREEN] ( LOCK) , then there is LOCK icon on this selected channel, and the channel is locked.
- Parental Guidance: Set parental guidance.
- Key Lock: Lock keypad.
OPTION 
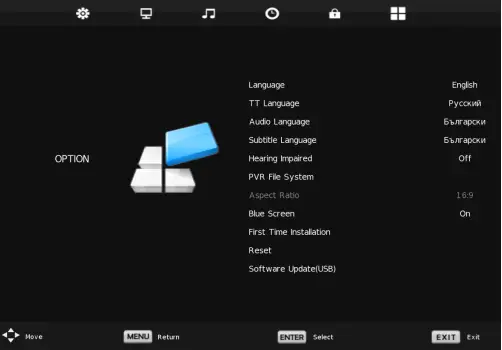
- Language: Select the language and default language according to shipping area and clients requirements.
- TT Language: TTX language option.(TV/AV only).
- Audio Languages: Audio language option.(DTV only).
- Subtitle Languages: Subtitle language option.(DTV only).
- Hearing Impaired: Display relevant subtitle content for the hearing impaired to watch.
- PVR File System: PVR menu.
- Aspect Ratio: Picture zoom mode option.
- Blue Screen: Set no signal display blue or black screen.
- First Time Installation: Go to Installation Guide.
- Reset: Reset all TV settings.
- Software Update(USB): Use USB to update the TV software.
- HDMI CEC: HDMI CEC option.
- HDMI Switch(HDMI source only): Switch the HDMI EDID.
- Environment: Choose Home Mode or Store Mode.
Press [EPG] hotkey to display the EPG menu, only effect under the DTV.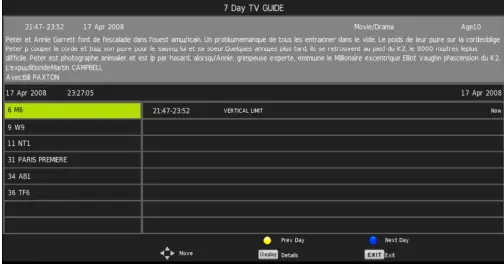
- Record: Press the [RED] button to enter the recorder menu to set.
- Remind: Press the [Green] button to enter the Reminder setting menu.
- Details: Press the [Display]/[INFO] button to display the current time or the current channel program information.
- Prev Day: Press the [Yellow] button to switch to the previous day’s programs.
- Next-Day: Press the [Blue] button to switch to the next day’s programs.
Schedule List
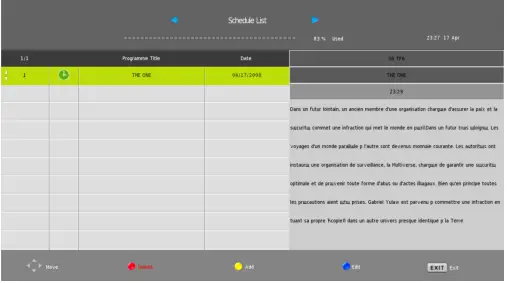
You can delete entries by the [RED] key, add entries by the [YELLOW] key, and edit by [BLUE] key.
PVR
Record
In DTV, press the [REC] button, it will display the following menu below, and start to burn the current DTV program. Press the [LEFT]/[RIGHT] button to move cursor to exercise different functions according to the hint.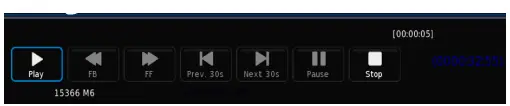 Playback
After burning the program, exit from Record, and press the [PLAY] button to implement the Playback function. The different functions can be implemented according to hint. Timeshift
In the DTVpress [Timeshift] button to implement the function of Timeshift. Press [LEFT]/[RIGHT] button to move cursor to exercise a different functions according to hint.
Media Player
In the option of Media Player on Main Menu, Press [OK]/[ENTER] to enter the Media Player menu, see the picture as follows: Press [LEFT]/[RIGHT] to select Movie, Music , Photo or Text.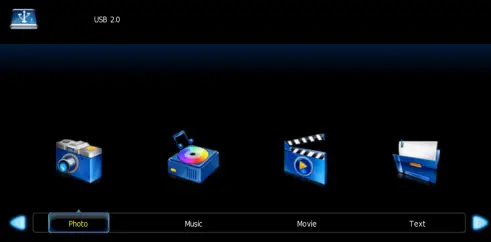
Troubleshooting
| Problem | No | Potential Cause | Solution | |
|
Power | No red standby light on TV | Power supply not receiving / giving power | Check connection between power lead and PSU – green light should be visible on PSU | |
| Standby light stuck on red | Remote not emitting signal | Try new battery in the remote | ||
| Standby light green; no picture | 8 | Power supply not receiving / giving power | Check connection between power lead and PSU _ green light should be solid on PSU | |
|
Signal / Input |
DTV – No signal | Not tuned in with channels | Auto -tune using DTV Auto-search in menu | |
|
2 |
Aerial problem | Try TV on another aerial in different location – if picks up channels , likely an issue with the location of the bathroom aerial | ||
| DTV – interference on screen | Caused by equipment around the aerial | Move aerial to different position away from any power cabling | ||
| HDMI – No signal |
2 | No signal received from the source | Check connection on TV and source | |
| USB – Media cannot be played | File format not compatible | Change file format and attempt to play | ||
|
Audio | No sound – Speakers | Mute | Try mute button on remote | |
| Sound trying to route to external speakers | Disconnect audio out/earphone port | |||
| No sound – external speakers | No signal bewteen TV and external speakers | Check audio connection at either end |
NOTE: Thank you for purchasing a ProoNision TV. Our products have been designed with over 10 years of engineering excellence and are designed of the highest quality standard in the Waterproof electronics industry. Should you encounter any problems that cannot be easily addressed within this instruction manual, please feel free to contact us on: +44(0)2034111693, or email us on [email protected].
“Provision Unit 1 Avad House Notholt UB5 5HY United Kingdom”
WEEE Compliance Scheme
Worldwide trading Ltd is a producer of Electrical and Electronic Equipment (EEE) and is therefore obligated under the Waste Electrical and Electronic Equipment (WEEE) Regulations. We are fully compliant with all responsibilities as a registered member of UK government-approved WEEE Compliance Scheme, Comply Direct. Our WEEE producer registration number is WEE/CF2743YR.
We have formally documented policies relating to the WEEE Regulations and we review our processes on a formalized and regular basis to ensure we remain fully compliant.
The UK WEEE Regulations were first introduced in 2007 with the aim of reducing the amount of EEE ending up in landfill. As per the requirements of the Regulations, we finance the recovery and recycling of WEEE when it reaches the end of its life and ensure our EEE products are marked accordingly with a crossed out wheeled bin symbol and a date mark. We also provide information on reuse and environmentally sound treatment of the products.


