
TCP Smart SMAWHTOWRAIL500W05EW Wifi Towel Radiator
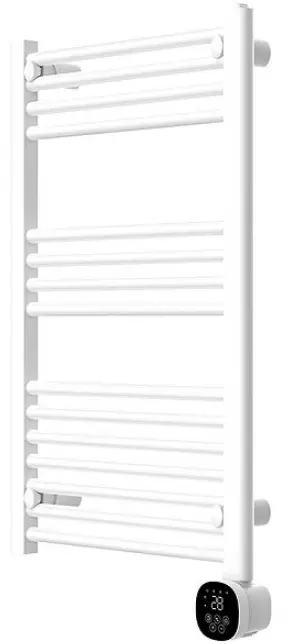
TCP Smart WiFi app-controlled towel radiator is the perfect bathroom heating solution. This advanced towel radiator comes with Smart WiFi featuring 24/7 hour programming, with Comfort and Eco mode settings. The display panel can be fitted on either left or right side to suit your bathroom layout. This product is only suitable for well insulated spaces or occasional use.
MODEL
- SMAWHTOWRAIL500W05EW
- SMABLTOWRAIL500W05EW
POWER
- AC230V
- 50-60Hz 500W Class II
IMPORTANT: These instructions are for your safety. Please read thoroughly before use and retain for future reference.
If you are in any doubt about installing this product, consult a qualified electrician.
INSTALLATION INSTRUCTIONS
This product is suitable for indoor use only. It is IP24 rated. Do not submerge unit underwater. Do not attach to surfaces which are damp, freshly painted or otherwise electrically conductive (eg metallic surfaces).
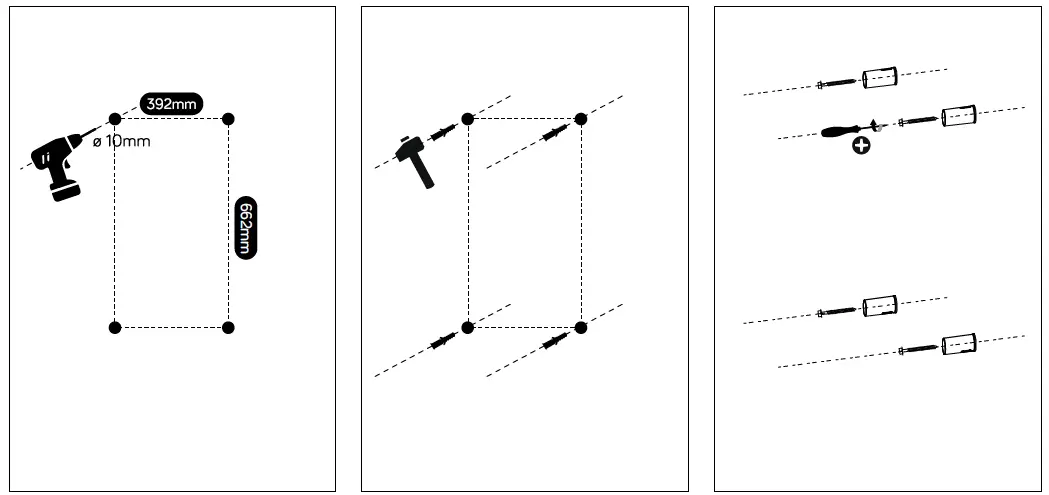
Please see above wall mounting instructions to ensure correct placement. Separate placement sheet is included in the box
- Drill holes on the wall according to the above placements.
- Warning: Be sure to keep to the distances as shown in the placement instructions.
- Fit the fasten tube in the hole and fit the bracket on the wall with screws.
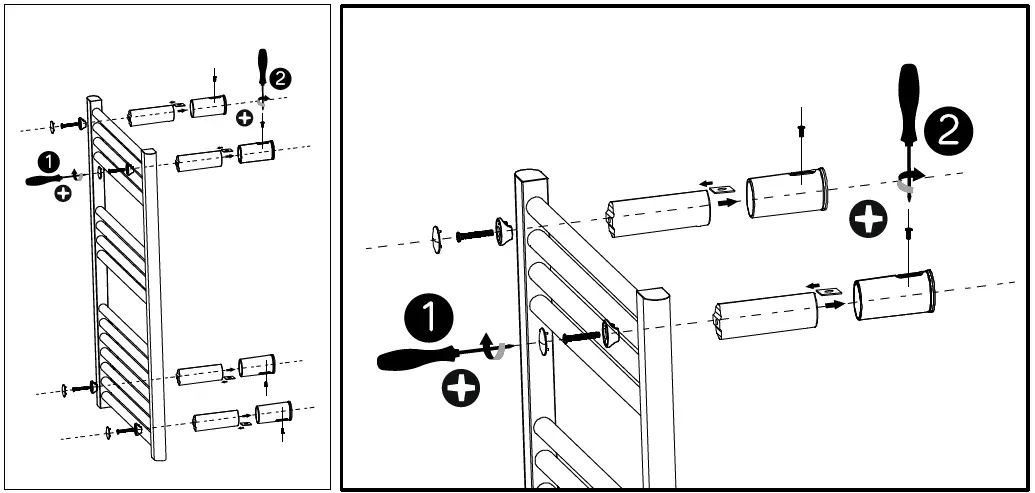
- Carefully hang the unit on the bracket, then fix the unit with the locker and screw following above picture (step 1). Then fix the screw in step 2 by turning the lock in the bracket. Finish by covering screw heads with the cover.
Warning: Before using the heater, make sure it’s mounted tightly on the wall.
LOCATION OF INSTALLATION
This product can be installed in a bathroom but only in the area designated by the IP rating – Zone 3 – see location information below.
Suitable for indoor only. This product is rated as IP24. If the product is to be installed within a bathroom it can only be located within zone 3.
Zone 0
- The area inside a bath or inside the shower. This area requires low voltage and an IP67 rating.
Zone 1
The area above the bath to a height of basin. 2.25m (7′ 4″”) from the floor. If the light is 240V then a 30m residual current device (RCD) must also be used to protect the circuit in this zone.
Zone 2
An area stretching 0.6m (1′ 11) outside the perimeter of the bath and to a height of 2.25m (7′ 4) from the floor. In addition, it is good practice to consider the area around a wash basin, within a 60cm (1′ 11″) radius of any tap to be considered as zone 2.
Zone 3
Anywhere outside Zones 0, 1, and 2 and where no noo water jet is likely to be used. If there is a likelihood of water jets being used for cleaning purposes in zones 1, 2 and 3 a fitting rated a minimum of IP65 must be used.
WIRING INSTRUCTIONS
The power supply to the towel radiator must be protected in accordance with the applicable standard by a 30mA differential Circuit-breaker, 16A rated. Before carrying out any connection tasks, cut off the power supply to the electronic regulator using the circuit-breaker or the protection fuse in the power supply circuit. This appliance does not come fitted/supplied with a fused plug. DO NOT wire/fit a plug to this appliance. Means for disconnection having a contact separation in all poles must be incorporated in the fixed wiring in accordance with the wiring rules. Connecting the power supply cable to the mains (220-240V AC) 220v – 240V +10% – 10% 50Hz monophase power supply.
Warning: you need to connect the 2 wires of the supply cable to a connection black ensuring the mains polarity is followed as below:
IMPORTANT: The wire in the mains lead are coloured in accordance with the following code:
- Blue – Neutral
- Brown – Live
The blue wire must be connected to the terminal marked with an N or coloured black. The brown wire must be connected t the terminal marked with an L or coloured red.
WARNING: Never connect live or neutral wires to the earth terminal. All fittings must be installed by a competent person in accordance with the current IEE Wiring Regulation (BS 7671). If in doubt, consult a qualified electrician.
SAFETY INSTRUCTIONS
(to be read before operating the heater).
- CAUTION: Some parts of this product can become very hot and cause burns. Particular attention has to be given where children and vulnerable people are present. Children 3 years and younger should be continually supervised when in close proximity to the heater. Children aged from 3 to 8 years shall only switch on/off the appliance provided that it has been placed or installed in its intended normal operating position and they have been given supervision or instruction concerning use of the appliance in a safe way and understand the hazards involved. Children aged from 3 to 8 years shall not plug in, regulate and clean the appliance or perform user maintenance.
- Keep the power cord away from the hot body of the heater.
- Indoor use only.
- Do not use the heater in areas where flammable liquids are stored or where flammable fumes may be present.
- Do not use this heater if it has been dropped;
- Do not use if there are visible signs of damage to the heater;
- Do not leave the heater switched on when your property is vacant.
WARNINGS
- Always use the heater in an upright position.
- If the supply cord is damaged, it must be replaced by the manufacturer, their service agent or a similarly qualified person in order to avoid a hazard.
- In order to avoid a hazard due to inadvertent resetting of the thermal cut out, this appliance must not be supplied through an external switching device, such as a timer, or connected to a circuit that is regularly switched on and off by the utility.
Control panel
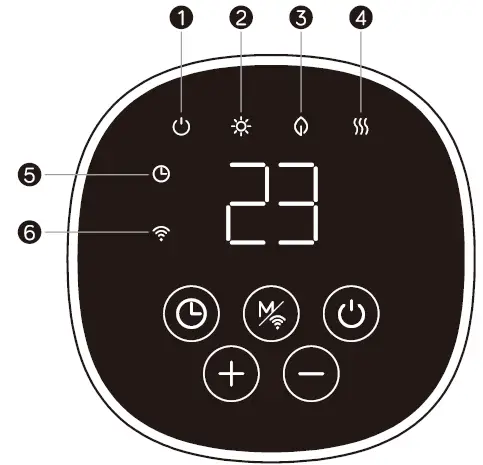
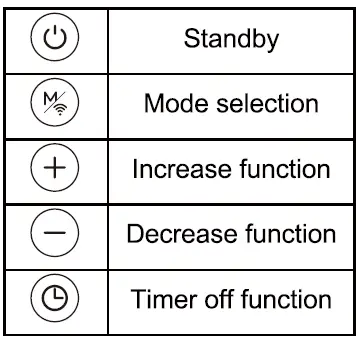
- Standby: on/off
- Comfort mode
- ECO mode
- Heating status
- Timer
- Wifi
OPERATING THE RADIATOR
Manual Settings using the LED screen
Choose a suitable location for the radiator, taking into account the safety instructions above.
ON/OFF BUTTON![]()
- Press once to turn the device on. Press again to turn the device off.
- This feature can be performed using the TCP Smart App.
MODE SELECTION![]()
Press this button to cycle between the following options

Press ![]() to enter mode selection. By pressing
to enter mode selection. By pressing![]() , the heating mode runs in a continuous cycle as above
, the heating mode runs in a continuous cycle as above
![]()
- Comfort mode: Press + and – to set the temperature from 5-35oC.
- ECO mode: This is pre-set as 4 oC below comfort mode.
- Pre-programmed schedule: Select to run the programme as stated below.
- Anti-frost mode: To avoid damage to the product during extreme cold weather use anti-frost mode. The heater must be turned on and Anti Frost mode selected for this function to work. The screen will display
 . The target temperature is 7 oC. The temperature cannot be adjusted.
![]()
- Pre-Programmed scheduling – Select to run the programme as stated below.
- Programmable scheduling – Select to create a programme to suit your own requirements.
- This feature can be performed using the TCP Smart App.
P1, P2 and P3 Programmed scheduling ![]()
Note: Clock and day of the week setting must be done for the below scheduling to work.
![]() (Monday-Sunday) Pre-programmed schedule. Please note: this schedule cannot be adjusted.
(Monday-Sunday) Pre-programmed schedule. Please note: this schedule cannot be adjusted.

- 00:00am – 01:00am
 comfort mode,
 - 01:00am – 07:00am
 ECO mode
 - 07:00am – 00:00am comfort mode.
![]() (Monday-Friday) Pre-programmed schedule. Please note: this schedule cannot be adjusted.
(Monday-Friday) Pre-programmed schedule. Please note: this schedule cannot be adjusted.

- 00:00am – 01:00am comfort mode,
- 01:00am – 05:00am ECO mode
- 05:00am – 09:00am comfort mode,
- 09:00am – 19:00pm ECO mode
- 19:00pm – 00:00am comfort mode
![]() (Saturday-Sunday) Pre-programmed schedule. Please note: this schedule cannot be adjusted.
(Saturday-Sunday) Pre-programmed schedule. Please note: this schedule cannot be adjusted.

- 00:00am – 01:00am comfort mode,
- 01:00am – 08:00am ECO mode
- 08:00am – 11:00am comfort mode,
- 11:00am – 13:00pm ECO mode
- 13:00pm – 16:00pm comfort mode,
- 16:00pm – 20:00pm ECO mode
- 20:00pm – 00:00am comfort mode.
![]() (Monday-Friday) Programmable schedule. Please note that this schedule can be adjusted to suit your requirements using the instructions below. The below is for illustration purposes only.
(Monday-Friday) Programmable schedule. Please note that this schedule can be adjusted to suit your requirements using the instructions below. The below is for illustration purposes only.

- 00:00am – 01:00am comfort mode,
- 01:00am – 05:00am ECO mode
- 05:00am –09:00am comfort mode,
- 09:00am – 12:00pm ECO mode
- 12:00pm – 16:00pm comfort mode,
- 16:00pm – 18:00pm ECO mode
- 18:00pm – 00:00am comfort mode.
![]() (Saturday-Sunday) Programmable schedule. Please note that this schedule can be adjusted to suit your requirements using the instructions below. The below is for illustration purposes only.
(Saturday-Sunday) Programmable schedule. Please note that this schedule can be adjusted to suit your requirements using the instructions below. The below is for illustration purposes only.
- 00:00am – 01:00am comfort mode,
- 01:00am – 05:00am ECO mode
- 05:00am –00:00am comfort mode
Adjustable program setting
- Press
 mode and select P3. press for 3 secs to enter day setting
 - The screen will display
 . Press + and – to set from (Monday-Sunday).
| 1 | Monday |
| 2 | Tuesday |
| 3 | Wednesday |
| 4 | Thursday |
| 5 | Friday |
| 6 | Saturday |
| 7 | Sunday |
Press![]() to confirm and enter hour setting
to confirm and enter hour setting
- The screen will display
 . Press + and – to select the hour from 00-23. Press to choose heating mode for every hour. Comfort mode or ECO mode. Or anti-frost mode where no symbols will display which means the heater will only operate if the temperature drops to 7 degrees.
 - Repeat the operation until you have completed the schedule of every hour and every day.
Notes: After setting heating mode for hour 23, press + to come back to day setting. When screen displays d7, press + to set ![]() schedule.
schedule.
- Use these buttons to increase or decrease the target temperature, and to increase or decrease time within timer function
- This feature can be performed using the TCP Smart App.
TIMER BUTTON
24 Hr Timer
Press once, the screen will display “![]() ” and will keep flashing. Press + and – to set timer from 0-24 hours. Wait 3 seconds to confirm setting. From the moment the time is set, the timer will then continue to count down. During the countdown, when the target temperature is reached, the towel heater will turn off. Once the heater detects a fall in actual room temperature it will restart. Once the countdown is ended the heater will turn off completely.
” and will keep flashing. Press + and – to set timer from 0-24 hours. Wait 3 seconds to confirm setting. From the moment the time is set, the timer will then continue to count down. During the countdown, when the target temperature is reached, the towel heater will turn off. Once the heater detects a fall in actual room temperature it will restart. Once the countdown is ended the heater will turn off completely.
Pre-Set Quick Timer
Press one time![]() , the screen will display “
, the screen will display “![]() ”, press
”, press![]() once to select the desired time either 0 2 , 0 4 , or 0 8 . From the moment the time is set, the timer will then continue to count down. During the countdown, when the target temperature is reached, the towel heater will turn off. Once the heater detects a fall in actual room temperature it will restart. Once the countdown is ended the heater will turn off completely. This feature can be performed using the TCP Smart App.
once to select the desired time either 0 2 , 0 4 , or 0 8 . From the moment the time is set, the timer will then continue to count down. During the countdown, when the target temperature is reached, the towel heater will turn off. Once the heater detects a fall in actual room temperature it will restart. Once the countdown is ended the heater will turn off completely. This feature can be performed using the TCP Smart App.
Clock and day of the week setting
Press the ![]() button for 3 seconds. The screen display will show” d”. Press + and – to select the day
button for 3 seconds. The screen display will show” d”. Press + and – to select the day
The number displayed will correspond to the day of the week as below
| 1 | Monday |
| 2 | Tuesday |
| 3 | Wednesday |
| 4 | Thursday |
| 5 | Friday |
| 6 | Saturday |
| 7 | Sunday |
Press ![]() to confirm the day and enter the clock hour setting. The screen will display
to confirm the day and enter the clock hour setting. The screen will display![]() . Press + and –to set the HOUR time. Press
. Press + and –to set the HOUR time. Press![]() to confirm the time set and enter minute setting with the screen displaying
to confirm the time set and enter minute setting with the screen displaying![]() . Press + and – to set the MINUTE time
. Press + and – to set the MINUTE time![]() . Press the
. Press the![]() button to confirm.
button to confirm.
OPEN WINDOW FUNCTION
When the ambient temperature drops by 2°C within 2minutes, the heater will register the possibility of an open window in the room. If this happens, it will stop heating and enter standby mode. To turn on open window function, press Mode and + buttons together and the screen will display![]() , after 3 seconds, the screen will display the set temperature. To turn off open window function, press Mode and – buttons together and the screen will display
, after 3 seconds, the screen will display the set temperature. To turn off open window function, press Mode and – buttons together and the screen will display![]() , after 3 seconds, the screen will display the set temperature.
, after 3 seconds, the screen will display the set temperature.
CLEANING THE HEATER
Allow heater to cool down before cleaning. Clean the outside of the heater by wiping with a damp cloth and buff with a dry cloth. Do not use any detergents or abrasives.
CORRECT DISPOSAL OF THIS PRODUCT

WARRANTY INFORMATION
The manufacturer provides warranty in accordance with the legislation of the customer’s own country of residence, with a minimum of 2 year, starting from the date on which the appliance is sold to the end user. The warranty only covers defects in material or workmanship. The repairs under warranty may only be carried out by an authorized service centre. When making a claim under the warranty, the original bill of purchase (with purchase date) must be submitted. The warranty will not apply in cases of
Normal wear and tear
- Incorrect use, e.g. overloading of the appliance, use of non-approved accessories
- Use of force, damage caused by external influences
- Damage caused by non-observance of the user manual, e.g. connection to an unsuitable mains supply or non-compliance with the installation instructions
- Partially or completely dismantled appliances.
CONNECTING THE APPLIANCE TO WI-FI
- Use the QR code below to download the TCP Smart App for control of the heater by voice or TCP Smart App.
QR code for both android and iOS

To control the heater using the TCP Smart App the unit must be turned on. Before you get started you will need the following
- Smart device such as a mobile phone or tablet
- Access to the Google or Apple App store, log on and passwords
- The name of your Wi-Fi network and password to your Wi-Fi network
- Confirm your home Wi-Fi router is running on 2.4Ghz and not 5Ghz. If you are unsure, please consult your broadband provider for details on how to change the settings.
- Turn off any Wi-Fi extenders during set up
- Check you do not have any limitations on the number of devices with your broadband provider
Please note: Our products do not work on 5Ghz only 2.4Ghz.
For instructions on how to connect to Amazon Alexa or Google Nest please visit https://www.tcpsmart.eu/howto-alexa-google-nest
With the heater turned on, hold down the Mode button ![]() for 3 seconds until it bleeps and the WiFi LED light blinks rapidly, the device is now in paring mode. In the TCP Smart App, enter your WiFi password and follow the instructions in the App to connect.
for 3 seconds until it bleeps and the WiFi LED light blinks rapidly, the device is now in paring mode. In the TCP Smart App, enter your WiFi password and follow the instructions in the App to connect.
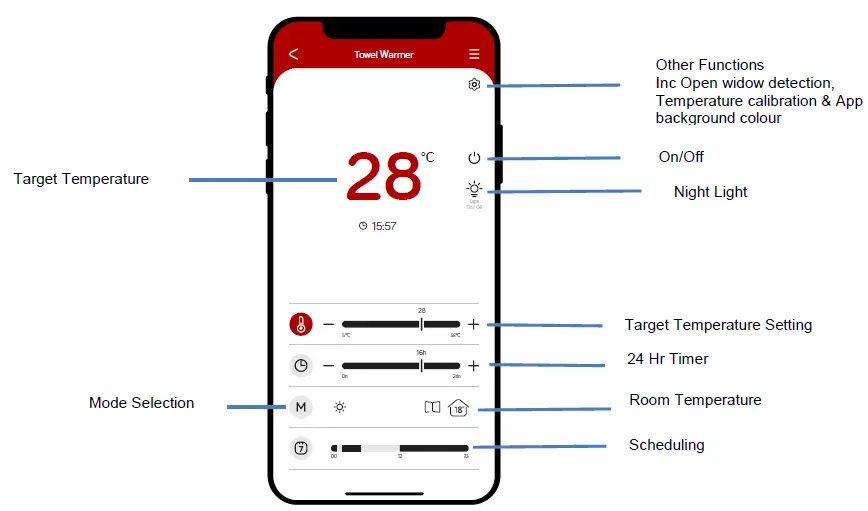
USING THE APPLIANCE WHEN CONNECTED TO WIFI
Main screen showing functions
Mode Selection Screen
Other functions
Select for following functions: Open Window Detection, Temperature Calibration and UI Background colour.
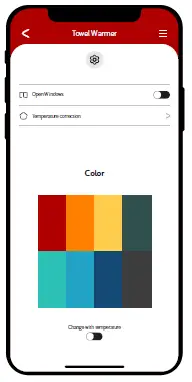
Open window Detection![]()
- Press on main screen. Press
 to turn on and off function. Press < to return to main screen.
Temperature Calibration![]()
Use this function to manually adjust to the actual room temperature if it is not correct.
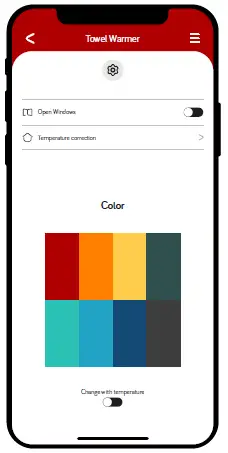
- Use this function to manually adjust to the actual room temperature if it is not correct.
- Press on main screen.
- Change the temperature by using+ or – buttons.
- Once you have set the temperature press tick button to set and < to return to previous screen.
App background colour
Press other functions button . To turn press the button
![]() to change with target temperature to the right. To turn off this function press this button to the left. Press < to return to main screen.
to change with target temperature to the right. To turn off this function press this button to the left. Press < to return to main screen.
Night Light
- Press
 to dim the LED screen. Press again to return to normal brightness.
Target Temperature Setting

- Use + and – buttons to set target temperature.
Timer![]()

Use the + and – button to set a countdown, from 1 to 24 hours. From the moment the time is set, the timer will then continue to count down. During the countdown, when the target temperature is reached, the towel heater will turn off. Once the heater detects a fall in actual room temperature it will restart. Once the countdown is ended the heater will turn off completely.
Smart Scheduling

Press timer bar to take you to the below screen
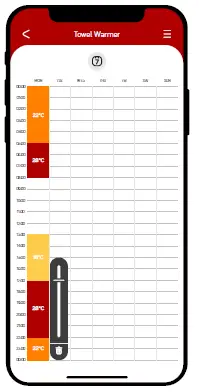
The scheduling can be selected as hourly increments on separate days. When you press the hour in any given day a temperaturebar will be displayed. Use this to select the temperature for that hour. Repeat as needed across each day / each hour of the day. Press < to return to main screen.
Note: Press Mode and ![]() to activate scheduling.
to activate scheduling.
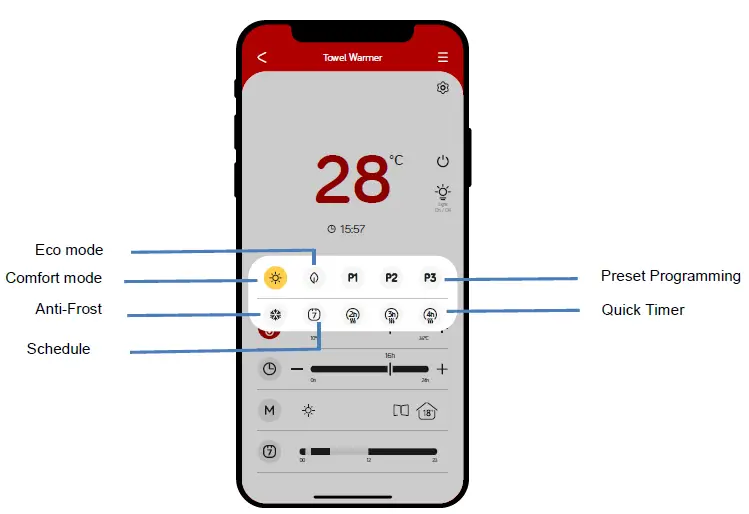
Mode (M)
Select M to choose the following functions
- Comfort mode: Set using the temperature scale on the main screen. Press < to return to main screen.
- Eco mode: this is a preset temperature which is 4°C below the comfort mode setting. Press < to return to main screen.
 Present Programme
 Present Programme
- Adjustable Programme
P1 and P2 are pre-programmed schedules. P3 is a schedule that can be set to your own requirements. This is done via the LED screen on the heater. Each p rogram me can then be activated by press ing the corresponding P1, P2 or P3 symbol. Press![]() to turn off. Press < to return to main screen.
to turn off. Press < to return to main screen.
Anti Frost
For this function to work the heater must be turned on. Once the Anti-frost mode is selected the target temperature will be overridden and the heater will stay at 7°C until the anti-frost function is turned off. . Select to turn this function on. Press![]() to turn off. Press < to return to main screen.
to turn off. Press < to return to main screen.
Scheduling![]()
- Press to turn on the scheduling you have selected. Press to turn off. Press < to return to main screen.
Quick Timer
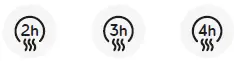
Select 2h, 3h or 4h for the heater to go into a countdown timer. From the moment the timer is set, the heater will continue to count down. Once completed the Towel Radiator will switch off.
Press ![]() to turn off ahead of the countdown time finishing. Press < to return to main screen.
to turn off ahead of the countdown time finishing. Press < to return to main screen.
| Table 2 | |||||||
| Information requirements for electric local space heaters | |||||||
| Model identifier(s): SMAWHTOWRAIL500W05EW/SMABLTOWRAIL500W05EW | |||||||
| Item | Symbol | Value | Unit | Item | Unit | ||
| Heat output | Type of heat input, for electric storage local space heaters only (select one) | ||||||
| Nominal heat output | Pnom | 0.5 | kW | manual heat charge control, with integrated thermostat | No | ||
| Minimum heat output (indicative) | Pmin | 0 | kW | manual heat charge control with room and/or outdoor temperature feedback | No | ||
| Maximum continuous heat output | Pmax,c | 0.5 | kW | electronic heat charge control with room and/or outdoor temperature feedback | No | ||
| Auxiliary electricity consumption | fan assisted heat output | No | |||||
| At nominal heat output | elmax | 0 | kW | Type of heat output/room temperature control (select one) | |||
| At minimum heat output | elmin | 0 | kW | single stage heat output, no room temperature control | No | ||
| In standby mode | elSB | 0.001 | kW | two or more manual stages, no room temperature control | No | ||
| with mechanic thermostat room temperature control | No | ||||||
| with electronic room temperature control | No | ||||||
| electronic room temperature control plus day timer | No | ||||||
| electronic room temperature control plus week timer | Yes | ||||||
| Other control options (multiple selections possible) | |||||||
| room temperature control, with presence detection | No | ||||||
| room temperature control, with open window detection | Yes | ||||||
| with distance control option | Yes | ||||||
| with adaptive start control | No | ||||||
| with working time limitation | Yes | ||||||
| with black bulb sensor | No | ||||||
|
Contact details |
TCP LTD, 1 EXCHANGE COURT, COTTINGHAM ROAD, CORBY, NN17 1EW | ||||||
TCP LTD
- 1 EXCHANGE COURT, COTTINGHAM ROAD, CORBY, NN17 1EW


