
Aputure Light Storm 300x Bi-Color LED Light Kit

Foreword
Thank you for purchasing Aputure “Light Storm” LS 300x. The Aputure LS 300x is a Bi-color Point Source LED Light Fixture. We’ve taken all of your favorite features of the daylight-balanced 300d II and added Expanded Bi-color CCT control, making it the first Bowens Mount Bi-color LED that can be used with optical modifiers properly.
IMPORTANT SAFETY INSTRUCTIONS
When using this unit, basic safety precautions should always be followed, including the following:
- Read and understand all instructions before using.
- Close supervision is necessary when any fixture is used by or near children. Do not leave the fixture unattended while in use.
- Care must be taken as burns can occur from touching hot surfaces.
- Do not operate the fixture if a cord is damaged, or if the fixture has been dropped or damaged, until it has been examined by qualified service personnel.
- Position any power cables such that they will not be tripped over, pulled, or put into contact with hot surfaces.
- If an extension cord is necessary, a cord with an amperage rating at least equal to that of the fixture should be used. Cords rated for less amperage than the fixture may overheat.
- Always unplug the lighting fixture from the electrical outlet before cleaning and servicing, or when not in use. Never yank the cord to remove the plug from the outlet.
- Let the lighting fixture cool completely before storing.
- To reduce the risk of electric shock, do not immerse this fixture in water or any other liquids.
- To reduce the risk of fire or electric shock, do not disassemble this fixture. Contact [email protected] or take it to qualified service personnel when service or repair work is required. Incorrect reassembly may cause electric shock when the lighting fixture is in use.
- The use of an accessory attachment not recommended by the manufacturer may increase the risk of fire, electric shock, or injury to any persons operating the fixture.
- Power this fixture by connecting it to a grounded outlet.
- Please remove the protective cover before powering on the light.
- Please remove the protective cover before using the reflector.
- Please do not block the ventilation and do not look at the light directly when it is powered on.
- Please do not place the LED lighting fixture near any liquids or other flammable objects.
- Only use a dry microfiber cloth to clean the product.
- Please have the product checked by an authorized service personnel agent if your product has a problem.
- The malfunctions caused by unauthorized disassembly are not covered under the warranty.
- We recommend only using the original Aputure cable accessories. Please note that our warranty for this product does not apply to any repairs required due to any malfunctions of unauthorized Aputure accessories, although you may request such repairs for a fee.
- This product is certified by RoHS, CE, KC, PSE, and FCC. Please operate the product in full compliance with the operation standards. Please note that this warranty does not apply to repairs arising from malfunctions, although you may request such repairs on a chargeable basis.
- The instructions and information in this manual are based on thorough, controlled company testing procedures. Further notice will not be given if the design or specifications change.
SAVE THESE INSTRUCTIONS
FCC Compliance Statement
This device complies with Part 15 of the FCC Rules. Operation is subject to the following two conditions:
- This device may not cause harmful interference.
- This device must accept any interference received, including interference that may cause undesired operation.
Warning: Changes or modifications not expressly approved by the party responsible for compliance could void the user’s authority to operate the equipment.
NOTE: This equipment has been tested and found to comply with the limits for a Class B digital device, pursuant to Part 15 of the FCC Rules. These limits are designed to provide reasonable protection against harmful interference in a residential installation. This equipment generates, uses, and can radiate radio frequency energy and, if not installed and used in accordance with the instructions, may cause harmful interference to radio communications. However, there is no guarantee that interference will not occur in a particular installation. If this equipment does cause harmful interference to radio or television reception, which can be determined by turning the equipment off and on, the user is encouraged to try reorient or relocate the receiving antenna.
- Increase the separation between the equipment and receiver.
- Connect the equipment to an outlet on a different circuit than the receiver is connected to.
- Consult the dealer or an experienced radio/TV technician for help.
RF Warning Statement:
This device has been evaluated to meet general RF exposure requirements.
Checklist
When you unbox the product, please make sure all the items listed below are included. Otherwise, please contact the seller immediately.
Product Details
Light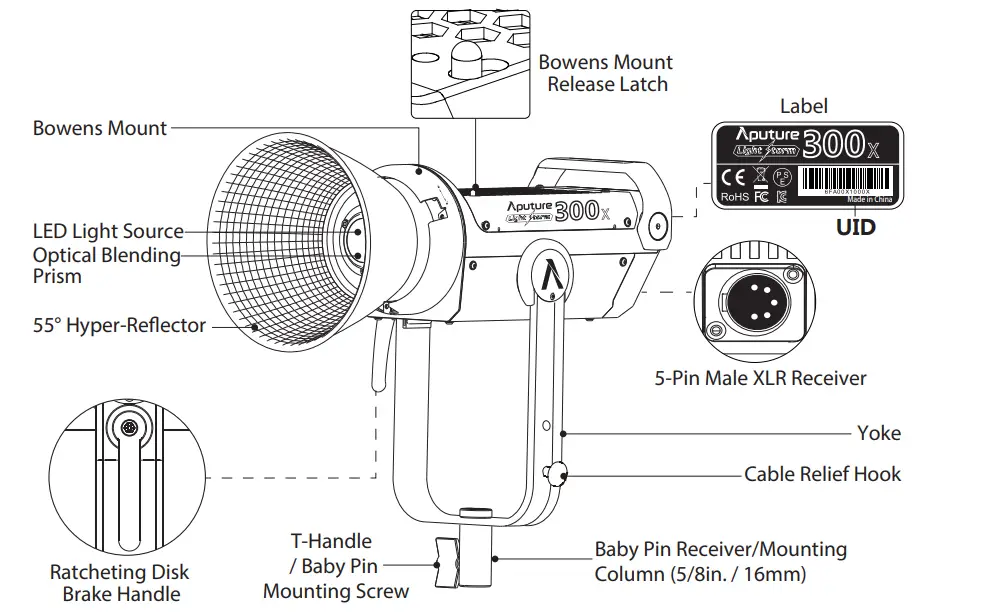
Controller box
 VA-Remote RC1+
 VA-Remote RC1+
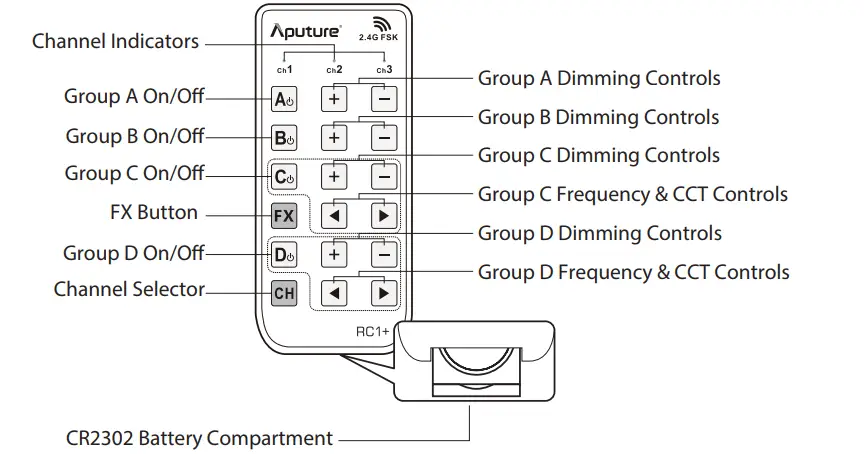
Installations
- Installing the cable relief hook

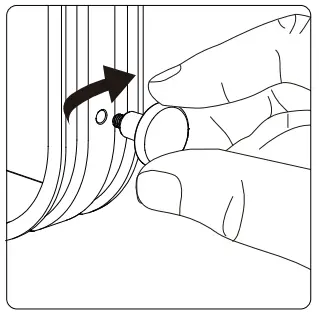
- Attaching/detaching the protection cover
Pull back the retaining pin, rotate the cover clockwise, then detach the cover.
To reattach the cover, insert it into the Bowens mount and rotate counterclockwise.
Notice: Always remove the protection cover prior to turning on the light. Always re-install the cover when packing it
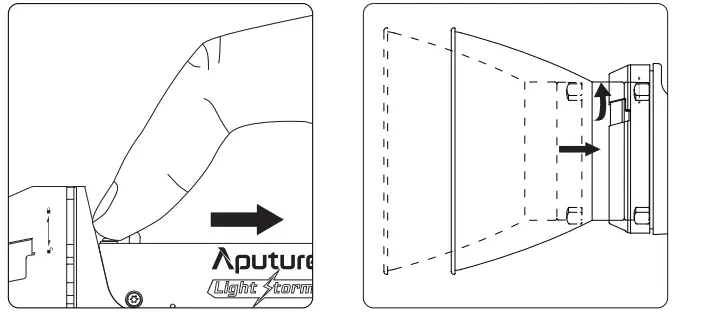
- Attaching/detaching the Hyper-Reflector
To install the reflector, pull back the retaining pin, insert the reflector into the Bowens mount, and rotate it counterclockwise as shown in the following pictures.
To remove the reflector, pull back the retaining pin and rotate the reflector clockwise.
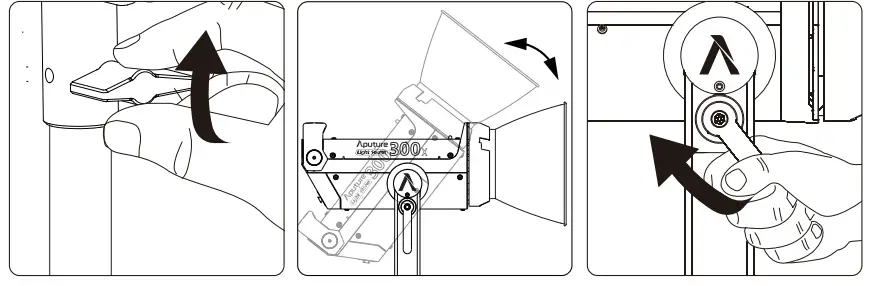
- Setting up the Light
Mount the light onto a light stand, then fix it in place using the T-Handle/Mounting
Screw on the Baby Pin Receiver/Mounting Column (5/8in. / 16mm). Then loosen/tighten the handbrake locking mechanism on the yoke to adjust the fixture’s angle of tilt.
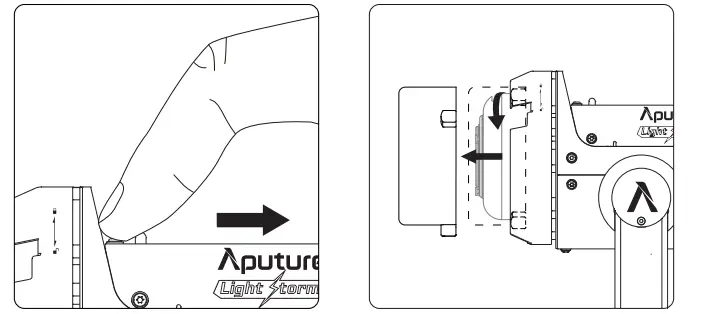
- Instructions for the Quick-Release “Lightning Clamp”
- Clamp the Lightning Clamp onto a light stand.
- To attach the control box, rotate the release lever to unlock the quick-release (the release baseplate, then mount the control box onto Lightning Clamp (the release the lever will automatically spring back).
- To remove the control box, grasp it firmly, then turn the release lever, and detach the control
 Specifications
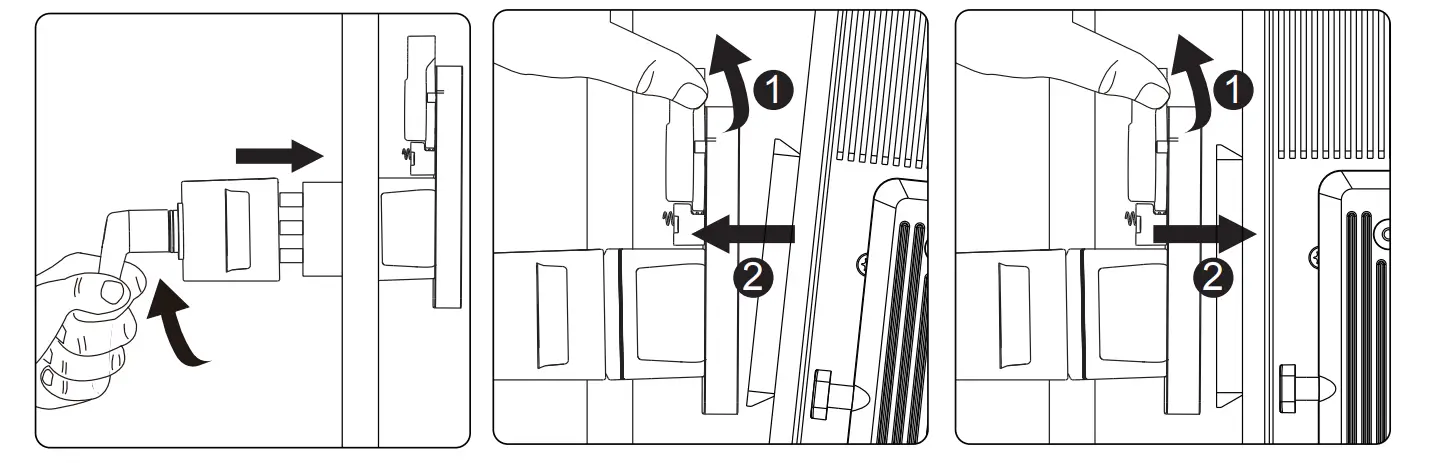
- Connect the light to the control box
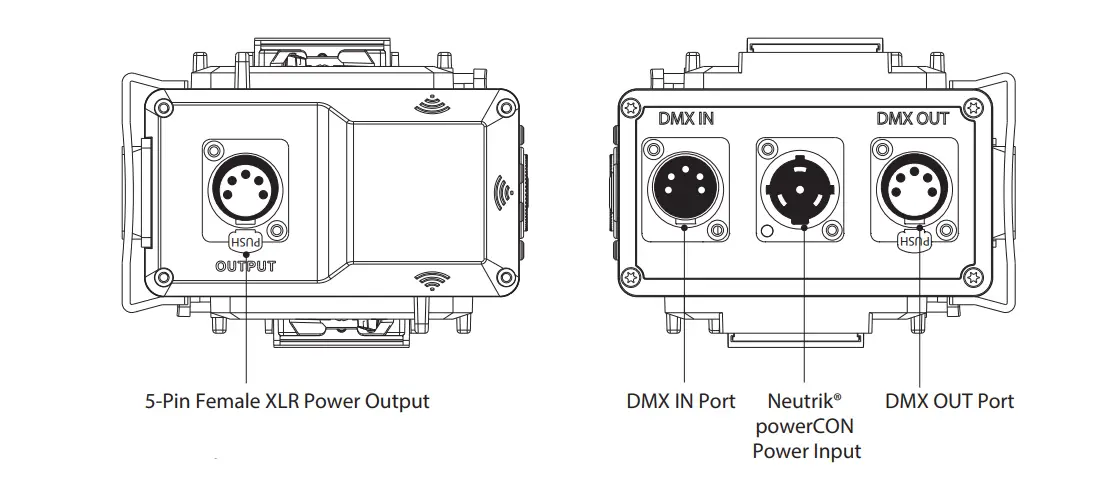
Connect the light to the control box using the 5-Pin Male-to-Female XLR Head Cable. * Hang the cable from the head cable relief hook to manage and reduce tension on the cable.
* Disconnect the XLR head cable by pushing down on the locking tabs on the female XLR connectors, then remove the cable. - Powering up the controller
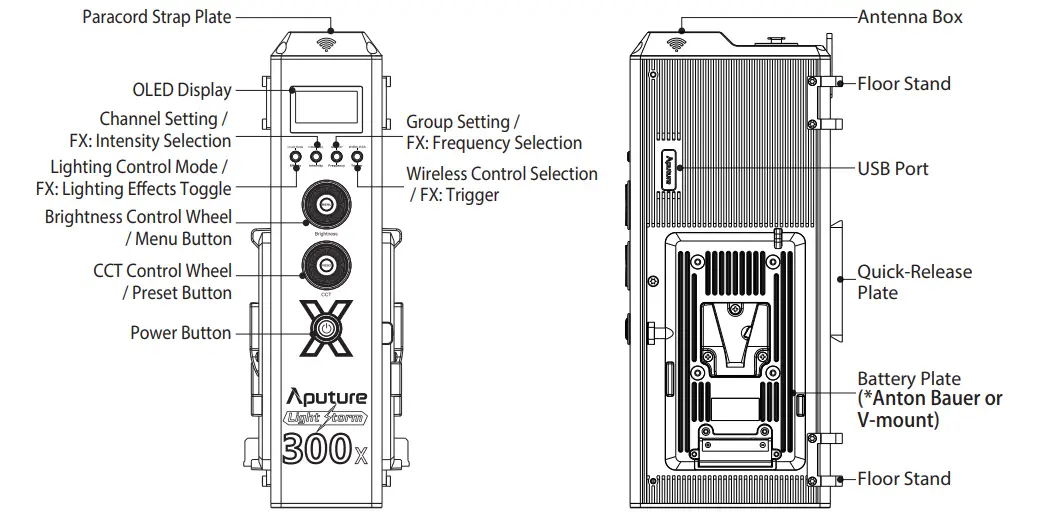
- Powering by AC

To disconnect the Neutrik® power cable, pull back on the yellow release tab on the cable connector, and rotate the connector counterclockwise. - Powering by Batteries

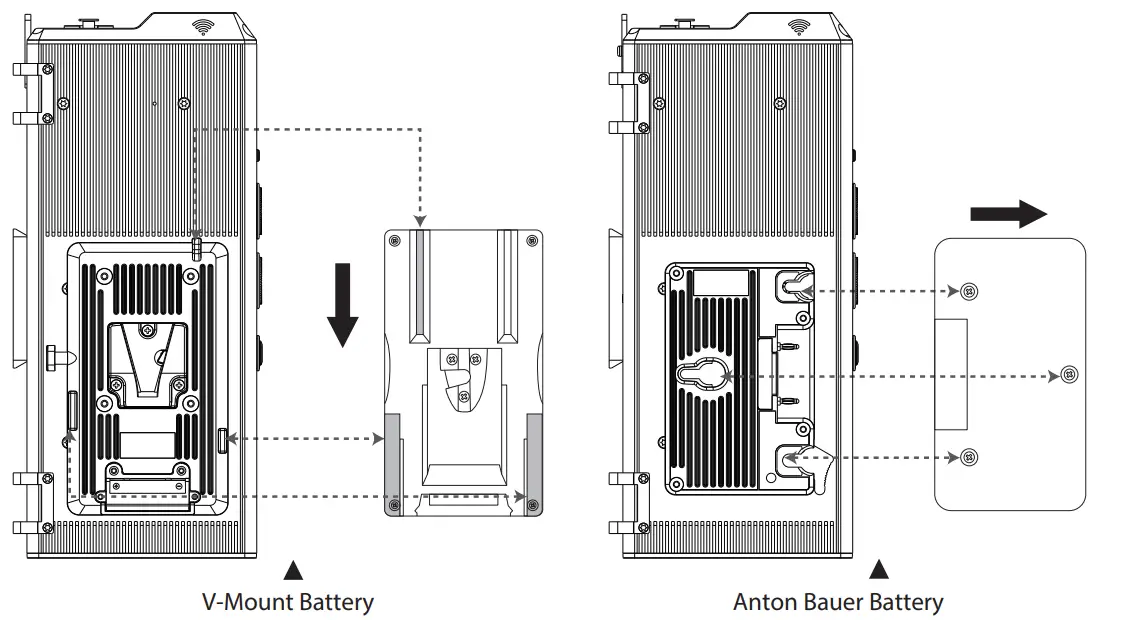
* Batteries: Voltage 12~16.8V; Recommended ≥15A continuous discharge.
* The LS 300x can be operated using a single battery for up to half of the fixture’s maximum output. Plugging the light into AC power or using two batteries allows you to utilize the light’s full output. When powering the light from a single battery, you must install the battery on the right side of the control box, or the light will not turn on.
* Do not use non-14.4v batteries (batteries with voltages outside of the 12-16.8V range). Using higher voltage batteries will damage the power supply and the lighting fixture.
* Only use batteries that support the necessary continuous current discharge specifications mentioned above. If non-compatible batteries are used, the batteries will enter a protection state and the lighting fixture will not operate as intended.
* Customers can choose V-Mount or A-Mount battery plates for their control boxes upon purchase according to their needs.
- Powering by AC
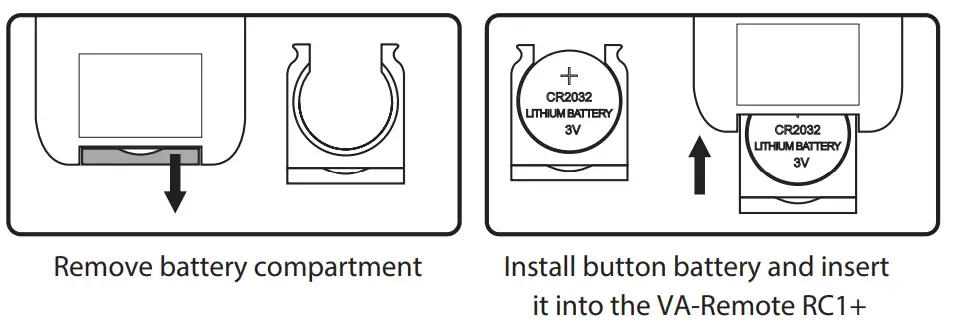
- insert the button battery to power VA-Remote RC1+

 Specifications
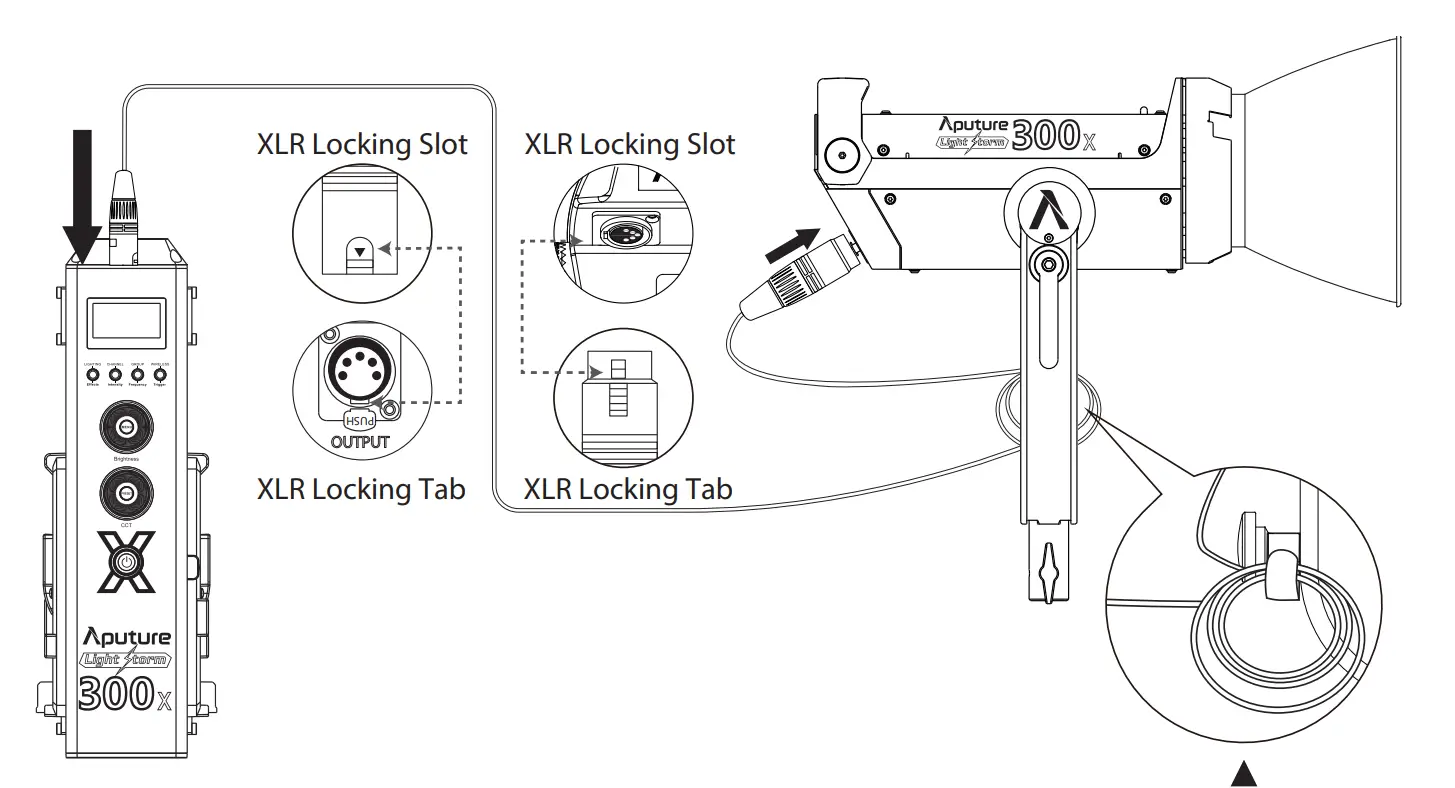 * Hang the cable from the head cable relief hook to manage and reduce tension on the cable.
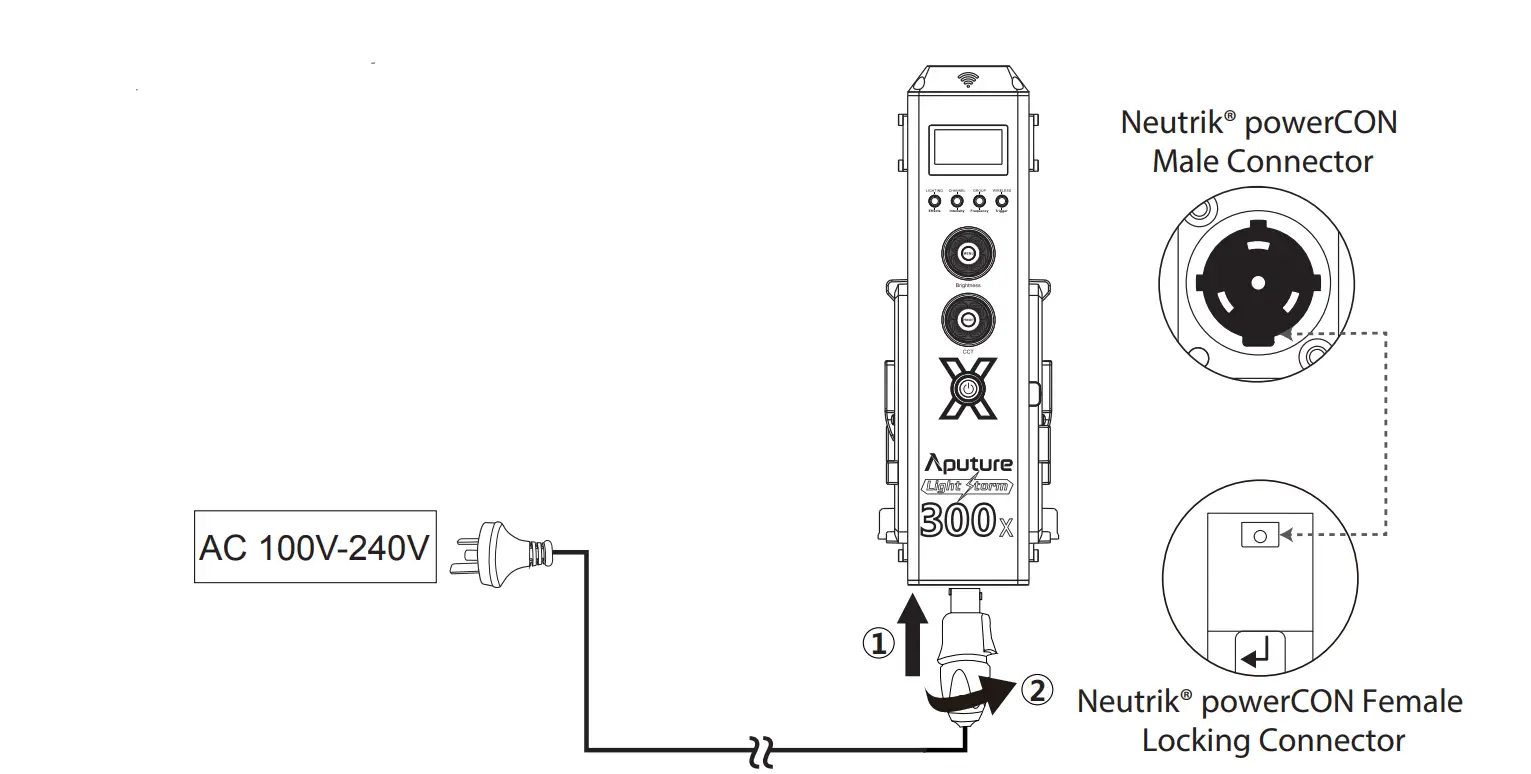
Operations
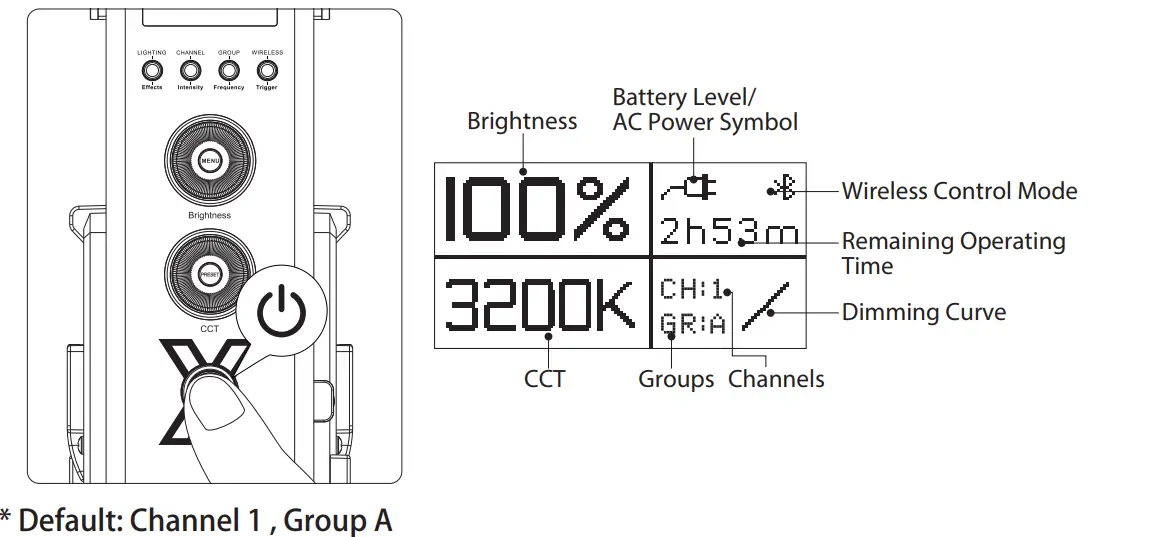
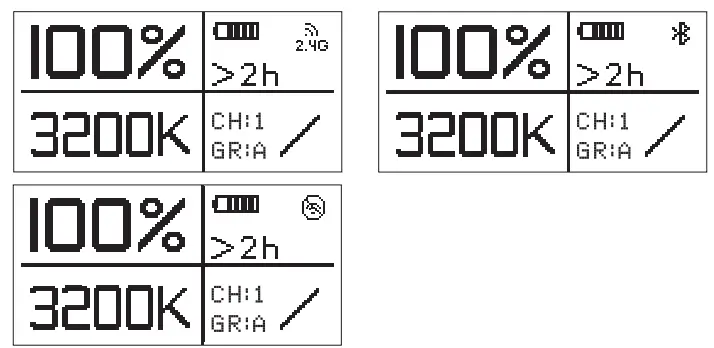
- Press the power button to turn the light on and off
 * Default: Channel 1, Group A
 - Manual Control
- Rotate the Brightness Control Wheel to adjust the intensity of the light from 0-100%.

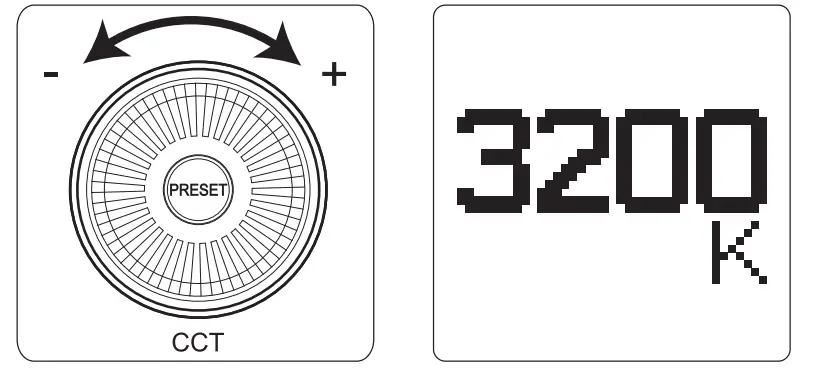
- Rotate the CCT Control Wheel to adjust the color temperature of the light from 2700K-6500K.

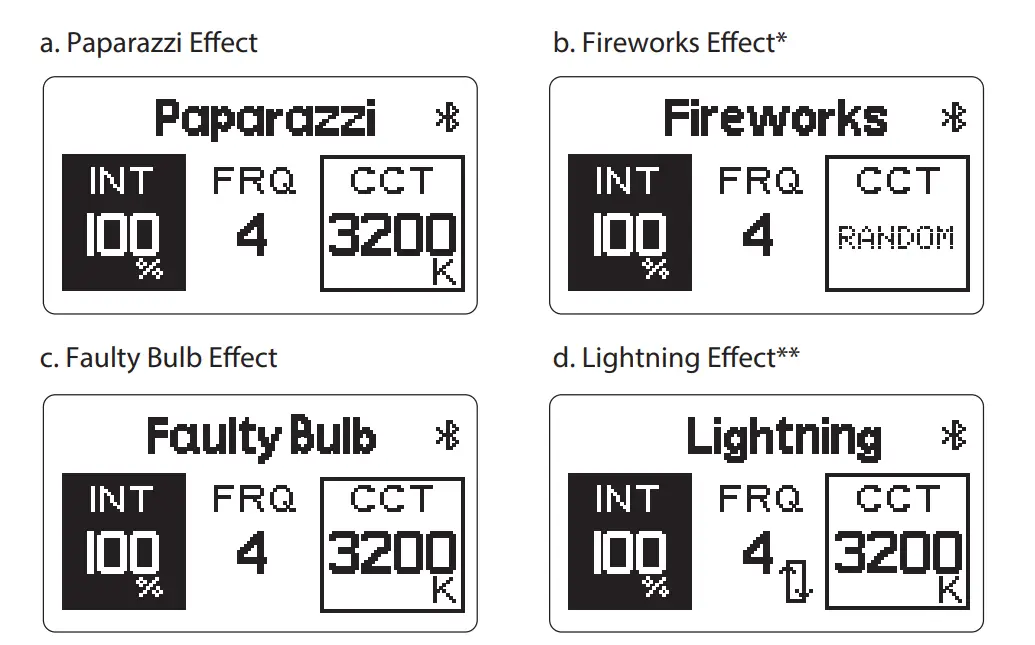
- Lighting FX Mode
Press and hold the EFects button for 2 seconds to activate Lighting FX mode, then short press the EFects button to toggle between Paparazzi, Fireworks, Faulty Bulb,
Lightning, TV, Pulsing, Strobe, Explosion, Fire, etc. * As of writing this the Fireworks effect worked in a CCT range presets including three choices of 3200K/5600K/Random.
** When controlling the lightning effect, short press the Trigger button to single trigger the lighting effect; long press the Trigger button to enter the Lightning Cycle Mode. * As of writing this the TV effect worked in CCT range presets and you cannot set a fixed base CCT.
** When controlling the explosion effect, short press the Trigger button to single trigger the lighting effect.
***As of writing this the Fire effect worked in CCT range presets and you cannot set a fixed base CCT.
When in Lighting FX mode, short press the “Intensity” button to enter Intensity
Adjustment Mode. Then rotate the Brightness Control Wheel to adjust the intensity from 10%-100% as displayed on the screen.
When in Lighting FX mode, short press the “Frequency” button to enter Frequency
Adjustment Mode. Then rotate the Brightness Control Wheel to adjust the frequency of the effect from 1 to 10 and R (Random) as displayed on the screen.
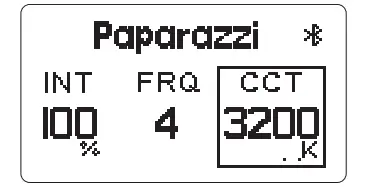
When in Lighting FX mode, rotate the CCT Control Wheel to adjust the base CCT of the lighting effect from 2700K to 6500K as displayed on the screen.* As of writing, you cannot set a fixed base CCT for certain effects, such as: Fireworks, TV, and Fire.
** If the light is powered of, upon turning on again, the light will resume its last saved setting. - Wireless Connectivity Modes
Press the Wireless/Trigger button in order to switch between 2.4GHz Wireless Remote Control, Bluetooth SIG Mesh Sidus Link App Control***, and no wireless control.
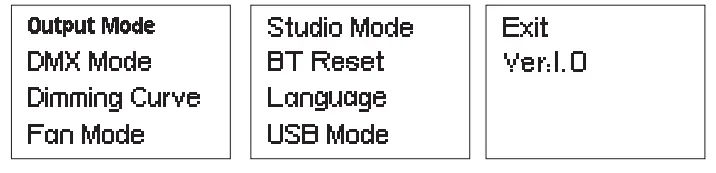
*** When setting up the device with the Bluetooth mobile application, the corresponding name of the fixture is LS 300x ****** (six digits + letters represent the fixture’s serial number). - Press the MENU button to enter the system menu interface, as shown below.

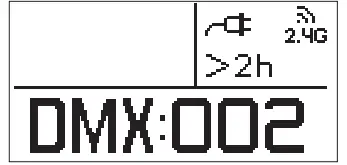
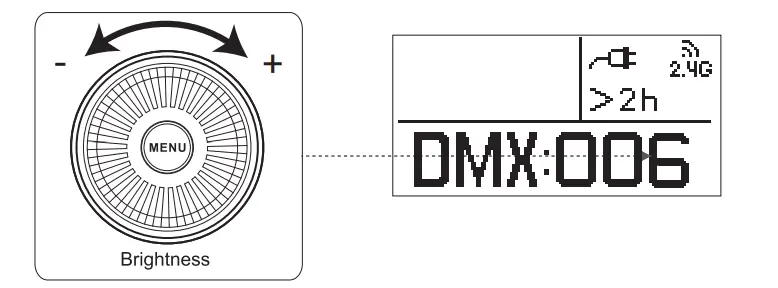
- DMX mode
When in DMX mode, rotate the brightness control wheels to set the device’s DMX channel. Then press the MENU button to take you back to the Menu interface.
Press the MENU button to enter the system menu, rotate the dimming wheel to select DMX mode, and press the MENU button again to enter DMX mode. - Dimming curve mode
Press the MENU button to enter the system menu, rotate the dimming wheel to select Dimming Curve, and press the MENU button again to enter the dimming curve selection menu. Use the wheel to choose from exponential (Exp), logarithmic (Log), S-Curve, or linear dimming curves, and press the MENU button to make your selection.
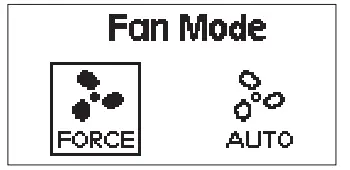
- Fan mode
Press the MENU button to enter the system menu, rotate the dimming wheel to select
Fan Mode, and press the MENU button again to enter Fan Mode. Use the wheel to select between Force* and Auto, then press the MENU button to confirm your selection. * In “Force Mode” the fan will continuously spin at its maximum speed. In “Auto Mode” the fan will only begin spinning when the light has reached 45°C.
 - Studio mode
Press the MENU button to enter the system menu, rotate the dimming wheel to select
Studio Mode, and press the MENU button again to enter the Studio Mode** menu.
Once in the menu, use the wheel to choose between “YES”*** or “NO” and press the
MENU button to confirm your selection. ** When Studio Mode is active, the light will turn on as soon as it receives power, without having to press the power button.
*** Studio Mode is active as the factory default. - Bluetooth reset
- Press the MENU button to enter the system menu, rotate the dimming wheel to select BT Reset. Press the MENU button again to enter the Bluetooth Menu. Use the wheel to select “YES” to reset the Bluetooth pairing (the pop-up window displays the current reset progress and is completed within 5 seconds); or select “NO” to return to the previous menu.

- After resetting the light’s Bluetooth connection, your mobile phone or tablet will be able to connect to and control the light****.
- If the Bluetooth Reset fails, a [Reset Failed] screen will pop-up, and the light will return to Bluetooth mode after 2 seconds.
**** The light must be connected to your mobile device using the Sidus Link mobile application, and not via your device’s typical Bluetooth connection menu.
- Press the MENU button to enter the system menu, rotate the dimming wheel to select BT Reset. Press the MENU button again to enter the Bluetooth Menu. Use the wheel to select “YES” to reset the Bluetooth pairing (the pop-up window displays the current reset progress and is completed within 5 seconds); or select “NO” to return to the previous menu.
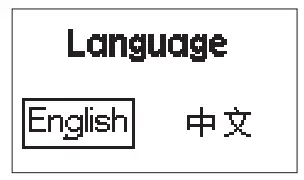
- Language
Press the MENU button to enter the system menu, rotate the dimming wheel to select
Language, and press the MENU button again to enter the Language menu*. Use the wheel to select from the available languages. Initial languages include “English” and “Chinese”.
* The factory’s default language is English. - USB Mode
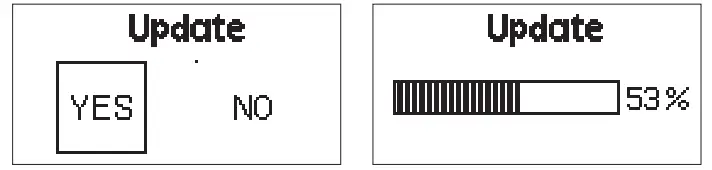
- The control box has a built-in USB port for firmware updates (for both the control box and lamp head). Insert a compatible USB* flash drive into the USB port.
- To update the light’s firmware, press the MENU button to enter the system menu rotate the dimming wheel to select USB Mode, and press the MENU button again to enter the Update menu. Use the wheel to select “YES” or “NO”. If a USB flash drive containing a firmware update is mounted in the USB port, the screen will display an update progress bar**. If you choose “NO”, press the MENU button then it will return the menu interface.
- If a USB flash drive is not inserted into the USB port of the flash drive and does not contain a firmware upgrade file, entering the Update menu and choosing “YES” will return you to the system menu interface.

*Only FAT16 and FAT32 storage formats can be used for firmware updates. Incompatible formats will result in the screen displaying a format error and will return to the main menu.
**, DO NOT unplug the light or the USB flash drive during the update process. In the case of an unexpected power failure, DO NOT remove the USB flash drive. When the power is restored, the fixture will automatically resume the update process. After successfully updating the firmware, the fixture will automatically restart.
- OTA Mode
You can also do an OTA wireless firmware update using the Sidus Link mobile app.
- Rotate the Brightness Control Wheel to adjust the intensity of the light from 0-100%.
 * Default: Channel 1, Group A
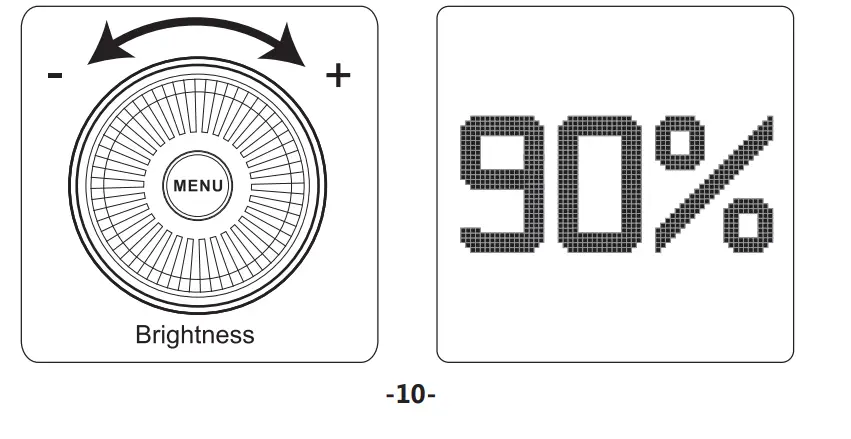
 * As of writing this the Fireworks effect worked in a CCT range presets including three choices of 3200K/5600K/Random.
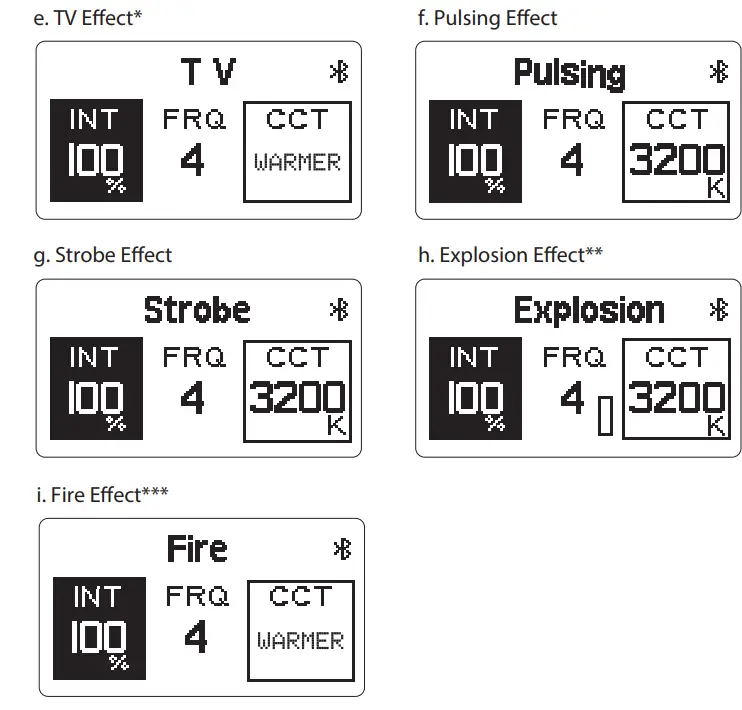 * As of writing this the TV effect worked in CCT range presets and you cannot set a fixed base CCT.
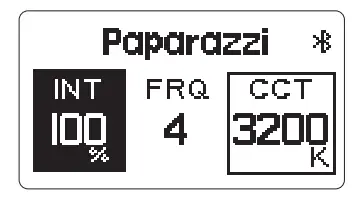
 * In “Force Mode” the fan will continuously spin at its maximum speed. In “Auto Mode” the fan will only begin spinning when the light has reached 45°C.
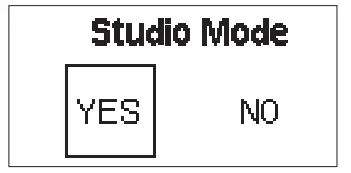 ** When Studio Mode is active, the light will turn on as soon as it receives power, without having to press the power button.
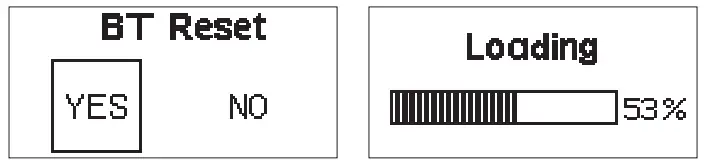
Remote Control
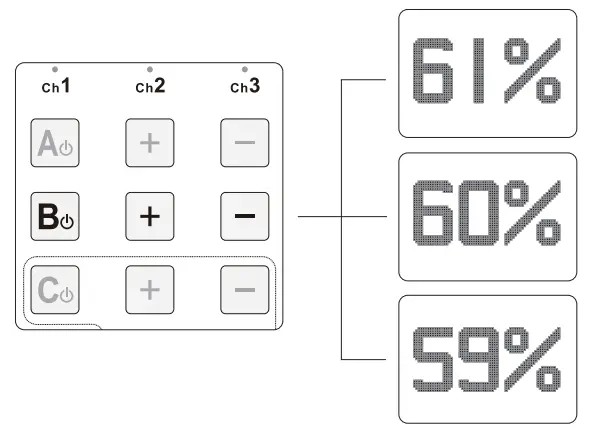
You can control the LS 300x from any channel or group configuration.
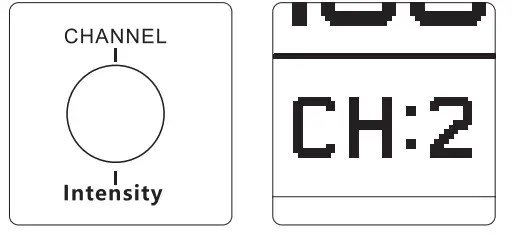
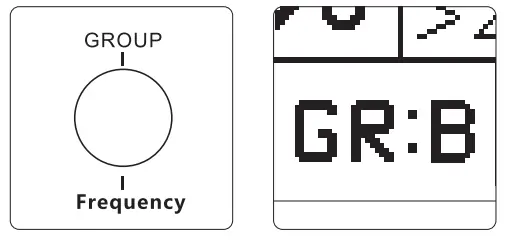
- * Light Storm lights have three channels (1/2/3) and four groups (A/B/C/D).
* Only groups “C” or “D” can be used to control brightness, CCT, and lighting eFFects, while groups “A” and “B” can only be used to control brightness.
- Configuring channel and group settings on the control box
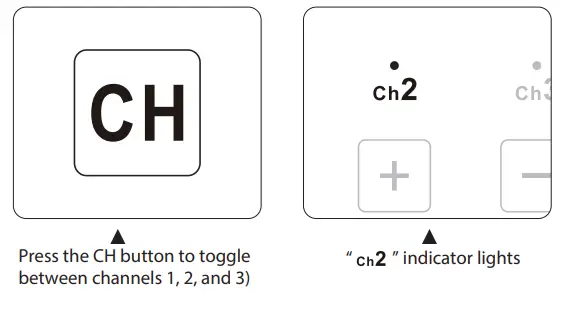
Press the CHANNEL button to toggle between channels 1, 2, & 3.
Press the GROUP button to toggle between groups A, B, C, & D.
- Configuring channel settings on the remote

- Adjusting brightness
Press A/B/C/D to toggle the lights on or off, press to adjust the brightness of the light from 0 to 100% accordingly.
 * This remote will not work when the light is in DMX mode.
** The remote control will only control the operation of the light when the fixture is in 2.4Ghz Wireless Control Mode. - CCT Control
In normal light control mode, press the buttons to adjust the light’s output CCT.
In FX Mode, press the buttons to adjust the light output CCT.
* The remote control can only be used to adjust CCT if the lights are in groups C or D. - FX Control
Press the button to enter or exit the lighting effect mode. Press the
  to toggle between different effects.
Press the buttons to adjust the output of the light. Press the buttons to toggle the effect frequency.
 * The remote control can only be used to operate lighting effects if the lights are in groups C or D.
 * This remote will not work when the light is in DMX mode.
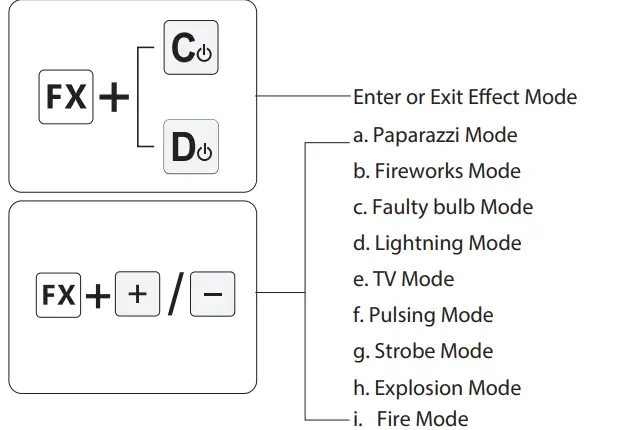 * The remote control can only be used to operate lighting effects if the lights are in groups C or D.
Connecting to DMX
- Connect a standard DMX controller
 * The DMX interface schematic is shown in the pictures below:
 - Channel Selection
In DMX mode, match the channel of your DMX controller with the light, and then adjust accordingly.
* The default DMX channel is “001”.
** The range of DMX channels is 1 to 512.
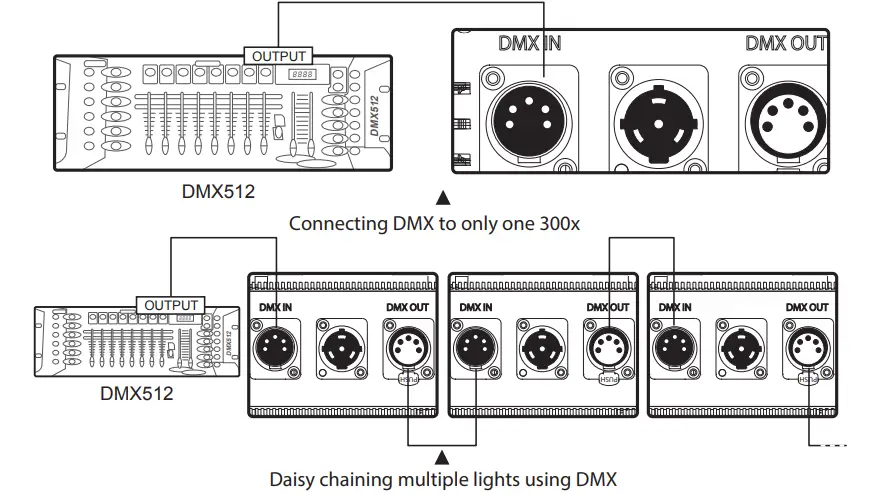 * The DMX interface schematic is shown in the pictures below:
Controlling Device Via DMX
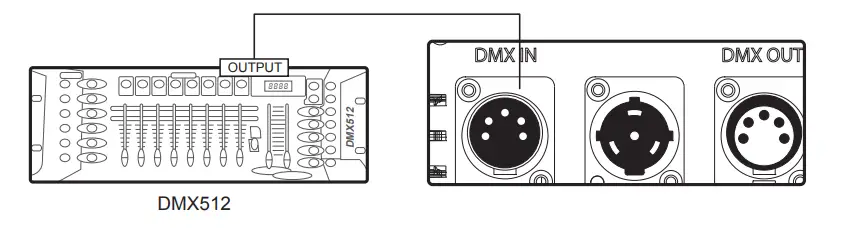
- Connect the DMX controller’s OUTPUT to the 300x’s controller INPUT as shown in the figure below.

DMX Chart
| DMX Channel Values / Functions
(6 DMX Channels) | ||
| Channel | Value | Function |
|
1 | Dimmer | |
| 0-255 | Intensity 0 to 100% | |
|
2 | CCT Control | |
| 0-5 | 2700K | |
| 6-10 | 2800K | |
| 11-15 | 2900K | |
| 16-20 | 3000K | |
| 21-25 | 3100K | |
| 26-30 | 3200K | |
| 31-35 | 3300K | |
| 36-40 | 3400K | |
| 41-45 | 3500K | |
| 46-50 | 3600K | |
| 51-55 | 3700K | |
| 56-60 | 3800K | |
| 61-65 | 3900K | |
| 66-70 | 4000K | |
| 71-75 | 4100K | |
| 76-80 | 4200K | |
| 81-85 | 4300K | |
| 86-90 | 4400K | |
| 91-95 | 4500K | |
| 96-100 | 4600K | |
|
2 | 101-105 | 4700K |
| 106-110 | 4800K | |
| 111-115 | 4900K | |
| 116-120 | 5000K | |
| 121-126 | 5100K | |
| 126-130 | 5200K | |
| 131-135 | 5300K | |
| 136-140 | 5400K | |
| 141-145 | 5500K | |
| 146-150 | 5600K | |
| 151-155 | 5700K | |
| 156-160 | 5800K | |
| 161-165 | 5900K | |
| 166-170 | 6000K | |
| 171-175 | 6100K | |
| 176-180 | 6200K | |
| 181-185 | 6300K | |
| 186-190 | 6400K | |
| 191-195 | 6500K | |
| 196-255 | Undefined | |
| Frequency Control | ||
| 0-19 | 1 | |
| 20-39 | 2 | |
| 40-59 | 3 | |
| 60-79 | 4 |
|
3 | 80-99 | 5 |
| 100-119 | 6 | |
| 120-139 | 7 | |
| 140-159 | 8 | |
| 160-179 | 9 | |
| 180-199 | 10 | |
| 200-219 | R | |
| 220-255 | Undefined | |
|
4 | Mode Selection | |
| 0-127 | Manual Mode | |
| 128-255 | FX Mode | |
| FX Control | ||
| 0-19 | Paparazzi | |
| 20-39 | Fireworks | |
| 40-59 | Faulty Bulb |
|
5 | 60-79 | Lightning |
| 80-99 | TV | |
| 100-119 | Pulsing | |
| 120-139 | Strobe | |
| 140-159 | Explosion | |
| 160-178 | Fire | |
| 180-255 | Undefined | |
|
6 | IN Lightning mode | |
| 0 | Start Point | |
| 1-127 | Single Trigger | |
| 128-255 | Cycle Mode | |
| IN Explosion mode | ||
| 0 | Start Point | |
| 1-127 | Single Trigger | |
| 128-255 | Undefined |
* In DMX mode, intensity, CCT, FX frequency and lighting effects can only be controlled by a DMX controller.
** When controlling multiple 300x lights independently (i.e., A and B), oF set each light by 6 channels. If you set light A at DMX 001, set light B at DMX 007, to control A and B separately on the DMX controller.
Using the Sidus Link APP
You can download the Sidus Link app from the iOS App Store or Google Play Store for enhancing the functionality of the light. Please visit sidus.link/app/help for more details regarding how to use the app to control your Aputure lights.
Specifications
|
Operating Current |
3.5A |
Power Consumption |
350W maximum | |
|
Power Supply |
AC 100~240V 50/60Hz |
Cooling Mode |
Active Cooling | |
|
TLCI |
≥96 |
CQS |
≥95 | |
|
CRI |
≥96 |
Color Temperature |
2700K~6500K | |
|
Radio Frequency |
2.4GHz |
Channels |
1/2/3 | |
|
Groups |
A/B/C/D |
Remote Ability |
≤100m | |
|
Battery requirement | 12V-16.8V
15A |
APP Control Type |
Bluetooth | |
|
Sizes (L*W*H) |
Light |
29.84*21.56*34.45cm / 11.75*8.49*13.56in | ||
|
Controller box Anton Bauer Battery |
27.86*12.67*8.73cm / 10.97*4.99*3.44in | |||
|
Controller box (V-Mount) |
27.86*12.67*9.67cm / 10.97*4.99*3.81in | |||
Photometrics
| CCT | Distance | 1m | 3m | 5m |
|
3200K |
Bare Bulb | 474 (fc) | 54 (fc) | 20 (fc) |
| 5100 (lux) | 580 (lux) | 220 (lux) | ||
|
Hyper-Reflector | 1505 (fc) | 121 (fc) | 42 (fc) | |
| 16200 (lux) | 1300 (lux) | 450 (lux) | ||
|
4300K |
Bare Bulb | 697 (fc) | 74 (fc) | 32 (fc) |
| 7500 (lux) | 800 (lux) | 350 (lux) | ||
|
Hyper-Reflector | 2257 (fc) | 195 (fc) | 65 (fc) | |
| 24300 (lux) | 2100 (lux) | 700 (lux) | ||
|
5500K |
Bare Bulb | 585 (fc) | 65 (fc) | 23 (fc) |
| 6300 (lux) | 700 (lux) | 250 (lux) | ||
|
Hyper-Reflector | 1904 (fc) | 158 (fc) | 51 (fc) | |
| 20500 (lux) | 1700 (lux) | 550 (lux) |
* This is an averaged result, the number might be slightly different on each light.
Trademarks
Bowens is a trademark registered by Bowens in China and other countries.
Anton Bauer is a trademark registered by Anton Bauer in the US and other countries. Neutrik® is a trademark registered by Neutrik® in the US and other countries.
Aputure Imaging Industries Co., Ltd. warrants the original consumer purchaser from defects in material and workmanship for a period of one (1) year after the date of purchase. For more details on warranty visit www.aputure.com
Aputure
Aputure Imaging Industries Co., Ltd.
Add F/3, Building 21, Longjun industrial estate,
HePing West Road, Shenzhen, Guangdong E-MAIL: [email protected]
Sales Contact: (86)0755-83285569-613
Aputure Imaging Industries Co., Ltd.
Inspection: Qualified
Add: F/3, Building 21, Longjun Industrial Estate, Heping West Road, Shenzhen, Guangdong
FAQS
By utilizing its internal lithium-ion battery that can be recharged using the included Micro-USB cable, the M9 can last up to 1.5 hours at 100% output and 13 hours at minimum brightness.
The Accent B7c can be charged by simply inserting it into an actively powered lamp. As long as the lamp is on the B7c will charge. It can charge and produce light simultaneously, however, as the internal heat builds up, the pace of charging will slow.
The Amaran AL-MW Mini LED is dustproof and waterproof down to 33′. The MC brings a whole different set of features including RGB. If playback doesn’t begin shortly, try restarting your device.
Press A/B/C/D to toggle the lights on or o, and press ( / ) to adjust the brightness of the light from 0 to 100% accordingly. * This remote will not work when the light is in DMX mode. ** The remote control will only control the operation of the light when the fixture is in 2.4Ghz Wireless Control Mode.
The Sidus Link Bridge is compatible with all legacy Aputure fixtures that use the 2.4GHz remote, such as the HR672 series, the Tri-8, LS C120d, LS C120d II, and LS C300d.
Like the LS 600d Pro, when plugged into AC power, the LS 600x Pro doubles as a high-intensity bi-color fixture and a supplementary charger for V-Mount & Gold Mount batteries, making it a useful addition to any filmmaker’s toolkit.
CCT Mode Press and hold the control wheel for 2 seconds to access the system menu. Rotate the control wheel to select CCT and press the wheel to enter CCT mode. In CCT Mode, rotate the control wheel to adjust the color temperature between 3200-6500K.
Off-camera lighting is often used to film scenes, with many light fixtures available to provide plenty of illumination and nuanced lighting either indoors or outdoors. On-camera lighting, however, is lighting that’s fixed to the camera to potentially contribute more versatility.
The LS C120d II does not have Bluetooth connectivity built in. Instead, it utilizes Aputure’s 2.4GHz wireless remote.
Sidus Link® for iPad provides free access to the basic lighting control features. And, every user could get a 7 days free trial of any paid plan.
Equipped with its native Hyper-Reflector, the 600d Pro can output 8,500 lux at 3 meters (10 feet). With the F10 Fresnel modifier, the combination can reach an illuminance of 29,300 lux at 3 meters in 15° spot. With a maximum power draw of 720W, the 600d Pro is on par with industry-standard HMI lights.
You can turn the NYX Bulb into ‘Blue mode’ by holding down the power button for 3 seconds. ‘Blue mode’ is the pairing mode so you can connect to the Astera App. You can also press the button shortly once you are in ‘Blue mode’ to cycle between 13 predefined colors and white tones.
Aperture is the adjustable lens opening that controls the amount of light allowed into the camera. Learning to properly adjust these three settings based on your location and subject is essential for capturing good exposures.
There are two basic types of light sources: Incandescence and Luminescence.
The 120d Mark II uses 140 watts of power, which is 20 watts as much as the previous 120d, but the tremendous performance boost from an already powerful device is a brilliant innovation.


