![]() Rubix Suspended Installation
Rubix Suspended Installation
Installation Guide
Rubix Suspended Installation
WARNING: Luminaire must be earthed. Risk of electric shock from LED boards if operated with cover removed. Installation / operation outside of luminaires intended scope invalidates warranty. Suitable only for domestic / light industrial / industrial applications within the scope of EN55015. Tested to compliance with BSEN 60598: specification for general requirements and tests. Must be installed by a suitably qualified person in accordance with all relevant legislation. Ambient operating temperature of 0°C to 25°C. If maximum operating temperature is exceeded luminaire will automatically dim / switch off. Terminal blocks are rated to 16A unless stated otherwise. The light source contained in this luminaire shall only be replaced by the manufacturer or his service agent or a similar qualified person.
LUMINAIRES WITH EMERGENCY PACK: When supply is isolated battery output terminals may be live if battery is connected. Isolate mains and battery before servicing. Emergency luminaires require unswitched live connection taken from same phase as switched supply. When unswitched supply is connected status indicator illuminates green, when unswitched supply is disconnected indicator extinguishes and luminaire operates in emergency mode. 24 hour charge period required before undertaking full discharge test. Emergency test sheets provided should be used to record all emergency tests. Batteries should be replaced when 3 hour duration is not met. Excessive switching of permanent live may result in premature battery failure. Battery electrolyte can be harmful to eyes / open wounds, do not puncture, if electrolyte touches skin / eyes flush with water. Do not incinerate batteries.
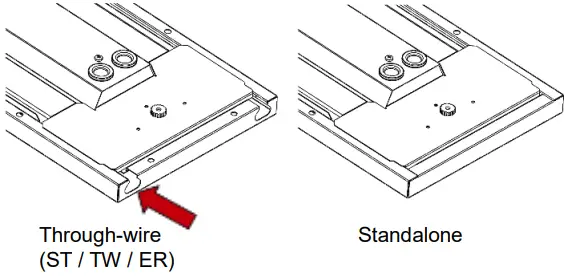
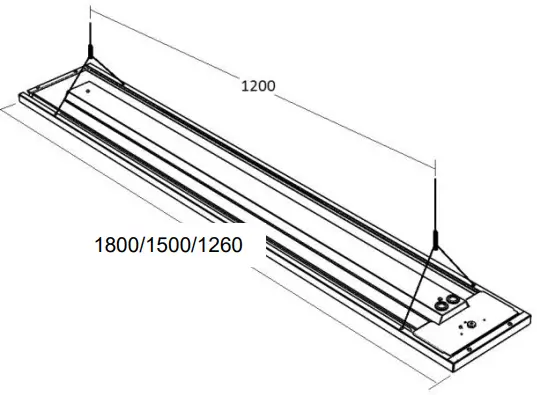
| 1. Firstly check fitting type is correct before installation – through-wire versions have cable cut-outs in ends and threaded holes for joining bracket / end plate | 2. Luminaire comes in 3 length options – all require suspension points at 1200mm |
 |  |
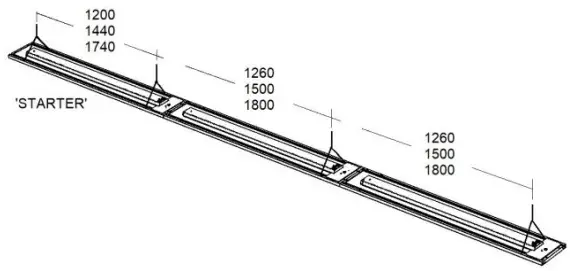
| 3. When mounting continuously, STARTER should have x2 suspensions. Subsequent TW fittings require just one… If preferred, each fitting CAN have 2 suspensions fitted (at same centres as STARTER). NOTE, if custom infill pieces are specified, positions of suspensions will be different – always check before installation!! | 4. Secure suspension drops as shown in marked positions. Screw suspension wire and clutch into ceiling fixture. |
 | 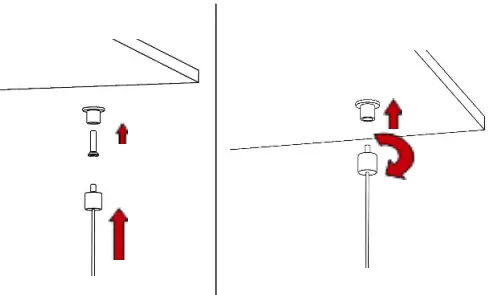 |
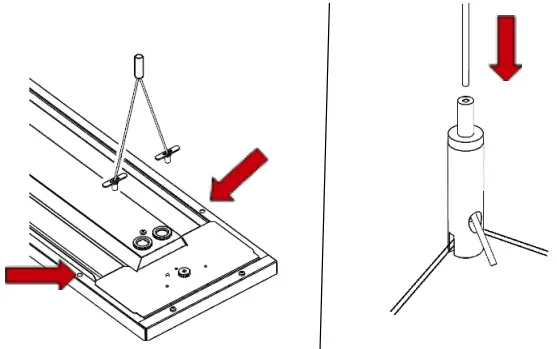
| 5. Insert toggles of Y suspension kit in to 7mm holes in luminaire To attach to main wire, depress top of clutch & insert wire | 6. To make electrical connection, loosen thumbnut, remove / lift away cover plate. Pass cable through entry gland and connect to appropriate terminations |
 | 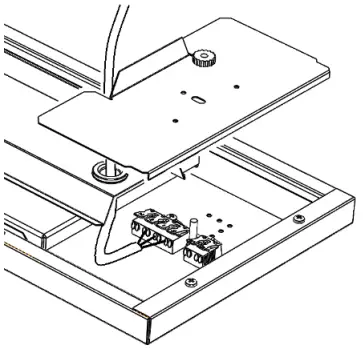 |
| 7. Fittngs are supplied with joining brackets reversed (1) – ensure both screws are removed / brackets rotated / re-fixed ready to connect to next fitting (2) | 8. When mounting continuously, fit joining brackets as shown using x2 M4x10 screws in the slots. |
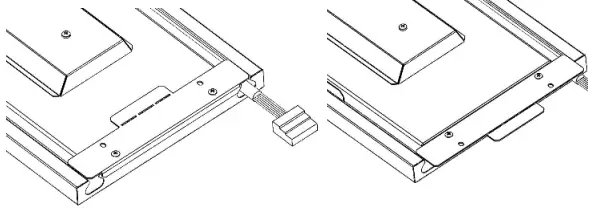 | 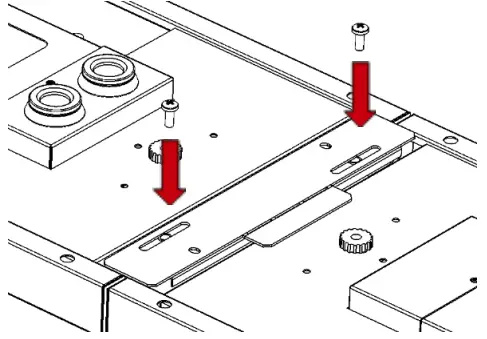 |
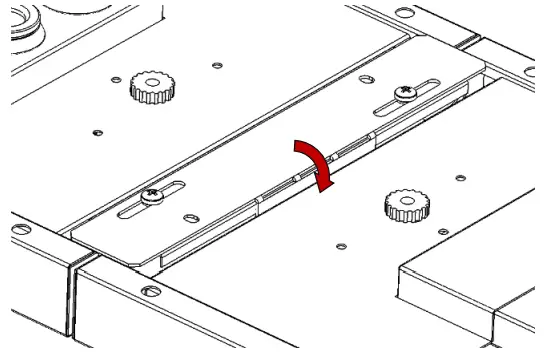
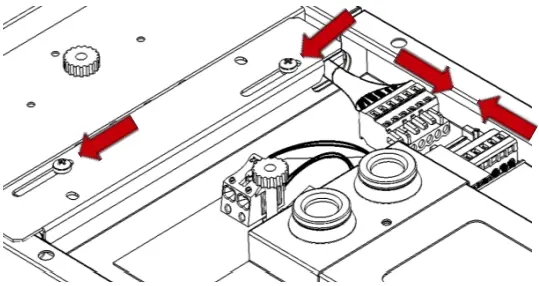
| 9. Bend tab down 90 degrees as shown | 10. Slide the joining bracket to one side and drop the throughwire loom into the next fitting. The through wire cable should be connected and located as shown (6-core as standard). |
 |  |
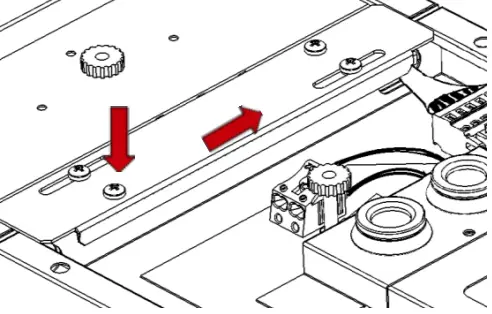
| 11. Once through-wire loom is connected, slide the joining bracket across to cover the loom and secure with remaining x2 M4x10 screws as shown. | 12. At Start and End of runs, fit ER cap (use x2 M4x10 screws (supplied) |
 | 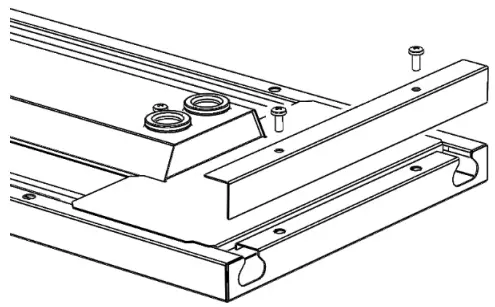 |
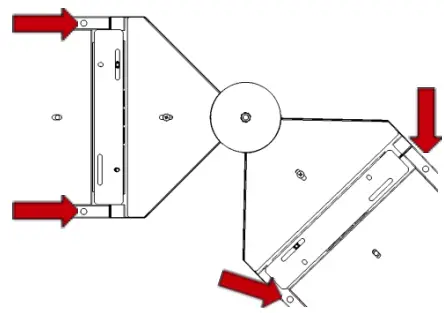
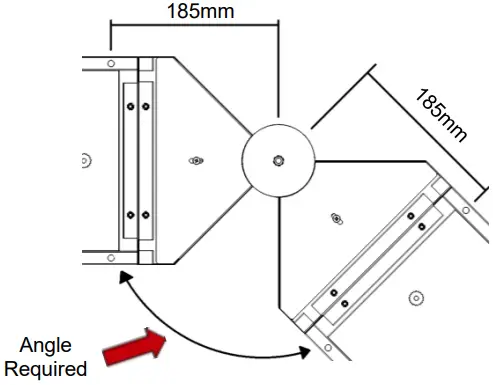
| 13. Corner Installation To install a corner section, first install the luminaires each sideof the corner. NOTE: A suspension point must be installed on both luminaires either side of the corner. | 14. Measure 185mm from the previous suspension drop and mark. Then, at the required angle, measure a further 185mm and install the next suspension drop. |
 |  |
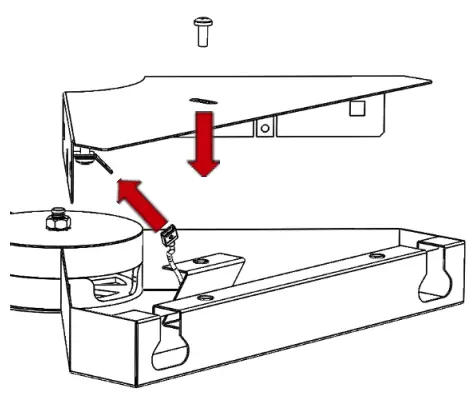
| 15. The luminaires can be installed on the suspension drops. Using the joining brackets provided, secure the corner between the luminaires and connect the internal wiring loom as per steps 8-11 above. | 16. The corner covers are secured using a single screw in the rear. Ensure the earth leads are connected inside the corners. |
 |
Maintenance
- Disconnect luminaire before undertaking any maintenance or cleaning.
- Cleaning should be undertaken on external parts of the luminaire only using a slightly damp lint free cloth.
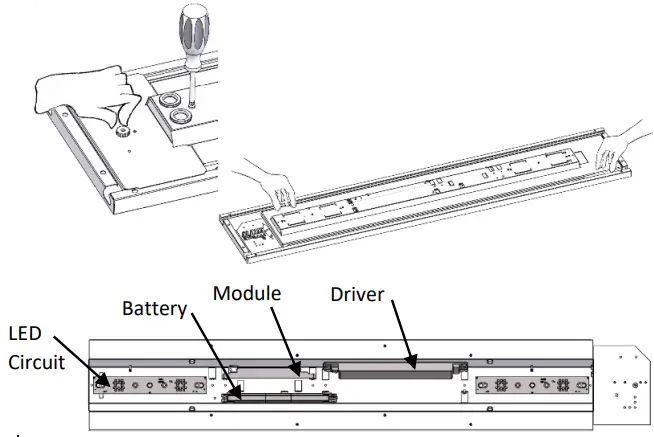
- In an anticlockwise motion turn thumbnuts to release end plates.
- Using a pan pozi screwdriver to remove gear cover. Gear tray willnow be removable.
- Use a pan pozi screwdriver to remove components.
- Please contact Dextra for assistance with spare component supply.
| Power | |
| L1 | Switched Live |
| E | Earth |
| N | Neutral |
| Emergency | |
| L2 | Unswitched Live |
| DA/AT3 | DALI Autotest |
| A/AT3 | DALI Autotest |
| Dimming | |
| -/D1/DA | Analogue/DSI/DALI |
| +/D2/DA | Analogue/DSI/DALI |
| L3 | Switch Dim /Corridor Function |
![]()

 Installation Guide")


 Led Installation Guide")


