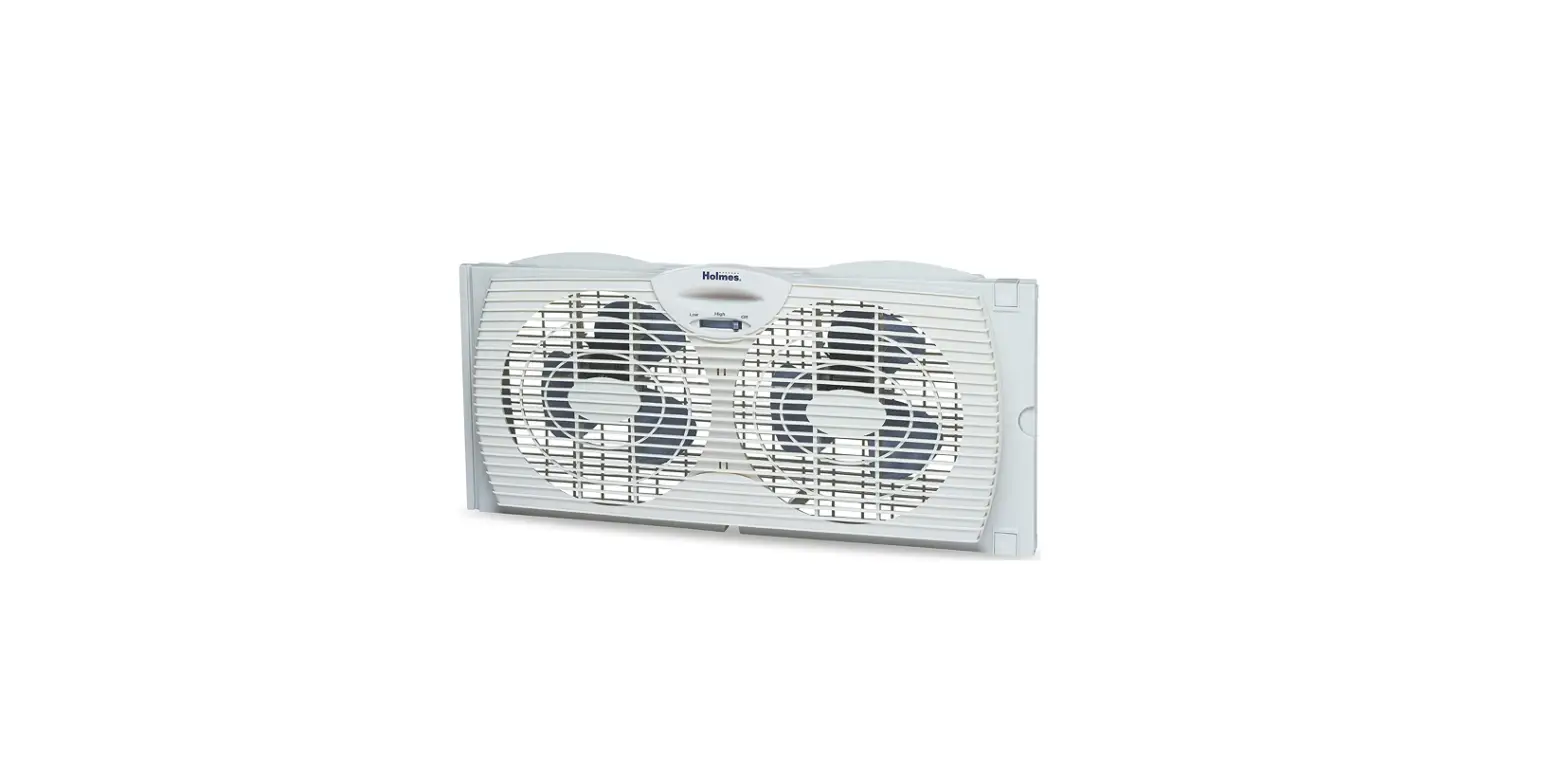
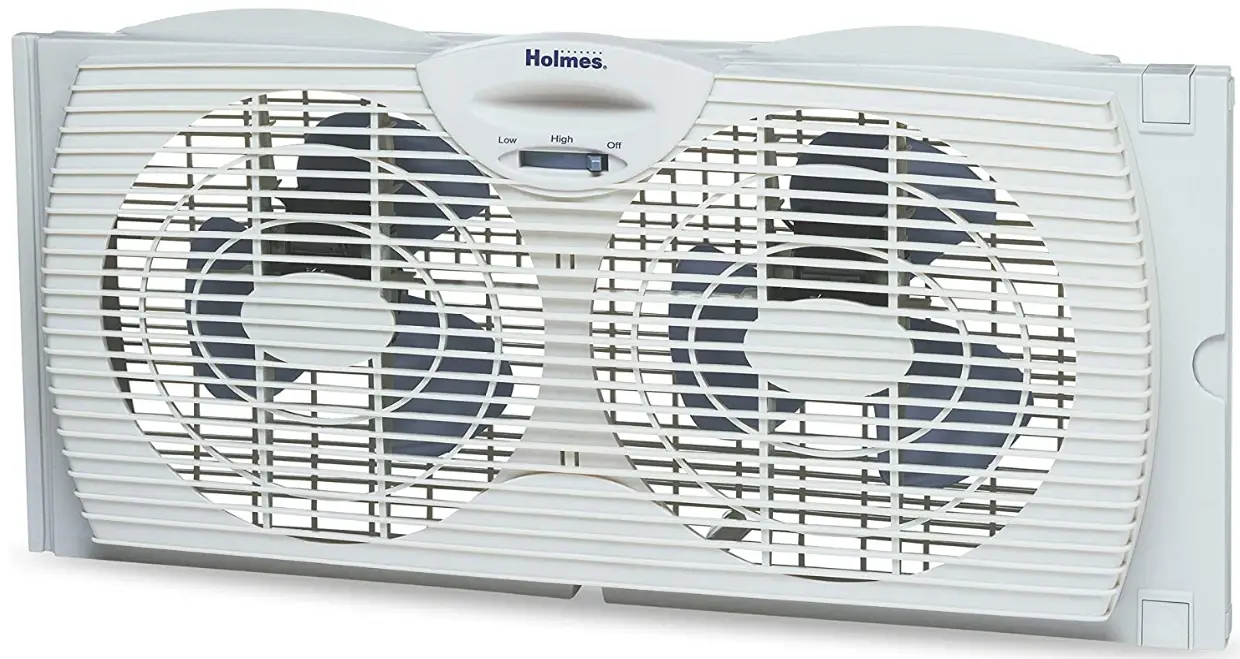
Holmes HAWF2021 Window Fan with Twin
IMPORTANT SAFETY INSTRUCTIONS
When using electrical appliances, basic safety precautions should always be taken including the following:
- Read all instructions before using this appliance.
- Use the fan only for purposes described in the instruction manual.
- To protect against electrical shock do not immerse the unit, plug or cord in water or spray with liquids and plug the appliance directly into a 120V AC electrical outlet.
- Close supervision is necessary when any appliance is used by or near children.
- Unplug from the outlet when not in use, when moving the fan from one location to another, before putting on or taking off parts, and before cleaning.
- Avoid contact with moving parts.
- Do not operate in the presence of explosive and/or flammable fumes.
- To avoid fire hazards, NEVER place the cord under rugs or any parts near an open flame, cooking, or other heating appliance.
- Do not operate any appliance with a damaged cord or plug after the appliance malfunctions, or has been dropped/damaged in any manner. Discard the fan or return it to an authorized service facility for examination and/or repair.
- Do not run the cord under the carpeting. Do not cover the cord with throw rugs, runners, or similar coverings. Do not route the cord under furniture or appliances. Arrange cord away
- from traffic areas and where it will not be tripped over.
- The use of attachments not recommended or sold by the appliance manufacturer may cause hazards.
- Do not let the cord hang over the edge of a table, counter or come in contact with hot surfaces or leave exposed to high-traffic areas.
- Do not use outdoors.
- To disconnect, grip the plug and pull from the wall outlet. Never yank on the cord.
- Always use it on a dry, level surface.
- Do not operate the fan until fully assembled with all parts properly in place.
- This product is intended for household use ONLY and not for commercial or industrial applications.
- WARNING: To reduce the risk of fire or electric shock, do not use this fan with any solid-state speed control device.
- This product employs overload protection (fuse). A blown fuse indicates an overload or short-circuits situation. If the fuse blows, unplug the product from the outlet.
- Replace the fuse as per the user servicing instructions (follow product marking for proper fuse rating) and check the product. If the replacement fuse blows, a short circuit may be present and the product should be discarded or returned to an authorized service facility for examination and/or repair.
Please Read and save these important Safety Instructions
This appliance has a polarized plug (one blade is wider than the other). To reduce the risk of electric shock, this plug is intended to fit in a polarized outlet only one way. If the plug does not fit fully in the outlet, reverse the plug. If it still does not fit, contact a qualified electrician to install the proper outlet. Do not attempt to modify this plug or defeat this safety feature in any way.
INSTALLATION INSTRUCTIONS
Carefully unpack all contents of the carton.
NOTE: MAKE SURE YOU REMOVE ALL CONTENTS FROM THE PACKAGE. PLEASE CHECK PACKAGING MATERIALS FOR PARTS THAT COULD BE REQUIRED TO OPERATE YOUR FAN.
- The window fan comes fully assembled and is ready for immediate installation.
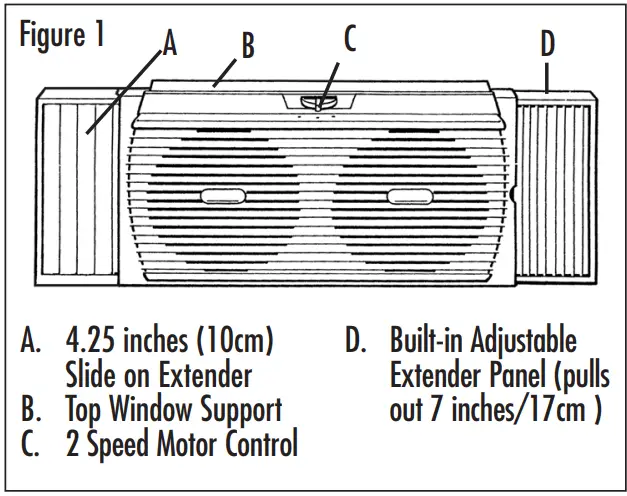
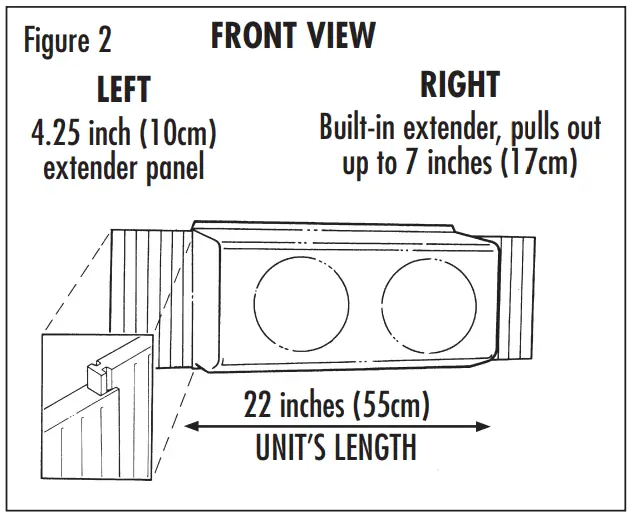
- Before installation, familiarize yourself with the built-in 7 inches (17cm) extender on the right side of the fan, and the additional 4.25 inches (10cm) extender which attach to the left side of the fan housing (see Figure 1).

NOTE: WE RECOMMEND KEEPING YOUR WINDOW SCREEN IN PLACE.
This window fan has been designed to fit double-hung windows with minimum openings of 22 inches (55cm) wide and 10 inches (25cm) high.
- Align the Window Fan horizontally in the window and the Built-In Extender Panel to the right.
- With the window open take an accurate measurement of the opening where the unit will be placed.
- Match your window measurement with the installation guide.
- Once you have attached the extender panel(s) (if needed), set the fan in the window. You will complete the installation with a built-in extender. Pull out both clips on the right side of the fan then pull out the built-in extender. To lock the extender into place, push the clips down.
- Carefully close the window onto the top of the fan so that the bottom edge of the window rests behind the top line of the fan housing. This helps keep the fan in place. For slider windows (will fit windows 10 inches/25cm wide and 36 inches/91cm high) In a slider window, the control must face inward, towards the window. The 7 inches (17cm) built-in extender will be positioned on top. Prior to installing the unit in the window, measure the height and adjust the upper extender for a snug fit.
NOTE: In some slider windows you may need to remove the screen.
INSTALLATION GUIDE
- For 22 inches (55cm) to 29 inches (73cm): Use up to 7 inches (17cm) of the right side, and pull out the extender panel.
- For 29 inches (73cm) to 33.25 inches (83cm): Use one 4.25 inches (10cm) extender panel on the left side. Adjust the pull-out extender on the right side for a tight fit (from 0.5 inches (1cm) to 7 inches (17cm) ).
- Larger than 33.25 inches (83cm): Additional extender panels will be required (See Window Fan Accessory Section).

OPERATING INSTRUCTIONS
- Make sure the rotary switch is in the OFF position.
- Plug into 120V AC electric outlet.
- To use in EXHAUST mode, manually turn the unit around in the window. (Controls can be operated from both sides.)
- To start the unit, turn the rotary switch(C) to the desired speed (high or low).
WARNING: BE SURE THE FAN IS SECURELY INSTALLED IN YOUR WINDOW AT ALL TIMES. DO NOT LEAN OR PUSH ON FAN WHILE IT IS IN THE WINDOW.
CLEANING/MAINTENANCE INSTRUCTIONS
Follow these instructions to correctly and safely care for your window fan. Please remember:
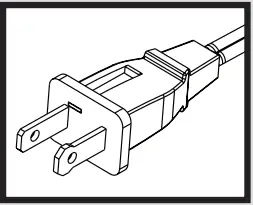
Replaceable Fuse
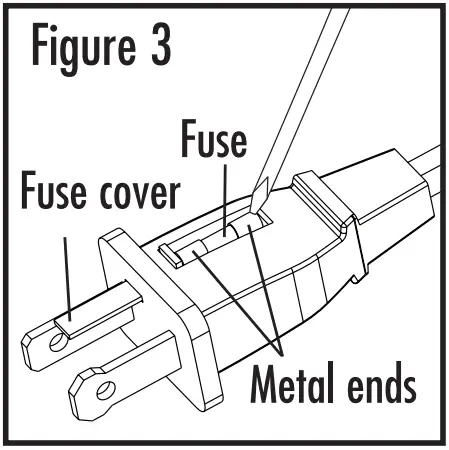
If your (5 Amp, 125 Volt) replaceable fuse blows, please order a new fuse at 1-800-546-5637. Follow the below instructions to replace the fuse on the plug.
User Servicing Instructions
- Unplug your fan. Grasp the plug and remove it from the receptacle or other outlet device. Do not unplug by pulling on the cord.
- Open the fuse cover, located on the top of the plug, by using your thumb or a flathead screwdriver to slide the cover down towards the prongs.
Note: Ensure that the fuse cover is completely open before attempting to remove the fuse. - Remove the fuse carefully by using a small screwdriver to pry the fuse out of the compartment by the metal ends of the fuse (see Figure 3)

- Place the plug on a solid, flat surface. Insert a new 5 Amp, 125 Volt fuse into the fuse compartment and use a small screwdriver to secure the metal ends of the fuse into the compartment.
Caution: Risk of fire. Replace fuse only with 5 Amp, 125 Volt fuse. - The slide fuse cover closed completely. If the fuse cover is difficult to close, make sure the fuse is secured in place completely by pressing down on the metal ends of the fuse.
- Risk of fire. Do not replace the attachment plug. Contains a safety device (fuse) that should not be removed.
Discard the product if the attachment plug is damaged.
Fan Cleaning
- Always unplug the fan before cleaning or disassembling it.
- Do not allow water to drip on or enter into the fan motor housing.
- Be sure to use a soft cloth moistened with a mild soap solution.
- Do not use any of the following as a cleaner: gasoline, thinner, or benzene.
Fan Blade and Front Grill Cleaning
- Make sure the fan is unplugged.
- Using a Phillips head screwdriver, remove the screws that hold the front and rear grills together. Carefully separate the front and the rear grills from the end opposite the built in extender. Do not completely detach the grills as this may damage the extender clips. Separate only enough to gain access to the blades with one hand.
- Clean blades and grills with a soft, moist cloth (see above).
- Securely fasten the grills together.
FAN STORAGE
For all window fans, and fans that come already assembled.
- It is important to keep it in a safe, dry location.
- We recommend using the original (or appropriately sized) box.
- Please remember to protect the fan from dust or moisture.
Window Fan Accessories

If you have any questions regarding your product or would like to learn more about other Holmes® products, please contact our Consumer Service Department at 1-800-546-5637 or visit our website at www.holmesproducts.com.
WARRANTY INFORMATION
1 Year Limited Warranty
Sunbeam Products, Inc. doing business as Jarden Consumer Solutions or if in Canada, Sunbeam Corporation (Canada) Limited doing business as Jarden Consumer Solutions (collectively “JCS”) warrants that for a period of one year from the date of purchase, this product will be free from defects in material and workmanship. JCS, at its option, will repair or replace this product or any component of the product found to be defective during the warranty period. Replacement will be made with a new or remanufactured product or component. If the product is no longer available, a replacement may be made with a similar product of equal or greater value. This is your exclusive warranty. Do NOT attempt to repair or adjust any electrical or mechanical functions on this product. Doing so will void this warranty.
This warranty is valid for the original retail purchaser from the date of the initial retail purchase and is not transferable. Keep the original sales receipt. Proof of purchase is required to obtain warranty performance. JCS dealers, service centers, or retail stores selling JCS products do not have the right to alter, modify or in any way change the terms and conditions of this warranty.
This warranty does not cover normal wear of parts or damage resulting from any of the following: negligent use or misuse of the product, use on improper voltage or current, use contrary to the operating instructions, disassembly, repair, or alteration by anyone other than JCS or an authorized JCS service center. Further, the warranty does not cover Acts of God, such as fire, flood, hurricanes, and tornadoes.
What are the limits on JCS’s Liability?
JCS shall not be liable for any incidental or consequential damages caused by the breach of any express, implied, or statutory warranty or condition. Except to the extent prohibited by applicable law, any implied warranty or condition of merchantability or fitness for a particular purpose is limited in duration to the duration of the above warranty. JCS disclaims all other warranties, conditions, or representations, express, implied, statutory, or otherwise. JCS shall not be liable for any damages of any kind resulting from the purchase, use or misuse of, or inability to use the product including incidental, special, consequential, or similar damages or loss of profits, or for any breach of contract, fundamental or otherwise, or for any claim brought against the purchaser by any other party. Some provinces, states, or jurisdictions do not allow the exclusion or limitation of incidental or consequential damages or limitations on how long an implied warranty lasts, so the above limitations or exclusion may not apply to you. This warranty gives you specific legal rights, and you may also have other rights that vary from province to province, state to state, or jurisdiction to jurisdiction.
How to Obtain Warranty Service
In the U.S.A.
If you have any questions regarding this warranty or would like to obtain warranty service, please call 1-800-546-5637 and a convenient service center address will be provided to you.
In Canada
If you have any questions regarding this warranty or would like to obtain warranty service, please call 1-800-546-5637 and a convenient service center address will be provided to you.
In the U.S.A.
This warranty is offered by Sunbeam Products, Inc. doing business as Jarden Consumer Solutions located in Boca Raton, Florida 33431. In Canada, this warranty is offered by Sunbeam Corporation (Canada) Limited doing business as Jarden Consumer Solutions, located at 20 B Hereford Street, Brampton, Ontario L6Y 0M1. If you have any other problem or claim in connection with this product, please write our Consumer Service Department. PLEASE DO NOT RETURN THIS PRODUCT TO ANY OF THESE ADDRESSES OR TO THE PLACE OF PURCHASE.
FAQs
If your Holmes HAWF2021 Window Fan with Twin is not working, there may be an issue with the power cord. The first thing you should do is check that the power cord is firmly plugged into the fan and the wall outlet. If it still doesn’t work, try a different outlet. If it still doesn’t work, you may have a defective power cord. Contact Holmes for a replacement power cord.
The Holmes HAWF2021 Window Fan with Twin is easy to clean and maintain. You can use a damp cloth to wipe down the blades, grill, and front cover of the fan. Never immerse this appliance in water or any other liquid. This window fan has a 1 year limited warranty on parts and labor from date of purchase against defects in materials or workmanship. Warranty does not cover damage caused by accident, misuse, abuse, or modification of the product.
It depends on how big your room is and how hot it currently is outside. Generally speaking, most people find that their rooms are significantly cooler within 20 minutes of using their Holmes HAWF2021 Window Fan with Twin .
The best way to set up your Holmes HAWF2021 Window Fan with Twin depends on where you want to place it in your home and what type of window you are going to place it on. For example, if you want to place your fan on a large window that opens outward instead of inward, you will need to install brackets onto your window so that they can support the weight of your Holmes HAWF2021 Window Fan with Twin
Window fans work best when used in pairs in two separate windows, one to pull cool outdoor air in from the shaded side of your house and the other to push hot inside air out on the sunny side.
An added benefit of using an electrically reversible fan, like the Holmes® Electronically Reversible Twin Window Fan, is that one fan blade will draw in fresh air while the other will exhaust stale interior air. Thermostats, remote controls, and temperature displays are possible extra features.
After the sun sets and it begins to cool off, open the windows on the side of your home where the breezes want to enter and instal the window fans. To help keep the window fan in place, close the sash. Set both fans to blow in the cool air at a high rate of speed.
To prevent the hot sun from pouring into your home during the day, keep your windows, doors, and blinds closed. Then, in the evening, open your windows and position one fan so that it is pointed out your window, pushing the heat outside, they suggest. To bring cool air into the space, position a second fan inside the room.
All window fans feature enclosed motors, so you can use one while it’s raining without risk. In the event of severe weather, we suggest you to take your product out of the window because strong gusts may force water into your house.
Window fans have an advantage over other room fans in that they can continuously replace the stale air inside the room with fresh air from outside in addition to circulating the air within the room. Window fans are the best air-cooling and purifying device, hence.
While a fan that can move more air is ideal, a window fan must also move an additional 50 cubic feet per minute in order to be effective. Therefore, a window fan needs to have at least 250 cfm in order to properly cool a 200 square foot space.
Although window fans can be used to effectively chill your home if humidity is not a concern, air conditioners do function well in combating humidity. One window fan can assist with both air intake from outside and air exhaustion from within.
In seasons where it is hot during the day and cold and dry at night, as well as on frigid days, window fans can efficiently cool your home. By using the fans instead of the air conditioner, you’ll save money on your utility bill and help the environment.
You might want to add vinegar or soap to the water, depending on how gnarly they are. And using a toothbrush or sponge will help you get rid of the filth. If not, a moist rag ought to work. Repeat the process to clean the fan blades and any remaining dust from the grille and exterior case.


